---
title: "Authenticating and Authorizing end-users with Istio and Auth0"
description: "Learn how Istio secures service-to-service traffic for your Kubernetes clusters and how to integrate with Auth0 for securing end-user traffic."
authors:
- name: "Rinor Maloku"
url: "https://auth0.com/blog/authors/rinor-maloku/"
date: "Jun 14, 2022"
category: "Developers,Tutorial,Istio"
tags: ["istio", "kubernetes", "service-mesh", "auth0", "security", "oauth", "oidc"]
url: "https://auth0.com/blog/securing-kubernetes-clusters-with-istio-and-auth0/"
---
# Authenticating and Authorizing end-users with Istio and Auth0
**TL;DR:** In this article, you will learn how to secure applications running on Kubernetes with Istio and Auth0. You will start by creating a brand-new cluster and then deploy an unsecured sample application. After testing the deployment, you will learn how to secure this application and its _pods_ with Istio and Auth0. For reference, you can find this application in [this GitHub repository](https://github.com/auth0-blog/istio-auth0-integration).
## Preface
Security is the most crucial aspect _to get right_ in every application. Failing to secure your apps and the identity of your users can be very expensive. Moreover, it can make customers and investors lose faith in your ability to deliver high-quality services. Therefore, it's of paramount importance to strictly follow standards and best practices when developing an application. Luckily, big vendors like [Auth0](https://auth0.com/), [Microsoft](https://docs.microsoft.com/en-us/azure/active-directory/fundamentals/active-directory-whatis), [Facebook](https://facebook.com), and [Google](https://google.com) can simplify this task by working as the identity providers of your apps. These companies, alongside increased security, also enable users to quickly log in to your apps without having to create yet another set of credentials.
Authentication and authorization are more complex for microservice architectures, as they require implementation on every service. The scenario can become even more problematic if you use different stacks to build these microservices. For each stack, you would have a different set of best practices and libraries to use (probably even write), increasing the surface area of possible bugs and consuming company resources that could be invested in providing business value.
To solve this problem, you will learn about Istio and how to integrate it with Auth0. As you will see, by using one of [the authentication features provided by Istio](https://istio.io/docs/concepts/security/#authentication), you can easily avoid this problem and secure your applications without code changes.
## Prerequisites
Before learning about Istio and how to use it, you need to get your hands on a Kubernetes cluster with admin access. Next, you will need `kubectl`, the Kubernetes command-line tool, to interact with the cluster. To install `kubectl`, head over to [the official documentation](https://kubernetes.io/docs/tasks/tools/install-kubectl/) and follow the instructions for your operating system.
In this article, we use _Kubernetes In Docker_, known as `kind`. Still, you can use any other local Kubernetes distribution such as Docker-Desktop ([installation](https://docs.docker.com/desktop/) and [usage](https://docs.docker.com/desktop/kubernetes/)), [Rancher Desktop](https://rancherdesktop.io/), or [Minikube](https://minikube.sigs.k8s.io/docs/start/).
To install `kind`, follow the installation instructions in the [Kind Quick Start.](https://kind.sigs.k8s.io/docs/user/quick-start/)
### Creating a cluster with `kind`
After installing `kind`, you can create a Kubernetes cluster with the following command:
```shell
kind create cluster --image=kindest/node:v1.23.1
```
This command pulls a container image with the Kubernetes version 1.23.1 and runs it on your container runtime. For example, if you are on Docker, you can see the running container by executing:
```bash
docker ps
```
Your output will show a new container running:
```
CONTAINER ID IMAGE COMMAND NAMES
2974301ffa31 kindest/node:v1.23.1 "/usr/loca…" kind-control-plane
```
> **Note:** In this article, we use Kubernetes version 1.23. Istio 1.14 is compatible with versions 1.20 and onwards. To learn about the supported releases of Kubernetes, check the official docs at [Istio > Supported Kubernetes releases.](https://istio.io/latest/docs/releases/supported-releases/)
## Introduction to Istio
When building and managing microservice-based applications, a myriad of complexities arise: you need to handle _service discovery_, _load balancing_, _application resilience_, and _hardware utilization_, to name just a few. So when Google introduced Kubernetes, which solves these complexities, it garnered a wide adoption by all cloud computing service providers.
However, Kubernetes lacks solutions to other problems faced when adopting microservices:
- **Traffic management:** retries, circuit breaking, load balancing, complex routing patterns, and so on
- **Security:** authentication of services and end-users, encryption of traffic in transit, and access control
- **Observability:** tracing requests, metrics, and access logs
The above features can be achieved at the application layer by simply adding more code to the application. For example, to add resiliency and circuit breaking, you can use [resilience4j](https://resilience4j.readme.io/docs).
However, a service mesh implements the capabilities mentioned above at the platform layer. For example, Istio injects a sidecar alongside each service and enables complex routing capabilities, generates metrics for observability, and so on.
> **Note:** A sidecar, in this context, is a _container_ that is added to your pods. Istio uses these containers to intercept inbound and outbound traffic of your application and enhance it with its features.
This article covers a slice of the security capabilities of Istio and shows integration with Auth0. For a more elaborate introduction, check out my article ["Learn Istio - How to Manage, Monitor, and Secure your services."](https://www.freecodecamp.org/news/learn-istio-manage-microservices/) To truly master it, check out the book [_Istio in Action_](https://www.manning.com/books/istio-in-action?utm_source=rinor&utm_medium=affiliate&utm_campaign=book_posta2_istio_9_30_18&a_aid=rinor&a_bid=9f6a70f3), written by [Christian Posta](https://twitter.com/christianposta) and me.
### Installing and configuring Istio
With all prerequisites configured and a good idea of what you are going to implement here, our next step is to install Istio in your Kubernetes cluster.
Begin by downloading Istio's artifacts.
```
curl -L https://istio.io/downloadIstio | ISTIO_VERSION=1.14.0 TARGET_ARCH=x86_64 sh -
```
This command downloads the Istio artifacts in the directory `istio-1.14.0`. The most important artifact being `istioctl` binary located under `./istio-1.14.0/bin`. Move it to your PATH environment variable so that you can easily execute `istioctl` commands.
`istioctl` is a CLI tool with many utilities, one of those being installing Istio in clusters. For example, execute the command below to install Istio.
```bash
istioctl install --set profile=demo -y
```
The command might take several minutes as it awaits all pods to be up and running. After it completes, print the deployed pods with the command below.
```bash
kubectl get pods -n istio-system
```
Your output will be similar to the following:
```
NAME READY STATUS RESTARTS
istio-egressgateway-6cf5fb4756-r569f 1/1 Running 0
istio-ingressgateway-dc9c8f588-cn2z4 1/1 Running 0
istiod-7586c7dfd8-2nbsk 1/1 Running 0
```
The listed components are:
- _Istio egress gateway_: used for securing egress traffic.
- _Istio ingress gateway_: the ingress point of traffic coming from the public network and into your cluster.
- _Istiod_: Istio's control plane that configures the service proxies.
> **Note:** At the time of writing, the latest Istio version to reach _General Availability_ is `1.14.0` and that is the version used when the article was written. You can try newer versions if you like, but these are not guaranteed to work equally.
In the next section, you will get an application up and running that later we will secure using Istio and Auth0.
## Deploying the Book Info Application
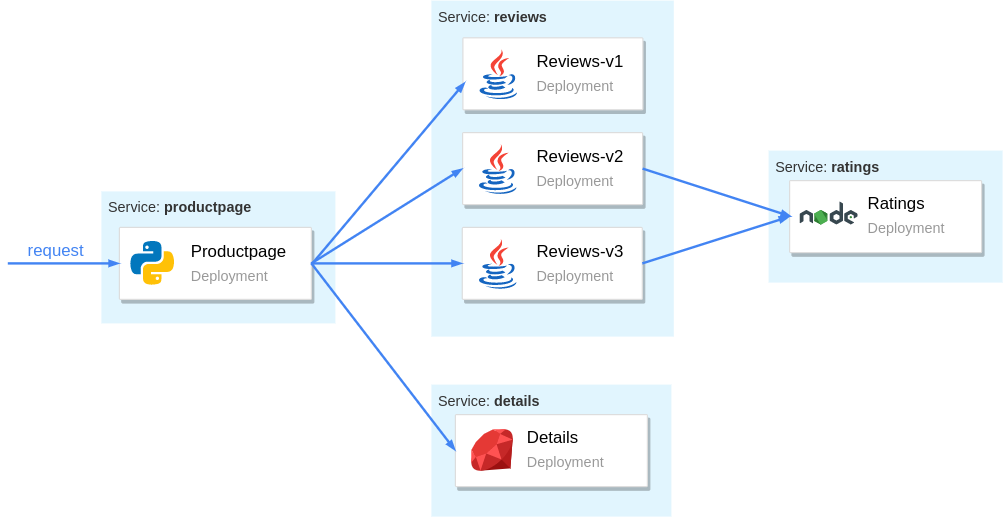
The [Book Info](https://istio.io/docs/examples/bookinfo/) is a sample application composed of four separate microservices and displays information about books, similar to a single catalog entry of an online book store. It is composed of the following microservices:
- The `productpage` microservice queries the `details` and `reviews` services to populate the page with book information.
- The `details` microservice has details about the book.
- The `reviews` microservice has reviews about the book. It queries the `ratings` microservice.
- The `ratings` microservice has book rating information that accompanies a book review.
The figure below illustrates how these microservices are organized and how they communicate:
To get the configuration to deploy the services and the Istio configuration that we will use in this article, you need to clone the following [repository](https://github.com/auth0-blog/istio-auth0-integration):
```bash
# clone the repo
git clone https://github.com/auth0-blog/istio-auth0-integration.git
# change directory to it
cd istio-auth0-integration
```
After that, create and label the namespace where you will deploy your services.
```bash
kubectl create ns demo
kubectl label namespace demo istio-injection=enabled
```
By labeling the namespace with `istio-injection=enabled`, pods that are deployed into it will get Istio's sidecar automatically injected. Next, deploy the sample application by executing the following command from the `istio-auth0-integration` directory:
```bash
kubectl config set-context $(kubectl config current-context) --namespace=demo
kubectl apply -f platform/kube/bookinfo.yaml
```
Although this command finishes quite fast, Kubernetes might need several minutes to run all the pods. You can wait for all pods to be running with the command below:
```bash
kubectl wait pods --for condition=Ready --timeout -1s --all
```
After the pods are ready, verify that all have the sidecar injected:
```
kubectl get pods
```
Which prints:
```
NAME READY STATUS RESTARTS
details-v1-5498c86cf5-gljnq 2/2 Running 0
productpage-v1-65b75f6885-bzjwg 2/2 Running 0
ratings-v1-b477cf6cf-qxfvb 2/2 Running 0
reviews-v1-79d546878f-n9986 2/2 Running 0
reviews-v2-548c57f459-2cmm7 2/2 Running 0
reviews-v3-6dd79655b9-9qnxl 2/2 Running 0
```
In the READY column, each row shows the value `2/2`, meaning that the sidecar container is injected alongside the application container by Istio.
### Routing traffic to services through the Istio Gateway
A best practice to control ingress traffic (incoming traffic) is to use [the _Istio Ingress Controller_](https://istio.io/docs/tasks/traffic-management/ingress/) and configure it using the [Gateway resource](https://istio.io/docs/reference/config/istio.networking.v1alpha3/#Gateway).
The controller was installed during Istio installation. It positions itself at the edge of the cluster, ensuring Istio's features (like monitoring, tracing, traffic management, and security) get enforced in the incoming traffic to your cluster.
The `Gateway` custom resource definition configures the ingress gateway to admit traffic. For example, for the Book Info application, you will want to expose port `80` for HTTP traffic, achieved with the `Gateway` definition below:
```yml
apiVersion: networking.istio.io/v1alpha3
kind: Gateway
metadata:
name: bookinfo-gateway
spec:
selector:
istio: ingressgateway
servers:
- port:
number: 80
name: http
protocol: HTTP
hosts:
- "*"
```
The above definition will apply only to workloads matching the selector. And the selector `istio: ingressgateway` matches only for the default ingress gateway setup during the Istio installation.
Apply it to the cluster by executing the command below:
```bash
# run from the istio-auth0-integration directory
kubectl apply -f networking/bookinfo-gateway.yaml
```
And with that, the Istio ingress gateway admits traffic on port 8080 for any host.
### Defining a virtual service for your application
After admitting traffic in your cluster, you need to configure the ingress gateway to route the traffic to your services. You do that using the `VirtualService` resource.
The following snippet defines a virtual service with explicit rules that tell your gateway to route incoming traffic with the listed paths to the `productpage` service:
```yaml
apiVersion: networking.istio.io/v1alpha3
kind: VirtualService
metadata:
name: bookinfo
spec:
hosts:
- "*"
gateways:
- bookinfo-gateway
http:
- match:
- uri:
exact: /productpage
- uri:
exact: /login
- uri:
exact: /logout
- uri:
exact: /callback
- uri:
prefix: /api/v1/products
- uri:
prefix: /static/
route:
- destination:
host: productpage
port:
number: 9080
```
Each of these endpoints exposes essential functionality, the key ones being:
- `/productpage`: This is the main endpoint you will consume in your browser. It renders the book info application.
- `/login`: After you integrate Auth0 in your app, this endpoint will redirect users to the Auth0 login page so they can sign in or sign up.
- `/logout`: This is the endpoint for users to log out from your app.
- `/callback`: This is the endpoint that Auth0 uses to send your users back to your app after the user signs in. On which occasion your application receives a code that it exchanges for the [access token](https://auth0.com/docs/tokens/overview-access-tokens).
This virtual service definition is already contained in the GitHub repository and you can apply it by executing the following command:
```bash
# run from the istio-auth0-integration directory
kubectl apply -f networking/bookinfo-virtualservice.yaml
```
After running this command, you will be able to use your application. For example, when using a managed Kubernetes solution such as AKS, GKE, or EKS, you will get a public IP address that you can find out by printing the services as follows:
```bash
kubectl get svc -n istio-system -l istio=ingressgateway
```
In the case of `kind` it will print the following:
```
NAME TYPE CLUSTER-IP EXTERNAL-IP
istio-ingressgateway LoadBalancer 10.96.0.62
```
The output shows status for the External IP is ``, and that won't change because `kind` doesn't assign IP addresses to Kubernetes services.
For this demonstration, we can simply port-forward Istio's ingress gateway to our local environment as shown below:
```bash
kubectl port-forward -n istio-system svc/istio-ingressgateway 8080:80
```
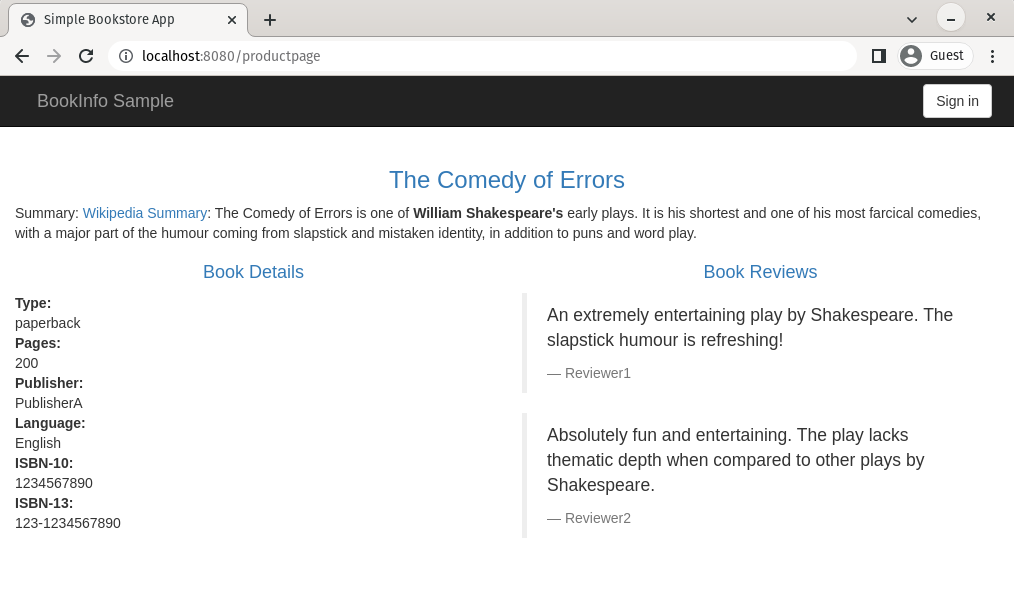
After that, you can access the application by opening a browser at `localhost:8080/productpage`, as shown below:
### Encryption of service-to-service traffic
Istio is "secure by default" merely by injecting the sidecar-proxies alongside the apps — all service to service traffic is authenticated and encrypted.
The control plane mints a certificate for each proxy. You can find it in its configuration.
> **Note:** To execute the commands below, you need two command-line tools: [jq](https://stedolan.github.io/jq/download/) for processing JSON and [step](https://smallstep.com/docs/step-cli/installation) for inspecting certificates.
```bash
istioctl proxy-config all deploy/productpage-v1 -o json | \
jq -r '.. |."secret"? | select(.name == "default")'
```
The above command prints the certificate used by `productpage` to mutually authenticate with other workloads within the mesh.
> **Note:** Istio implements the _Secure Production Identity Framework For Everyone_ (abbr. SPIFFE) to define identity to workloads within the mesh. The SPIFFE specification defines the SPIFFE ID to communicate identity between workloads. Learn more about [The SPIFFE Identity and Verifiable Identity Document](https://github.com/spiffe/spiffe/blob/main/standards/SPIFFE-ID.md).
The SPIFFE ID is encoded within the certificate, which contains the namespace and service account of the workload. You can print the SPIFFE ID with the command below:
```bash
istioctl proxy-config all deploy/productpage-v1 -o json | \
jq -r '.. |."secret"?' | \
jq -r 'select(.name == "default")' | \
jq -r '.tls_certificate.certificate_chain.inline_bytes' | \
base64 -d - | step certificate inspect
```
The SPIFFE ID of the workload is encoded into the Subject Alternative Name, as shown below:
```bash
# output is redacted
X509v3 Subject Alternative Name: critical
URI:spiffe://cluster.local/ns/demo/sa/bookinfo-productpage
```
By adopting Istio, all traffic within the mesh is encrypted (using the minted certificates that we printed out earlier). This protects our data from getting sniffed and prevents person-in-the-middle attacks. As a result, even if gaining access to any of the machines or networking devices, attackers won't be able to read the traffic going back and forth.
Additionally, because services mutually authenticate using the issued certificates, you can further improve security by defining the minimum access for each service using `AuthorizationPolicies`.
> **Note:** Service-to-service authorization is not in the scope of this article. However, if you are interested to know more, Istio has a [quick example](https://istio.io/latest/docs/tasks/security/authorization/authz-http/) to get you started and you’ll find detailed descriptions in the [AuthorizationPolicy API reference](https://istio.io/latest/docs/reference/config/security/authorization-policy/).
## Authenticating and Authorizing Users
To implement access control policies for the services, we need to initially redirect the user to Auth0 for authentication and then configure the services with policies that allow or reject requests based on the user permissions.
The figure below visualizes what user permissions are required for them to access the services:
- The `productpage` service is accessible by any user.
- The `reviews` service is accessible by identities with the `read:book-reviews` permission.
- The `details` service is accessible only by identities with the `read:book-details` permission.
- The `ratings` service has no policies applied; however, you might want to do that as an exercise.
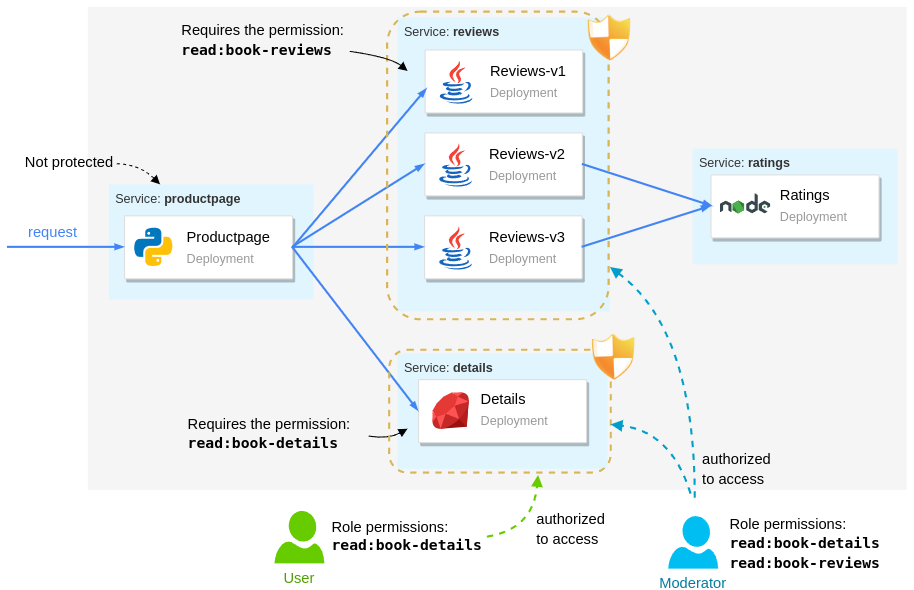
From the users' perspective, we have:
- Moderators have the highest access and they can access every service.
- Users can access only the product page and the details service
- Unauthenticated users can access the `productpage`. Unauthenticated access to the `productpage` is essential to trigger the authentication flow.
### Setting up the Auth0 application
Let's start to configure Auth0 to authenticate users for our services. First, you need to sign up for a free Auth0 account (or you can use an existing one if you already have it).
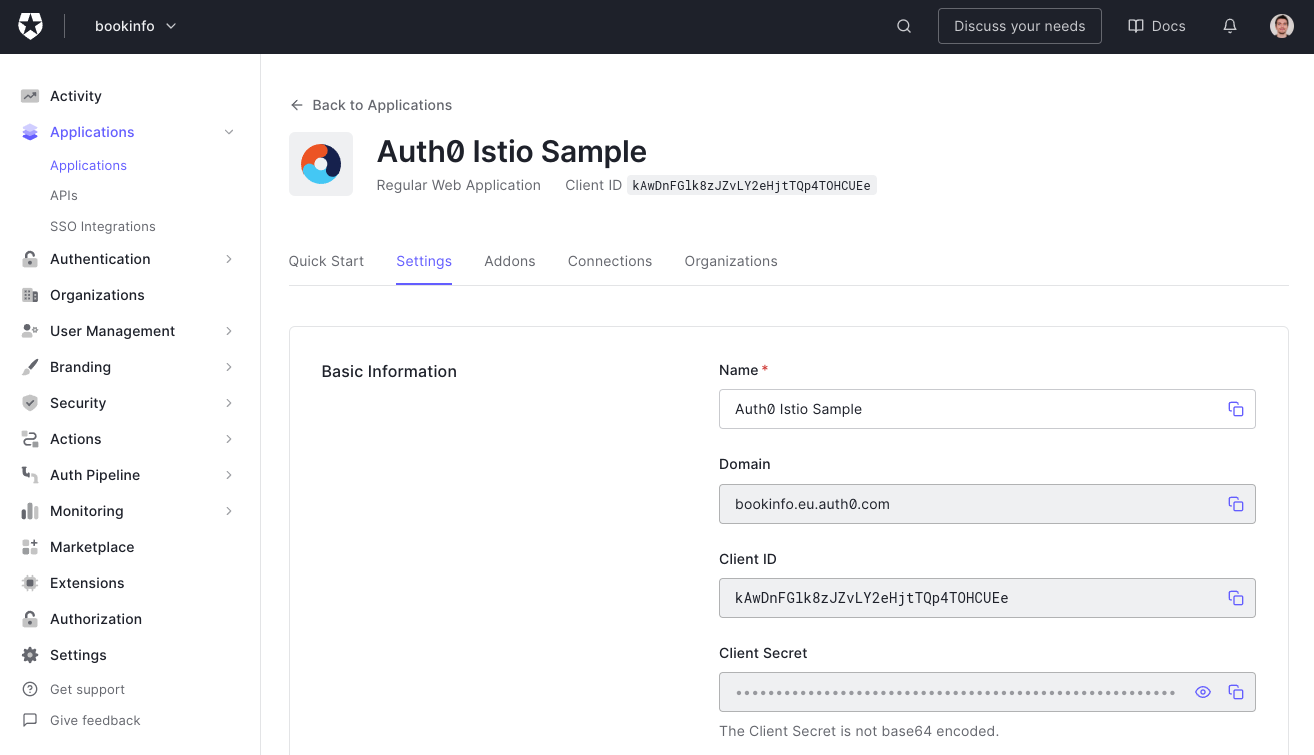
After signing up, you will have to go to your Auth0 dashboard and create a new Auth0 Application. You can do that by going to [the _Applications_ page](https://manage.auth0.com/#/applications) of your dashboard and by clicking on the _Create Application_ button. When you click on this button, Auth0 will show you a dialog where you will have to input two things:
- _Application Name_: You can use anything here to identify your application (e.g., "Auth0 Istio Sample").
- _Application Type_: As the product page is a classic web application (i.e., it is not a single-page app nor a native app), you will have to choose _Regular Web Applications_.
Then, when you click on _Create_, Auth0 will redirect you to the _Quick Start_ tab of your new application. From there, you can go to the _Settings_ tab and change two fields on it:
- _Allowed Callback URLs_: Through this field, you will white label a URL that Auth0 will call after your users authenticate. Here, you can insert `http://localhost:8080/callback`.
- _Allowed Logout URLs_: Through this field, you will white label a URL that Auth0 will call after your users log out. Here, you can insert `http://localhost:8080/productpage`.
If you have a publicly accessible IP address, make sure that you replace `localhost:8080` with the ingress gateway IP address while updating these fields, then hit the _Save Changes_ button on the bottom of the _Settings_ page.
### Registering the API in Auth0
In addition to the application, you will need to register an API on the Auth0 dashboard. For this purpose, head to [the APIs section of your dashboard](https://manage.auth0.com/#/apis) and click on _Create API_. When you do so, Auth0 will show you a form where you will have to input the following:
- A _Name_ for your API: You can use something like "Auth0 Istio Sample" again.
- An _Identifier_ for your API: You can use a URI like `https://bookinfo.io`. It doesn't have to be a valid URL. Nothing will call it as such.
- A _Signing Algorithm_: Make sure you use `RS256` for this field.
After creating the API you are redirected to its configuration page. On this page, we will configure the API to add permissions to the access token after a user logs in. Follow these steps:
1. Switch to the _Settings_ tab and scroll down to _RBAC Settings_.
2. Enable both the _Enable RBAC_ and _Add Permissions in the Access Token_ options. Then, scroll to the bottom of the page and click _Save_.
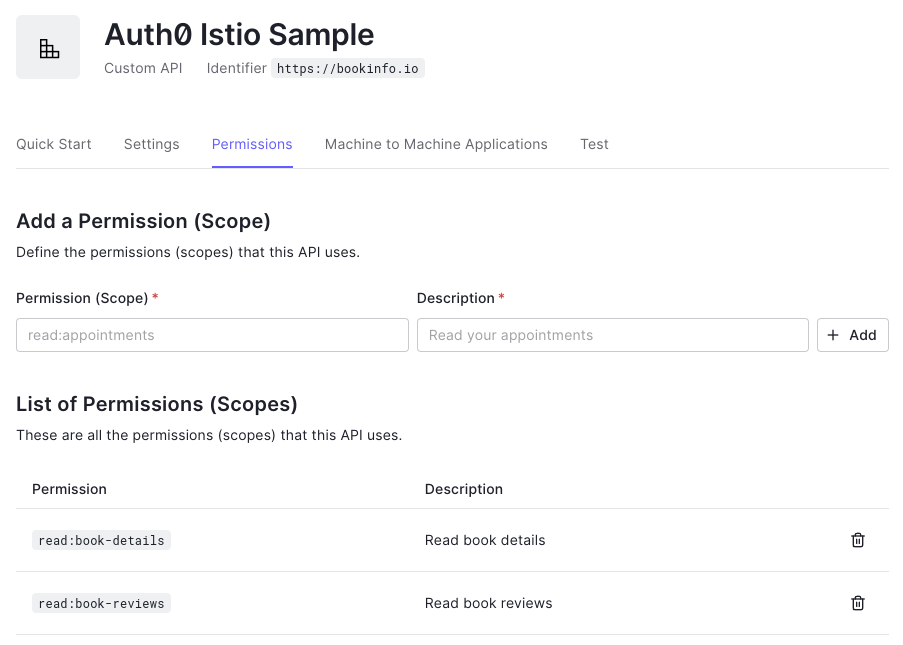
Next, switch to the *Permissions* tab and add the following two permissions:
| Permission | Description |
|-------------------|-------------------|
| `read:book-details` | Read book details |
| `read:book-reviews` | Read book reviews |
The result should look as shown in the image below:
### Defining roles and assigning permissions
You can assign permissions directly to users. However, a better practice is to define `roles` that group a set of permissions. When a user is assigned a role, they will inherit the same set of permissions.
To define roles, navigate to [the *Roles* section of your dashboard](https://manage.auth0.com/#/roles), and create the following two roles:
| Role | Description |
| ----------- | ------------ |
| `moderator` | Moderator |
| `user` | Regular user |
After creating those roles, add the permissions listed in the table below to each one. You can do it by clicking the role and heading to the _Permissions_ tab:
| Role | Permissions |
|-----------|--------------|
| `user` | `read:book-details` |
| `moderator` | `read:book-details`
`read:book-reviews` |
### Creating users and assigning roles
Next, let's create a couple of users and assign those roles. For that purpose, head over to the [User Management section of your dashboard](https://manage.auth0.com/#/users) and create the following users:
| User | Role |
|-------------------|-----------|
| user@bookinfo.com | `user` |
| mod@bookinfo.com | `moderator` |
|
||
To assign roles after creating the users, you need to click the user, which will route you to the _User Profile page_. Then switch to the _Roles_ tab, where you can assign the listed roles.
Head back to the _Application_ section of your Auth0 dashboard and open the application you created before. Leave this page open as you will need to copy some values from it in no time.
That concludes all work on the side of Auth0. The remainder of the work is on the side of Istio.
### Validating the access token
After users authenticate to Auth0 by proving their identity, they receive an access token in JWT format. Istio provides the `RequestAuthentication` custom resource to validate JWT tokens.
A sample `RequestAuthentication` resource is shown below. It is stored in `security/auth0-authn.yaml`. In it, you will see two placeholders called `{YOUR_DOMAIN}`, which you need to replace with the value presented in the _Domain_ field of your Auth0 Application (e.g., `istio-auth0.eu.auth0.com`):
```yaml
apiVersion: security.istio.io/v1beta1
kind: RequestAuthentication
metadata:
name: "auth0"
namespace: demo
spec:
jwtRules:
- issuer: "https://{YOUR_DOMAIN}/"
jwksUri: "https://{YOUR_DOMAIN}/.well-known/jwks.json"
```
After replacing the placeholders, apply it to the cluster:
```
kubectl apply -f security/auth0-authn.yaml
```
If you refresh the `productpage` app, you might be surprised that the page accepts requests without access tokens! We still didn't redirect users to Auth0 to authenticate themselves, so why are the requests admitted?
Don't worry. It will make sense in a bit. The `RequestAuthentication` resource validates if the JWT Token was tampered with using the _JSON Web Key Set_ specified by the `jwksUri`. If it wasn't tampered with, it checks if the token has expired and if the audiences match if specified in the `RequestAuthentication` resource. If all the checks pass, the token is valid.
There can be three different outcomes based on the user requests:
- Requests with valid tokens are admitted into the cluster, and their claims are made available to policies (as we'll see later on in the article)
- Requests with invalid tokens are rejected
- Requests without tokens (or with tokens that don't match any issuer) are admitted into the cluster but lack the claims (thus those requests can be denied by policies due to lack of claims)
> Note: You can reject requests lacking JWT tokens using the `AuthorizationPolicy` custom resource. Check [this document to learn how](https://istio.io/latest/docs/reference/config/security/request_authentication/).
## Authenticating User Requests with Auth0
Next, we will update the `productpage` application to redirect users to Auth0 for authentication. The updated app reads the Auth0 credentials from environment variables that can be assigned using a Kubernetes Secret.
To create the secret, you must replace the placeholders below with your own values in the file `security/app-credentials.yaml`.
For the first placeholder, `{YOUR-CLUSTER-PUBLIC-IP}`, you can use the public IP address of your Kubernetes cluster; in our instance, it is `localhost:8080`.
For the following three placeholders, `{YOUR-APPLICATION-CLIENT-ID}`, `{YOUR-APPLICATION-CLIENT-SECRET}`, `{YOUR-AUTH0-DOMAIN}`, you can use the properties of your Auth0 application (_Client ID_, _Client Secret_, and _Domain_).
Finally, for the last placeholder, `{YOUR-AUDIENCE}`, you will have to use the identifier that you gave to your Auth0 API (if you followed the article without changes, it is the value `https://bookinfo.io`):
```yaml
apiVersion: v1
kind: Secret
metadata:
name: app-credentials
namespace: demo
type: Opaque
stringData:
AUTH0_CALLBACK_URL: http://{YOUR-CLUSTER-PUBLIC-IP}/callback
AUTH0_CLIENT_ID: {YOUR-APPLICATION-CLIENT-ID}
AUTH0_CLIENT_SECRET: {YOUR-APPLICATION-CLIENT-SECRET}
AUTH0_DOMAIN: {YOUR-AUTH0-DOMAIN}
AUTH0_AUDIENCE: {YOUR-AUDIENCE}
```
Update the file and apply it to the cluster:
```
kubectl apply -f security/app-credentials.yaml
```
Next, update the `productpage` deployment with the new image redirecting to Auth0 for authentication and setting its environment from the previously created secret:
```bash
kubectl -n demo patch deployment productpage-v1 --patch "
spec:
template:
spec:
containers:
- name: productpage
image: rinormaloku/productpage:istio-auth0
envFrom:
- secretRef:
name: app-credentials
"
```
Wait until the updated pod is running, then refresh the `productpage` application page in your browser and hit the _Sign In_ button. It will redirect you to the Auth0 login page, where you will be able to sign in.
After the authentication, the end-user is redirected to the `productpage` application with the access token. This token is sent to the `productpage`, which uses it when requesting other services, which then can apply policies based on the permissions of the identity.
Before we go to the next section, let's decode the token and observe the contents. The `productpage` app prints the token in the logs, which you can find out by executing the following command:
```
kubectl logs deploy/productpage-v1 | grep Bearer | tail -n 1 | \
awk -F'Bearer ' '{print $2}' | \
awk -F\\ '{print $1}'
```
To get its contents, decode the token in [jwt.io](https://jwt.io). In the sample below, we show the payload of the access token. It contains claims that identify the user (the `sub` claim) and claims that determine the permissions (the `permissions` claim) alongside other claims:
```
{
"aud": [
"https://bookinfo.eu.auth0.com/userinfo",
"https://bookinfo.io"
],
"azp": "kAwDnFGlk8zJZvLY2eHjtTQp4TOHCUEe",
"exp": 1654255314,
"iat": 1654168914,
"iss": "https://bookinfo.eu.auth0.com/",
"permissions": [
"read:book-details",
"read:book-reviews"
],
"scope": "openid profile",
"sub": "auth0|629521272b1c3e0067ebf6cd"
}
```
> **Note**: Don't write access tokens to standard output in your services! We do so only for demonstration purposes.
In the next section, we'll create policies that allow access to services based on the `permissions` claim of the token.
### Authorizing end-users with Istio
Policies in Istio are defined using the `AuthorizationPolicy` custom resource. For example, with the policy below we allow users with the permission `read:book-details` to access the details service:
```
apiVersion: "security.istio.io/v1beta1"
kind: "AuthorizationPolicy"
metadata:
name: "details-policy"
namespace: demo
spec:
action: ALLOW
selector:
matchLabels:
app: details
rules:
- when:
- key: request.auth.claims[permissions]
values: ["read:book-details"]
```
Remember that we can apply this policy to any of the services. However, using the selector `app: details` we apply it specifically to the details service.
The following policy allows access to the reviews service only for users with the permission `read:book-reviews`:
```
apiVersion: "security.istio.io/v1beta1"
kind: "AuthorizationPolicy"
metadata:
name: "reviews-policy"
namespace: demo
spec:
action: ALLOW
selector:
matchLabels:
app: reviews
rules:
- when:
- key: request.auth.claims[permissions]
values: ["read:book-reviews"]
```
Apply both to the cluster with the command below:
```
kubectl apply -f security/policies/
```
Wait a few seconds for the policy to be applied to the services.
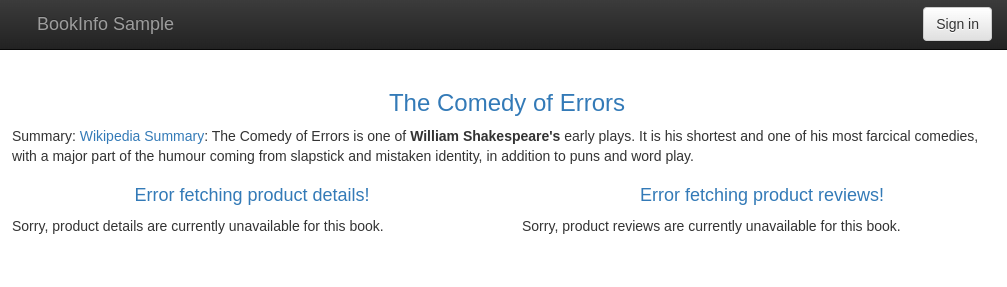
Then refresh the `productpage` in your browser and you will see that it shows two "error fetching ..." messages. This means that your policy is enforced and that the `productpage` microservice was unable to fetch the product details and the product reviews for an unauthenticated user.
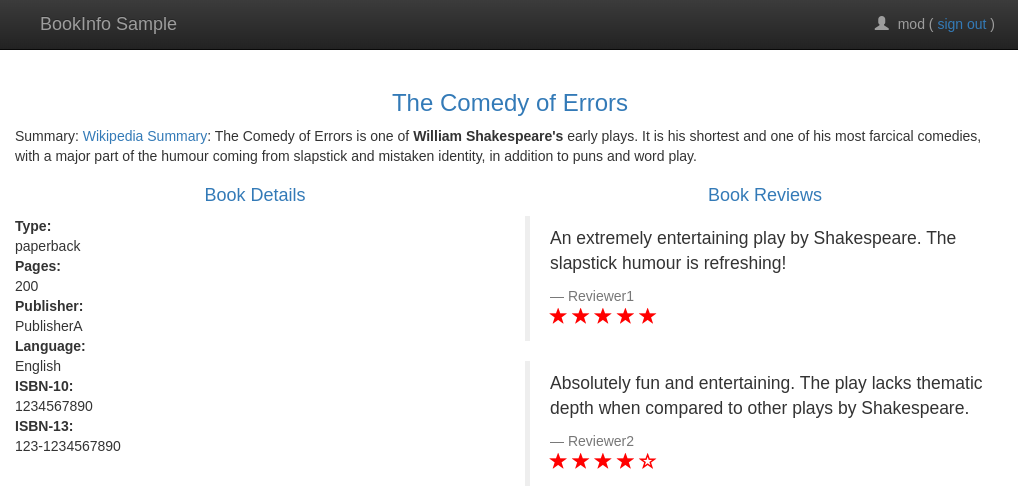
Next, verify that after logging in with the credentials of the user `user@bookinfo.com`, you'll be able to access the product details but not the reviews!
When you log in with the moderator credentials (`mod@bookinfo.com`), you will see that both services are queried successfully! That's because the moderator role has both permissions.
## Conclusion
In this article, you learned how to use Istio and Auth0 to secure a microservices application. First, you started by creating a Kubernetes cluster. Then, you learned how to configure Istio in your cluster. After that, you deployed an unsecured sample application. In the end, you learned how Istio secures service-to-service traffic, and how you can authenticate and authorize users with Istio and Auth0.