
DevOps automation refers to the practice of using tools, scripts, and repeatable workflows to streamline and standardize software development and operations processes. This replaces reliance on manual steps which are error-prone, time-consuming, and difficult to track. Automation enables teams to define their systems as code, execute changes consistently, and reduce operational overhead.
When applied to identity platforms like Auth0, DevOps automation becomes especially valuable, as you will learn in the Scaling Identity series. In the first article, Scaling Identity: Why You Need Auth0 Configuration Automation, we learned why automating Auth0 configuration is essential, the risks of manual setup, and how multi-tenant environments benefit from a DevOps and Infrastructure as Code (IaC) approach. This article walks through a practical approach to treating Auth0 as code and automating Auth0 configuration with Terraform.
Using Terraform with Auth0 provides a reliable foundation for managing identity infrastructure in a consistent, repeatable, and auditable way. By treating Auth0 configuration as code, teams can reduce manual changes, improve visibility, and safely promote changes across environments.
The Auth0 Terraform provider allows teams to manage Auth0 resources declaratively using Terraform configuration files. It exposes Auth0’s Management API through Terraform, enabling infrastructure teams to define and version-control identity-related configuration alongside the rest of their infrastructure.
With the provider, changes to Auth0 are planned, reviewed, and applied using standard Terraform workflows. This makes it easier to understand the impact of changes before they are deployed and to roll back if necessary.
Managing Auth0 Resources as Code With Terraform
Let’s discuss a simple scenario to understand how we can use Terraform to configure Auth0 Actions and register web applications. To make it easier, here is the source code repository on GitHub. This sample uses the local Terraform backend. You can adjust the source code according to your needs to use it with any possible remote Terraform backend.
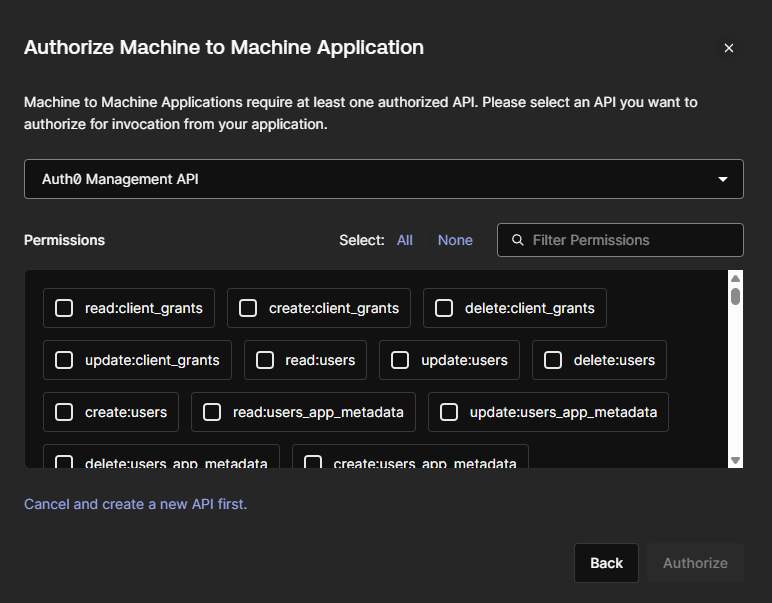
The first step required to use the Auth0 Terraform Provider is to register a Machine-to-Machine (M2M) application in our tenant:

This application requires permissions in the Auth0 Management API to manage resources in the Auth0 tenant using Terraform. In this article, we are going to create a sample web application and Auth0 Actions. In this case we need the below permissions:
read:actionsupdate:actionsdelete:actionscreate:actionsread:triggersupdate:triggersread:clientupdate:clientdelete:clientcreate:clientread:client_credentialsupdate:client_credentialsdelete:client_credentialscreate:client_credentialsread:tenant_settingsupdate:tenant_settings
Once the application is created in the Auth0 tenant, open the Settings tab and copy the below values. We will need them so the Terraform provider can authenticate and gain access to our Auth0 tenant:
- Domain
- Client ID
- Client secret
Now let’s look into the terraform folder from our repository and let’s analyze the main.tf file:
terraform {

  # We have to indicate that we want to use Auth0 Terraform Provider and specify its version:
  required_providers {
    auth0 = {
      source  = "auth0/auth0"
      version = ">= 1.36.0"
    }
  }
}

# We have to provide credentials so Auth0 Terraform Provider can access our tenant using Auth0 Management API:
provider "auth0" {
  domain        = var.auth0_domain
  client_id     = var.auth0_client_id
  client_secret = var.auth0_client_secret
}

### Auth0 Tenant Initial Config

# Here we can define our Auth0 tenant settings. In this case we want to enable "en" locale for our tenant:
resource "auth0_tenant" "tenant_configuration" {
  enabled_locales = ["en"]
  ...
}

### Auth0 Web Applications

# Here we define Auth0 client which will be a web application.
resource "auth0_client" "sample_web_app" {
  name = var.sample_web_app_name
  ...
}

# Here we are defining credentials for our web app. In this case we want to use client secret with POST method:
resource "auth0_client_credentials" "web_app_credentials" {
  client_id = auth0_client.sample_web_app.id
  ...
}

### Auth0 Actions

# Here we define an Auth0 action which will add custom claim to ID Token:
resource "auth0_action" "add-custom-claim-to-id-token_action" {
  name = "add-custom-claim-to-id-token"
  ...
}

# Here we attach the above action to "post-login" trigger:
resource "auth0_trigger_action" "add-custom-claim-to-id-token_action_trigger_binding" {
  trigger = "post-login"
  ...
}
Now under the vars folder there are three tfvars files for each environment:
dev.tfvars: contains variables used for DEV environmenttest.tfvars: contains variables used for TEST environmentprod.tfvar: contains variables used for PROD environment
It is very important to remember that these files should not contain any sensitive data like client client secrets or passwords. Additionally, we can either use these tfvars files to store the configuration or use some variable groups available in the CI/CD tool (like GitHub) and then reference them during deployment.
Here is the content of dev.tfvars file:
# Auth0 Web Applications

sample_web_app_name = "Sample Web App Created with Terraform"

sample_web_app_callbacks = [
  "http://localhost:4200"
]

sample_web_app_logout_urls = [
  "http://localhost:4200/login"
]

# Auth0 Actions

auth0_actions_custom_claims_namespace = "urn:tmf"
The above values will be used when deploying resources with Terraform commands. Let’s invoke Terraform commands locally to see how to apply the above configuration in our Auth0 tenant.
If you haven’t downloaded the source code we are discussing from GitHub already, you can find it under the auth0-as-code repository.
First of all, let’s open the command prompt and change the path to be located in the terraform folder. Next, let’s set up environment variables required for the Auth0 Terraform provider. These are the Client ID, Client secret and Auth0 domain values that we copied earlier from the Settings tab of our M2M application registered in Auth0 tenant:
export TF_VAR_auth0_domain="YOUR_AUTH0-DOMAIN"export TF_VAR_auth0_client_id="YOUR_CLIENT_ID"export TF_VAR_auth0_client_secret="YOUR_CLIENT_SECRET"
Next, let’s initialize Terraform locally, using the command:
terraform init.
The command prepares a Terraform working directory and initializes the Terraform backend. As mentioned before, for this article we do not use a remote backend and store the Terraform state file locally.
We should see “Terraform has been successfully initialized!” message after the init command is executed. Now let’s execute the below command:
terraform plan -var-file="vars/dev.tfvars" -out=dev.plan
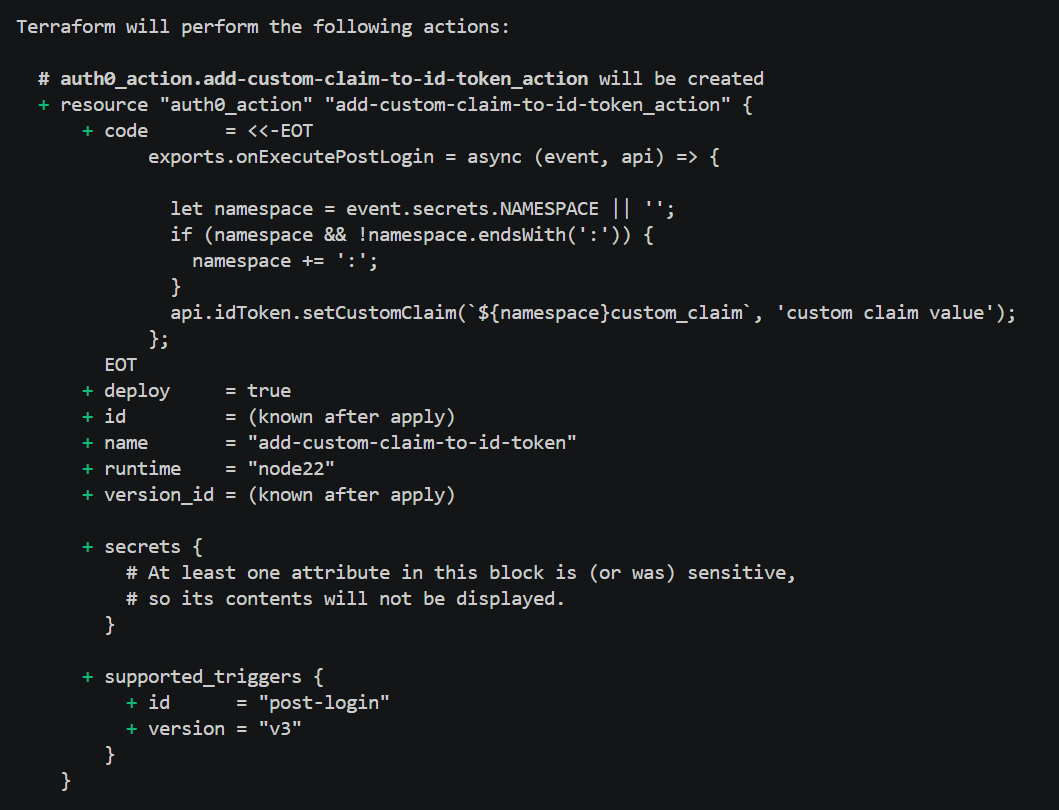
This command will generate a Terraform plan file using the configuration from dev.tfvars file. Auth0 domain, Client ID, and Client secret values are taken from the environment variables we set before. They can also be automatically injected when using CI/CD platforms like GitHub. For now we want to test the configuration locally. After the command execution we should see “Terraform will perform the following actions:” in the console. We can also see what will be added and configured in our Auth0 tenant. Here is the part of the plan displayed in the console:
The below command is the last one we have to use to push changes to the Auth0 tenant. We use the dev.plan file generated using the plan command explained earlier:
terraform apply dev.plan
If the above command was successfully executed, we should see the following in the terminal window:
Apply complete! Resources: 2 added, 0 changed, 0 destroyed.
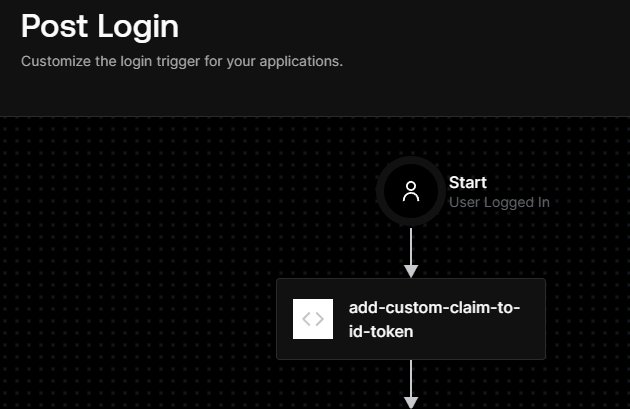
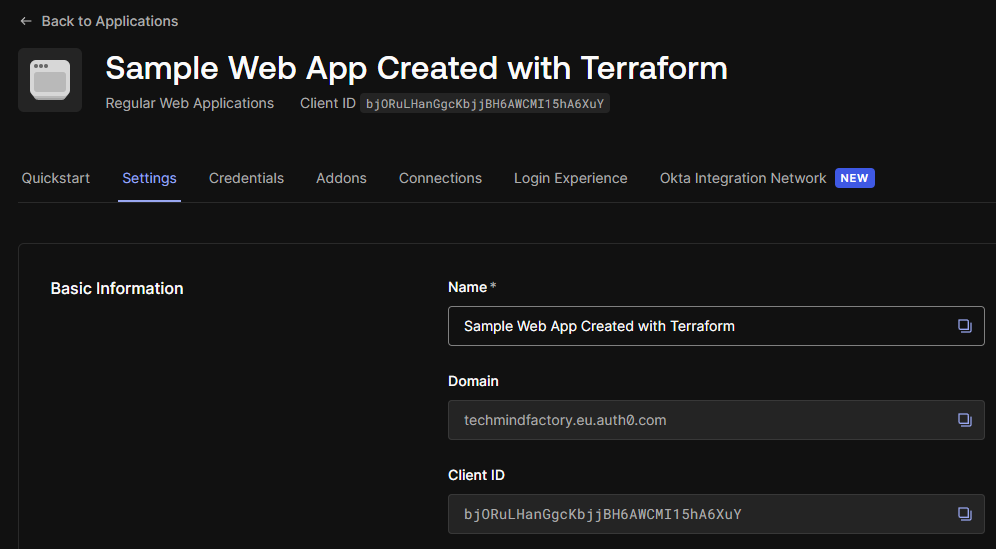
If we go to the Auth0 dashboard, we should see that the web application was registered and the Auth0 Action was added to the “post-login” trigger:
Structuring Terraform Modules for Reusable Patterns
A module in Terraform is a self-contained package of Terraform resources, variables, and outputs. Modules allow you to reuse code across different environments, projects, or resources, making your infrastructure easier to manage and maintain. There are a couple of benefits using Terraform modules for Auth0:
- Reusability: You can create multiple web apps or APIs with different settings without duplicating code.
- Consistency: Standardizes configuration for Auth0 resources, like grant types or JWT configuration.
- Separation of Environments: Dev, staging, and prod can call the same module with different variables.
Here is the example of how we could structure modules:
terraform/
├── modules/
│   └── auth0_web_app/
│       ├── main.tf
│       ├── variables.tf
│       └── outputs.tf
The auth0_web_app folder folder contains main.tf file with reusable structure (also called Terraform module) for registering web application in Auth0:
resource "auth0_client" "web-application-client" {
  name             = var.name
  app_type         = var.app_type
  oidc_conformant  = var.oidc_conformant

  callbacks           = var.callbacks
  allowed_logout_urls = var.allowed_logout_urls

  grant_types = var.grant_types

  jwt_configuration {
    alg                 = var.jwt_alg
    lifetime_in_seconds = var.jwt_lifetime_in_seconds
    secret_encoded      = var.jwt_secret_encoded
  }

  refresh_token {
    rotation_type                = var.refresh_token_rotation_type
    expiration_type              = var.refresh_token_expiration_type
    token_lifetime               = var.refresh_token_token_lifetime
    idle_token_lifetime          = var.refresh_token_idle_token_lifetime
    leeway                       = var.refresh_token_leeway
    infinite_token_lifetime      = var.refresh_token_infinite_token_lifetime
    infinite_idle_token_lifetime = var.refresh_token_infinite_idle_token_lifetime
  }
}
Next, under the modules/auth0_web_app/variables.tf we define all the variables for the module we have discussed above:
variable "name" {
  description = "Name of the Auth0 web application"
  type        = string
}

variable "app_type" {
  description = "Type of the Auth0 client"
  type        = string
  default     = "regular_web"
}
…
Under the modules/auth0_web_app/outputs.tf we can define output values that will be generated after the resource is deployed. In this case, we want to get client ID and secret:
output "client_id" {
  value       = auth0_client.this.client_id
  description = "The client ID of the Auth0 application"
}

output "client_secret" {
  value       = auth0_client.this.client_secret
  description = "The client secret of the Auth0 application"
  sensitive   = true
}
Once you have created your module, you can call it from the main.tf file of your resource definition:
module "my_web_app" {
  source               = "../../modules/auth0_web_app"
  name                 = "Sample Web App Created with Terraform"
  callbacks            = ["http://localhost:4200"]
  allowed_logout_urls  = ["http://localhost:4200/login"]
}
Final Thoughts
In this article, we explored automating Auth0 configuration with Terraform and treating Auth0 as code. The final article of the Scaling Identity series will dive into using GitHub as the foundation for managing Auth0 resources reliably and at scale.
About the author

Daniel Krzyczkowski
Tech Mind Factory
Founder of Tech Mind Factory. Works as a Cloud & Identity Engineer, helping organizations design, build, and deploy modern identity solutions and secure cloud applications.
View profile