---
title: "Nest.js Brings TypeScript to Node.js and Express"
description: "Let's learn about Nest.js, the new framework that takes advantage of TypeScript to create reliable and well structured Express applications."
authors:
- name: "Bruno Krebs"
url: "https://auth0.com/blog/authors/bruno-krebs/"
date: "Oct 5, 2017"
category: "Developers,Tutorial,Nest"
tags: ["nest.js", "nestjs", "nest", "nodejs", "typescript", "rest", "restful", "http", "api", "http-request", "backend"]
url: "https://auth0.com/blog/nestjs-brings-typescript-to-nodejs-and-express/"
---
# Nest.js Brings TypeScript to Node.js and Express
**TL;DR:** In this article we are going to learn about Nest.js, a framework for building Node.js web applications. Why Nest.js? Because, although Node.js already contains a lot of libraries to develop web applications, none of them effectively address one of the most important subjects: the architecture. As we will see, Nest.js introduces various building blocks that help developers to better organize Node.js applications. [This GitHub repository contains the final code developed throughout this article!](https://github.com/auth0-blog/nest-companies)
## Nest.js Introduction
[Nest.js](http://docs.nestjs.com/) is a new framework in the already cluttered Node.js landscape. What makes it different from other frameworks is that Nest.js leverages [TypeScript](https://www.typescriptlang.org/) to help developers effortless build highly testable, scalable, loosely coupled, and easily maintainable applications. For example, when building an application, developers will define TypeScript classes decorated with `@Controller()` to handle HTTP request. Developers will also create classes that implements the `NestMiddleware` interface to define [Express middlewares](http://expressjs.com/en/guide/using-middleware.html).
For those who already know and use [Angular](https://angular.io/), the syntax and the components that Nest.js introduces to backend development will be quite familiar.
Let's take a look at the most important building blocks used to compose Nest.js applications.
### Modules
[Modules on Nest.js are the most basic building blocks](http://docs.nestjs.com/modules). Through modules we encapsulate related code that composes our application, like components and controllers. To start Nest.js, we need to inform the root module of our application. Although not needed, breaking an app into multiple modules is advised, as it helps keeping different matters encapsulated.
For example, let's say that we have an application that manages users and their personal finances. Even though personal finances are related to users, we would rather avoid [high coupling](https://en.wikipedia.org/wiki/Coupling_(computer_programming)) between the classes and [low cohesion](https://en.wikipedia.org/wiki/Cohesion_(computer_science)) by splitting them into separate modules.
Defining a module on Nest.js is simple:
```typescript
import { Module } from '@nestjs/common';
import { UsersService } from './users.service';
@Module({
components: [UsersService],
exports: [UsersService]
})
export class UsersModule {}
```
In this case, we are exporting a module called `UsersModule` that contains a single component, `UsersService`. As this component is defined in the `exports` property of the `@Module` decorator, other modules that import `UsersModule` will be able to use it.
To start a new Nest.js application using `UsersModule` as the root module is as simple as calling `NestFactory` like this:
```typescript
import { NestFactory } from '@nestjs/core';
import { UsersModule } from './modules/users.module';
async function bootstrap() {
const app = await NestFactory.create(UsersModule);
await app.listen(3000);
}
bootstrap();
```
Running this code will trigger a Nest.js application and bootstrap all components defined on `UsersModule`.
### Controllers
As in many other platforms (like [Spring](https://docs.spring.io/spring/docs/current/spring-framework-reference/html/mvc.html#mvc-controller) and [ASP.NET](https://msdn.microsoft.com/en-us/library/dd410269(v=vs.98).aspx)), controllers on Nest.js are responsible for handling HTTP requests. To define a new controller on a module we need to:
- create a new class,
- decorate the class with `@Controller()`,
- and add the controller to the module definition.
As we want this controller to expose some content or accept new data, we also need to create a method marked with one endpoint decorator (e.g. `@Get` or `@Post`). Therefore, this is the minimum code we need to create a controller:
```typescript
import {Controller, Get} from '@nestjs/common';
@Controller('friendly-guy')
export default class FriendlyGuyController {
@Get()
sayHi() {
return "Howdy!"
}
}
```
And this is how we add the controller to a module:
```typescript
import { Module } from '@nestjs/common';
import FriendlyGuyController from './friendly-guy-controller';
@Module({
modules: [],
controllers: [FriendlyGuyController]
})
export class ApplicationModule {}
```
### Components
Nest.js allows developers to create components that can be injected into other components or controllers. A component usually plays one of two roles on Nest.js applications. The first one is the `Service` role, when a component contains some business logic. The second one is the `Repository` role, when a component abstracts away the interaction with databases.
For example, let's say that we have a `Service` that handles checkouts on a store. To allow a checkout to consolidate, the `Service` has to interact with a `Repository` to check if there are enough items on the inventory for the desired product. In this scenario, we would have the `Service` defined as follows:
```typescript
import { Component } from '@nestjs/common';
@Component()
export class CheckoutService {
constructor(private readonly inventoryRepository: InventoryRepository) {}
checkout(cart: ShoppingCart) {
for (let item of cart.items) {
let inventory = this.inventoryRepository.getInventory(item.product);
if (inventory.size < item.quantity) {
throw new Error("Not enough items");
}
}
// ...
}
}
```
The `CheckoutService`, in this case, is a `@Component()` that can be injected on a controller or on another component. Besides that, the component itself depends on a repository called `InventoryRepository`. This repository is then used to retrieve the inventory for a specific product, so the service can check if there are enough items to be sold.
As Nest.js heavily uses the [Dependency Injection design pattern](https://angular.io/guide/dependency-injection), it's easy to manage dependencies between the building blocks. We just have to define dependencies in the constructor of a controller or component, and Nest.js will provide an instance for us.
```typescript
// ...
export class CheckoutService {
constructor(private readonly inventoryRepository: InventoryRepository) {}
// ...
}
```
### Middlewares
Whenever we want to act on a request before it reaches a controller, we can create a [`Middleware`](http://docs.nestjs.com/middlewares). On Nest.js, middlewares are classes that implement the [`NestMiddleware` interface](https://github.com/nestjs/nest/blob/master/src/common/interfaces/middlewares/nest-middleware.interface.ts) and that are decorated with `@Middleware()`. This interface expects us to define a concrete implementation of the `resolve` method to return an [Express middleware](https://expressjs.com/en/guide/writing-middleware.html): `(req, res, next) => void`.
Below we can see an example of a middleware that enables [CORS](https://developer.mozilla.org/en-US/docs/Web/HTTP/Headers/Access-Control-Allow-Origin):
```typescript
import { Middleware, NestMiddleware, ExpressMiddleware } from '@nestjs/common';
@Middleware()
export class CorsMiddleware implements NestMiddleware {
resolve(): ExpressMiddleware {
return (req, res, next) => {
// list os domains
res.header('Access-Control-Allow-Origin', '*');
// list of methods (e.g GET,HEAD,PUT,PATCH,POST,DELETE)
res.header('Access-Control-Allow-Methods', '*');
next();
};
}
}
```
To activate this middleware, we need to make our module implement `NestModule` to provide a concrete method definition of the `configure` method:
```typescript
import { Module, NestModule, MiddlewaresConsumer, RequestMethod } from '@nestjs/common';
import { CorsMiddleware } from './cors.middleware';
@Module({})
export class ApplicationModule implements NestModule {
configure(consumer: MiddlewaresConsumer): void {
consumer.apply(CorsMiddleware).forRoutes(
{ path: '/example', method: RequestMethod.GET }
);
}
}
```
In this case, `CorsMiddleware` has been activated only for `GET` requests that aim the `/example` path on our application. [The official documentation provides further explanation on how to use middlewares](http://docs.nestjs.com/middlewares).
### Exception Filters
One great feature provided by Nest.js is the addition of a layer responsible for catching unhandled exceptions. On this layer we can define custom [Exception Filters](http://docs.nestjs.com/exception-filters). To define an exception filter, we have to:
1. create a class that implements the `ExceptionFilter`,
2. decorate it with `@Catch()`,
3. and implement the `catch(exception: HttpException, response)` method.
For example, let's suppose that we have a custom exception called `BusinessException`. If we want to provide a default message to users whenever this exception occurs, we can create an exception filter like this:
```typescript
import { ExceptionFilter, Catch } from '@nestjs/common';
import { BusinessException } from './business.exception.ts';
@Catch(BusinessException)
export class BusinessExceptionFilter implements ExceptionFilter {
catch(exception: BusinessException, response) {
response.status(status).json({
message: 'Oh, no! You are not doing business right!',
});
}
}
```
Then we can make a controller use this exception handler by using the `@UseFilters()` decorator:
```typescript
import { UseFilters } from `@nestjs/common`;
@UseFilters(new BusinessExceptionFilter())
export class BusinessController {}
```
Or we can make it a global exception handler by making our app instance use it:
```typescript
async function bootstrap() {
const app = await NestFactory.create(ApplicationModule);
// Adding global exception handler
app.useGlobalFilters(new HttpExceptionFilter());
await app.listen(3000);
}
bootstrap();
```
## Building a Nest.js Application
Now that we understand the building blocks available on Nest.js, let's create a small application with this framework. Through this app, we will be able to see some of the core concepts of Nest.js in action.
Nest.js provides two easy ways to start a new application. We could clone [the Nest.js TypeScript Starter project available on GitHub](https://github.com/kamilmysliwiec/nest-typescript-starter), or we could use the [CLI tool for Nest.js applications](https://github.com/nestjs/nest-cli). Both alternatives are equally good and provide a solid foundation to build apps. Though, as we want to understand how a Nest.js application is built, we are going to create a new one from scratch.
### What We'll Build
During the rest of the article, we are going to create a small RESTful API that enables users to create and retrieve companies. To keep things simple, we will handle companies without interacting with any external database. That is, we will hold companies in memory and instances of companies will be lost on a eventual reboot.
The application, although small, will help us understand from what pieces a Nest.js application is made of and how these pieces work together. In the end, we will have the same configuration we would get by using the Nest.js CLI tool or by cloning the starter project.
### Initializing NPM
A Nest.js application is nothing more than a Node.js app. As such, we will create a new directory to hold the source code of our app, and will use NPM to manage our dependencies. We achieve that by running the following commands:
```bash
# create a new directory
mkdir nest-companies
# move to new directory
cd nest-companies
# starts NPM with default properties
npm init -y
```
The last command, [`npm init -y`](https://docs.npmjs.com/cli/init), starts the `nest-companies` directory as a Node.js project by creating the [`package.json`](https://docs.npmjs.com/files/package.json) file with [default properties](https://github.com/auth0-blog/nest-companies/commit/d4f60e7244ca1976d71bf8fbcd14b6fe9a072093).
### Adding Dependencies
With this file in place, we can add the minimum dependencies to boot a Nest.js application. To do that, we use `npm` as follows:
```bash
npm i @nestjs/common \
@nestjs/core \
@nestjs/microservices \
@nestjs/websockets \
rxjs \
typescript \
reflect-metadata
npm i -D @types/node \
ts-node
```
There is no way we can create a Nest.js app with less dependencies than this. Therefore it's worthwhile to understand why we have to add each dependency above.
- The first dependency, [`@nestjs/common`](https://github.com/nestjs/nest/tree/master/src/common), adds the most commonly used components on a Nest.js application. For example, having this dependency we can define a [Module](https://docs.nestjs.com/modules) for our application, as we will see soon.
- The second dependency, [`@nestjs/core`](https://github.com/nestjs/nest/tree/master/src/core), defines the core functionality of Nest.js. Through this library, we can create, among other things, an instance of [NestApplication](https://github.com/nestjs/nest/blob/master/src/core/nest-application.ts) to run our Nest.js module.
- The third dependency, [`@nestjs/microservices`](https://github.com/nestjs/nest/tree/master/src/microservices), won't be used by us directly. Even though this library is internally used by `@nestjs/common`, we need to add it as a dependency because Nest.js team marked it as a [peer dependency](https://docs.npmjs.com/files/package.json#peerdependencies). An issue on GitHub has been created a while ago to discuss [why `@nestjs/core` is required as a peerDependency on `@nestjs/common`](https://github.com/nestjs/nest/issues/116). Though, as nothing concrete has been achieved yet, we need to add the dependency explicitly.
- Just like the `@nestjs/microservices`, `@nestjs/websockets` also is also required internally by Nest.js. Therefore, the solution for now is the same, explicitly add it as a dependency of our project.
- The fifth dependency is a well-known library: `rxjs`. As this [library's README file on GitHub states](https://github.com/Reactive-Extensions/RxJS), `rxjs` is a set of libraries to compose asynchronous and event-based programs using observable collections and [Array#extras](https://blogs.msdn.microsoft.com/ie/2010/12/13/ecmascript-5-part-2-array-extras/) style composition in JavaScript.
- [TypeScript](https://www.typescriptlang.org/), the sixth dependency, is a superset of JavaScript that compiles to clean JavaScript output. This language adds types, classes, and modules to JavaScript. It helps developers to be more productive and produce more reliable code through tooling that supports autocompletion and type checking. The whole Nest.js framework has been written in TypeScript, and using this language is advised when developing applications with this framework.
- The last runtime dependency, [`reflect-metadata`](https://github.com/rbuckton/reflect-metadata), is also used internally by Nest.js framework while it's marked as a peer dependency. This library gives Nest.js the ability to manage decorators on runtime through a reflective API. Being a peer dependency, we also explicitly define it in our project.
Besides these seven runtime dependencies, we also needed to define two [development dependencies](https://docs.npmjs.com/files/package.json#devdependencies) on our app. The first one, `@types/node`, provides TypeScript definition for the Node.js API. With it, we can use count on TypeScript to check if our code is valid while interacting with Node.js directly. The second development dependency, [`ts-node`](https://github.com/TypeStrong/ts-node), allows us to execute TypeScript files directly without prior transpilation to Javascript. Using this library on production is not advised, as it adds a lot of burden to the process.
### Bootstrapping Nest.js Applications
After installing all dependencies, we now have to create the following files to bootstrap a Nest.js application:
1. A file that contains the definition of the root module of our application.
2. A file to create a Nest.js instance with our root module.
3. A file to load `ts-node` to run our source code without transpiling it.
4. A file to configure TypeScript to our needs.
Note that the third file will be used during development only. On other environments, like [staging](https://en.wikipedia.org/wiki/Deployment_environment#Staging) or production, we would run a pre-transpiled version of our app.
Before creating these files, let's create a directory to hold the source code:
```bash
# creating src folder
mkdir -p src
```
We will define our root module by creating a file called `app.module.ts` in the `src` directory and by adding the following code to it:
```typescript
import {Module} from '@nestjs/common';
@Module({
modules: [],
controllers: []
})
export class ApplicationModule { }
```
To start the Nest.js application with this module we will create a file called `server.ts` in the `src` directory with the following code:
```typescript
import { NestFactory } from '@nestjs/core';
import { ApplicationModule } from './app.module';
async function bootstrap() {
const app = await NestFactory.create(ApplicationModule);
await app.listen(3000);
}
bootstrap();
```
Then we will create the file that will load `ts-node` and execute our application. We will call this file `index.js` and add it to the root directory of our project with the following code:
```javascript
require('ts-node/register');
require('./src/server');
```
Lastly, we will indicate that our project is a TypeScript project by creating a file called `tsconfig.json` in the root directory with the following code:
```json
{
"compilerOptions": {
"module": "commonjs",
"declaration": false,
"noImplicitAny": false,
"removeComments": true,
"noLib": false,
"emitDecoratorMetadata": true,
"experimentalDecorators": true,
"target": "es6",
"sourceMap": true,
"allowJs": true,
"outDir": "./dist"
},
"include": [
"src/**/*"
],
"exclude": [
"node_modules",
"**/*.spec.ts"
]
}
```
Note that the most important properties in this configuration for a Nest.js application is the presence of
`emitDecoratorMetadata` and `experimentalDecorators`. We need to activate decorators on any Nest.js application since the framework heavily uses this TypeScript feature to define controllers, modules, components, etc.
Having these four files in place, we can now start our application by running the following command:
```bash
node index
```
### Creating Nest.js Controllers
Even though our application is up and running, we can't do much with it now as there are no controllers to accept requests. Therefore, let's create our first Nest.js controller. We will define this controller in a new file called `companies.controller.ts` that we are going to create in the `src` directory with the following code:
```typescript
import {Controller, Get} from '@nestjs/common';
@Controller('companies')
export class CompaniesController {
@Get()
getCompanies() {
return ["Coke", "Apple", "Tesla"]
}
}
```
This controller is as simple as it gets. For now, we defined a single endpoint that responds with a list of companies when users send HTTP requests to the `/companies` path. To make this controller available, we need to add it in the `controllers` property of the `@Module` decorator of our root module (`./src/app.module.ts`):
```typescript
import {Module} from '@nestjs/common';
import {CompaniesController} from './companies.controller';
@Module({
modules: [],
controllers: [CompaniesController]
})
export class ApplicationModule { }
```
If we run our application again, we will be able to get the list of companies as shown here:
```bash
# starting the application
node index
# getting the list of companies
curl localhost:3000/companies
# ["Coke","Apple","Tesla"]
```
### Serializing Classes on Nest.js
On real applications we would usually be interested on handling more properties besides the company name. To do this, we will create a class that represents a company, add more properties to it, and refactor our controller to use with this class.
Let's create this class in a new file called `company.ts` in the `./src/` directory with the following code:
```typescript
export class Company {
name: string;
industry: string;
constructor(name: string, industry: string) {
this.name = name;
this.industry = industry;
}
}
```
In this case, we've created a simple representation of company with two properties: the `name` of the company and the `industry` where the company acts. After creating this class, let's refactor the `CompaniesController` class as follows:
```typescript
import {Controller, Get} from '@nestjs/common';
import {Company} from './company';
@Controller('companies')
export class CompaniesController {
private companies = [
new Company("Coke", "Soda"),
new Company("Apple", "Computers"),
new Company("Tesla", "Cars")
];
@Get()
getCompanies() {
return this.companies;
}
}
```
The changes to the controller, although small, gives us a more realistic scenario that we would face while developing production ready Nest.js applications. We started by importing the `Company` class into our controller. After that we defined a static array containing three instances of `Company`. Then we ended up changing the `getCompanies()` method implementation to return this array instead of an array of strings.
Running the application and issuing a `GET` request to `/companies` will now return the list of companies with their name and industry:
```typescript
# starting the application
node index
# getting the list of companies
curl localhost:3000/companies
# [{"name":"Coke","industry":"Soda"} ,{"name":"Apple","industry":"Computers"} ,{"name":"Tesla","industry":"Cars"}]
```
Note that, on Nest.js, we don't need to instruct the controller to send the response as JSON. We simply return what we want and the framework serializes the returned object(s) as JSON.
### Deserializing Classes on Nest.js
Even though Nest.js serializes responses as JSON by default, the other way around is not true. To accept JSON requests and transform them into instances of our classes, we need to install and configure [`body-parser`](https://github.com/expressjs/body-parser) manually. Luckily, the process is simple. First we install the package by issuing `npm install body-parser`, then we update the `./src/server.ts` file to make our app use `body-parser`:
```typescript
import { NestFactory } from '@nestjs/core';
import { ApplicationModule } from './app.module';
import * as bodyParser from 'body-parser';
async function bootstrap() {
const app = await NestFactory.create(ApplicationModule);
app.use(bodyParser.json());
await app.listen(3000);
}
bootstrap();
```
With these two extra lines of code (the `import` statement and `app.use(...)`), we can now accept requests with JSON objects. Let's test this feature by adding a new method in the `CompaniesController` class to accept `POST` requests:
```typescript
import {Controller, Get, Post, Body} from '@nestjs/common';
import {Company} from './company';
@Controller('companies')
export class CompaniesController {
// companies array definition ...
// getCompanies method definition ...
@Post()
createCompany(@Body() company: Company) {
this.companies.push(company);
}
}
```
The `createCompany` method that we just created contains two decorators. The first one, `@Post()`, indicates that this method is responsible for handling `POST` requests targeted to `/companies`. The second decorator, `@Body()`, indicates that the framework needs to deserialize the request body into an instance of `Company`. With these changes, we can now add new companies to the array of companies that is defined in the `CompaniesController` class:
```bash
# starting the application
node index
# getting the list of companies
curl localhost:3000/companies
# [{"name":"Coke","industry":"Soda"} ,{"name":"Apple","industry":"Computers"} ,{"name":"Tesla","industry":"Cars"}]
curl -X POST -d '{
"name" :"Nestle",
"industry": "Foods"
}' -H "Content-Type: application/json" localhost:3000/companies
# getting the new list of companies
curl localhost:3000/companies
# [{"name":"Coke","industry":"Soda"}, {"name":"Apple","industry":"Computers"} ,{"name":"Tesla","industry":"Cars"}, {"name" :"Nestle","industry": "Foods"}]
```
## Securing Nest.js Applications
Nest.js framework creates, in the end, just an Express application. Therefore, we can easily use JWTs to secure Nest.js applications with [Auth0](https://auth0.com) and get [state-of-the-art user management features](https://auth0.com/user-management). To do that, we'll need an [Auth0](https://auth0.com/) account to manage authentication. [To sign up for a free Auth0 account, let's follow this link](https://auth0.com/signup). Next, let's set up an Auth0 API to represent our app.
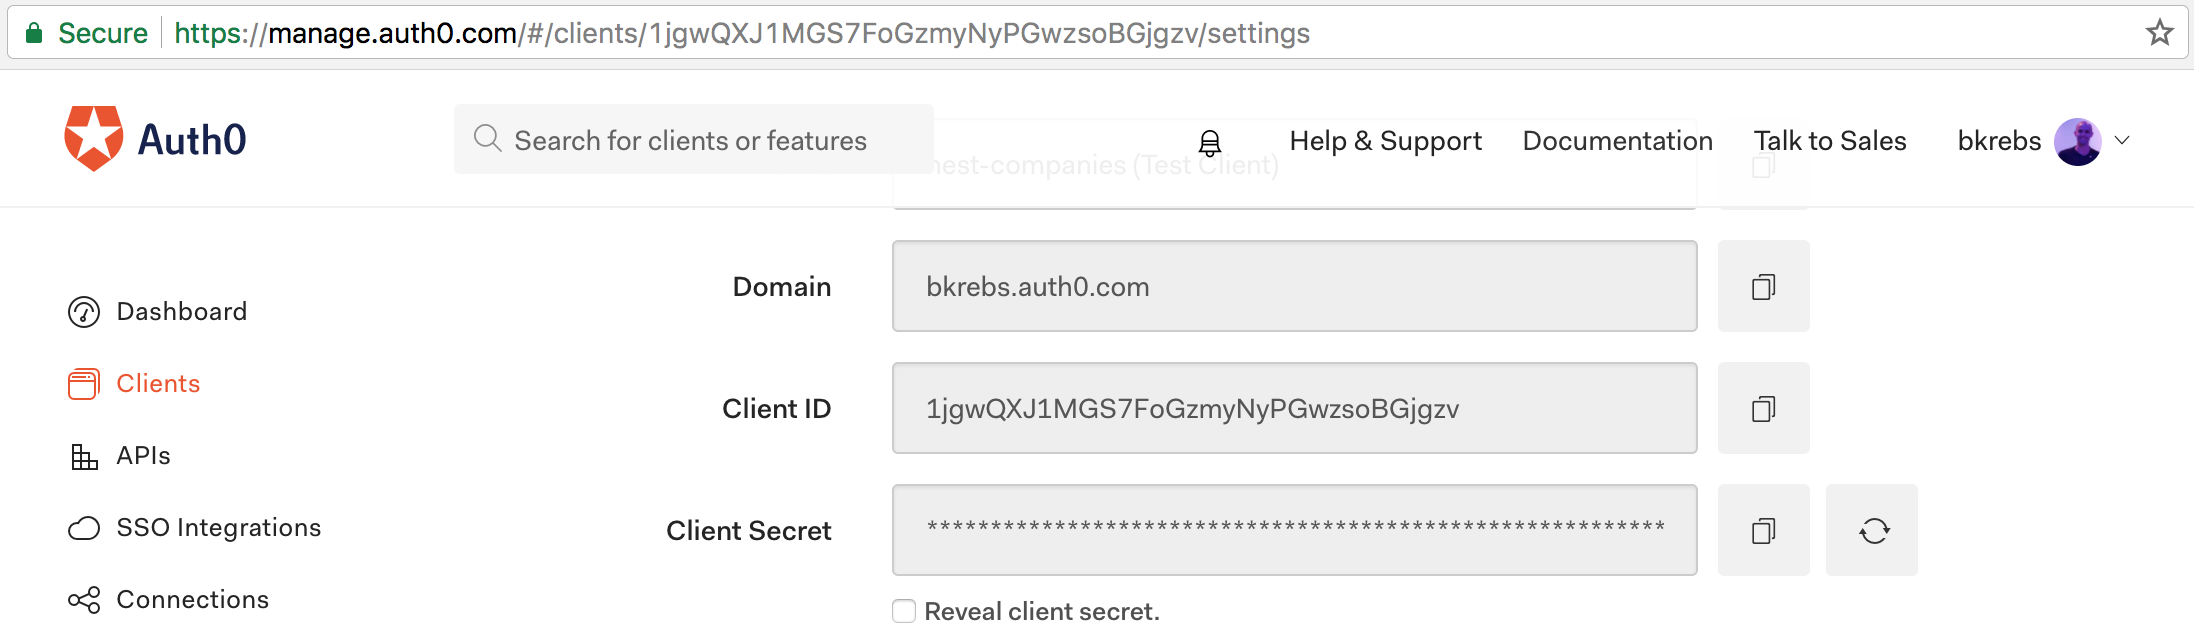
To create the API, let's go to [APIs in our Auth0 dashboard](https://manage.auth0.com/#/apis) and click on the "Create API" button. There we can enter `nest-companies` as the name for the API and set the Identifier to our API endpoint URL. In this case, this is `http://localhost:3000/`. The Signing Algorithm must be **RS256**.
Having created the API, we can now implement Auth0 authentication on our Nest.js application. The first step is to install three dependencies:
```bash
npm install express-jwt \
jwks-rsa \
@types/express-jwt
```
The first dependency, `express-jwt`, facilitates the creation of a middleware that validates JWTs. The second dependency, `jwks-rsa`, is a library to retrieve RSA public keys from a JWKS (JSON Web Key Set) endpoint. The third one, `@types/express-jwt`, provides the TypeScript definition of the `express-jwt` library. We don't need to install a TypeScript definition of [`jwks-rsa` because this library already ships with one](https://github.com/auth0/node-jwks-rsa/blob/master/index.d.ts).
Following the Nest.js way of doing things, we are going to create a `@Middleware()` to set up `express-jwt` and `jwks-rsa` in our app. Let's create this middleware in a new file called `authentication.middleware.ts` in the `./src` directory with the following code:
```typescript
import { Middleware, NestMiddleware, ExpressMiddleware } from '@nestjs/common';
import * as jwt from 'express-jwt';
import {expressJwtSecret} from 'jwks-rsa';
@Middleware()
export class AuthenticationMiddleware implements NestMiddleware {
resolve(): ExpressMiddleware {
return jwt({
secret: expressJwtSecret({
cache: true,
rateLimit: true,
jwksRequestsPerMinute: 5,
jwksUri: `https://${CLIENT_DOMAIN}/.well-known/jwks.json`
}),
audience: 'http://localhost:3000/',
issuer: 'https://${CLIENT_DOMAIN}/',
algorithm: 'RS256'
});
}
}
```
Note that we need to replace both `${CLIENT_DOMAIN}` placeholders in the code above by our own Auth0 client domain. In my case, I will replace these placeholders with `bkrebs.auth0.com` so the app can check that `https://bkrebs.auth0.com/` is the issuer and check keys on the [`https://bkrebs.auth0.com/.well-known/jwks.json`](https://bkrebs.auth0.com/.well-known/jwks.json) JWKS.
Then, to activate this middleware and make our endpoints secure, we need to refactor `ApplicationModule` as follows:
```typescript
import {Module, NestModule, MiddlewaresConsumer, RequestMethod } from '@nestjs/common';
import {CompaniesController} from './companies.controller';
import {AuthenticationMiddleware} from './authentication.middleware';
@Module({
modules: [],
controllers: [CompaniesController]
})
export class ApplicationModule implements NestModule {
configure(consumer: MiddlewaresConsumer): void {
consumer.apply(AuthenticationMiddleware).forRoutes(
{ path: '/**', method: RequestMethod.ALL }
);
}
}
```
In this case we are securing all endpoints in our application (`/**`) from all request methods (`GET`, `POST`, etc). To see the middleware in action, we need to restart our application, fetch a JWT from Auth0, then send it in the `Authorization` header of our requests:
```bash
# start the application
node index
# fetch JWT from Auth0
curl -X POST -H 'content-type: application/json' -d '{
"client_id": "$CLIENT_ID",
"client_secret":"$CLIENT_SECRET",
"audience":"http://localhost:3000/",
"grant_type":"client_credentials"
}' https://bkrebs.auth0.com/oauth/token
# copy the access_token and issue in the Authorization header
curl -H 'authorization: Bearer $JWT' http://localhost:3000/companies
# trying to access the enpoint without a JWT won't work
curl http://localhost:3000/companies
```
Note that we need to replace `$CLIENT_ID` and `$CLIENT_SECRET` in the second command above. We can get these values from the [`nest-companies (Test Client)` client that Auth0 generated](https://manage.auth0.com/#/clients) for us. Besides that, we also need to replace `$JWT` in the third command with the `access_token` returned by Auth0.
## Final Thoughts
Nest.js is a new framework that relies on a mature approach for building web applications on Node.js. From the very beginning, the authors of this framework followed best practices and managed to create a well structured framework. As we saw in this article, creating applications with Nest.js is easy, flexible, and intuitive. Added to this, TypeScript enhances the code quality of applications built with Nest.js by introducing type safety in our backend applications and by facilitating the development process (e.g. eventual refactorings).
Although we covered many important piecies of this framework in this article, there is a lot more to talk about. In a future article we are going to cover more advanced topics like WebSockets, Automated Tests, i18n, Database Integration, etc. Stay tuned!