---
title: "Interaction-Based Authentication for Alexa Skills with Auth0"
description: "Learn how to easily add interaction-based authentication for your Alexa skills with Auth0."
authors:
- name: "João Angelo"
url: "https://auth0.com/blog/authors/joao-angelo/"
date: "Apr 27, 2017"
category: "Developers,Tutorial,Alexa"
tags: ["alexa", "authentication", "webtask"]
url: "https://auth0.com/blog/interaction-based-auth-for-alexa-with-auth0/"
---
# Interaction-Based Authentication for Alexa Skills with Auth0
---
**TL;DR:** In this post we will look at how you can add interaction-based authentication to your Alexa skills. This will allow you to build Alexa skills that can perform tasks that you wouldn't want just anybody to be able to do. In our example, we will be building a fictional Pizza on Demand service that allows you to order pizza with just your voice.
To follow along with our tutorial, be sure to check out the [GitHub repo](https://github.com/auth0/auth0-alexa-authentication-sample).
---
This blog post illustrates how to achieve secure authentication on each interaction with Alexa. At a very high-level this shows how to issue a command to Alexa, receive a one-time authentication code through a different medium (SMS or email), and then use that code to confirm the transaction through Alexa.
## How it Works
1. The user enables your Alexa skill which requires account linking.
2. The user authenticates with your system and grants Alexa access to use your account on your behalf.
3. The user interacts with Alexa and issues a command that requires an additional confirmation of the user identity.
4. Your system processes the command, issues and delivers a one-time authentication code to the user associated with the account information provided by Alexa. The authentication code can be delivered either through email or SMS.
5. The user receives the authentication code and communicates it to Alexa which forwards it again to your system.
6. Your system validates the authentication code and confirms the transaction.
By leveraging a one-time authentication code delivered through means that have been previously verified as being associated to the end-user, your system can ensure that the transaction was indeed completed by the end-user associated with the account and not by someone else that happened to have access to the Alexa device.
## Step by Step Guide
This guide will take you through all the necessary steps required to deploy and run the Alexa skill authentication sample available from [GitHub](https://github.com/auth0/auth0-alexa-authentication-sample). The sample in question uses a fictitious pizzeria Pizza on Demand (POD) that wants to securely allow their users to order pizzas through their recently developed Alexa skill.
### Pre-Conditions
In order to deploy and run this sample skill you'll need to ensure the provision of the following accounts:
* Auth0 account - Sign up for Free - [https://auth0.com/](https://auth0.com/)
* Amazon Developer account - [https://developer.amazon.com/home.html](https://developer.amazon.com/home.html)
* (Optional, but recommended) Twilio account - [https://www.twilio.com/](https://www.twilio.com/)
* (Optional) Pusher account - [https://pusher.com/](https://pusher.com/)
## Auth0 Configuration
The following steps will all be performed through the [Auth0 Dashboard](https://manage.auth0.com/#/).
### Step 1 - Create the POD Back-End API
On the sidebar to the left, select the APIs menu and then click the CREATE API button.
*Note: If you don't see an APIs section on the sidebar make sure that on your advanced account settings you enable the Enable APIs Section switch. Under your account name in the upper right corner of your [Auth0 Dashboard](https://manage.auth0.com/#/), choose **Account Settings** from the dropdown, then select the [Advanced](https://manage.auth0.com/#/account/advanced) tab. In the **Settings** section, turn on the toggle for **Enable APIs Section.***
Provide the following information:
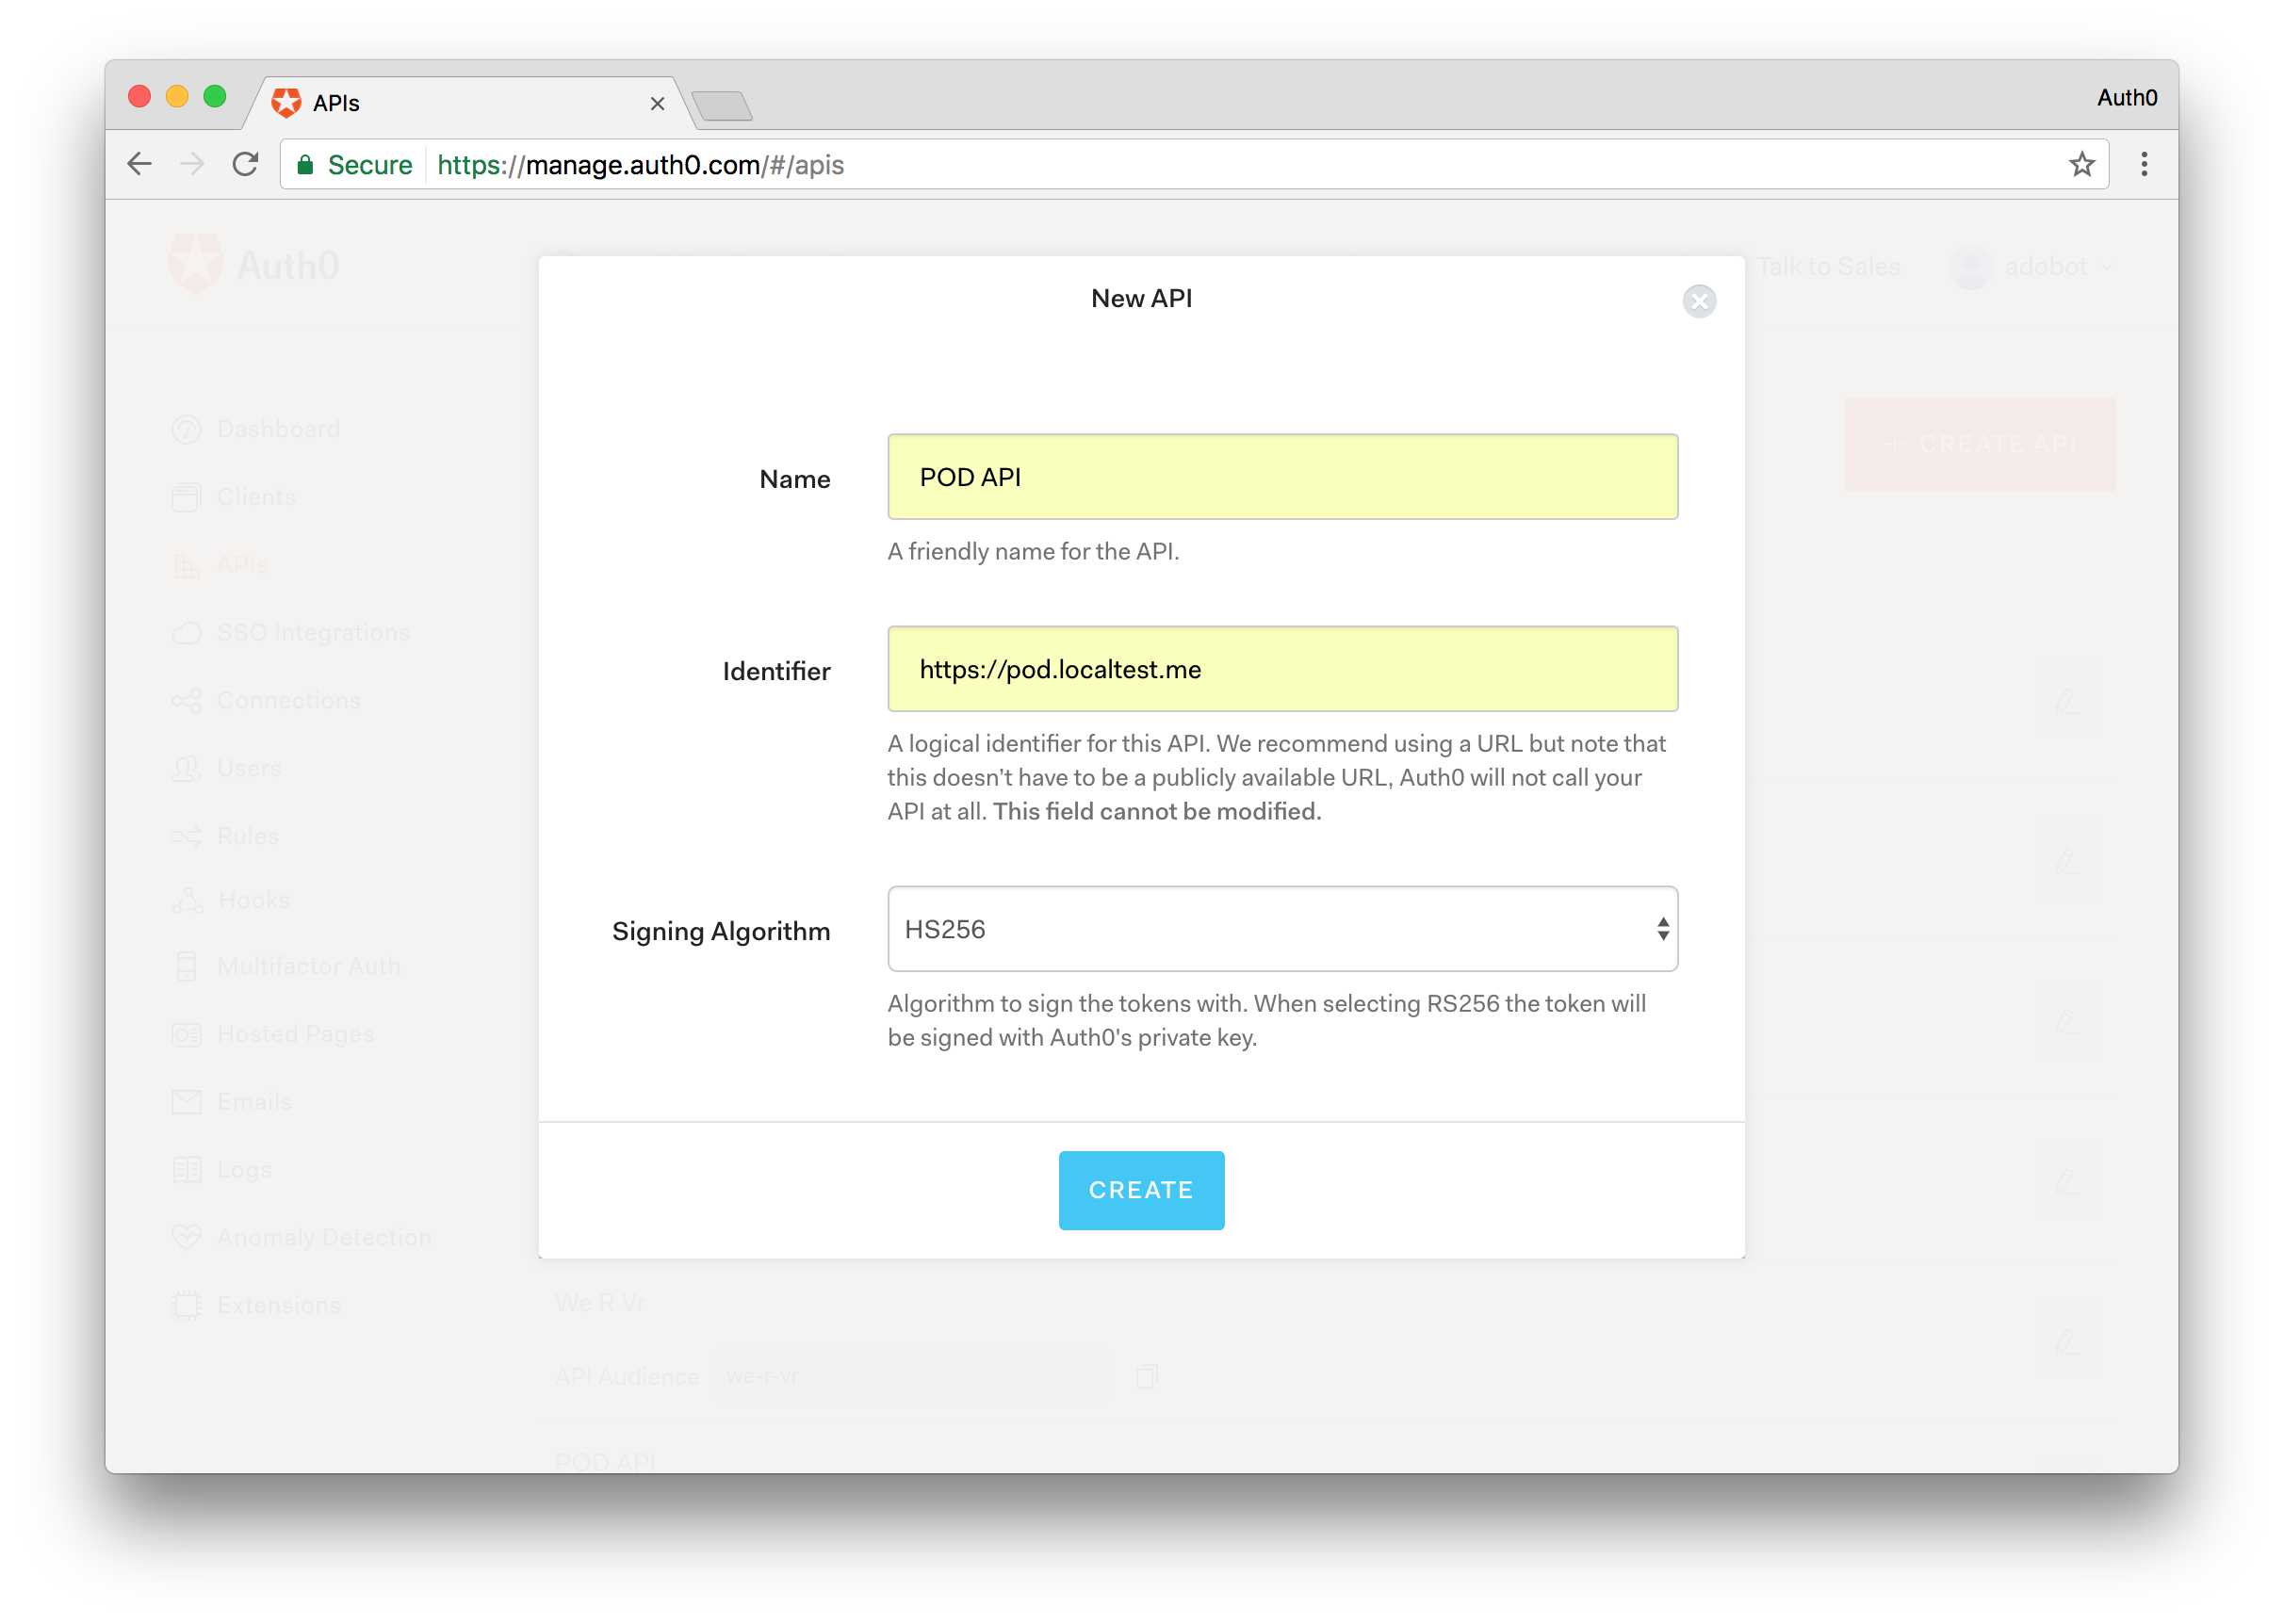
* A name of your choice, for example, **POD API**.
* The value **https://pod.localtest.me** for the identifier (you could provide different identifier, but this will be required in other configuration so it's recommended to pick the one used by this guide).
* Select **HS256** as the signing algorithm.
Confirm the API creation.
After being navigated to the API details page, choose the Settings section and enable the **Allow Offline Access** switch.
### Step 2 - Create the POD Client Application
On the sidebar to the left, select the **Clients** menu and then click the **CREATE CLIENT** button.
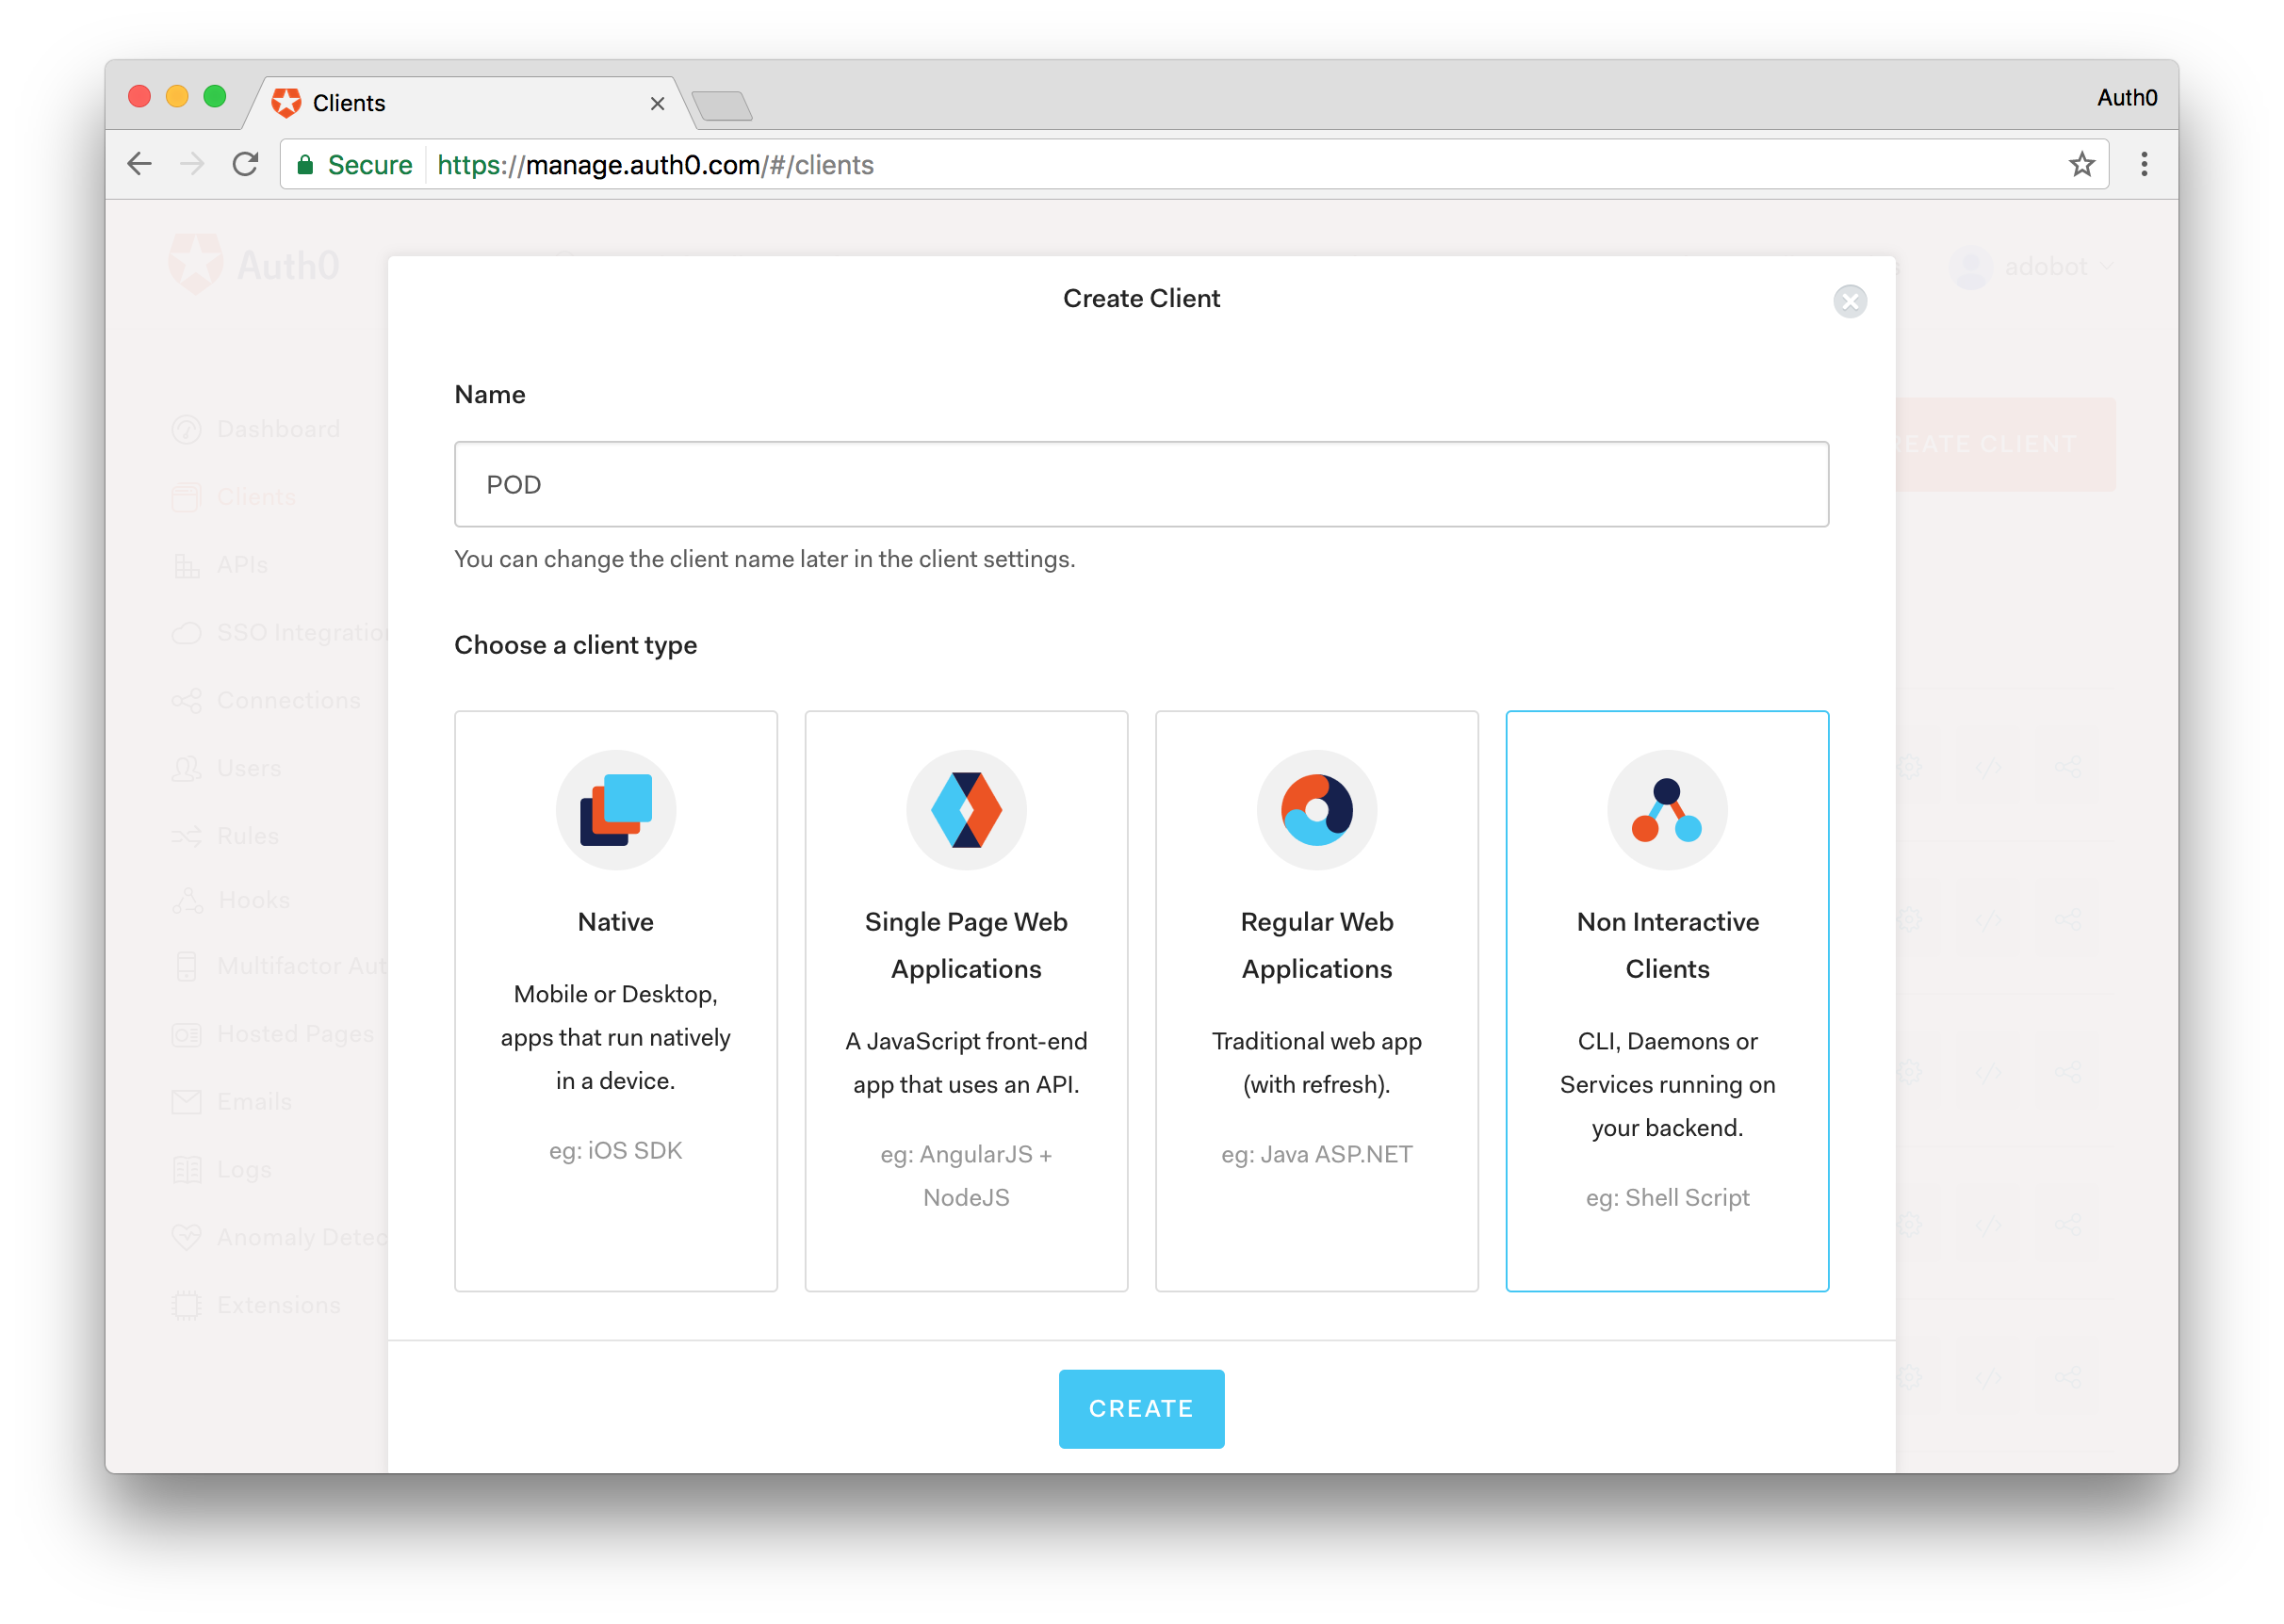
Provide a name at your choice, for example, POD, and select Non Interactive Clients as the client type.
### Step 3 - Create a Database Connection
On the sidebar to the left, select the **Connections** menu, then the **Database** sub-menu, and finally click the **CREATE DB CONNECTION** button.
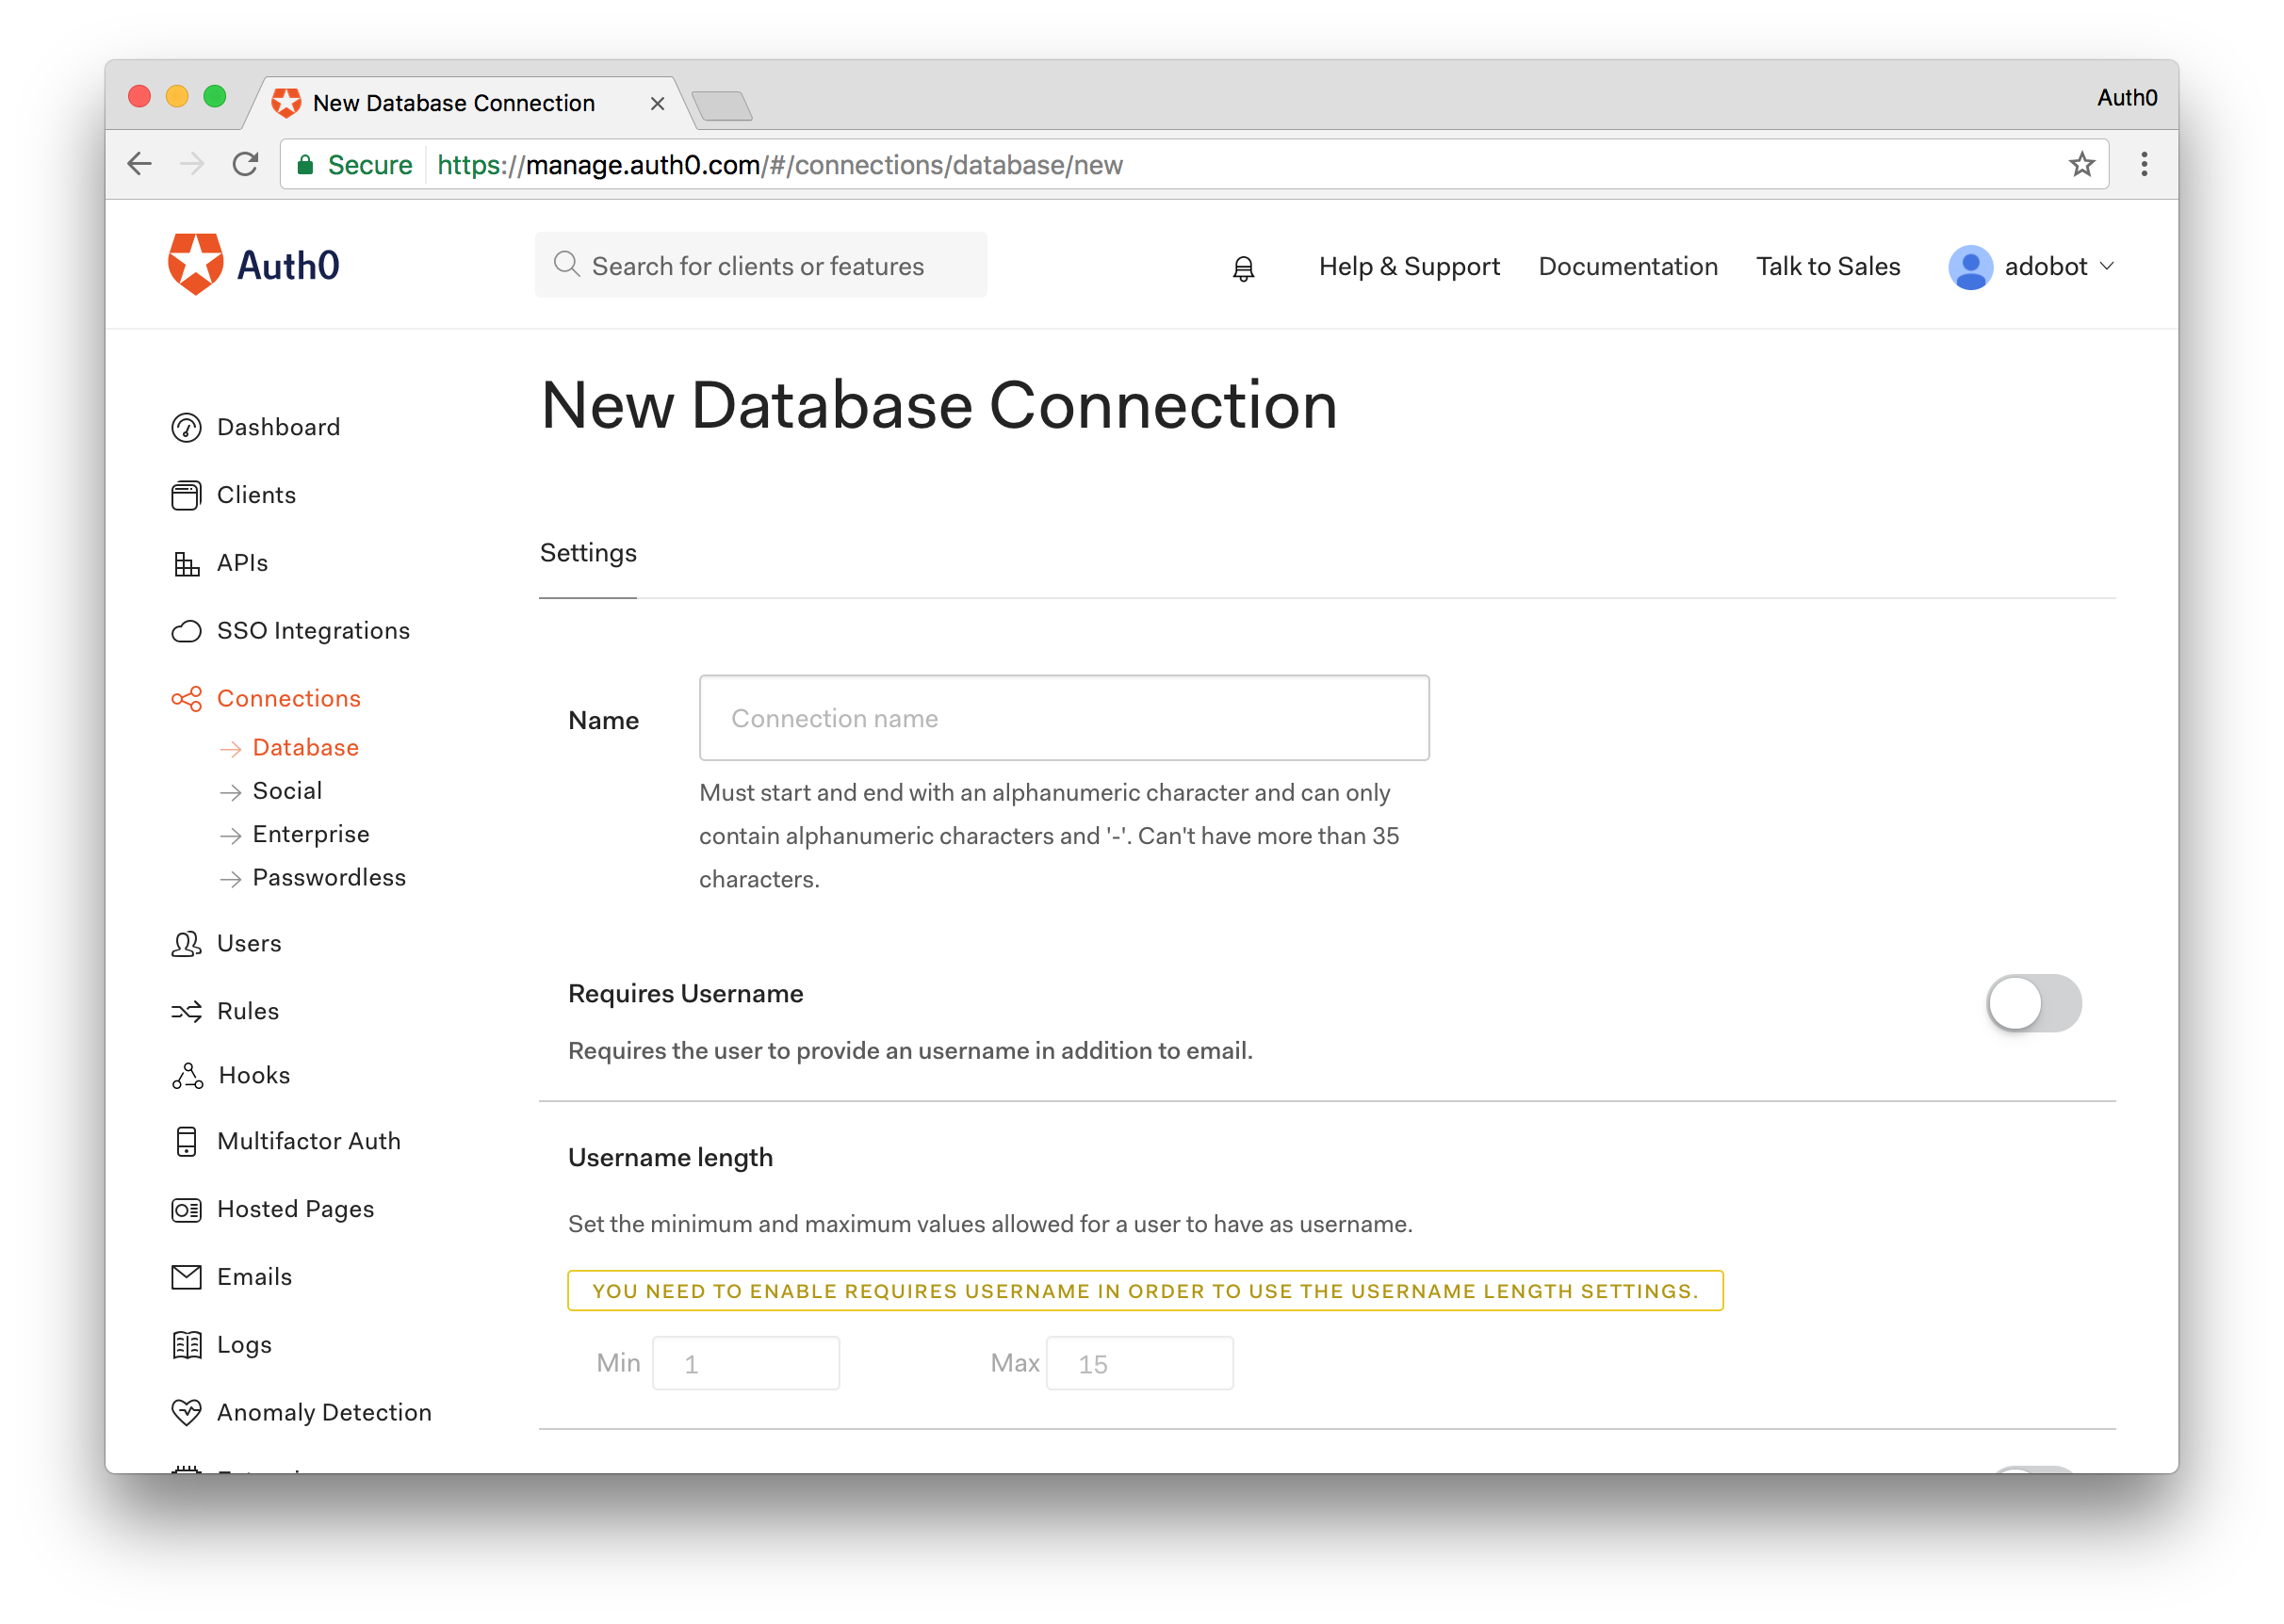
Provide a name of your choice, for example, **POD-DB**.
After being navigated to the connection details page, choose the Clients section and ensure that the connection is enabled for the POD client application created in the previous step.
### Step 4 - Create a Test User
On the sidebar to the left, select the **Users** menu and click the **CREATE USER** button.
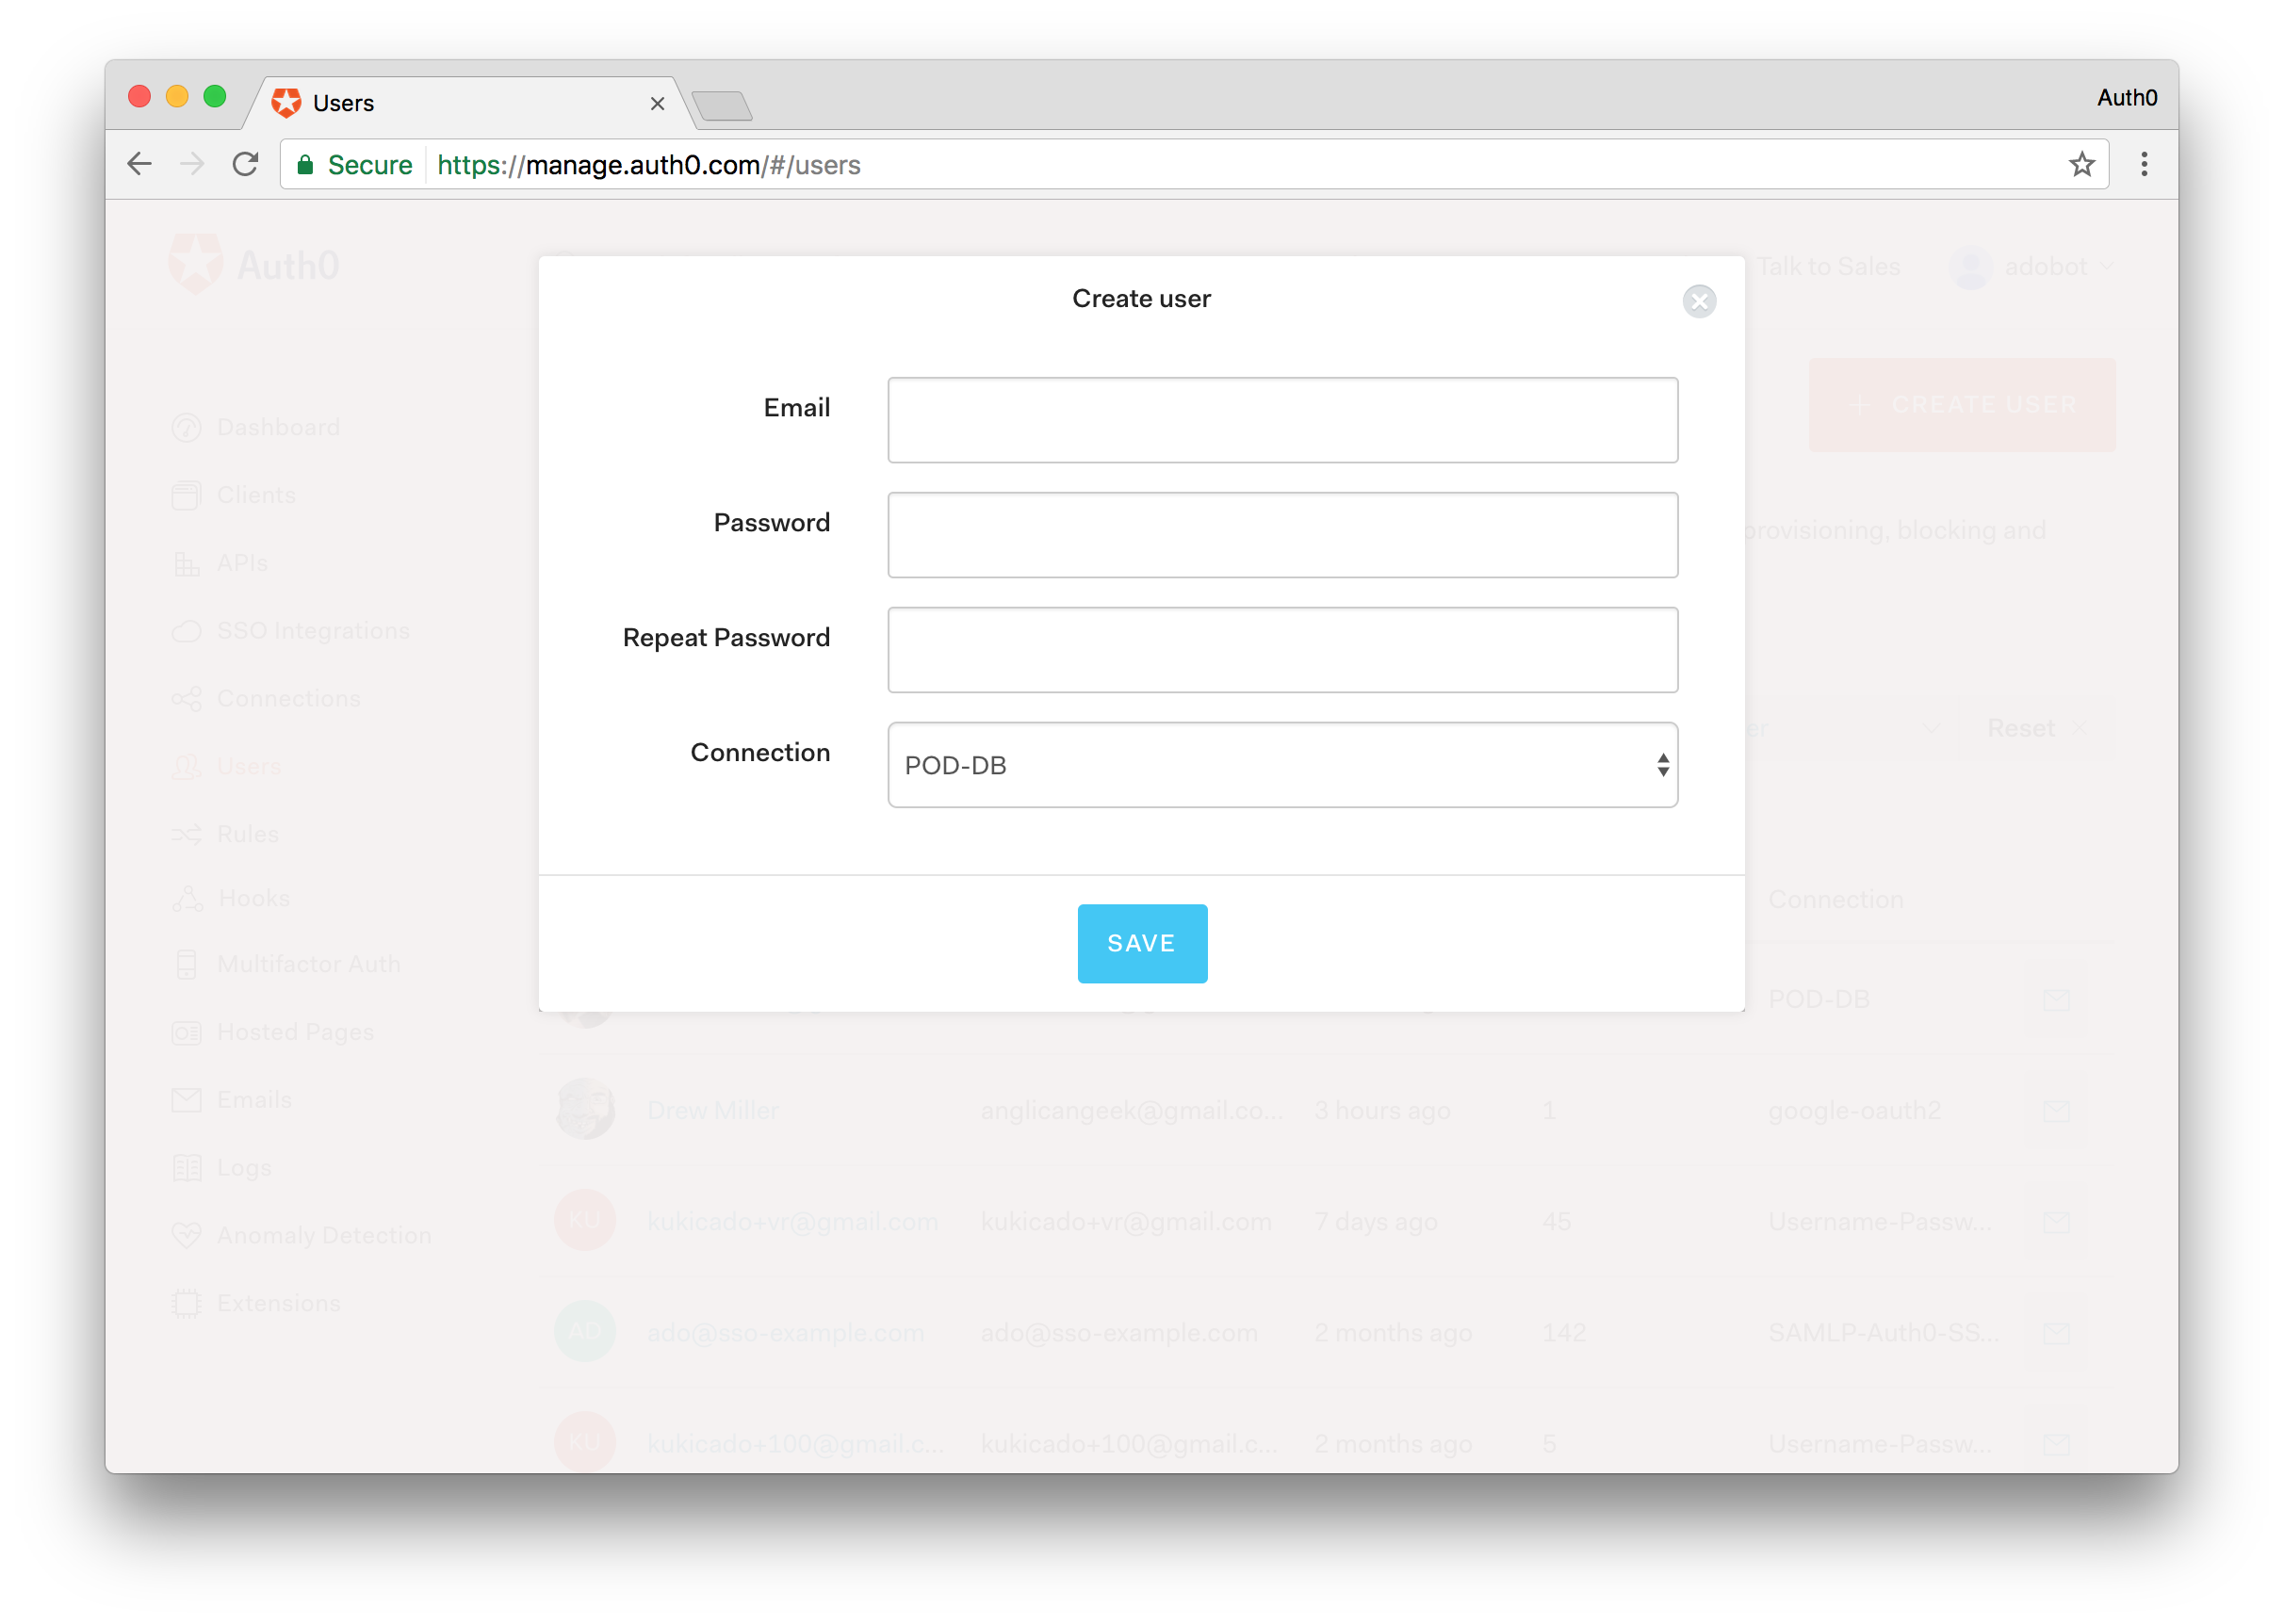
Provide the following information:
* A real email address that you have access to (if you're not going to use Twilio it's strictly required that the email address for the user be a real one).
* A password of your choice.
* Select the previously created connection as the connection to which the user is associated.
If you intend to use Twilio to deliver authentication codes to the user's mobile phone number, after you get navigated to the user details page you need to click the EDIT button in the metadata section and provide the target phone number as part of the `user_metadata`:
```
{
"phone_number": "[your phone number here]"
}
```
### Step 5 - Enable Passwordless
On the sidebar to the left, select the **Connection** menu, then the **Passwordless** sub-menu and enable either the *SMS* or *Email* switch. If you provided a phone number for the test user then you **are required to enable the SMS option**. Otherwise, you can choose to enable the Email option and get the authentication codes through your email inbox.
Enabling the SMS option requires you to provide information about your Twilio account. For the Email connection and purely for testing purposes, you can use the Auth0 built-in email provider.
In either case, when configuring the chosen type of passwordless connection, you need to set the **OTP Length** to **4** and enable the **Disable Sign Ups** switch.
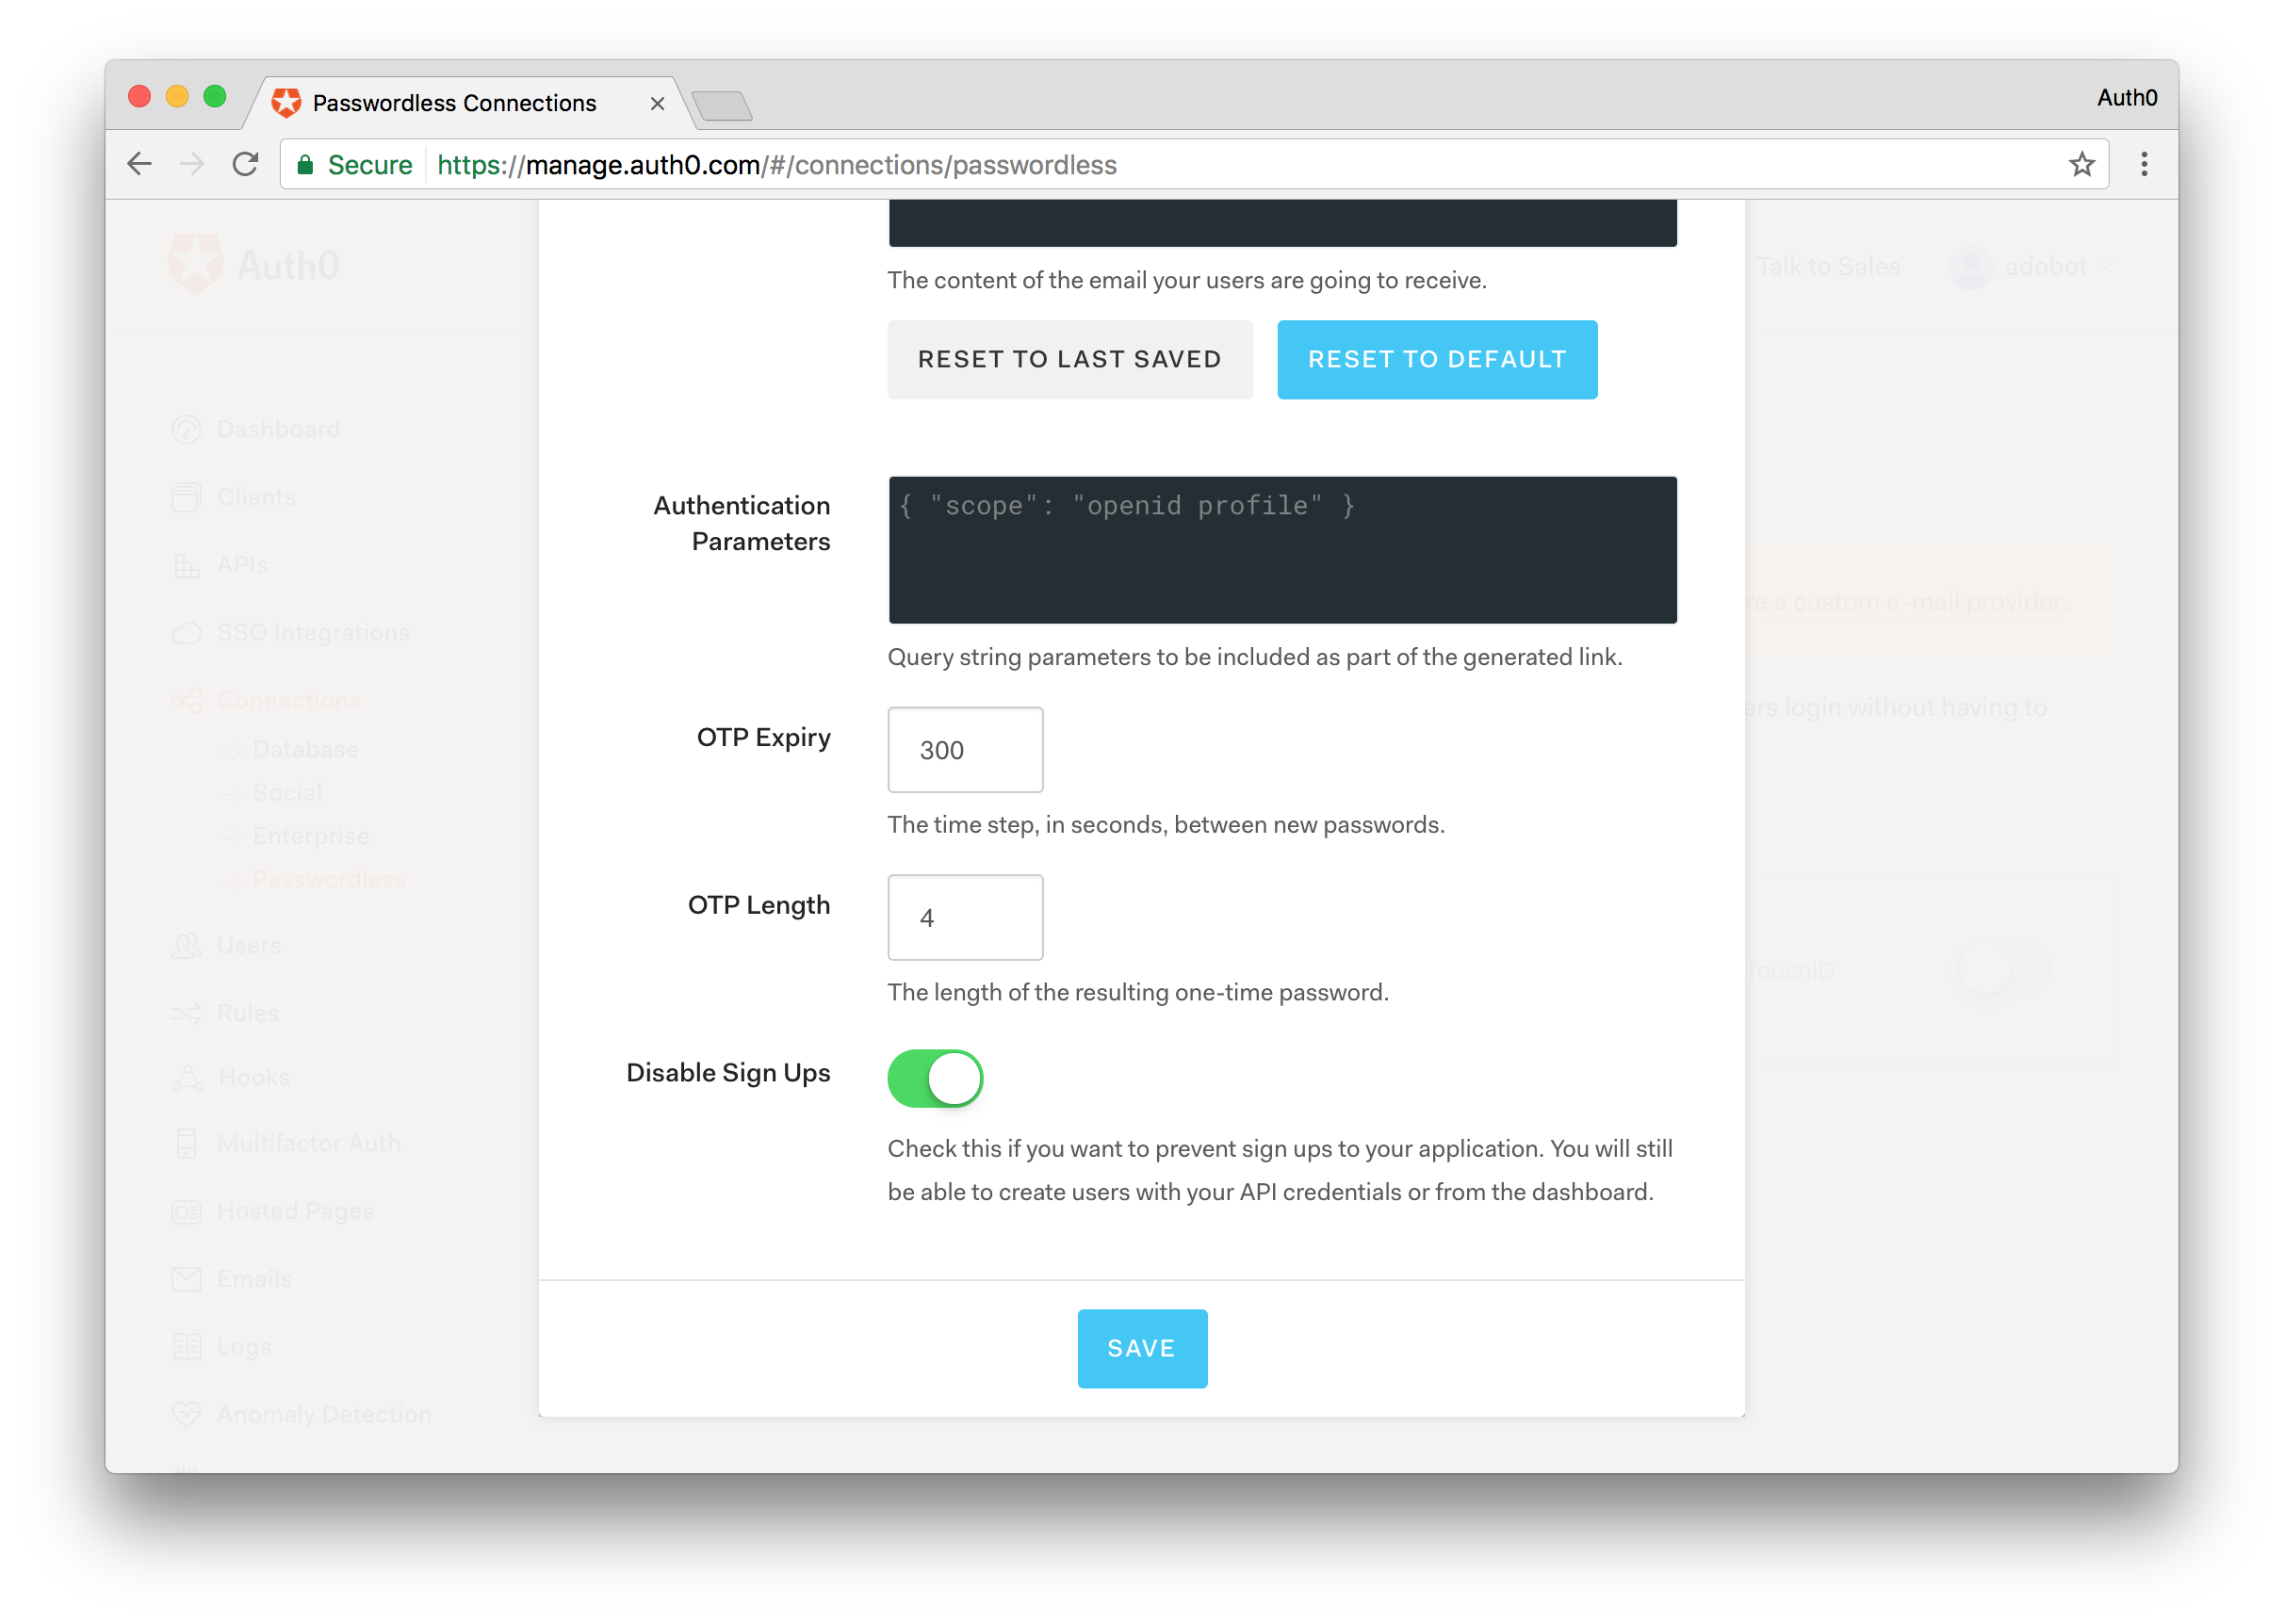
*Note: The use of passwordless authentication either with SMS or email requires that the phone number or email address of the user be verified before using it to deliver authentication codes. For demonstration purposes, this sample skill does not require that step so please take that under consideration.*
### Step 6 - Ensure Enabled Connections in POD Client Application
On the sidebar to the left, select the **Clients** menu, locate the entry for the client application created in step 2 and click the Connections button available in that client entry row.
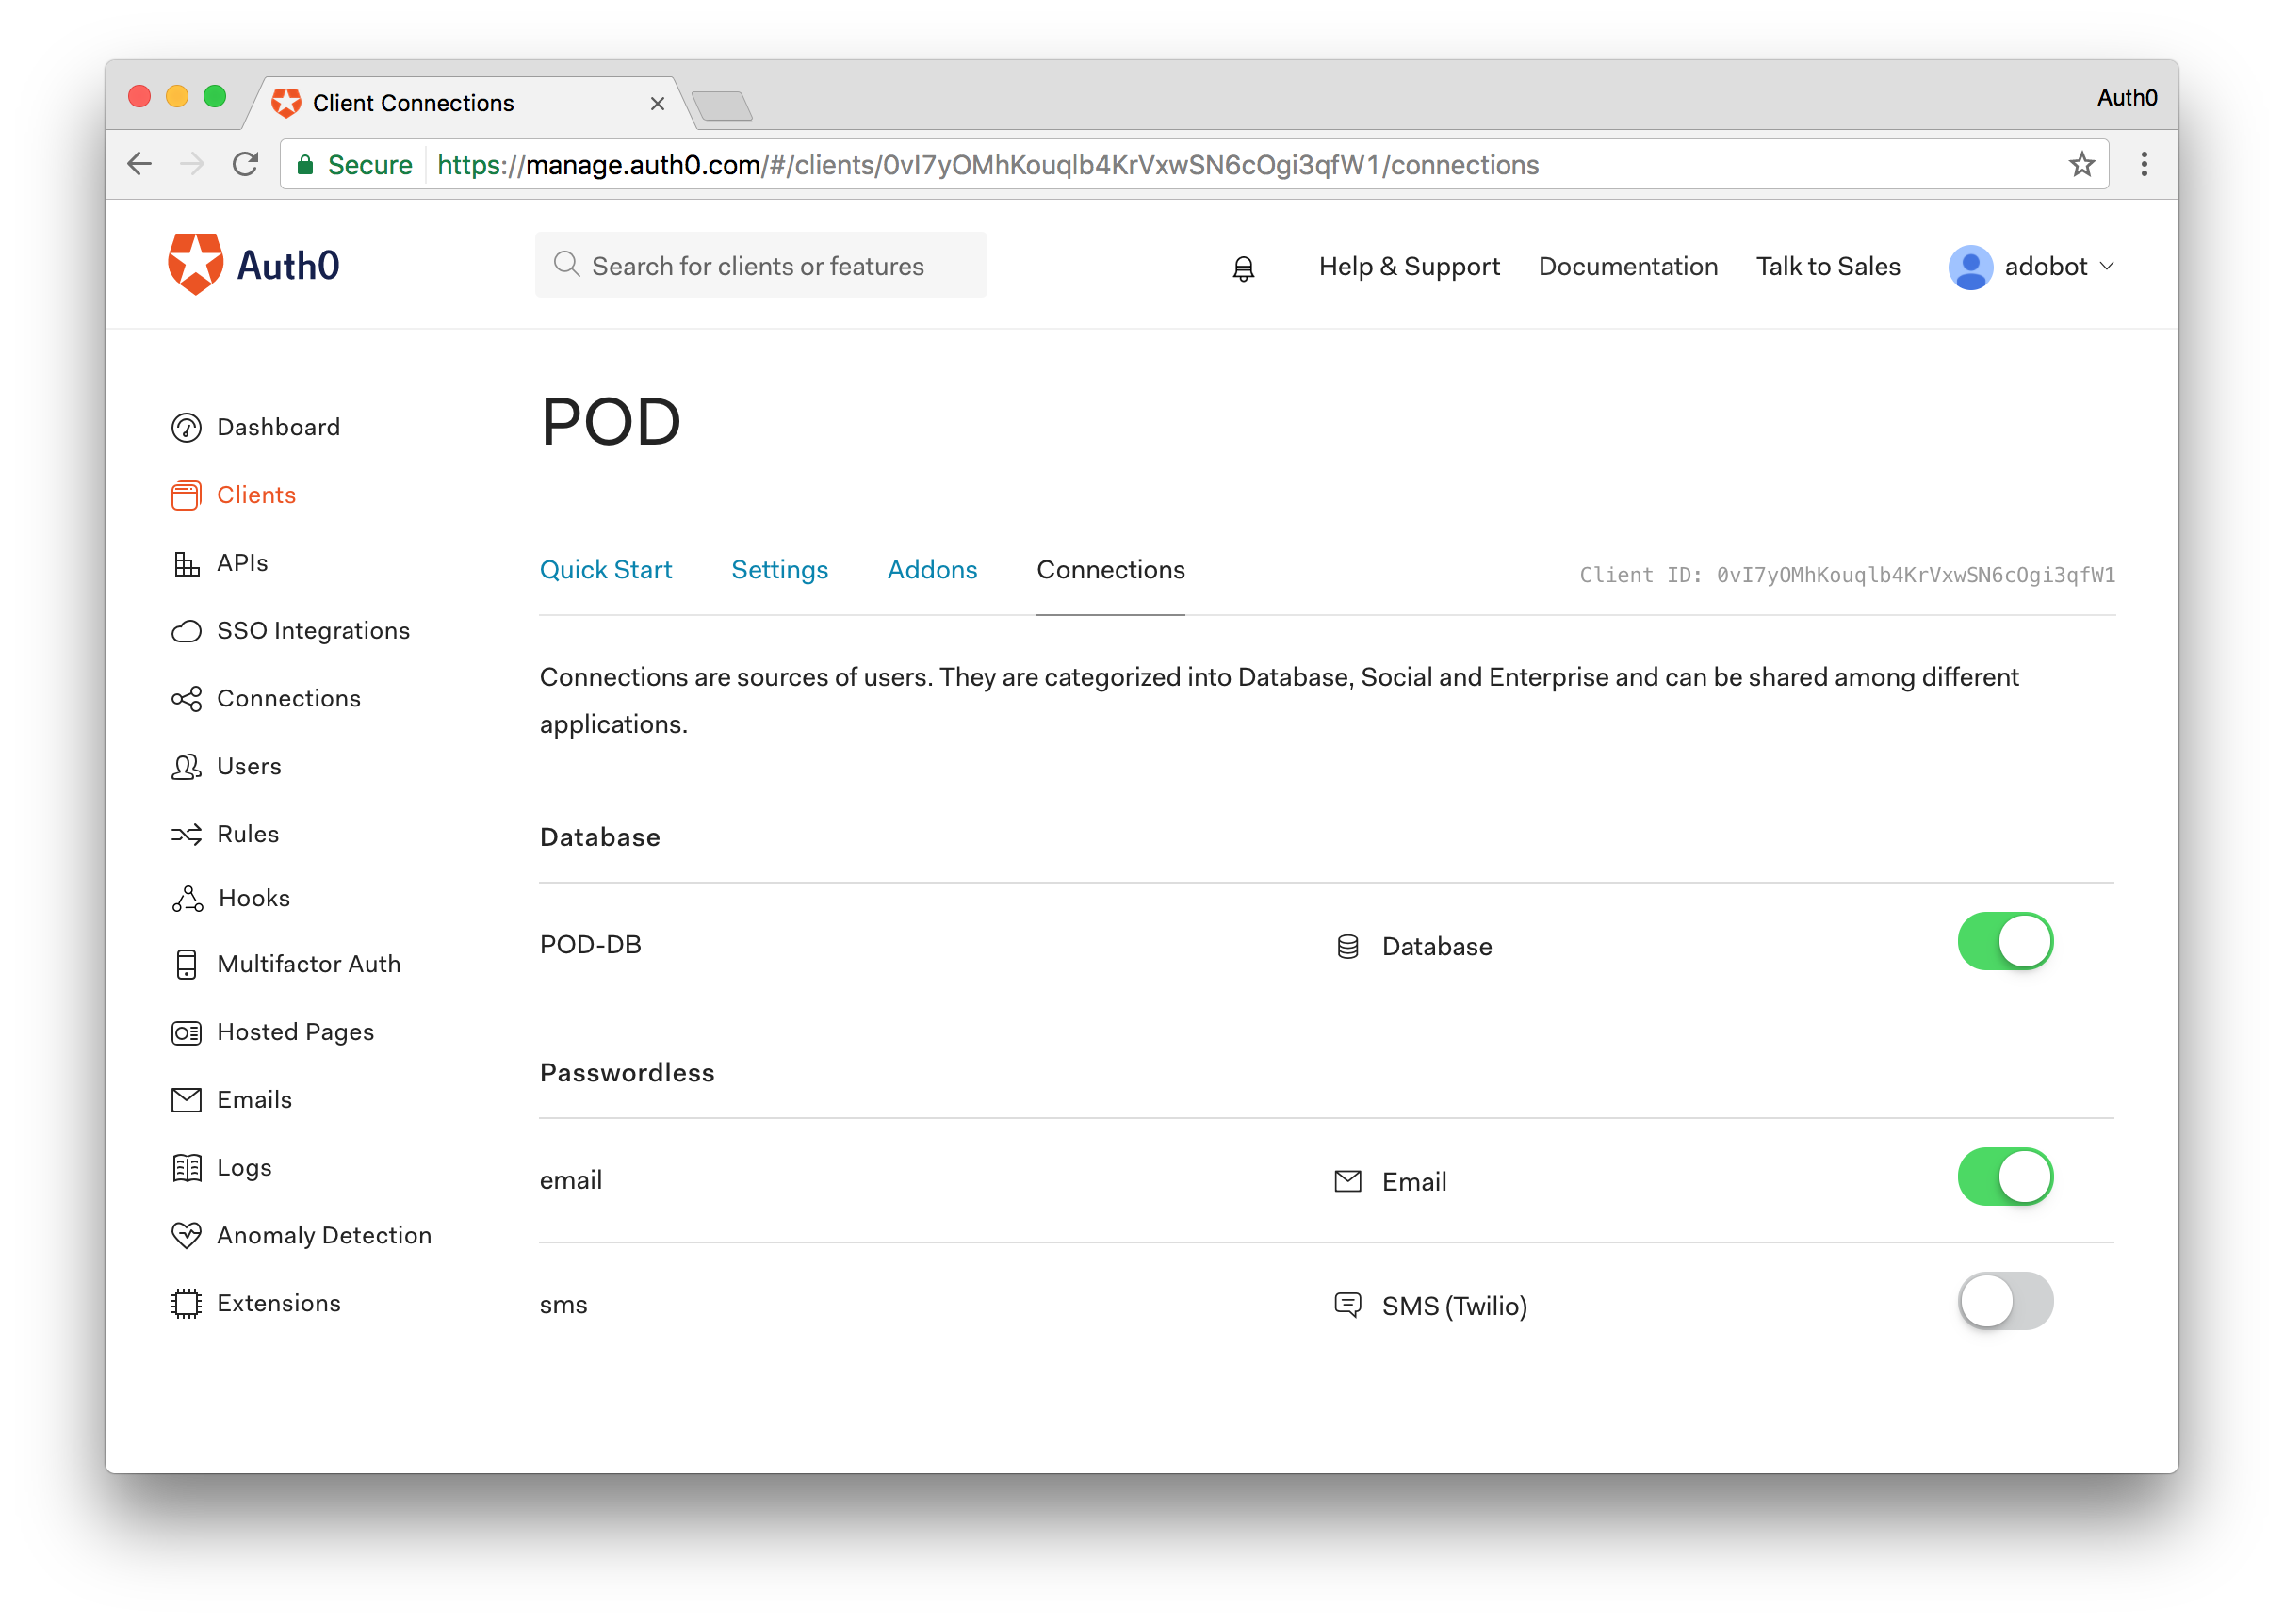
Ensure that the only enabled connections for the client are the database connection created in step step 3 and the type of Passwordless connection that you enabled in step step 5 of this guide.
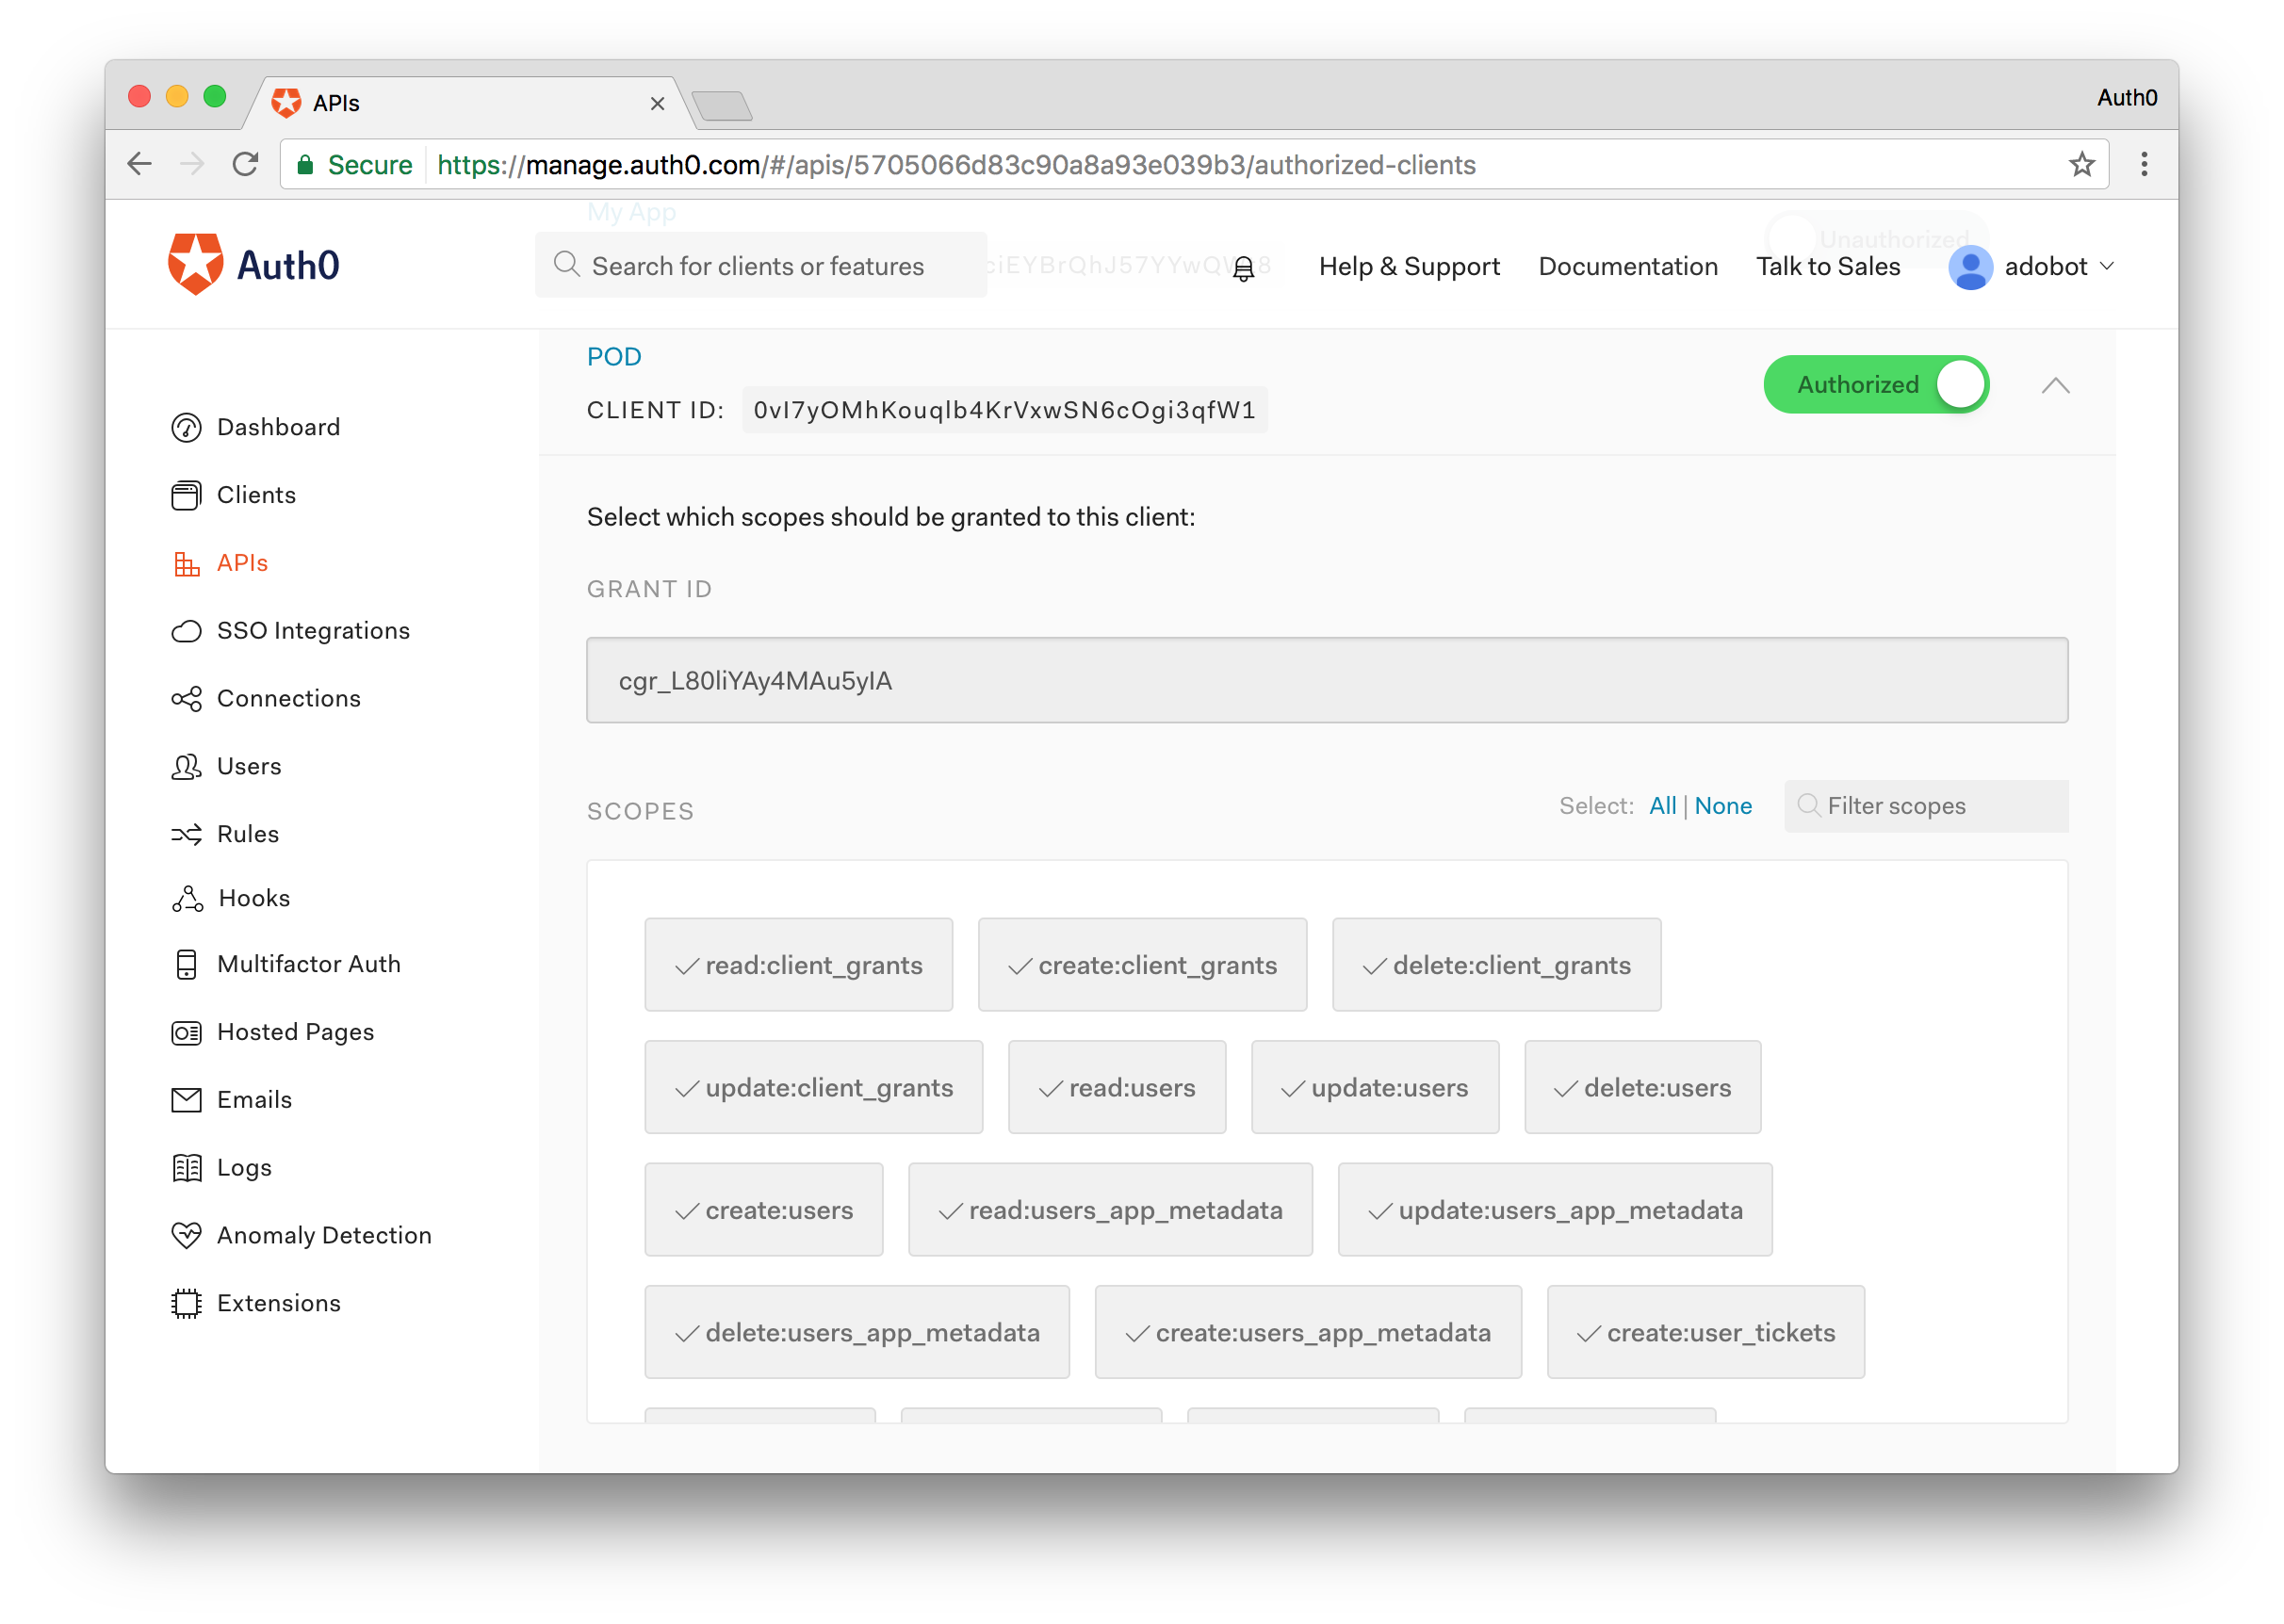
### Step 7 - Enable Management API Access for the POD Client Application
The last step we'll need to do is ensure that the POD Client application we created in step 2 can access the Auth0 Management API. Navigate to the **APIs** menu and find the **Management API**. Open it and from here click on the **Non-Interactive Clients** tab. Find the POD Client application and flip the switch to Authorize the application. For simplicity, we'll enable all of the scopes.
This should be all we need to do on the Auth0 side. Next, we'll take a look at setting up the Alexa skill.
## Amazon Developer Configuration
The following steps will all be performed through the Amazon Developer Console, in particular, within the Alexa skills list section [https://developer.amazon.com/edw/home.html#/skills/list](https://developer.amazon.com/edw/home.html#/skills/list).
Start the process by clicking on the **Add a New Skill** button.
### Step 1 - Skill Information
Provide the following information:
* Choose **Custom Interaction Model** for the skill type.
* Choose **English (U.S.)** for the language.
* Provide a name of your choice, for example, POD.
* Provide an invocation name of your choice, for example, pizza on demand.
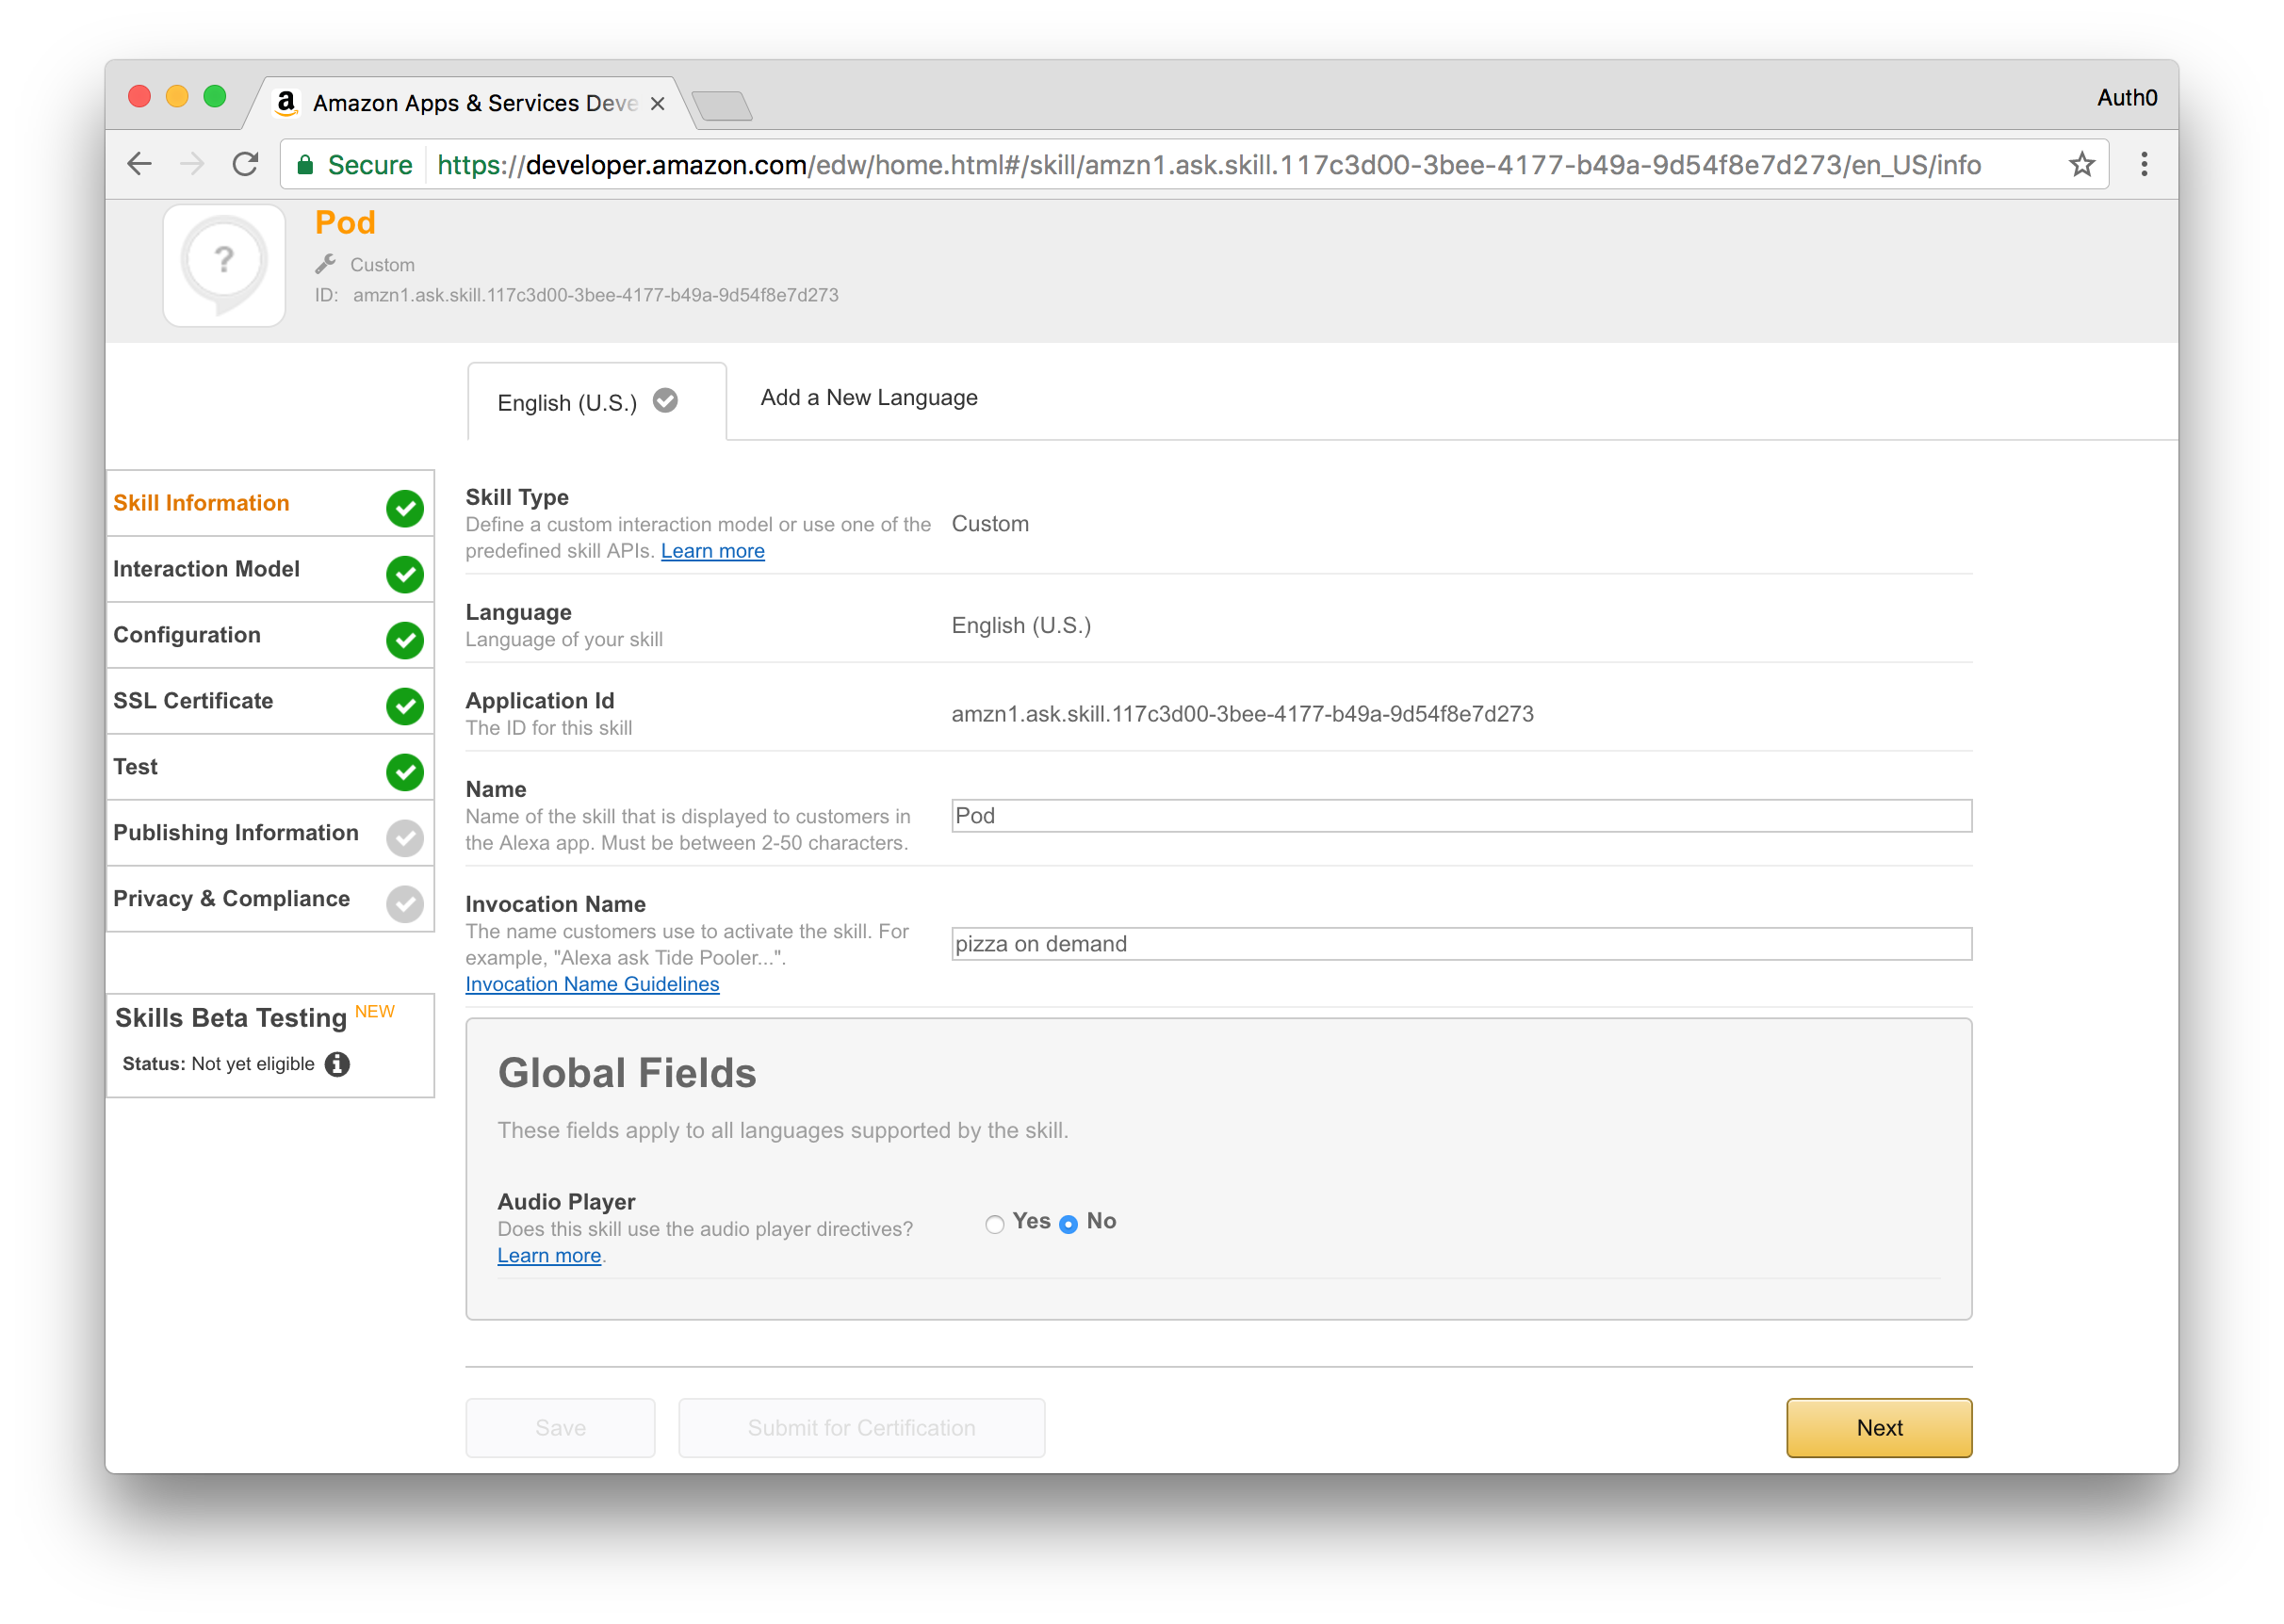
Click the **Next** button to move to the following step.
### Step 2 - Skill Interaction Model
Click the **Add a Slot Type** button and provide `PIZZA_SIZE` for the slot type name and some sample values, for example:
```
Small
Medium
Large
Jumbo
```
Click the **Save** button and wait for the slot type to be processed.
After processing of the previous slot type completes, click the **Add a Slot Type** button again and provide `PIZZA_TOPPINGS` for the slot type name and some sample values. For example:
```
Pepperoni
Mushrooms
Onions
Sausage
Bacon
Extra cheese
Black olives
Green peppers
Pineapple
Spinach
Chicken
```
Click the **Save** button and wait for the slot type to be processed.
After adding both slot types, you'll need to provide the intent schema and sample utterances. The information to add to these fields is available in following files contained within this [sample repository](https://github.com/auth0/auth0-alexa-authentication-sample):
* Intent Schema: [`src/alexa/IntentSchema.json`](https://github.com/auth0/auth0-alexa-authentication-sample/blob/master/src/alexa/IntentSchema.json)
* Sample Utterances: [`src/alexa/SampleUtterances.txt`](https://github.com/auth0/auth0-alexa-authentication-sample/blob/master/src/alexa/SampleUtterances.txt)
You can copy/paste the content of those files to the respective form fields or feel free to add your own utterances. After providing this information click the **Next** button to move to the next step.
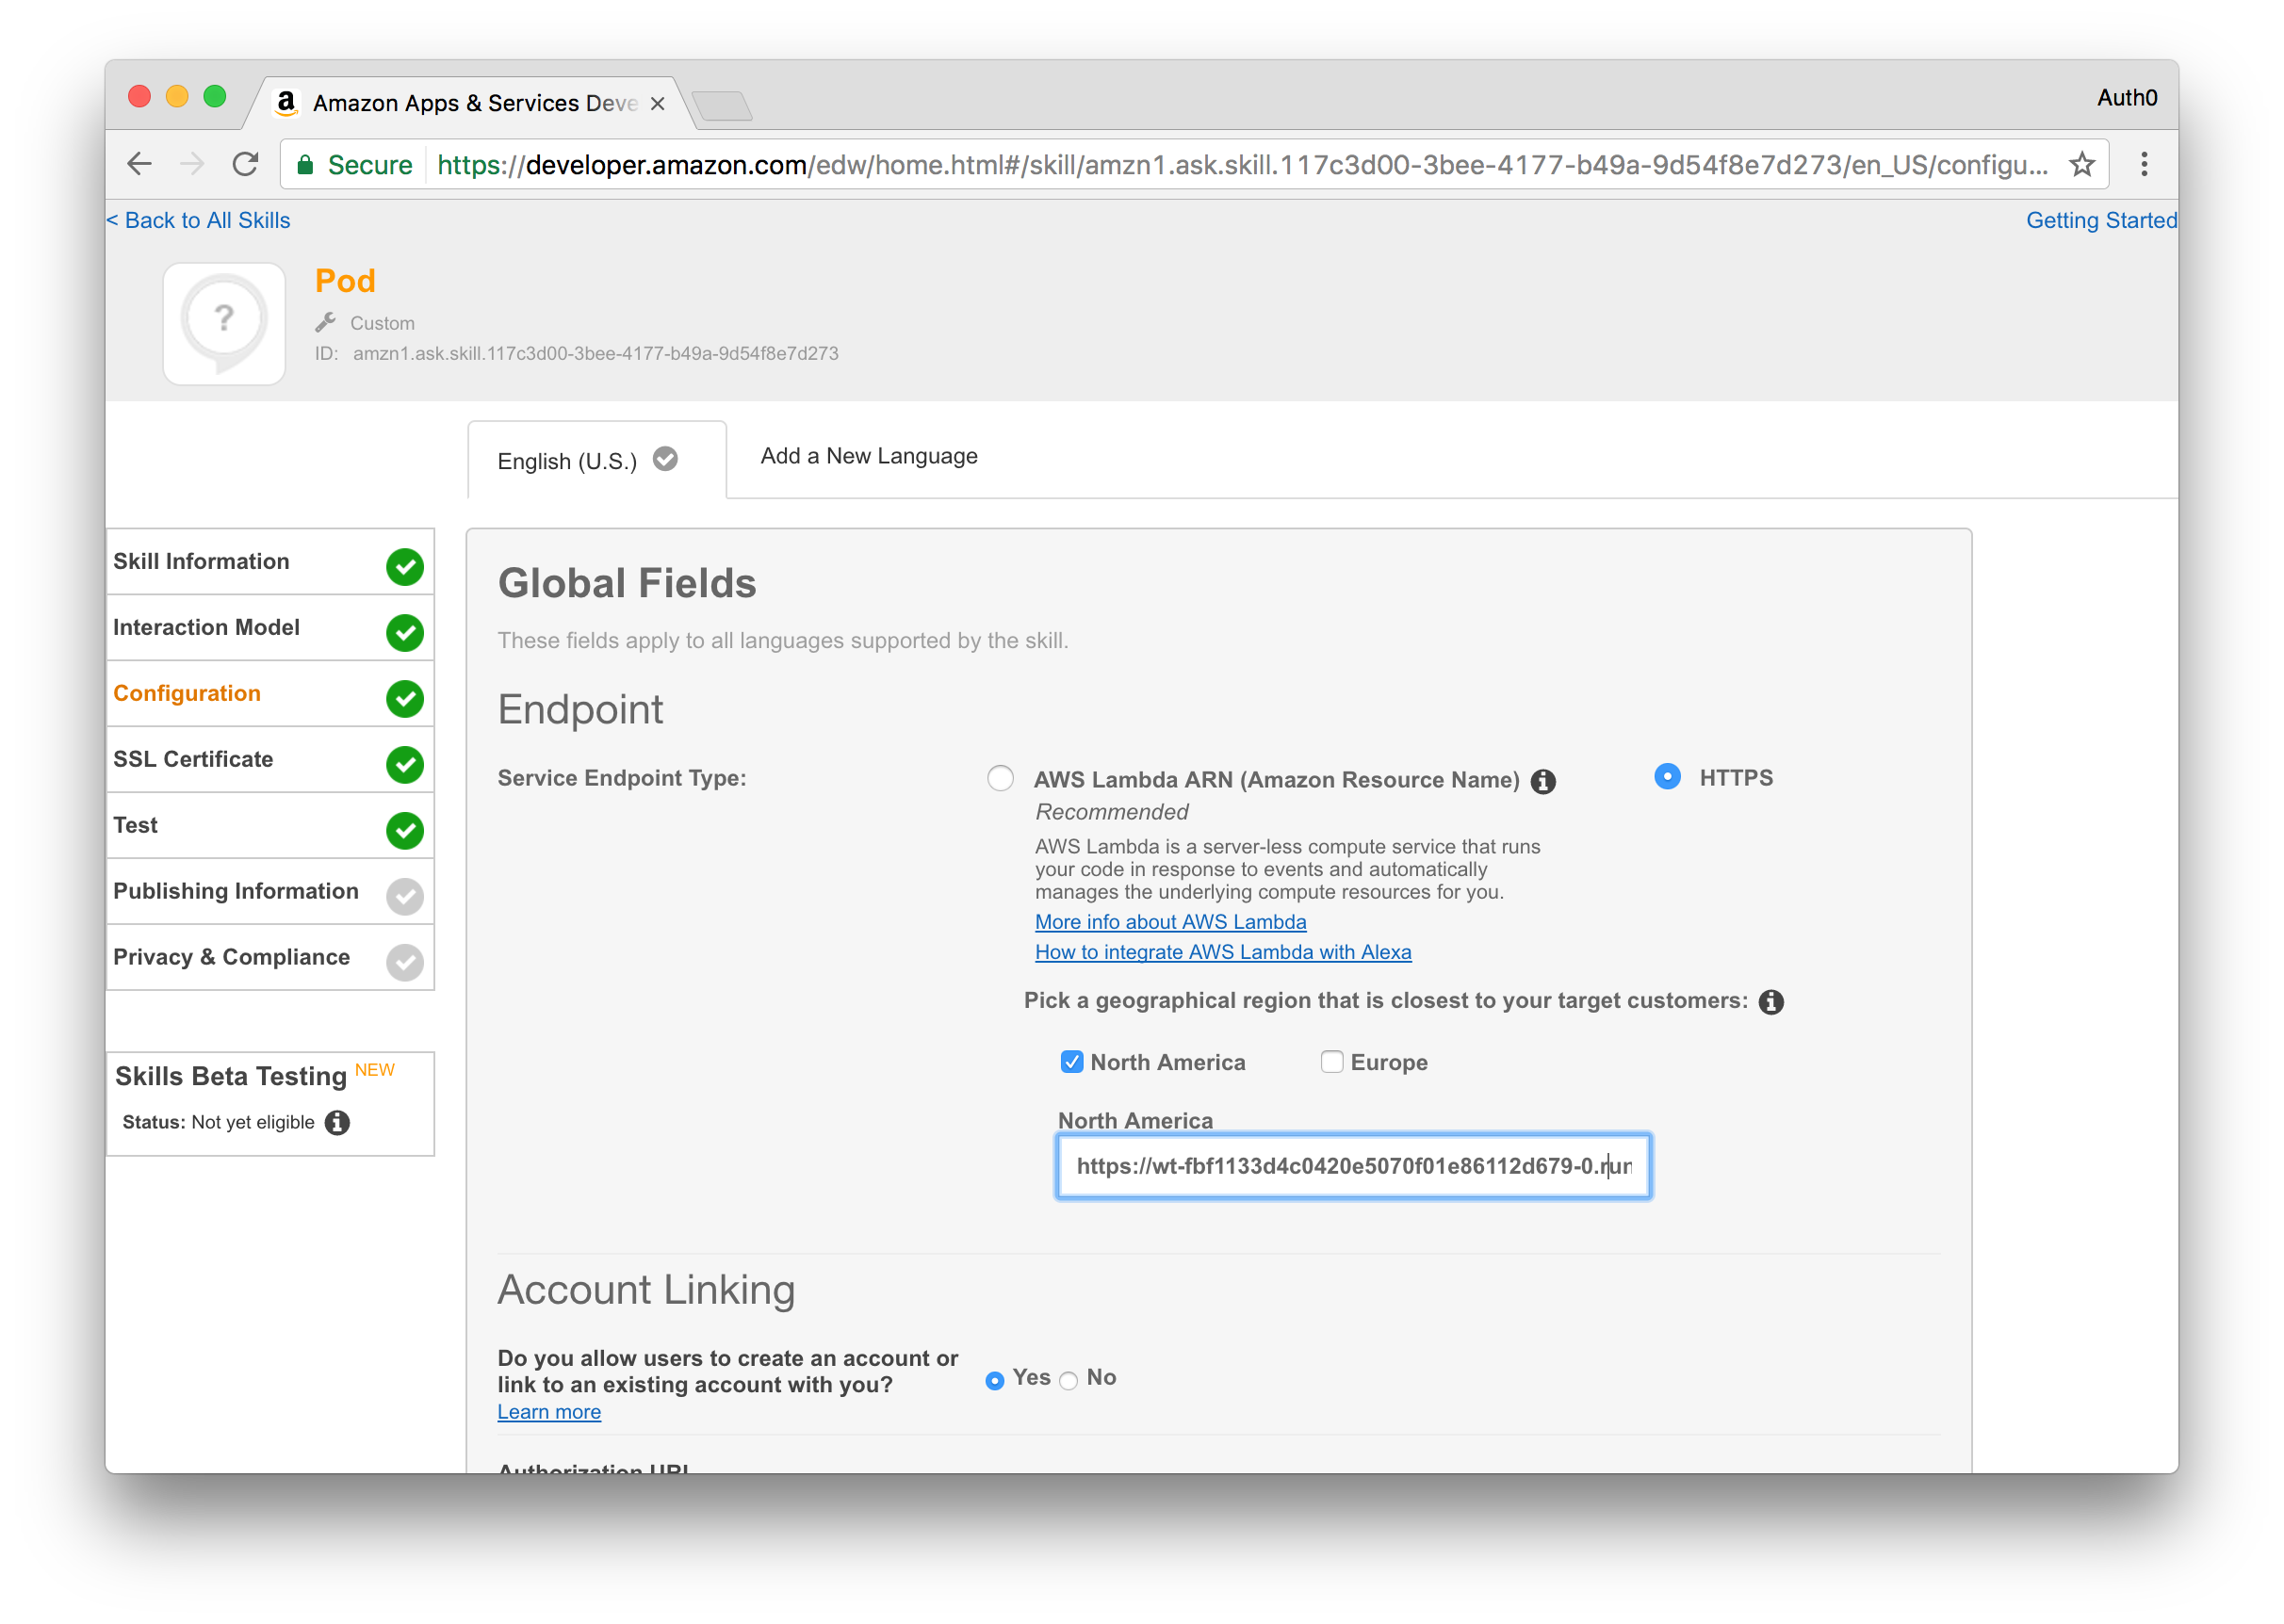
### Step 3 - Skill Configuration
Choose HTTPS for the service endpoint type and then pick the geographical region that is most applicable to you and provide the URL at which the POD Alexa Skill API will be available. If you plan to strictly follow this guide and deploy the sample as a Webtask associated with your Auth0 account, then you can use an URL similar to the following:
```
https://TEMP.run.webtask.io/pod/alexa
```
*Note: We will change this value once we've deployed our Webtask, so feel free to put whatever you want in here for now.*
After configuring the URL, enable the **Account Linking** process and provide the following information:
* For the Authorization URL, use an URL based on the following template `https://[your auth0 account].auth0.com/authorize?audience=[the identifier of the POD API]`. If you strictly followed this guide the identifier of the POD API will be https://pod.localtest.me, otherwise, use the identifier you chose.
* For the Client Id use the client identifier of the client application created in step 2 of the Auth0 section of this guide.
* For the Domain List, add the domain **cdn.auth0.com** to the list.
* For the Scope field, add the scopes **openid** and **offline_access** to the list.
* For the Authorization Grant Type, choose **Auth Code Grant**.
* For the Access Token URI, use an URL based on the following template **https://[your auth0 account].auth0.com/oauth/token**.
* For the Client Secret, use the client secret of the client application created in step 2 of the Auth0 section of this guide.
* For the Client Authentication Scheme, choose **HTTP Basic**.
* For the Privacy Policy URL, if the skill will be deployed to Webtask, use an URL based on the following template **`https://TEMP.run.webtask.io/pod/app#/policy`**, otherwise, use a suitable URL.
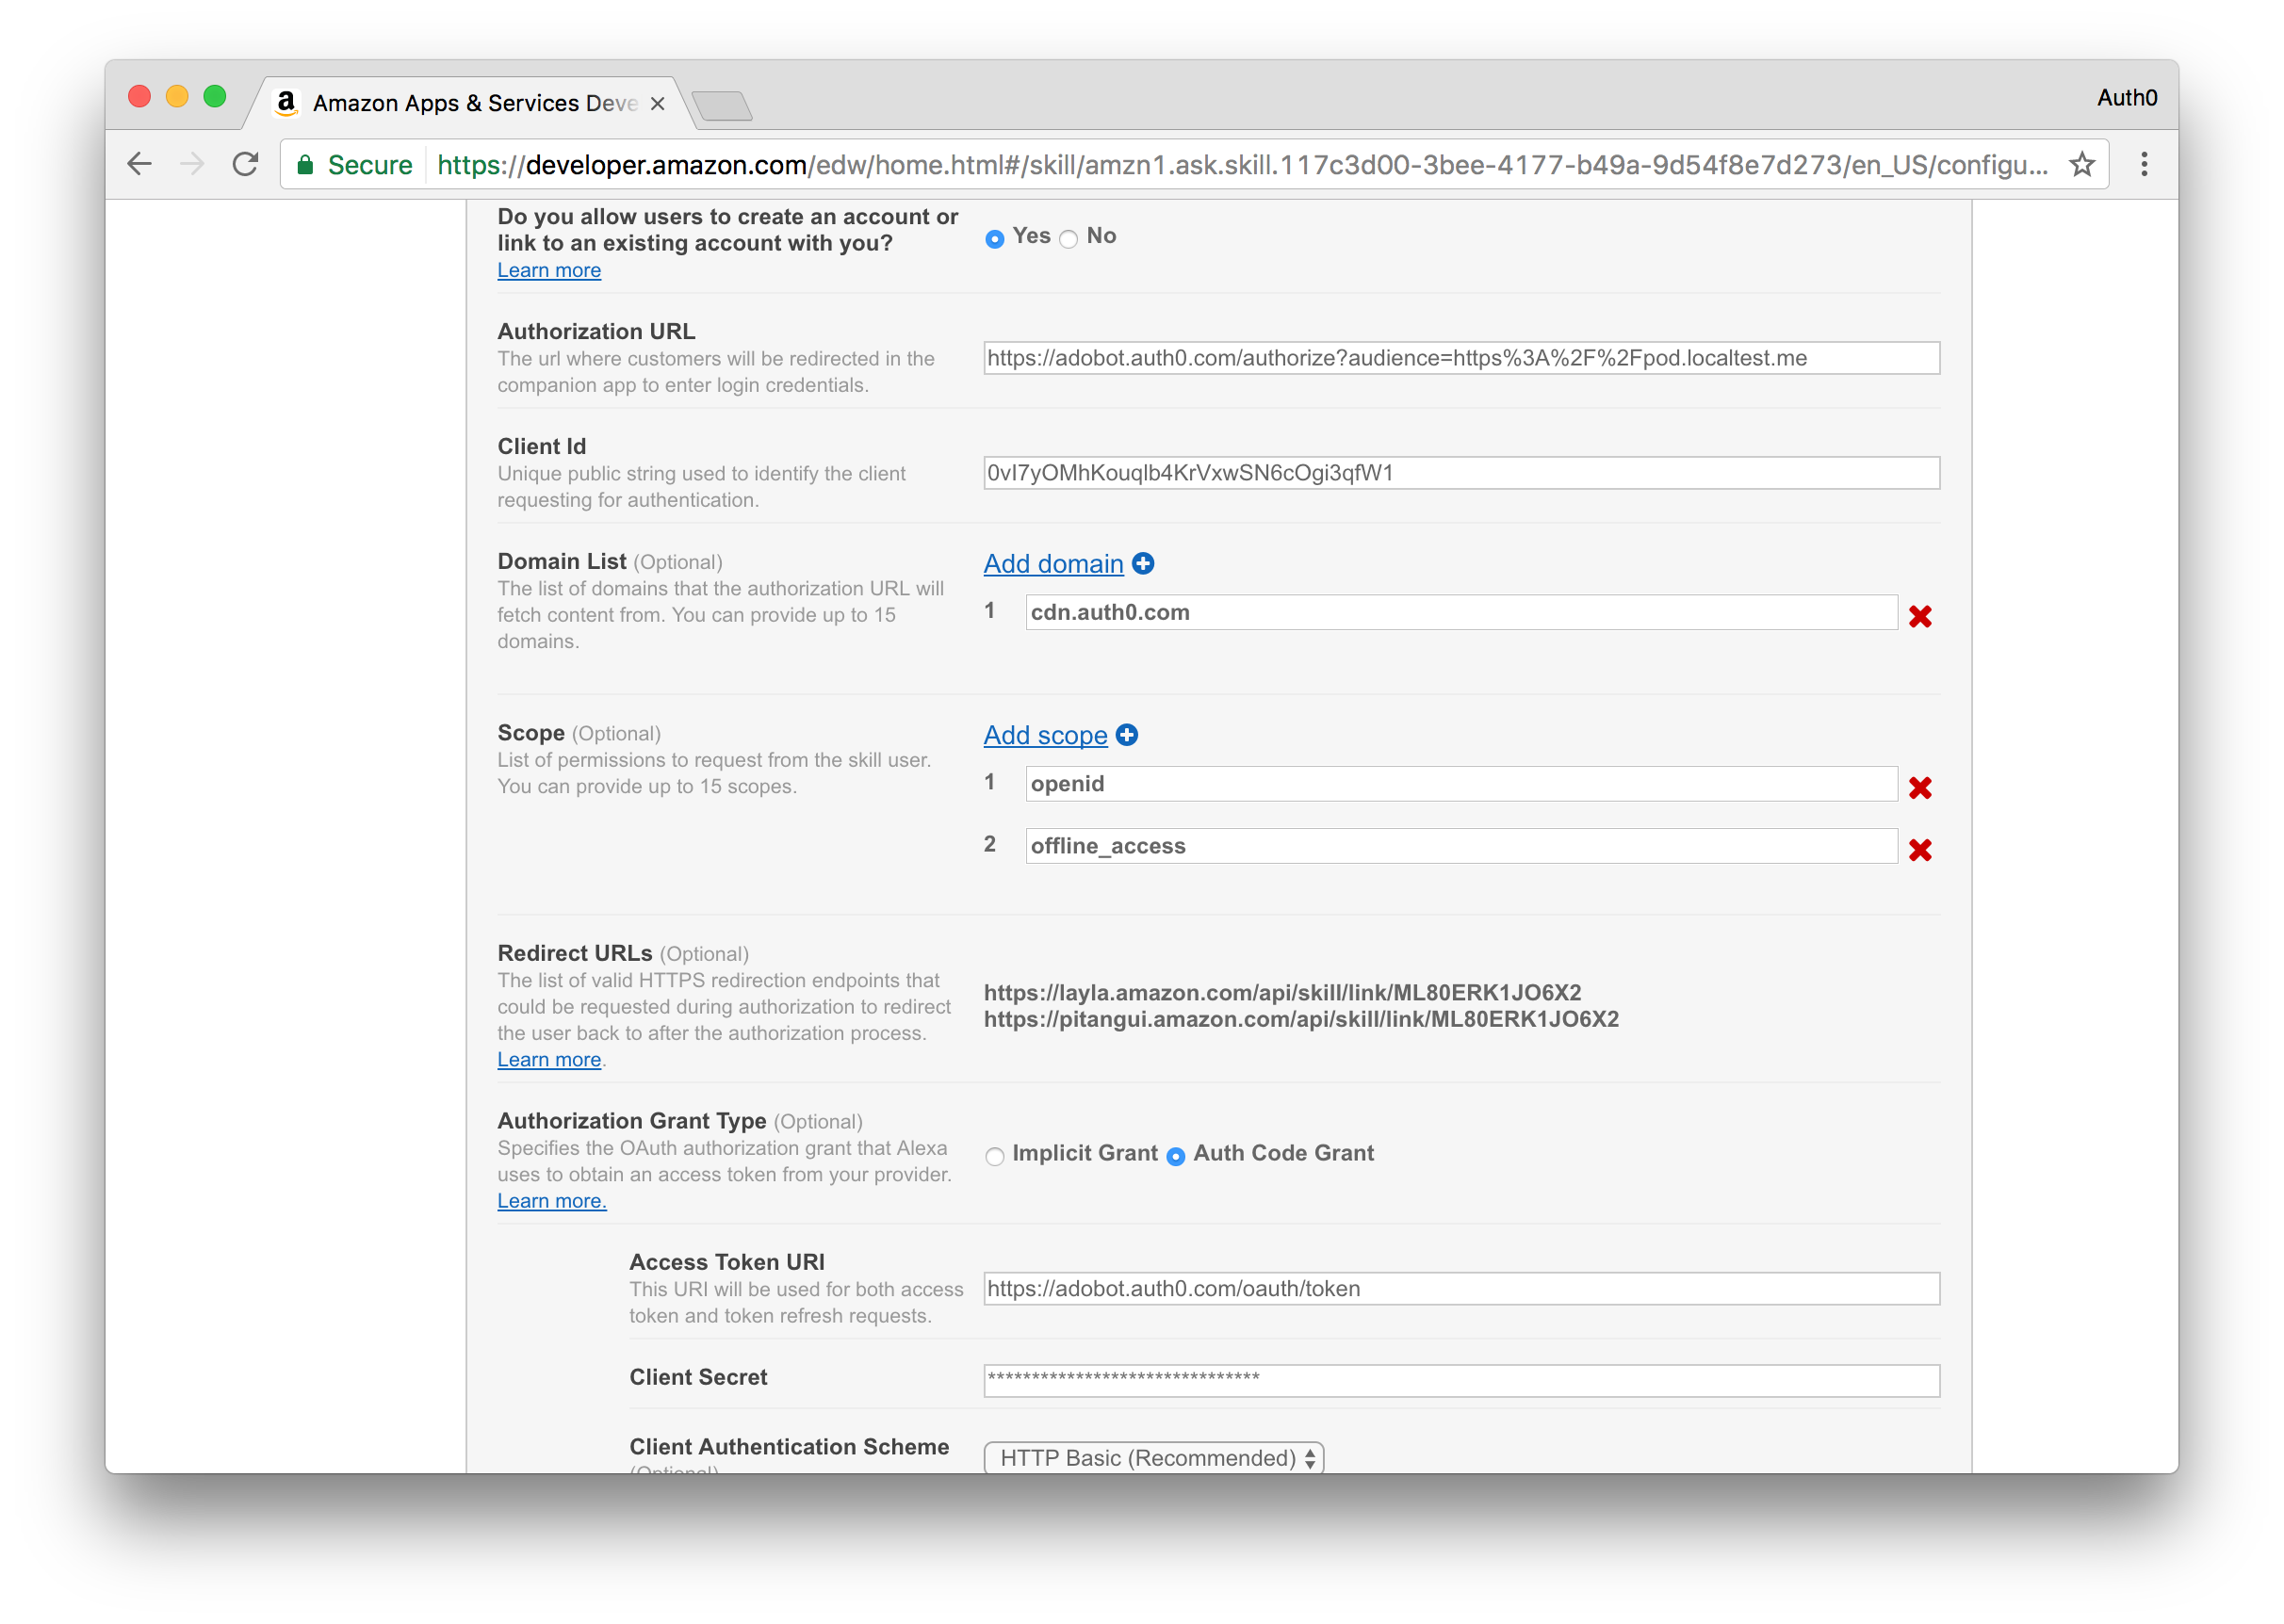
Before moving to the next step, take note of all the URLs listed in the Redirect URLs section because you'll later add those to the client application configuration in Auth0.
Click the **Next** button to move to the next step.
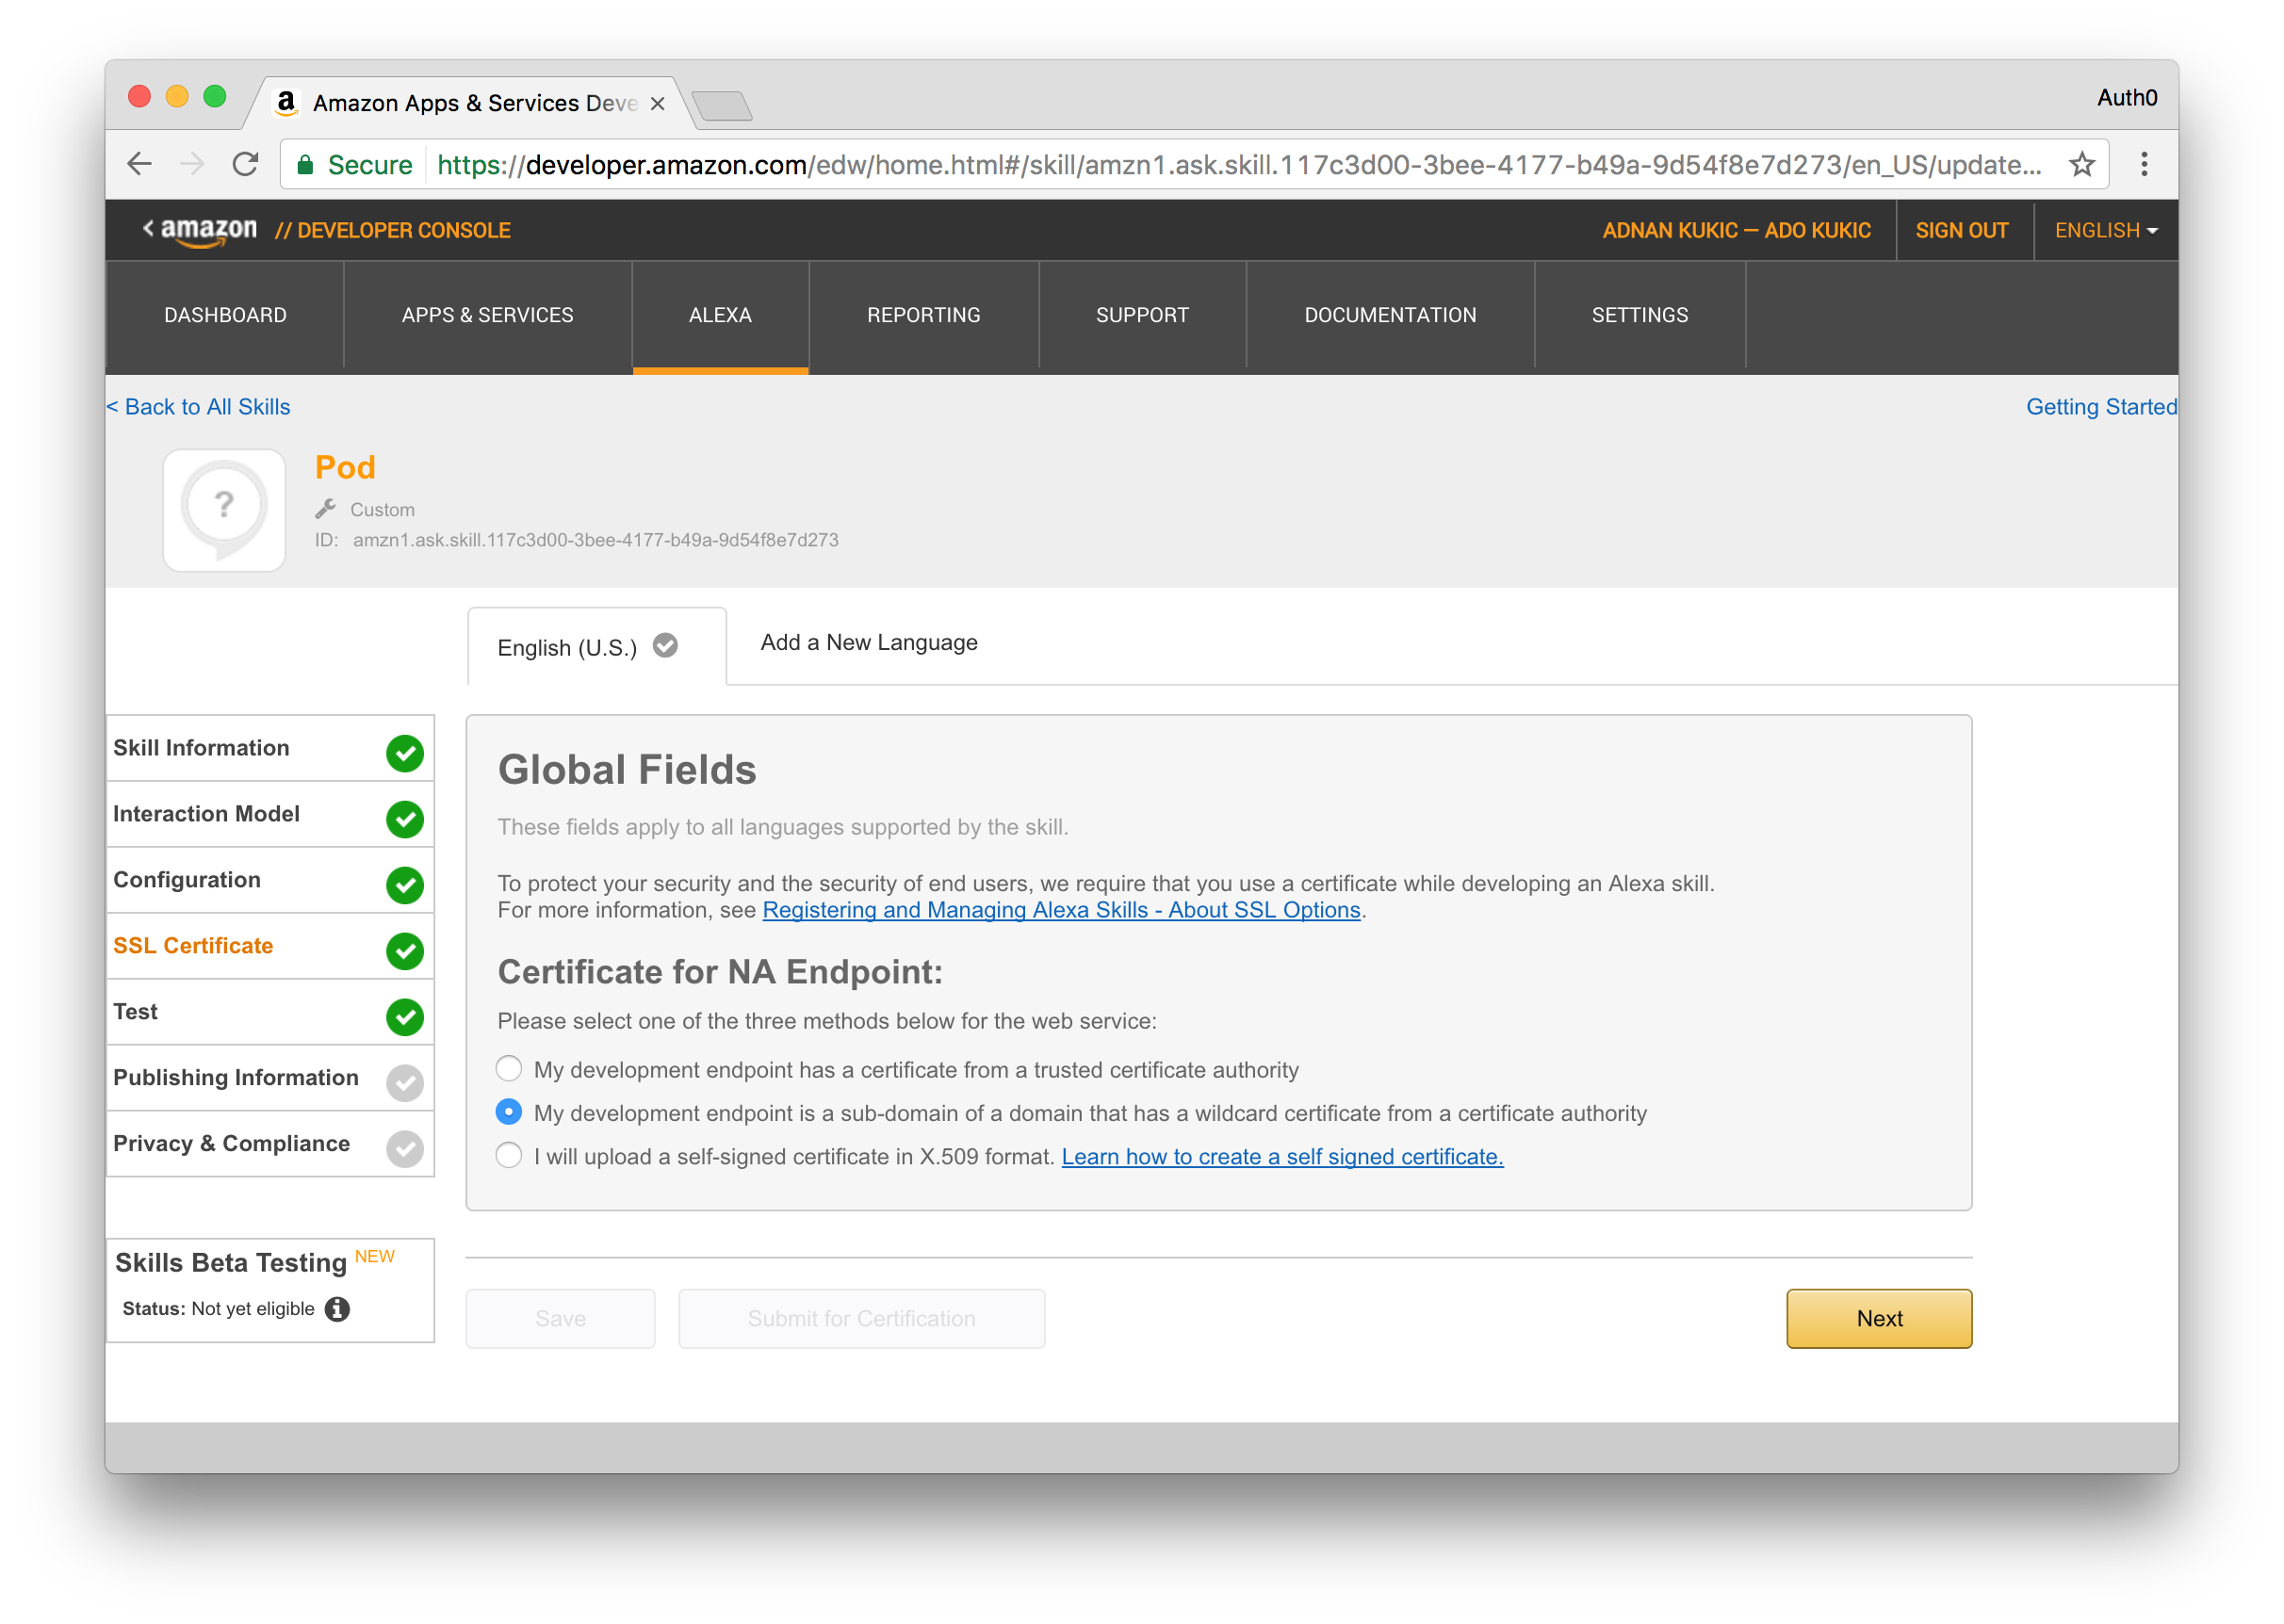
### Step 4 - Skill SSL Certificate
If you plan on strictly following this guide the skill will be deployed to [Webtask](https://webtask.io) and as such you can choose the option **My development endpoint is a sub-domain of a domain that has a wildcard certificate from a certificate authority**, otherwise, you'll need to select the suitable option and proceed accordingly.
At this stage, you've already provided Amazon all the necessary information to enable the test step. However, you'll first need to perform a few additional steps outside the Amazon Developer Console before being able to successfully test it, namely deploying the code that will interact with the Alexa skill. I have [already built](https://github.com/auth0/auth0-alexa-authentication-sample) this functionality with NodeJS, but we'll need to deploy the application somewhere, and for that we'll use [Webtask](https://webtask.io).
## Deploying an Auth0 Webtask
For a simplified deployment experience and given that it's for demonstration purposes only, this guide will take you through the steps required to deploy the sample skill to a Webtask associated with your Auth0 account. If you haven't already gotten the code, clone it from [Github](https://github.com/auth0/auth0-alexa-authentication-sample) now.
Before continuing, ensure that you have the Webtask CLI installed [https://webtask.io/docs/wt-cli](https://webtask.io/docs/wt-cli). Be sure to also install the Webtask Bundle module by running:
```
npm install -g webtask-bundle
```
Given the deploy will use the Webtask associated to your Auth0 account, you'll need to access the account settings in the Auth0 Dashboard and then select the Webtask section.
Go through and execute the setup instructions available at that location.
The following steps assume that you already cloned the sample repository locally and that you have an `npm` and `wt-cli` enabled command line open at your local sample working directory.
### Install Node Modules
```
npm install
```
### Configure Secrets
Start by creating a `secrets.example.ini` file (you can use [secrets.example.ini](https://github.com/auth0/auth0-alexa-authentication-sample/blob/master/src/runtimes/secrets.example.ini) as template) under `/src/runtimes/` containing the settings mentioned in the next sections from the [GitHub repo](https://github.com/auth0/auth0-alexa-authentication-sample).
#### Mandatory Settings
```
AUTH0_DOMAIN=[your auth0 account domain]
API_ID=[identifier for the API created in step 1]
API_SIGNING_KEY=[signing key for the API created in step 1]
APP_CLIENT_ID=[client identifier for the application created in step 2]
APP_CLIENT_SECRET=[client secret for the application created in step 2]
```
#### Optional Settings
The Pusher related settings are optional because the web application can function without them; it just won't provide real-time updates. If you have a Pusher account, you can create an application to represent this sample and then include the following settings.
```
PUSHER_APPID=[Pusher application identifier]
PUSHER_CLUSTER=[Pusher cluster]
PUSHER_KEY=[Pusher key]
PUSHER_SECRET=[Pusher secret]
```
### Create Deployment Bundle
```
npm run build
```
### Create Webtask
In the following command, you'll need to add the appropriate Webtask CLI profile using the `-p` option if the default one is not the one associated with the Auth0 account you used to configure the skill.
```
wt create -n pod --secrets-file src\runtimes\secrets.ini build\bundle.js
```
*Note: Be sure to match the secrets file and bundle.js to wherever they are located in your directory.*
After the previous command executes successfully, you will be given the Webtask URL to your application in the form of `https://wt-00000.run.webtask.io`. This application includes the API called by Alexa located at `/pod/alexa/`, a mostly internal API located at `/pod/api/`, and a back-end web application available at `/pod/app/`. You can use the last one to quickly check if the deploy went smoothly.
Make note of the Webtask URL that you were given. We will now go back and update the URL in our Amazon Developer console and change the placeholder URL we placed for step 3 of the Amazon based configuration. Be sure to append the correct `/pod/alexa` endpoint so that the full URL reads:
```
https://wt-00000.run.webtask.io/pod/alexa
```
We are almost there. Now that we have our Webtask deployed, we just need to make a few more configuration changes in our [Auth0 Dashboard](https://manage.auth0.com).
## Auth0 Additional Configuration Steps
On the sidebar at the left, select the **Clients** menu, locate the entry for the client application create in step 2 and click the Settings button available in that client entry row.
Go the **Allowed Callback URLs** field and add all the redirect URLs you saved from step 3 in Amazon's configuration. These URLs will allow the Amazon backend to request and received tokens meant to be used against the POD API.
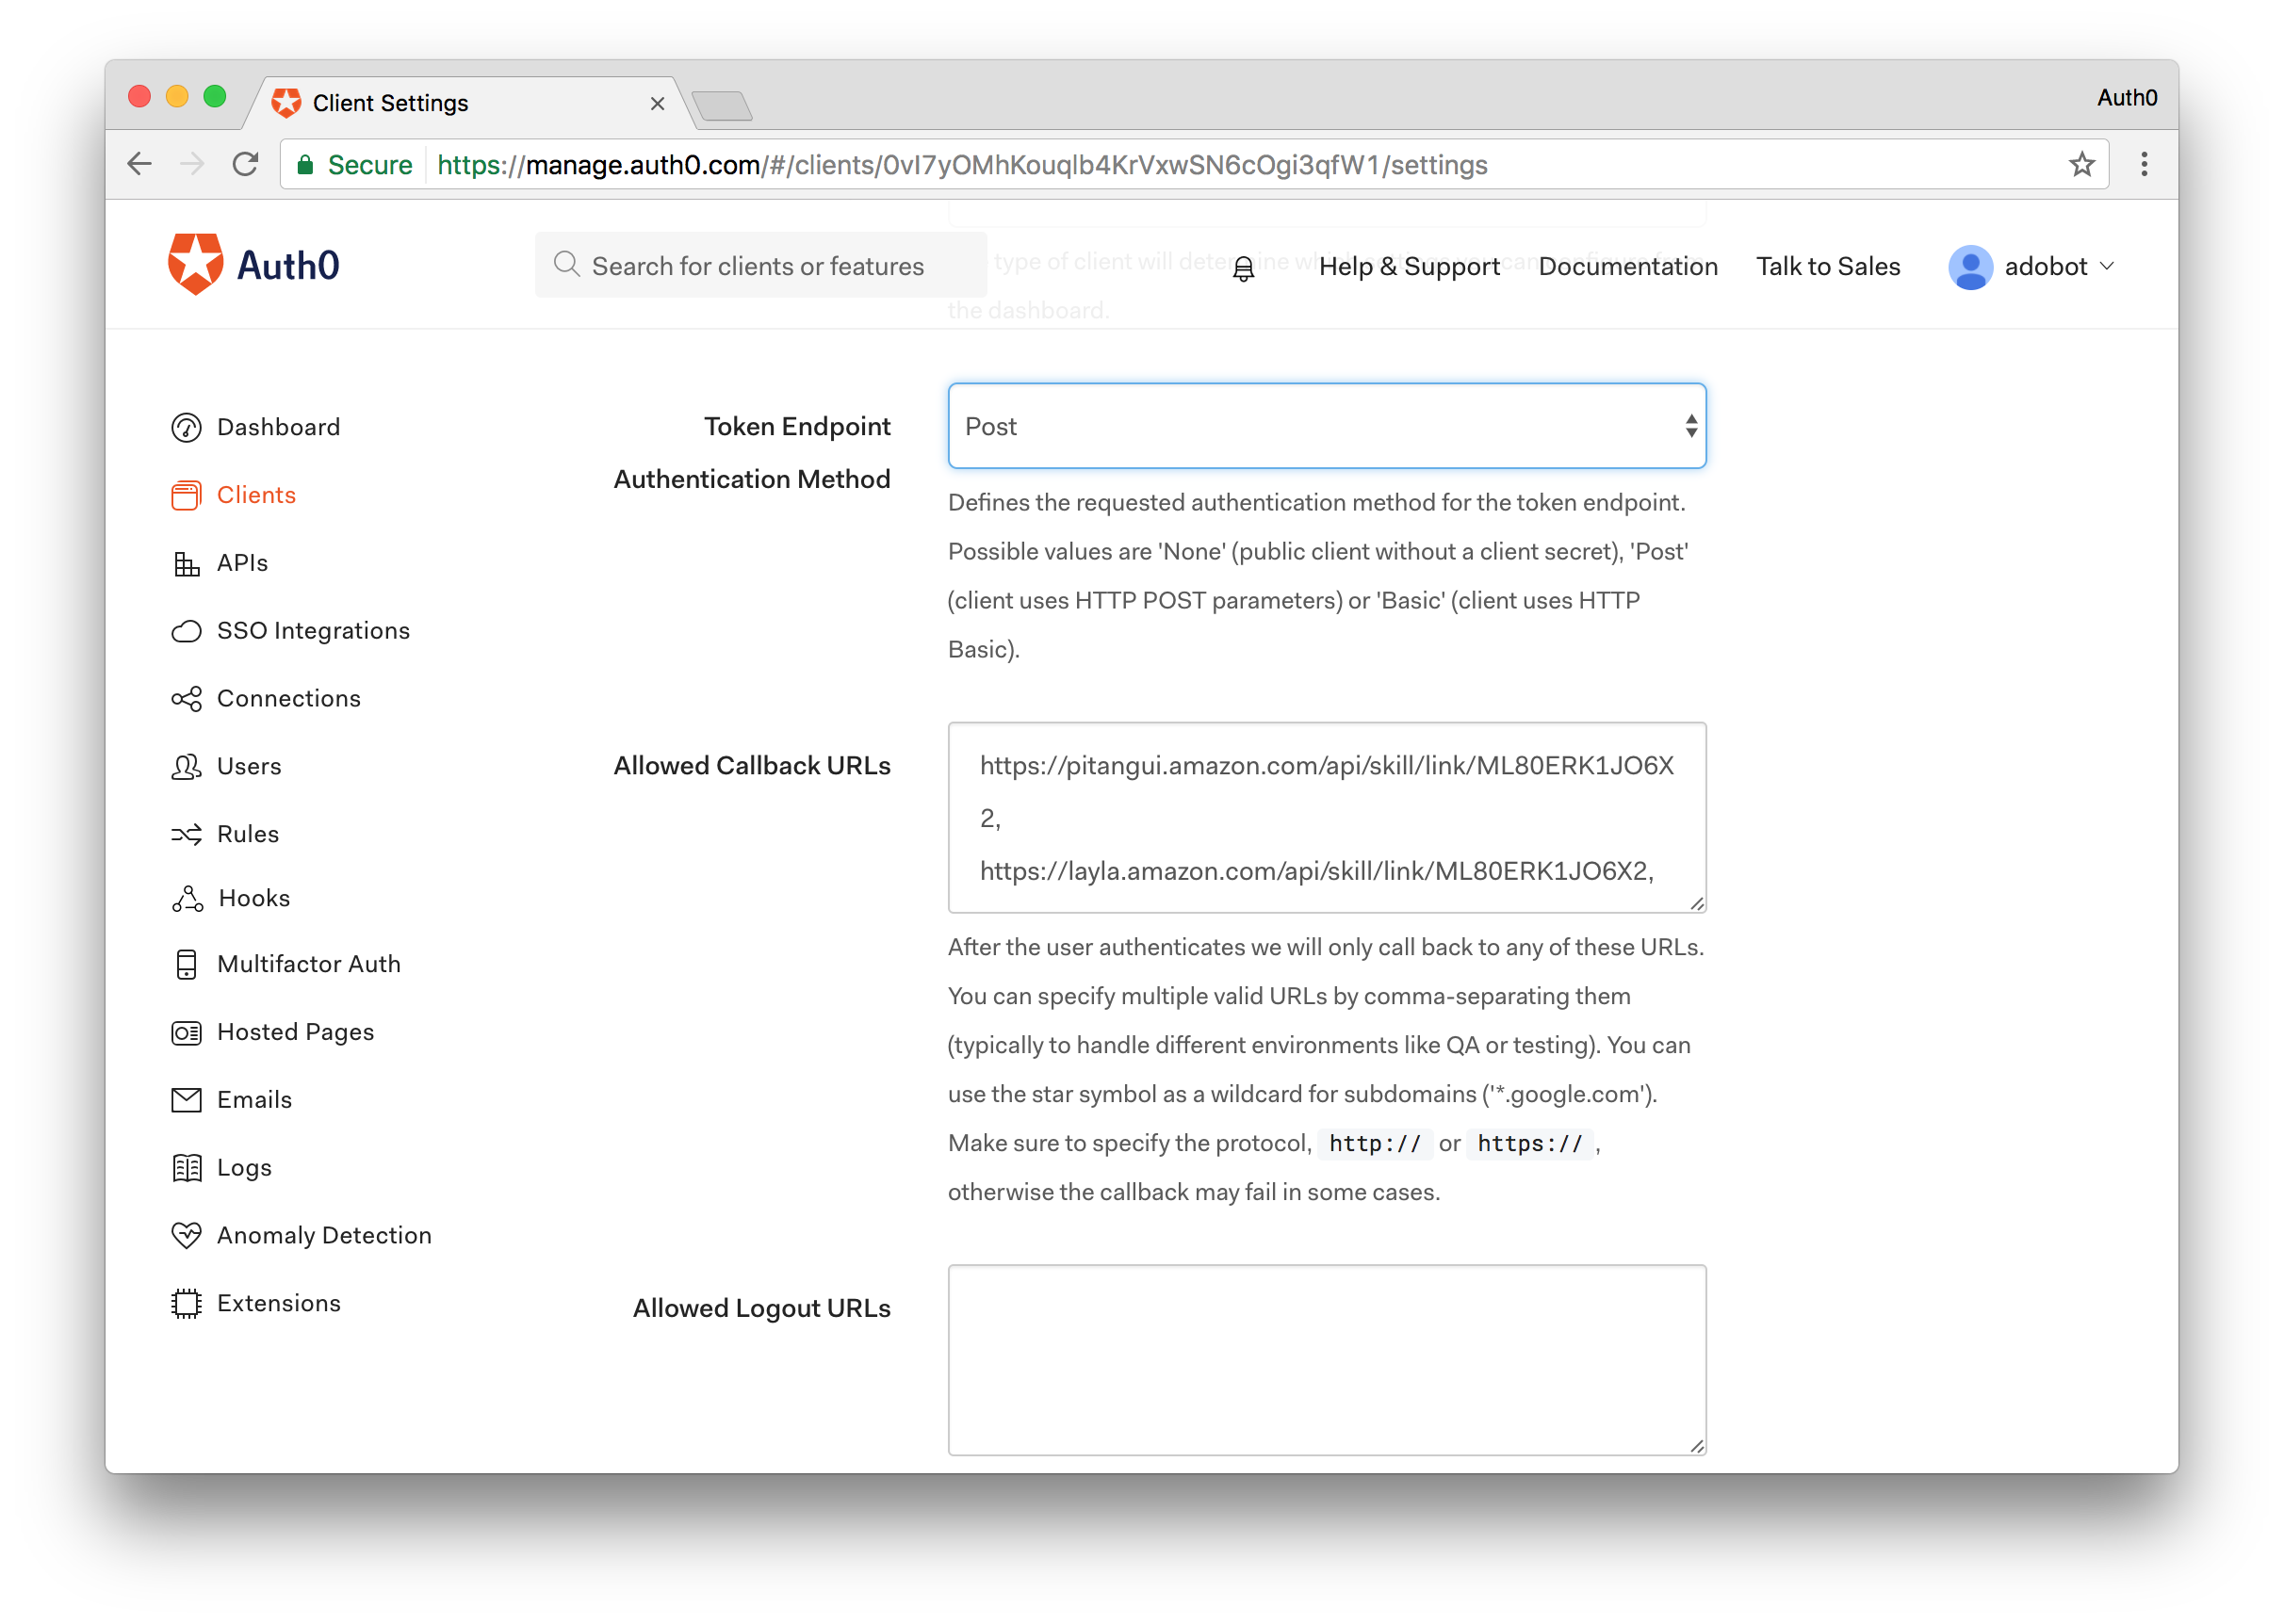
Since we are deploying this sample application to Webtask, we'll also add an additional redirect URL that will allow the POD website to authenticate users against Auth0. The URL to be added will be your Webtask URL from above with `/pod/app/oidc/callback` appended to it like so:
```
https://wt-0000.run.webtask.io/pod/app/oidc/callback
```
*Note: For simplicity purposes, both the Amazon back-end and the POD website reuse the same client application configured in Auth0.*
## Installing the Alexa Application
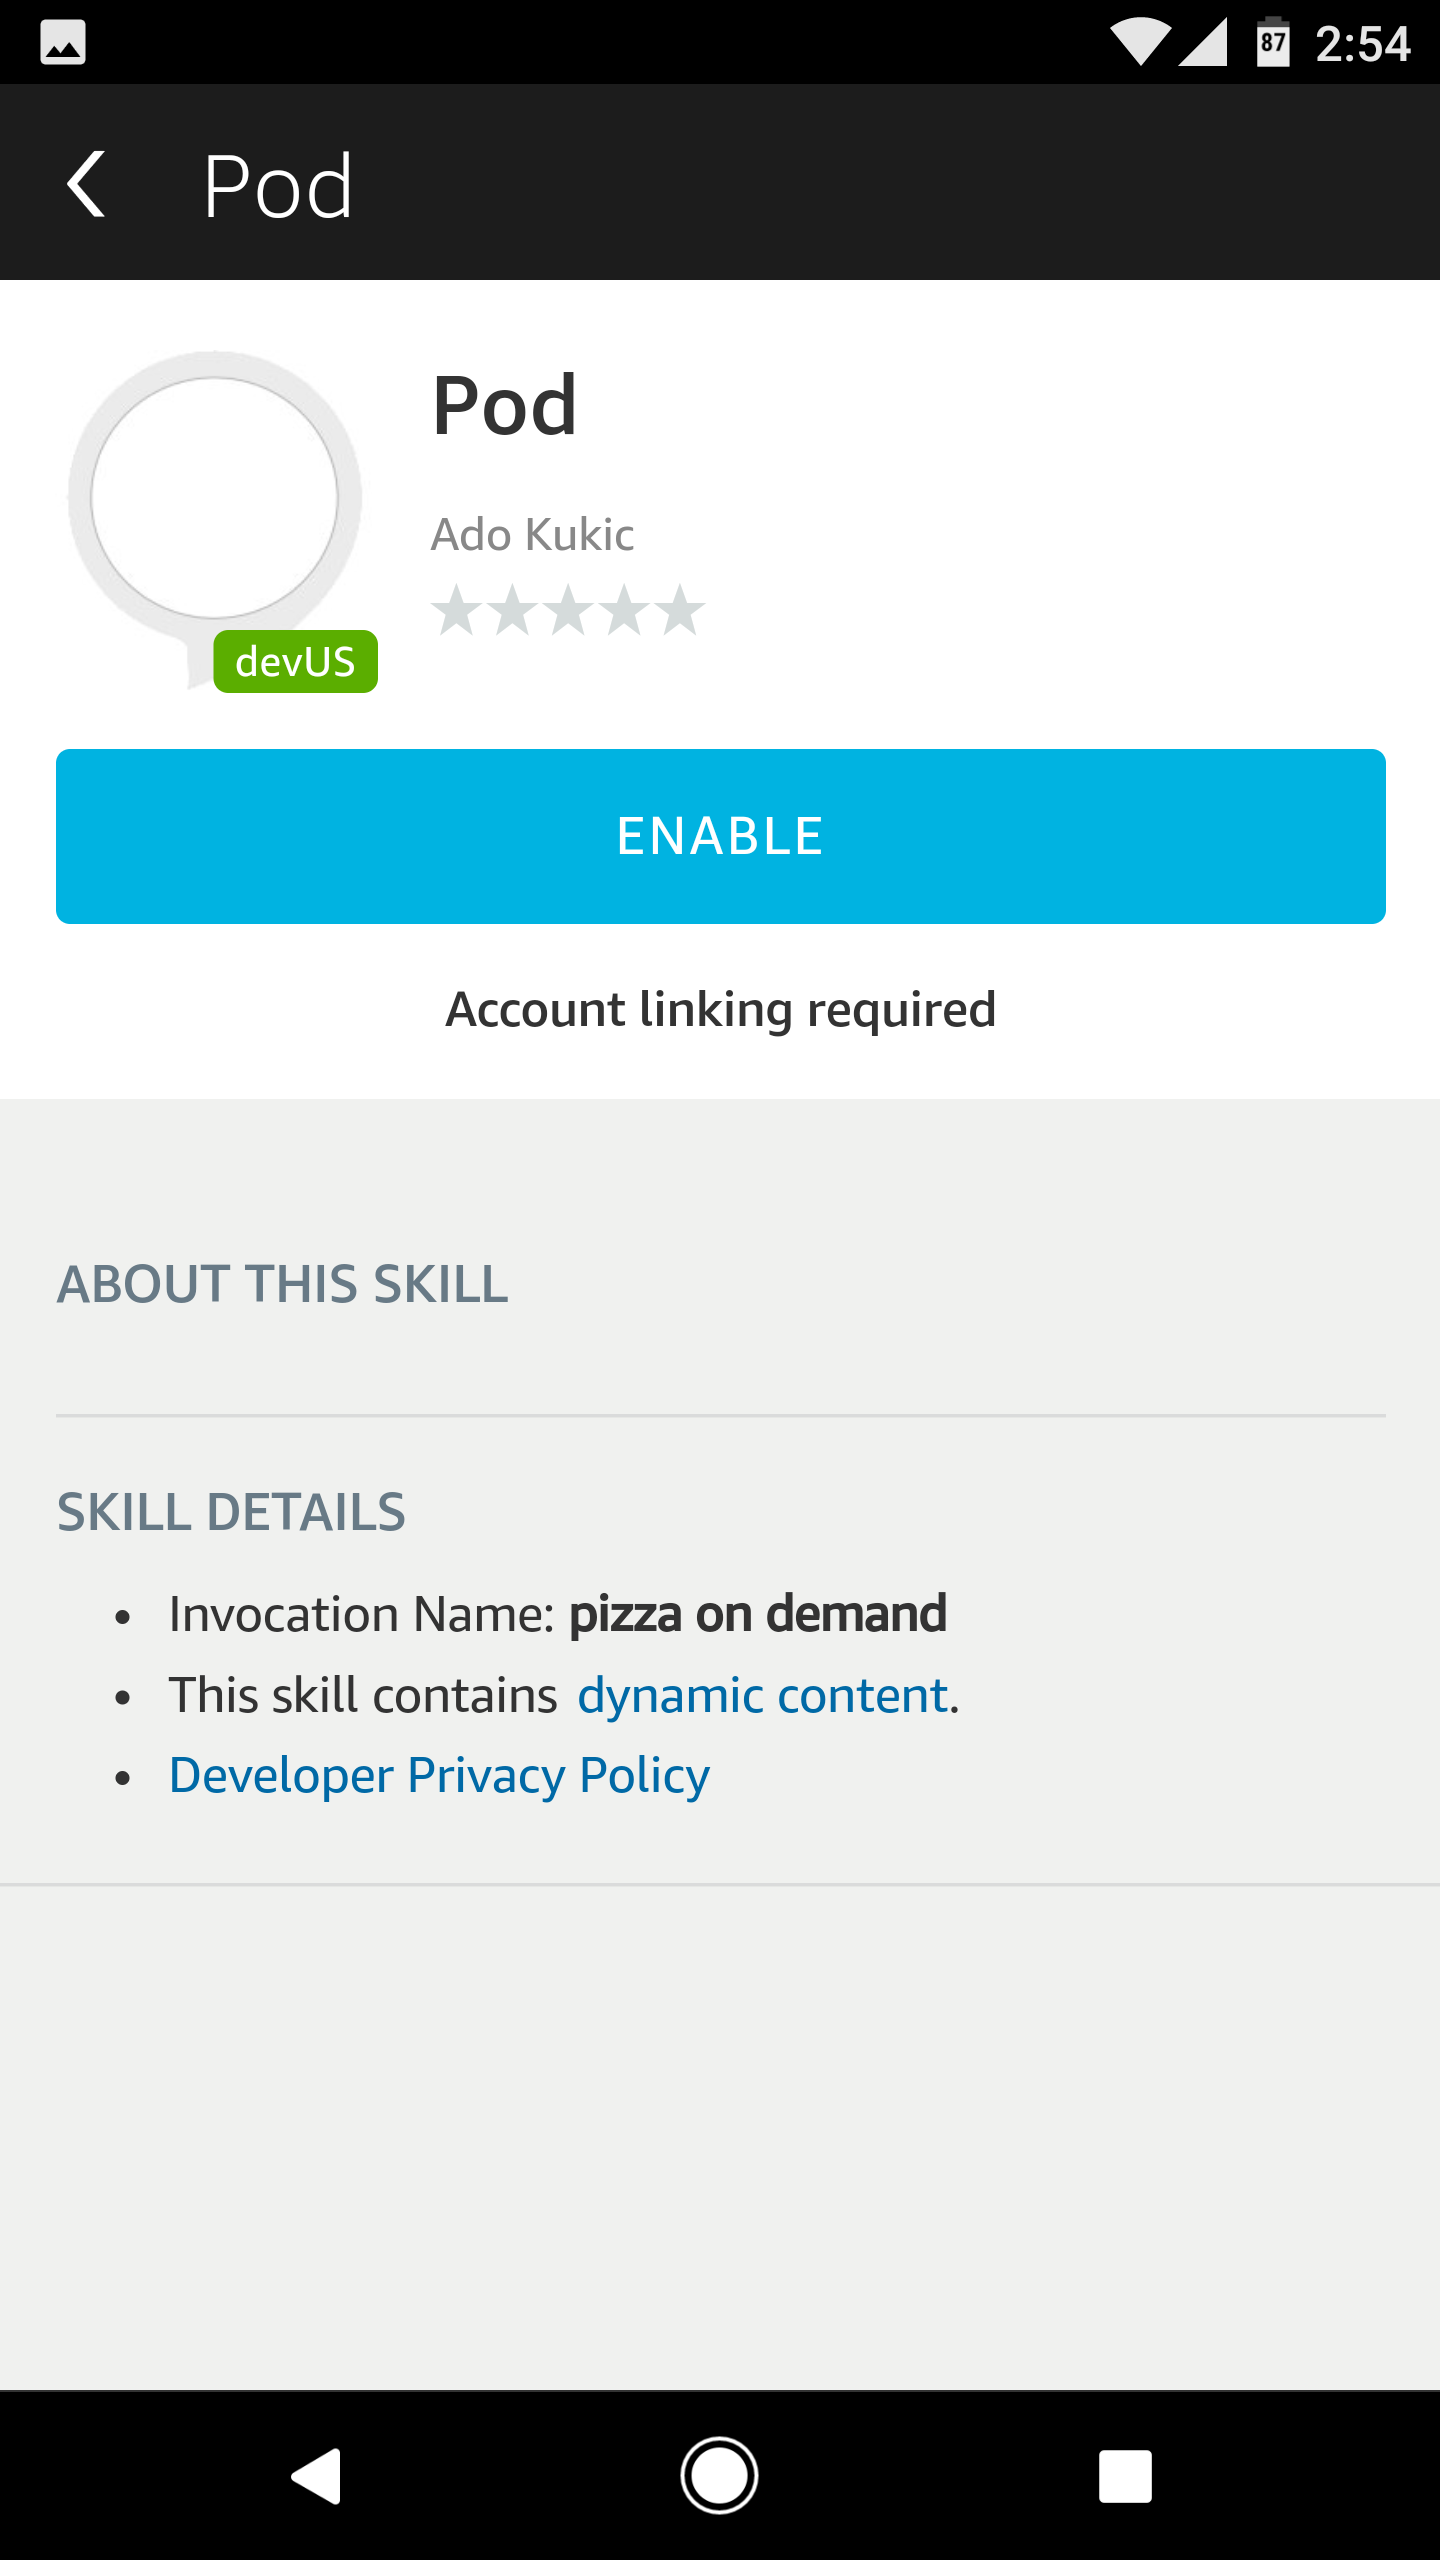
This sample skill requires account linking so before being able to properly test it, you'll need to install the Amazon Alexa application for your mobile platform of choice and go through the account linking.
*Note: The Alexa application is geo-restricted so you may not be able to install it by default in some countries. However, at least from an Android perspective, you can Google/Bing your way out of this small roadblock.
After successfully installing the application, you'll need to login with your Amazon account and then access your skills. In this section you should see the skill you configured previously among your listed skills.*
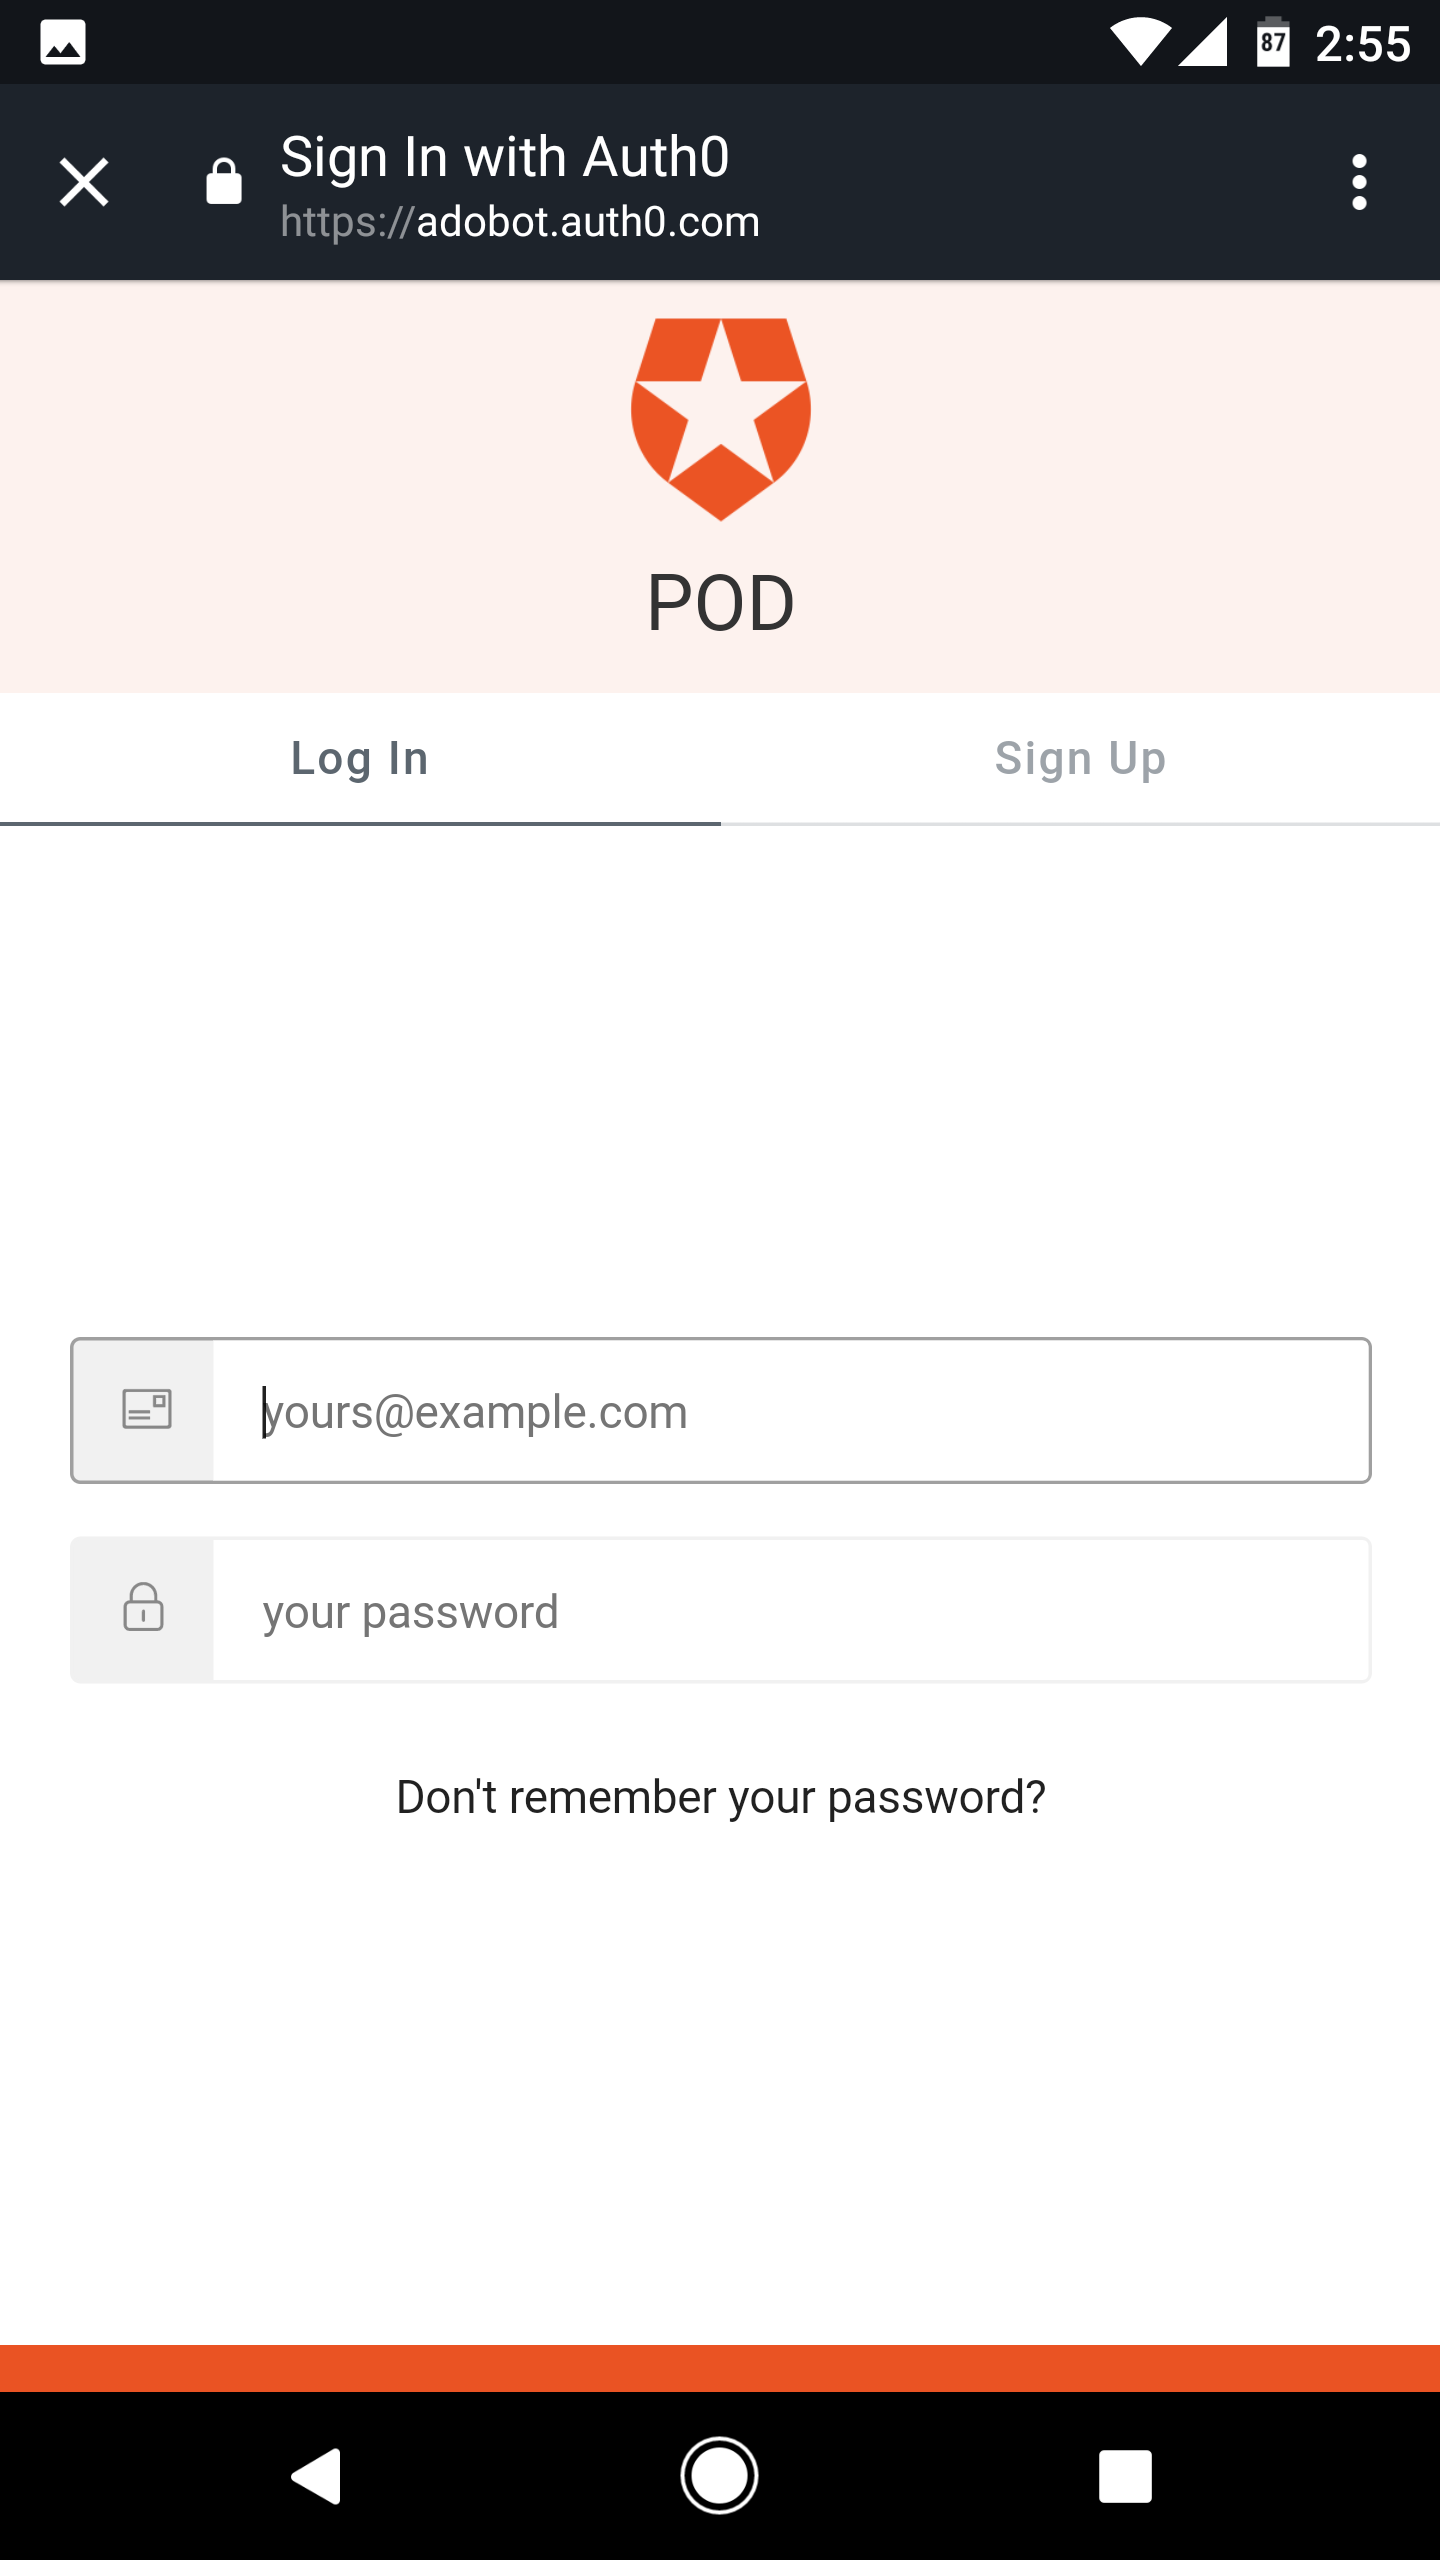
Access this skill and go through the account linking process. This process will show you the Auth0 hosted authentication page where you'll be able to log in using the username/password credentials of the user you created in step 4 of the Auth0 configuration.
**Enable the Pod App**
**Login with Auth0**
**Alexa Account Linking Success**
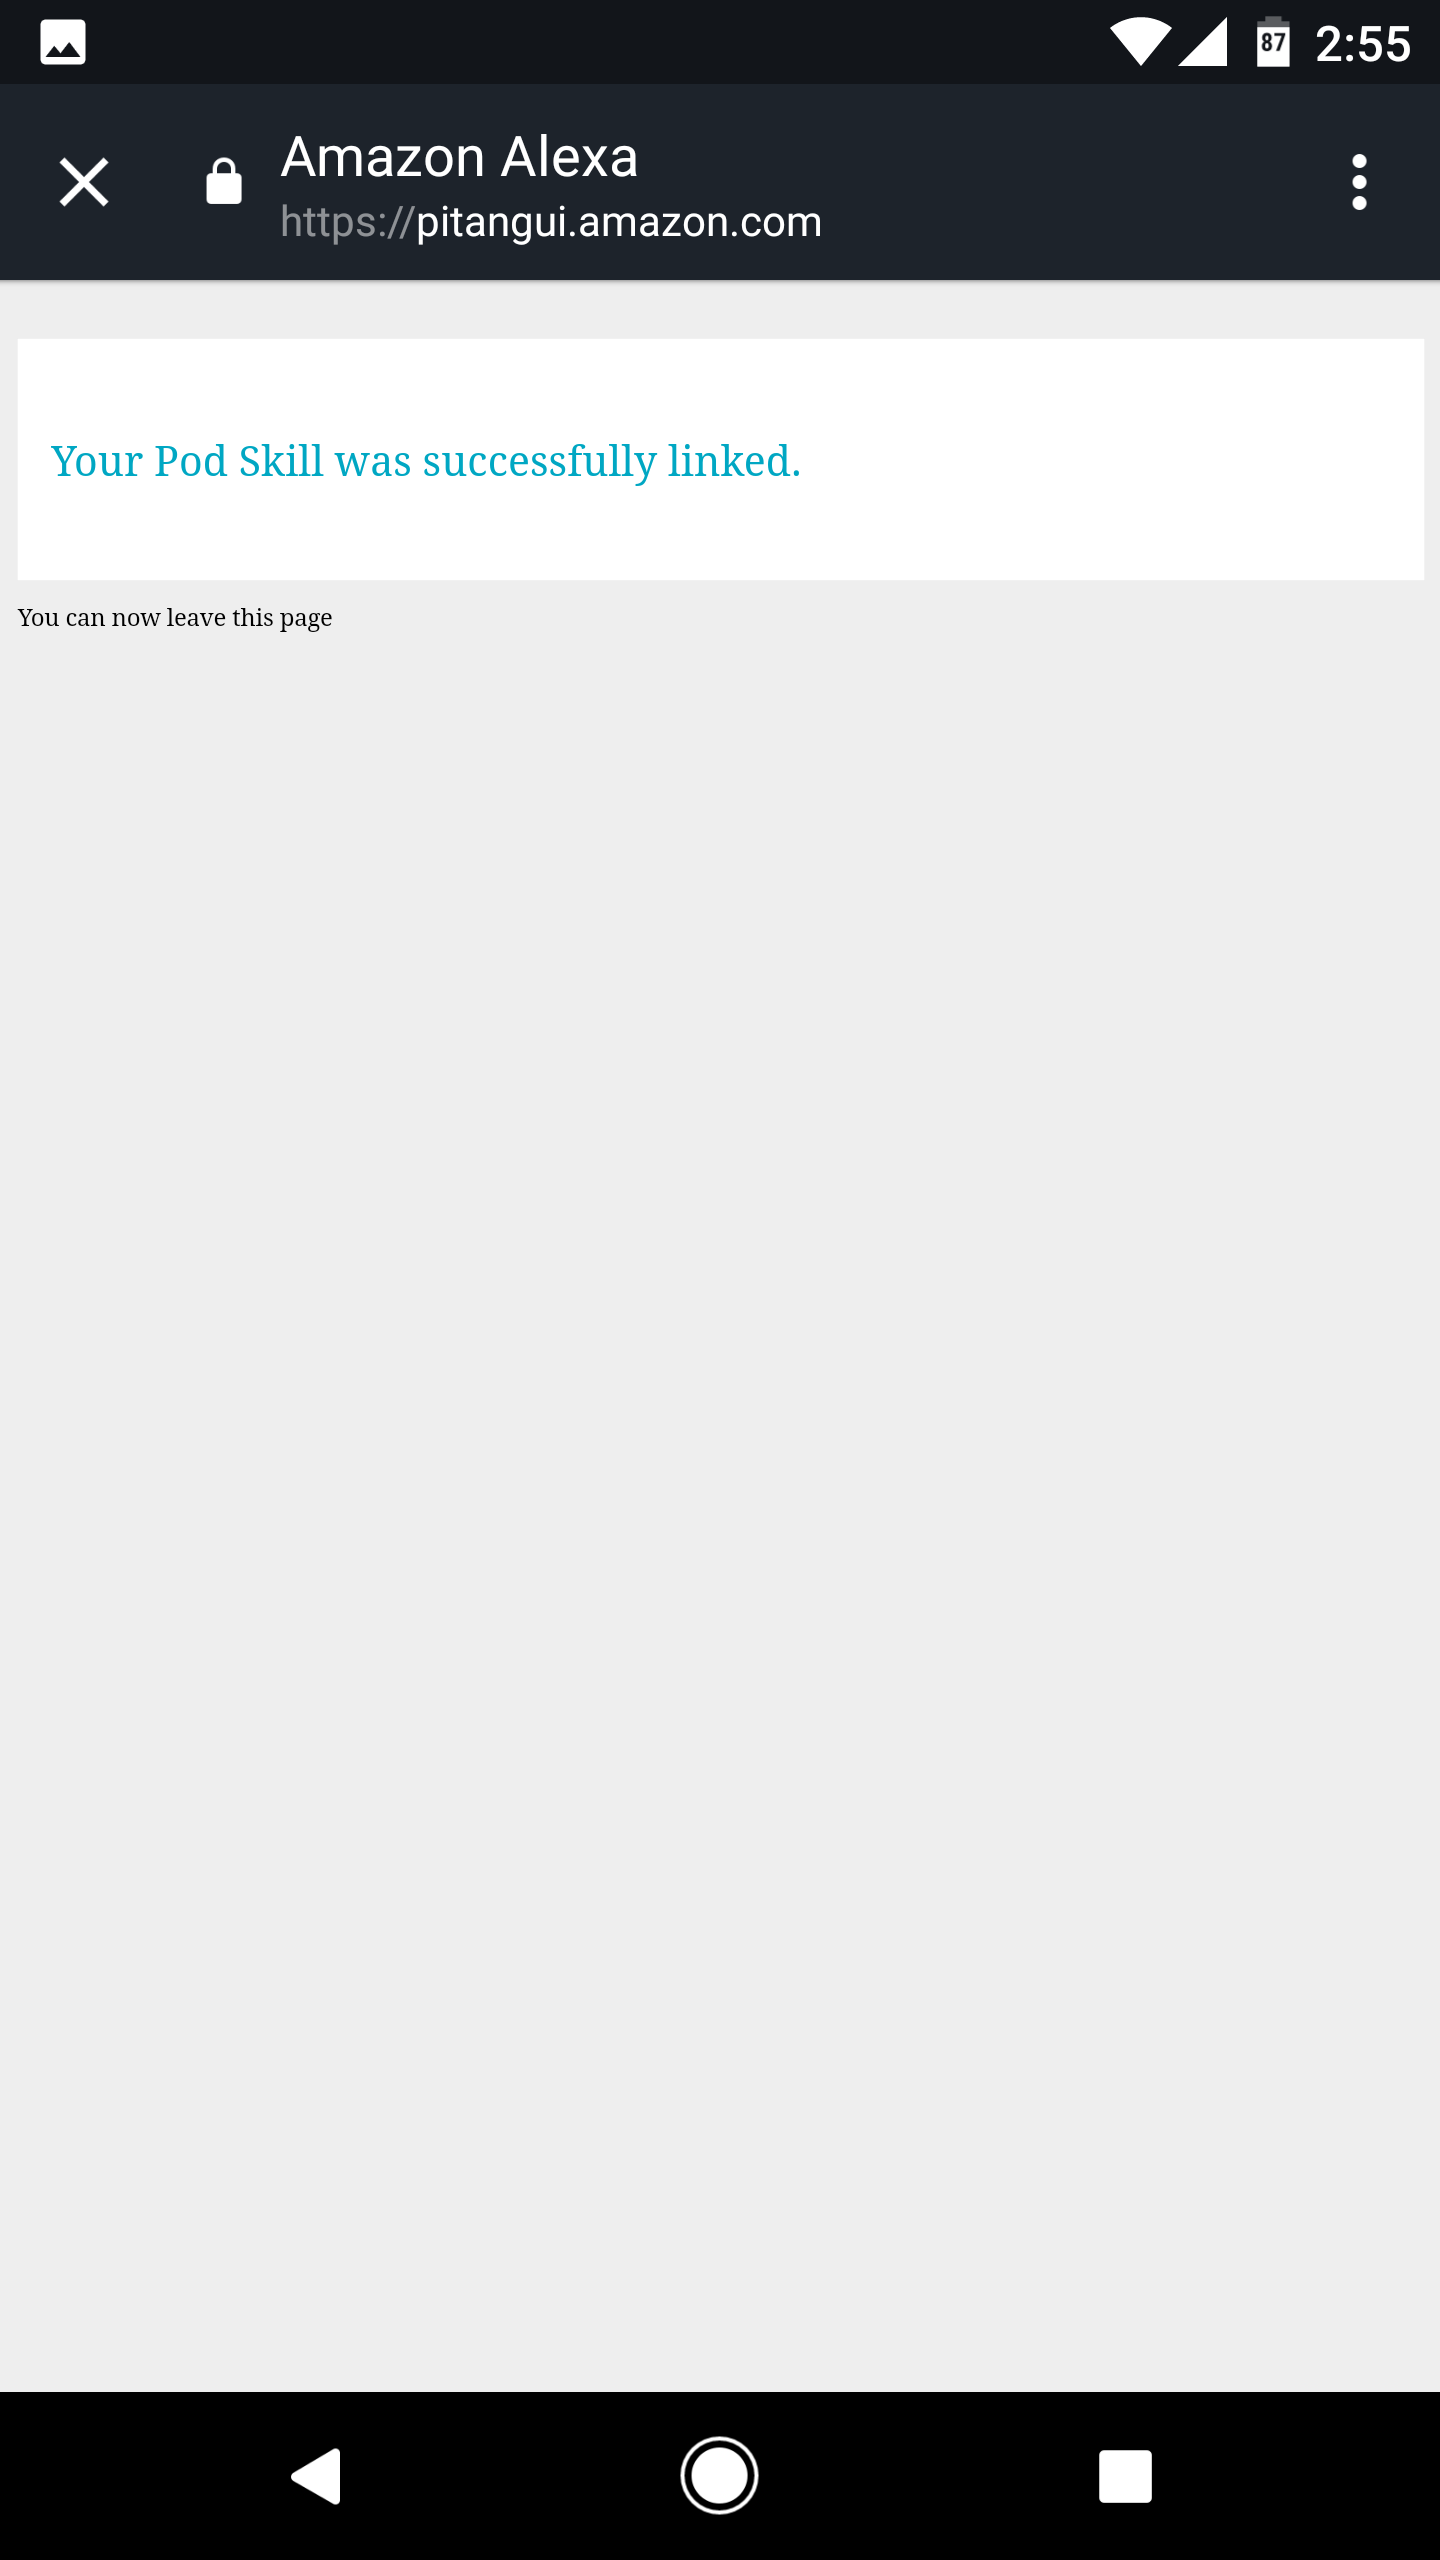
You're now ready to test your Alexa skill.
## Testing the Pizza on Demand Skill
### Using the Amazon Developer Console
Access the [Alexa skills list section](https://developer.amazon.com/edw/home.html#/skills/list) in the Amazon Developer Console and select the skill you created previously.
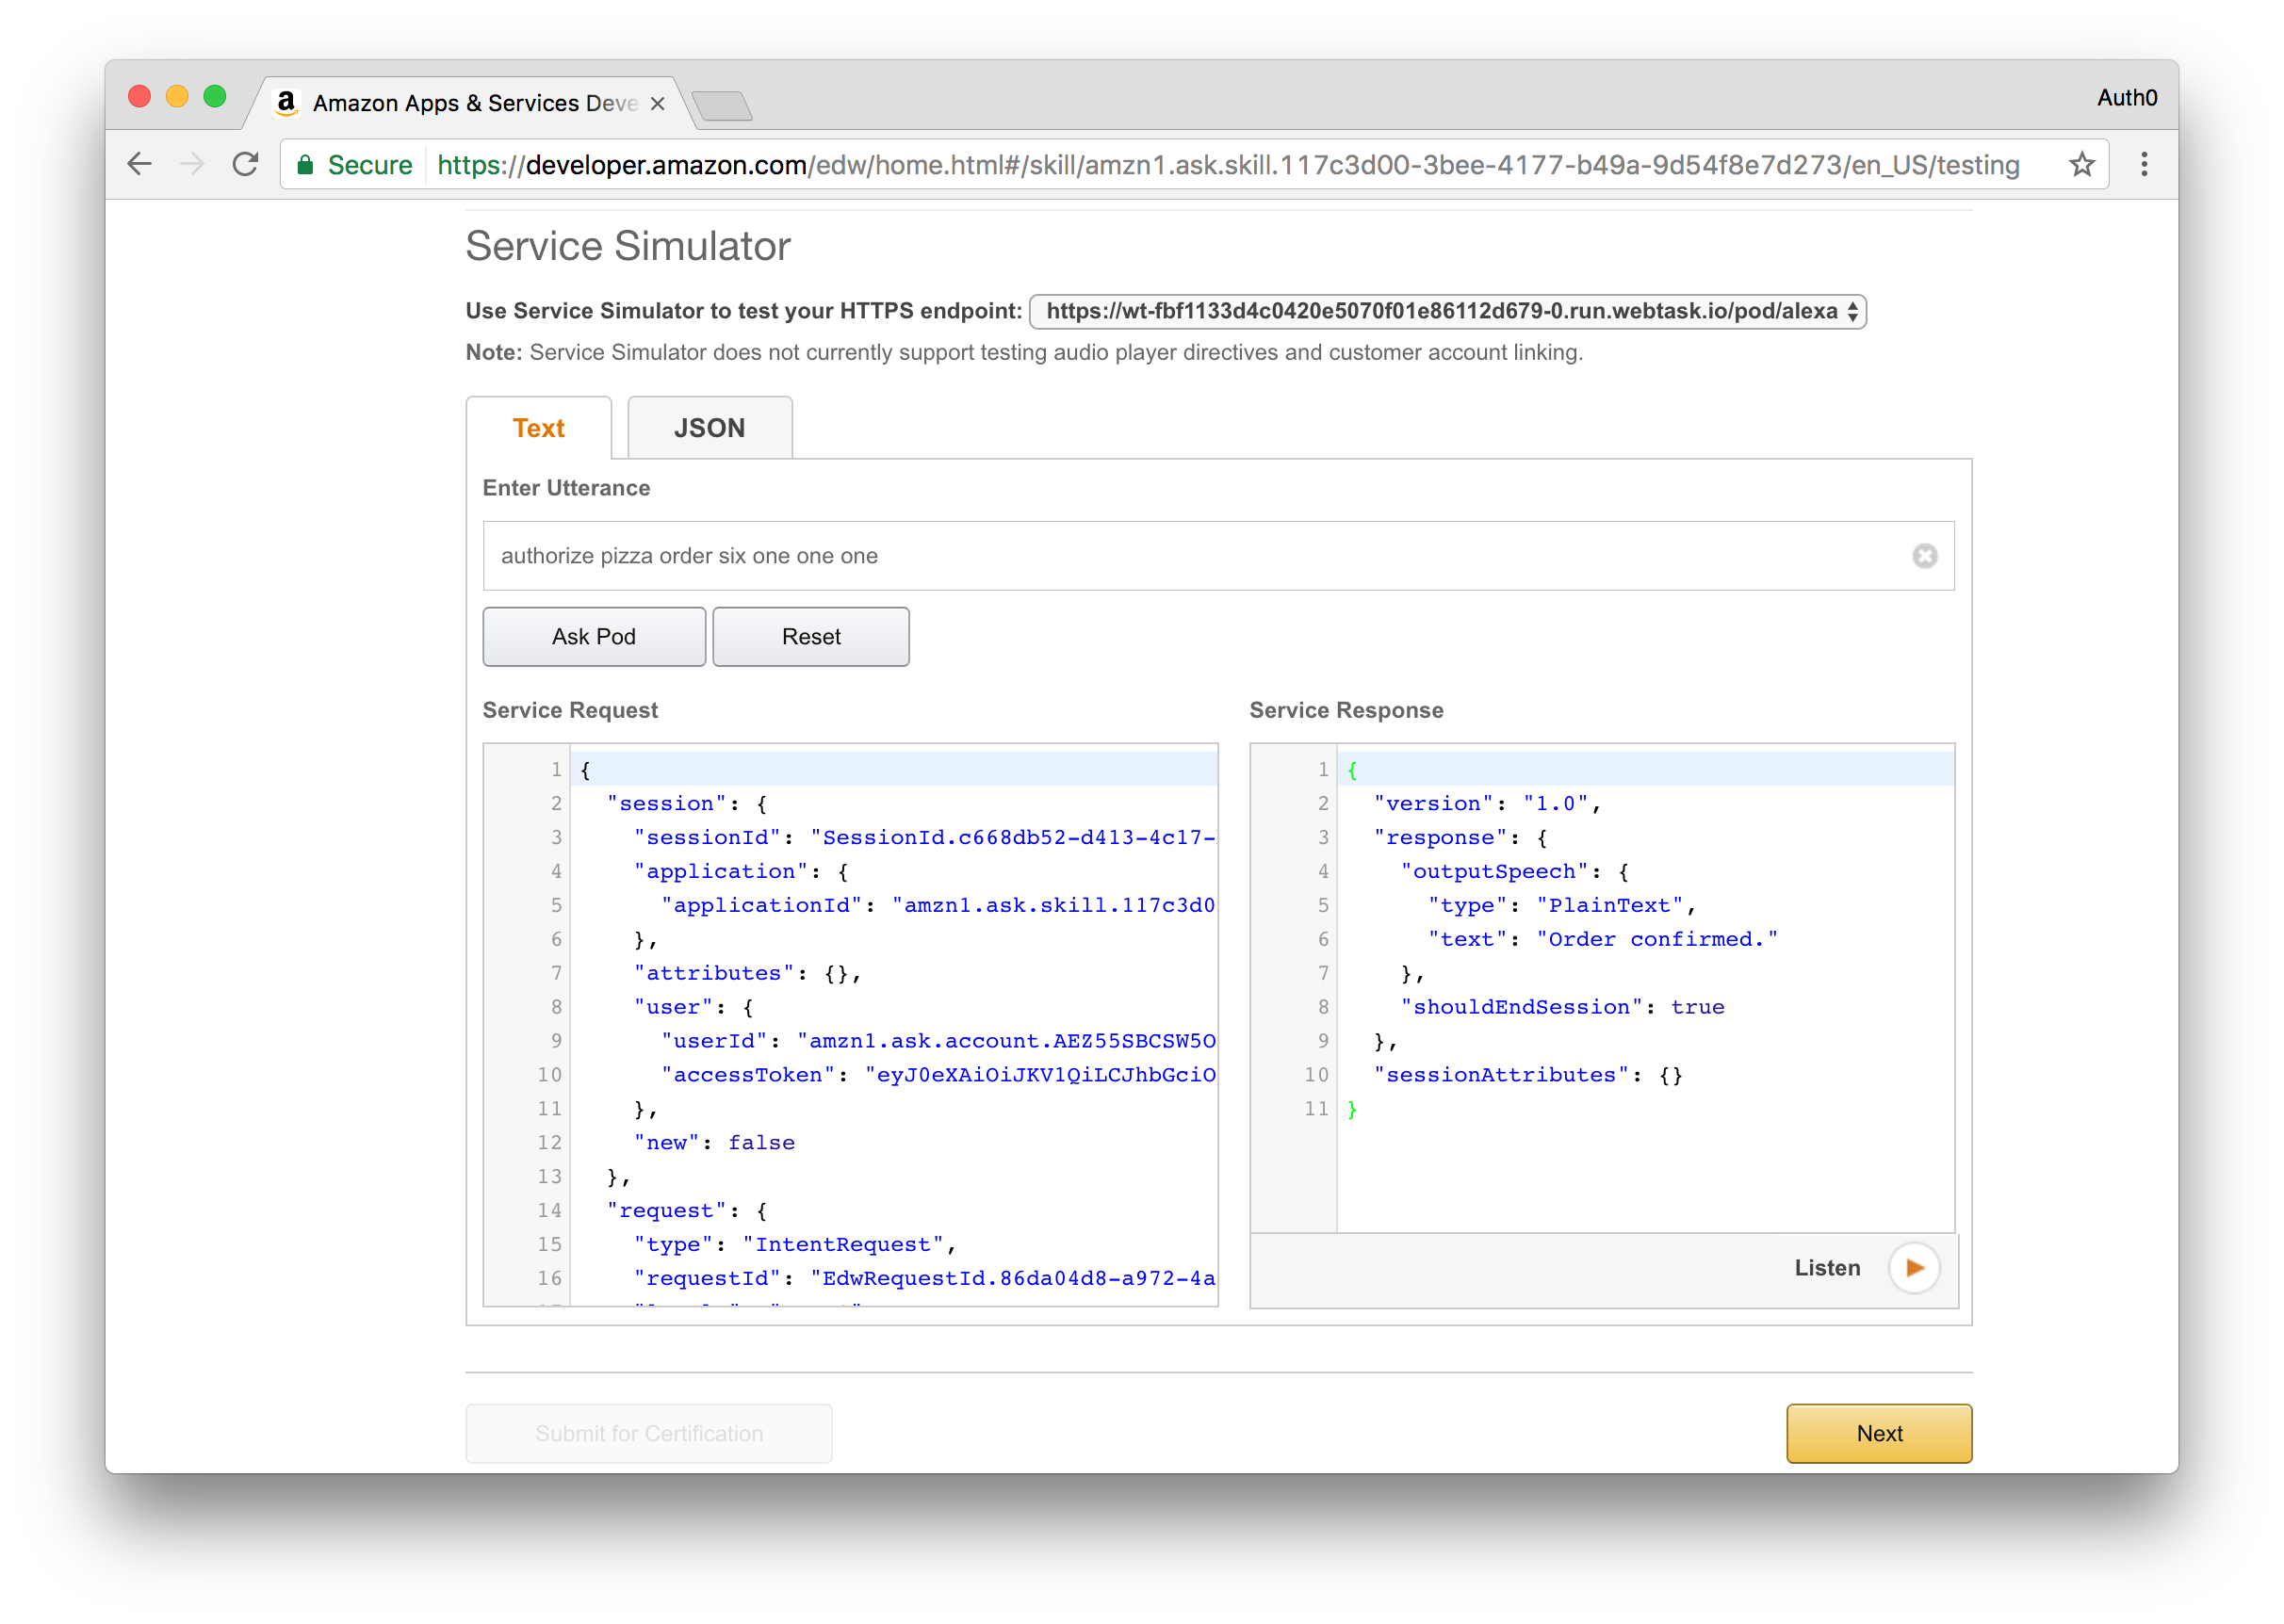
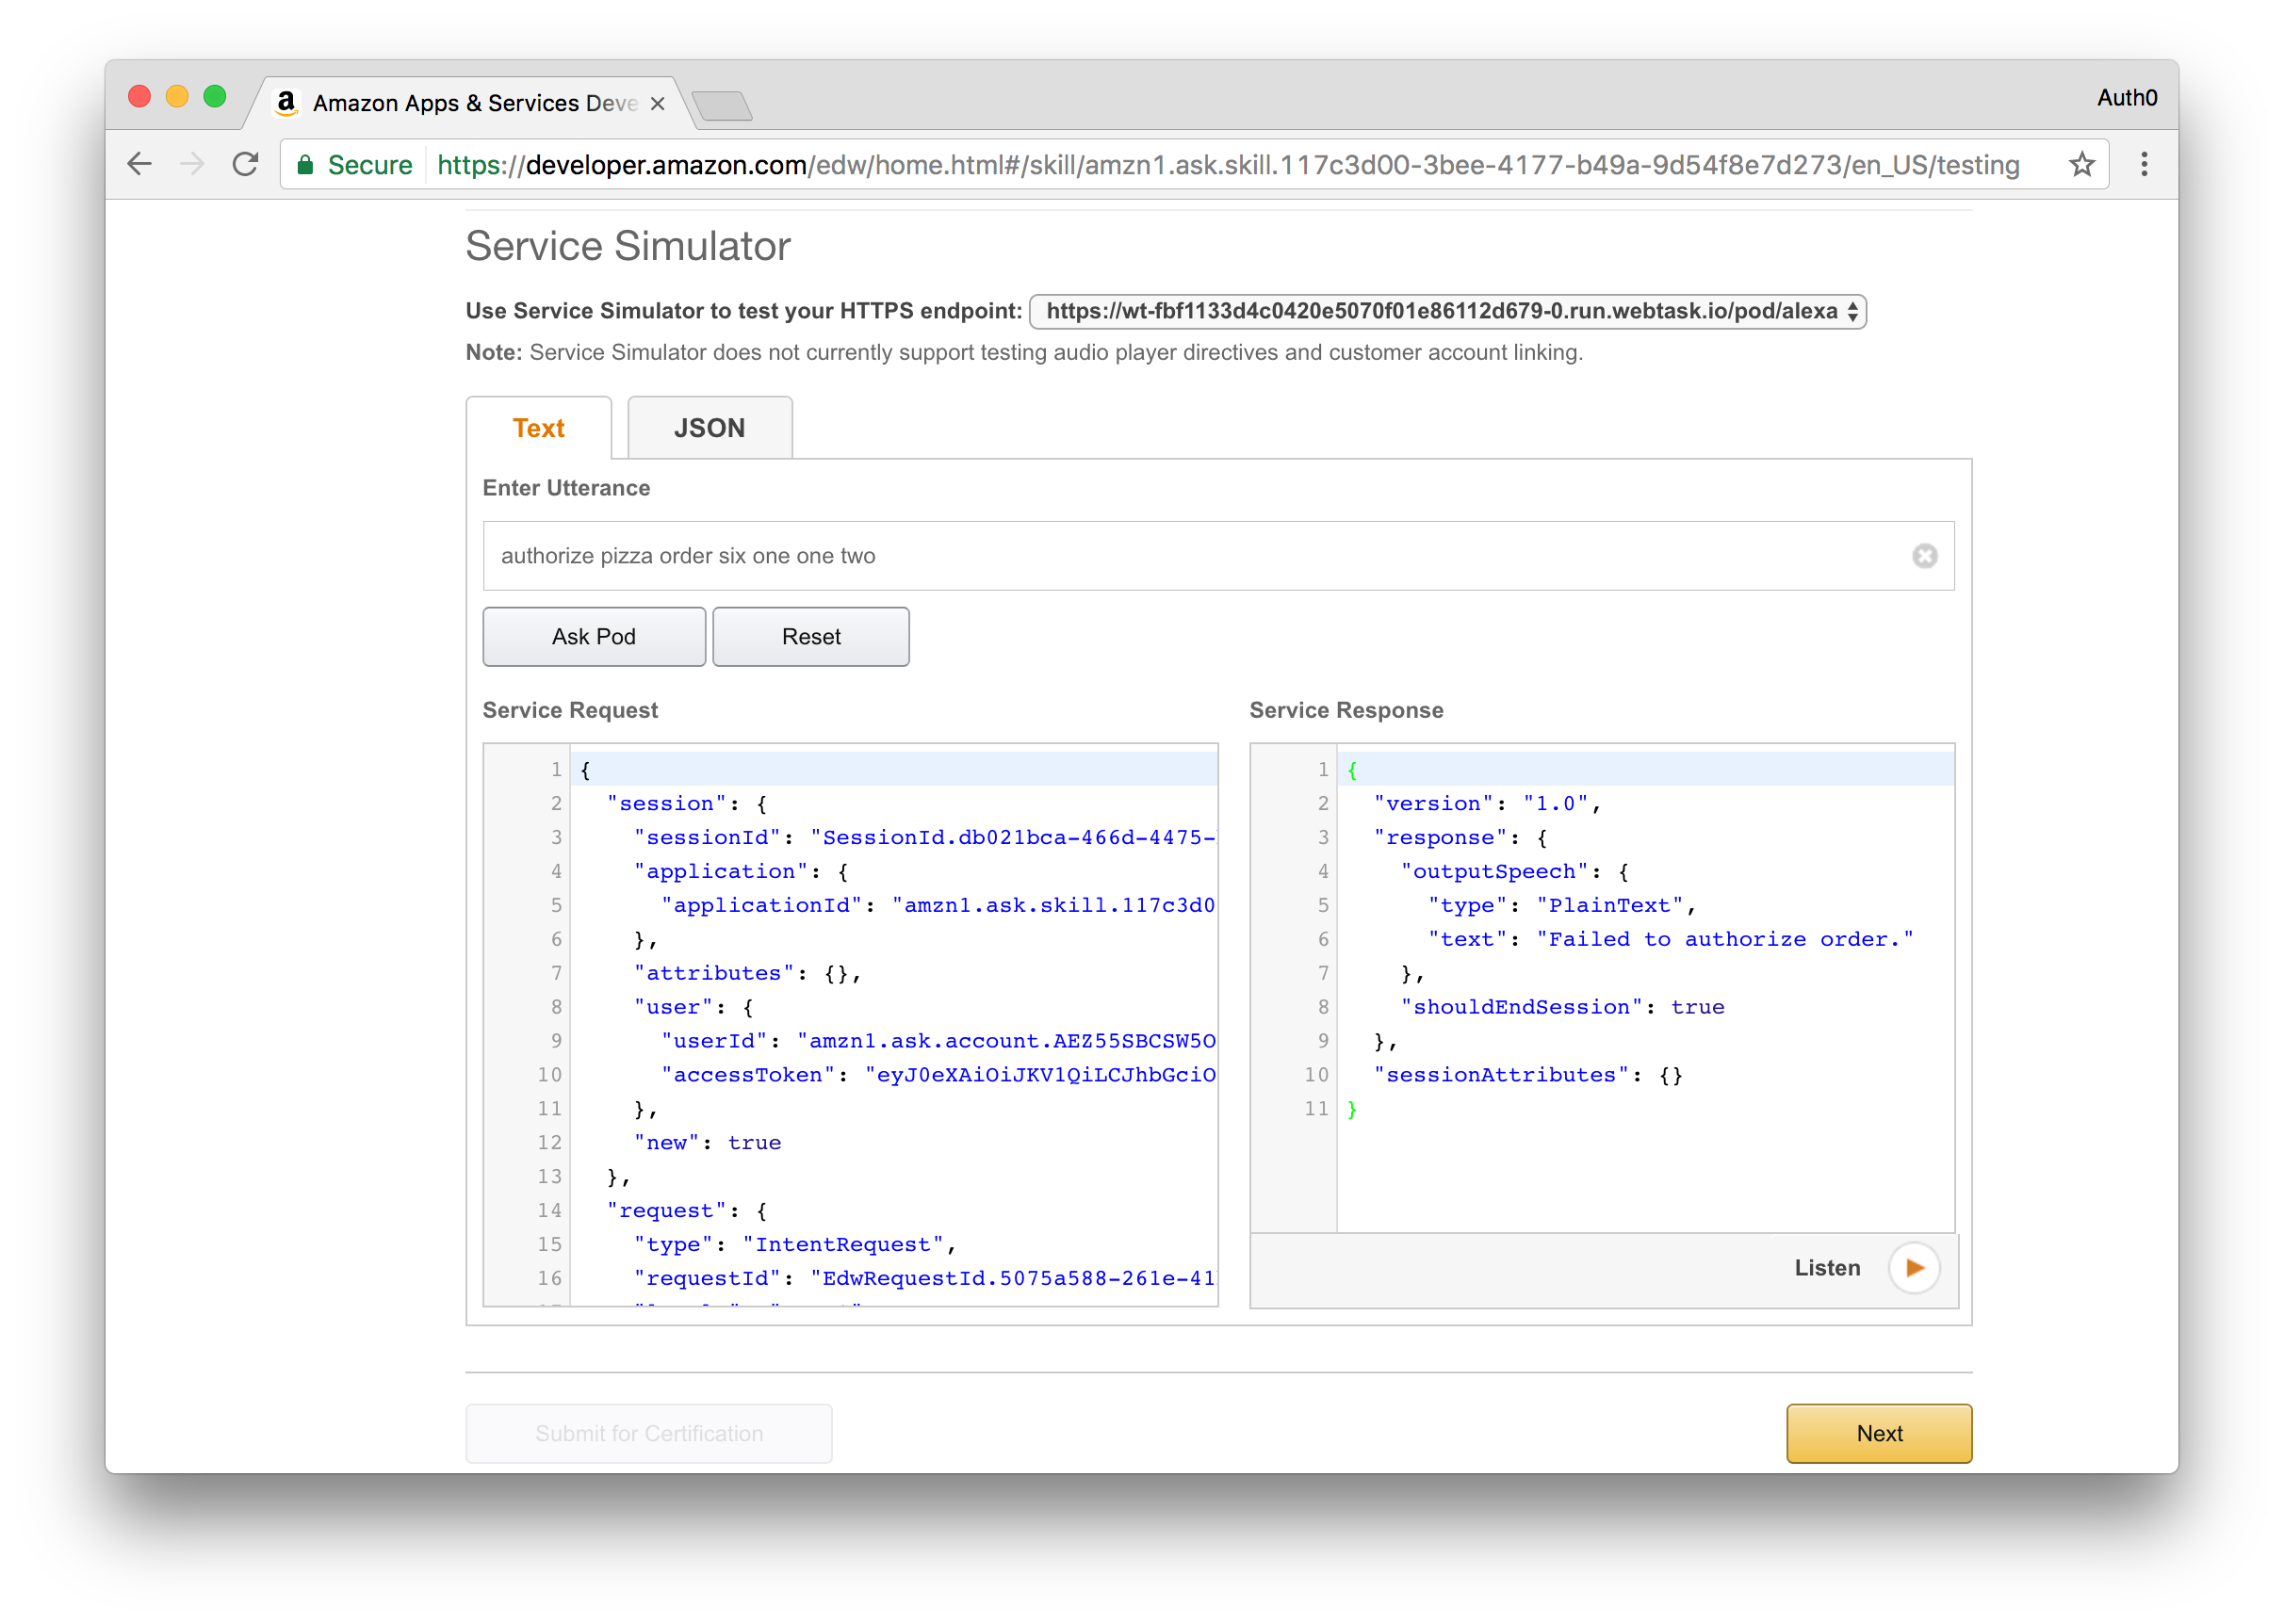
On the sidebar at the left, select the **Test** section and scroll to the Service Simulator area.
You can now enter an utterance and review both the request performed by Alexa and the response returned by the deployed skill.
Try it out by typing in **Get me a pizza**. You will get a response that that a pizza order has been created and you will shortly receive an email or text message with a confirmation code.
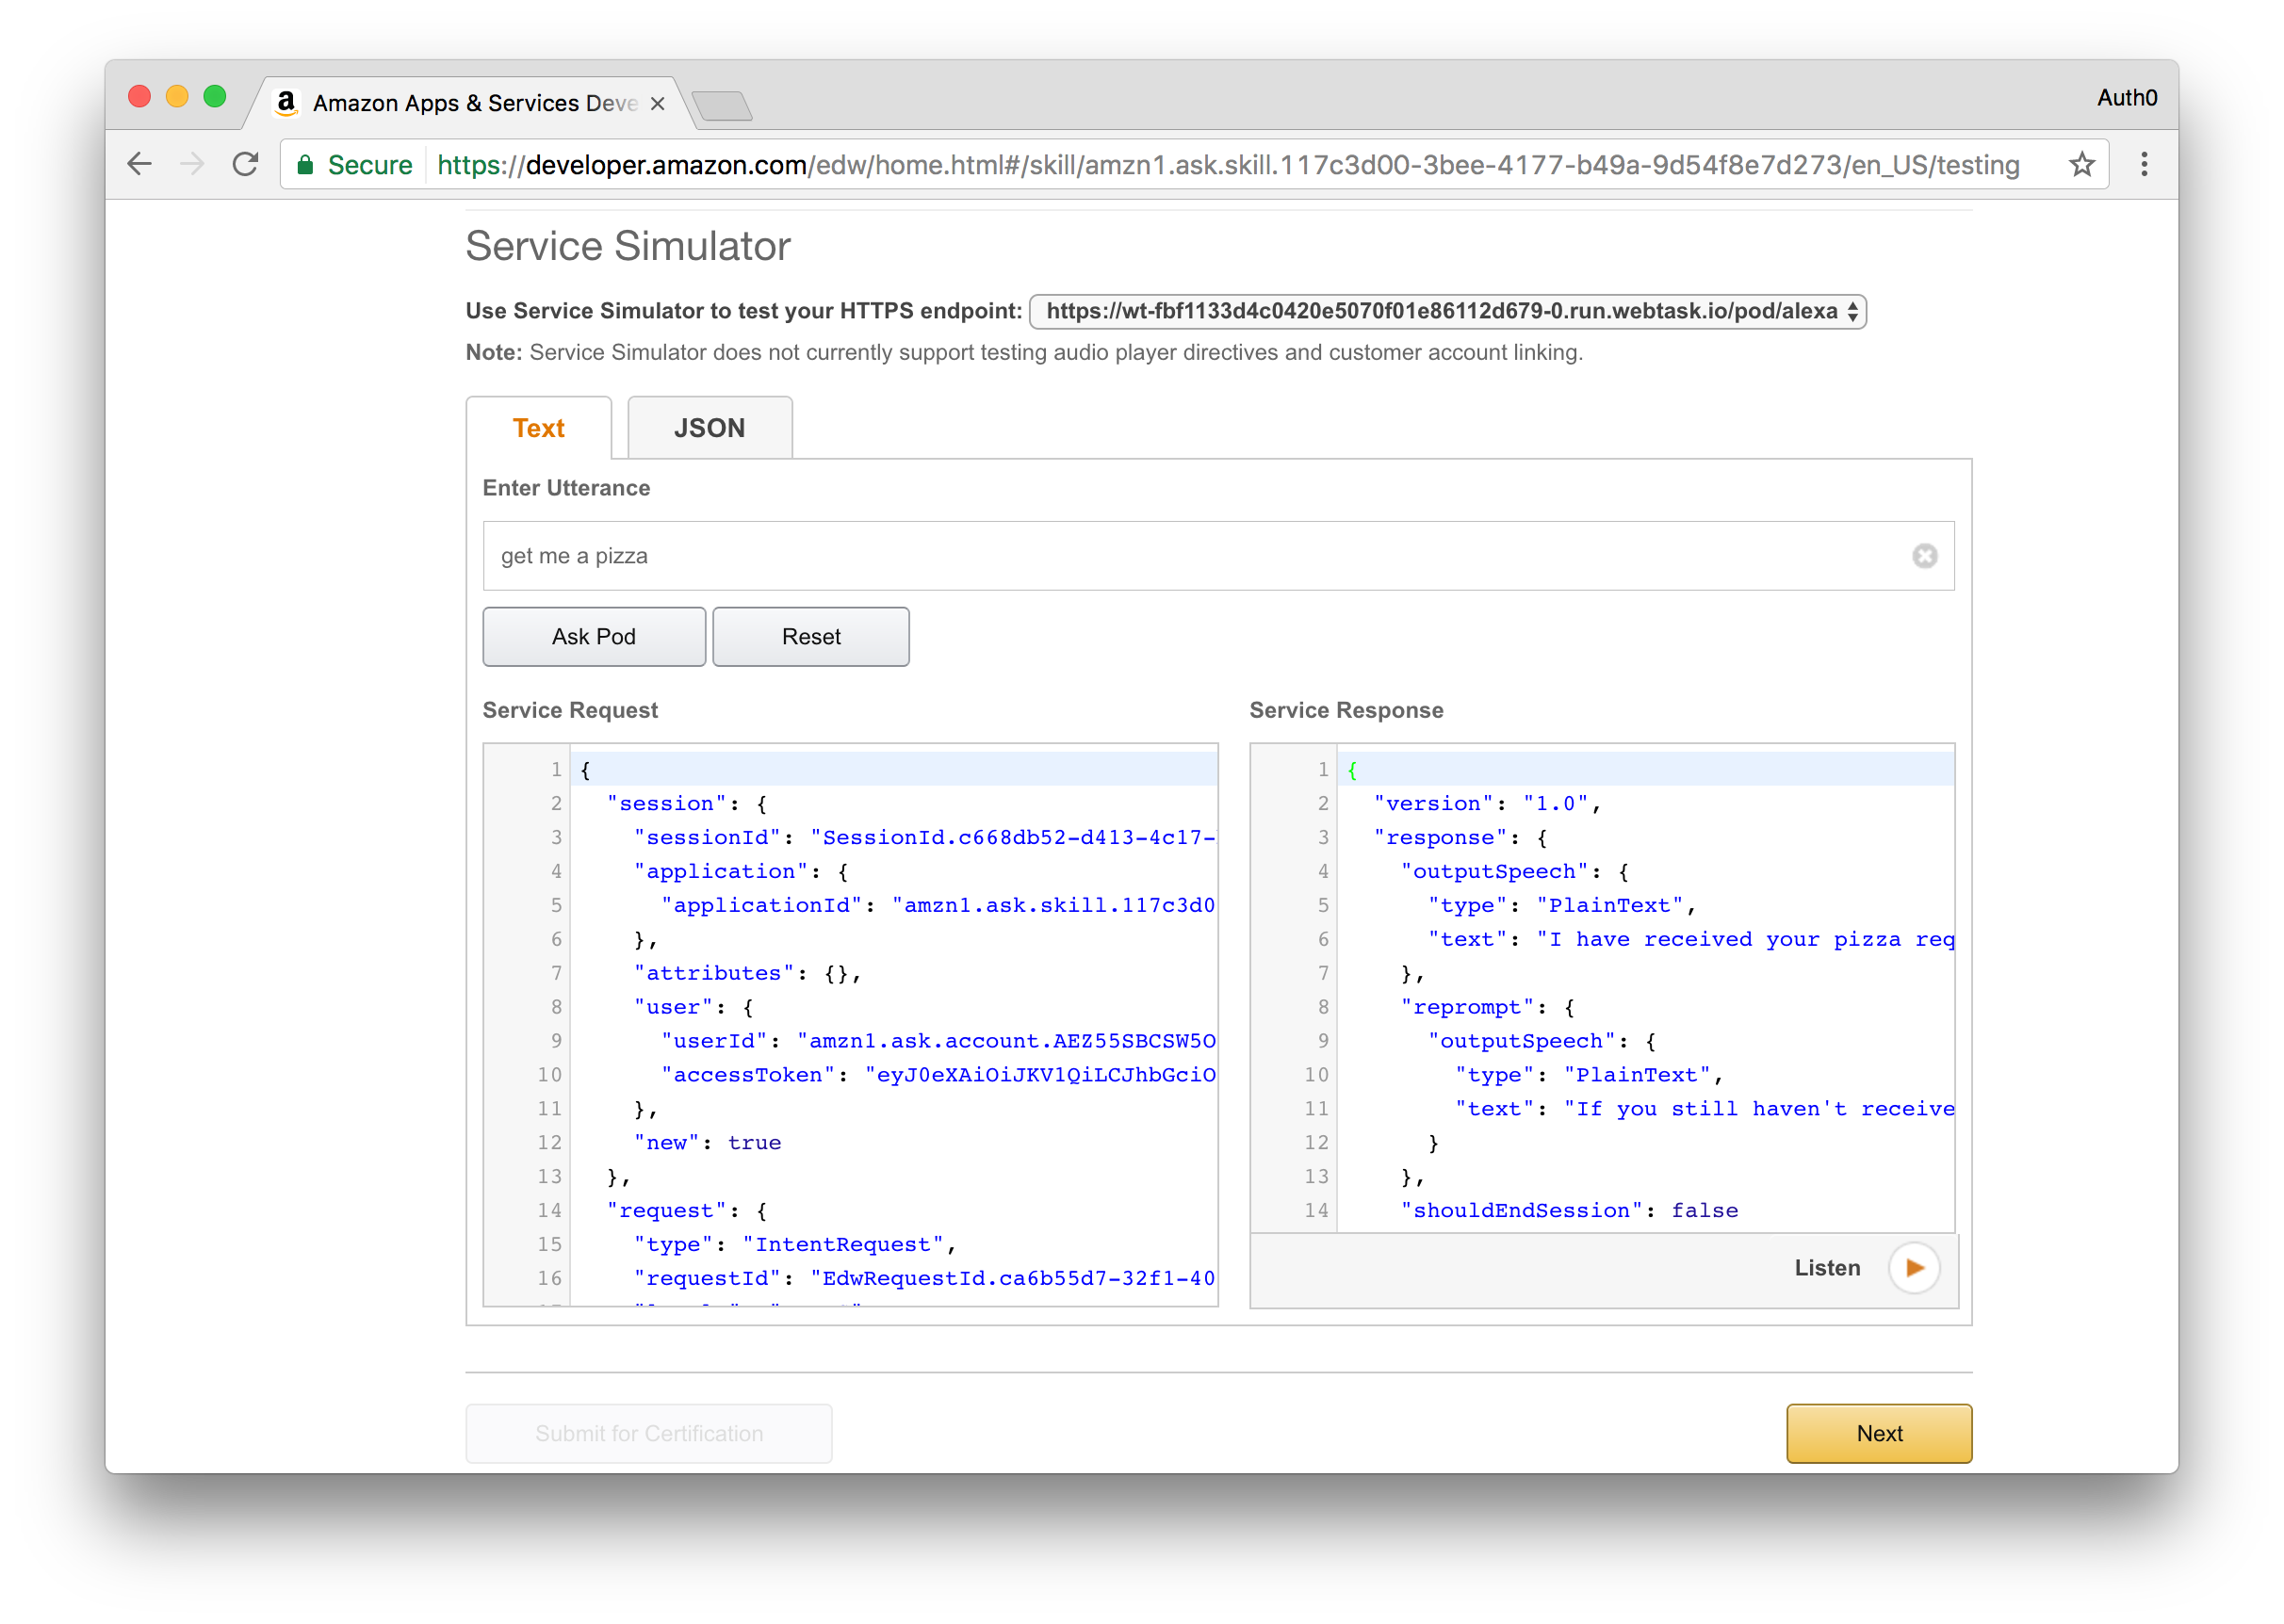
To confirm the order, you will need to provide this code by sending another request to your Alexa skill. This time, type in **Authorize Order** and provide the code you receive, for example **Authorize Order One Two Three Four**.
If the code matches what was in your email, Alexa will respond with a success message saying that the pizza order is confirmed, otherwise you will get a message saying that the order failed to process.
**Success response**
**Error response**
### Using Echosim.io
[Echosim.io](https://echosim.io/) is an online simulator for the Echo device. Access the [Echosim.io](https://echosim.io/) application and log in with your Amazon account.
Follow the on-screen instructions on how to activate the microphone and talk to Alexa. Given Echosim.io is aimed at providing an online simulation of an Echo device, you'll have to use the skill invocation name you configured in order to first activate the correct skill.
## Aside: Platform Extensibility for your SaaS
We have recently released a product called [Auth0 Extend](https://auth0.com/extend/). This product enables companies to provide an easy extension point where customers can run arbitrary JavaScript code. With [Auth0 Extend](https://auth0.com/extend/), customers can create custom business rules, scheduled jobs, or connect to the ecosystem by integrating with other SaaS systems, like Marketo, Salesforce, and Concur. All using plain JavaScript and NPM modules.
## Conclusion
In this post we took a look at how you can create an Alexa skill and pair it with [Auth0](https://auth0.com) for enhanced security. We also introduced you to [Webtask](https://webtask.io), our serverless offering that made it effortless to deploy an Alexa skill implementation. Sign up for a free Auth0 account and add interaction-based authentication to your Alexa skills in no time at all.
> [Auth0 offers a generous **free tier**](https://auth0.com/pricing) to get started with modern authentication.
### Special Thanks
Thanks to [Ado Kukic](https://twitter.com/kukicado) for peer reviewing the proof of concept application and the blog post to ensure that it works properly.