---
title: "How to Make Secure HTTP Requests with Vue and Express"
description: "Learn how to build a secure Express API and make API calls to it from a Vue.js application."
authors:
- name: "Holly Guevara"
url: "https://auth0.com/blog/authors/holly-guevara/"
date: "Oct 7, 2021"
category: "Developers,Tutorial,VueJS"
tags: ["vuejs", "express", "api", "authentication", "authorization", "jwt", "client", "server"]
url: "https://auth0.com/blog/how-to-make-secure-http-requests-with-vue-and-express/"
---
# How to Make Secure HTTP Requests with Vue and Express
**TL;DR:** In this article, you're going to build an Express API and then make API calls to it from an existing Vue.js application. You'll then secure this API by only allowing users who have an access token to view certain data. Here is the [GitHub repository with the final code](https://github.com/auth0-blog/vue-express-auth) if you'd like to take a peek now.

## Requirements
This application is using the latest versions (at the time of writing) of the following:
* [Vue.js](https://vuejs.org/) (`2.6.10`)
* [Node.js](https://nodejs.org) (`10.16.3`)
* [npm](https://www.npmjs.com) (`6.11.3`)
You're starting with a pre-built Vue application that currently has its data hard-coded in. You'll modify it so that instead of using hard-coded data, you'll build an API and pull it from there. If you'd like more background about how this was built, check out the [previous tutorial here](https://auth0.com/blog/beginner-vuejs-tutorial-with-user-login/).
### Installing Node and npm
Node.js is a runtime environment that uses JavaScript on the server. This makes it very popular in modern JavaScript applications because you can use JavaScript across the board: on the frontend and backend.
Node.js comes with `npm`, a Node package manager. You can [download Node.js here](https://nodejs.org/en/download).
Let's get started!
## Recap of the Vue.js App
In case you didn't go through [the previous tutorial](https://auth0.com/blog/beginner-vuejs-tutorial-with-user-login/), here's a recap of what the requirements were:
* Display a list of events (public)
* Allow users to register/sign in
* Display individual event details (must be logged in)
The caveat here was that instead of getting the data from one central API, it was just stored in the component itself with [Vue's data function](https://vuejs.org/v2/guide/instance.html#Data-and-Methods). Because the data was saved in the JavaScript since we didn't have an API, there was no way to properly secure it. In the application's current state, the user would be kicked to the login page if they tried to view individual event details, but they could still manually search through the JavaScript to see the page content. In this tutorial, you're going to modify that app so that it pulls from an API.
## Application Setup
You're going to make a separate folder for the server code that you'll be working on. Keeping the client code (Vue app) and server code (Express app) in the same parent folder makes it easier to switch back and forth while still keeping them separated.
First, make a new folder called `vue-express-events-auth` that will serve as the parent folder for `client` and `server`. Since the client side of this application is already built, you're just going to [clone the Vue application repo](https://github.com/auth0-blog/vue-events-auth) and call it `client`. Then make a new folder inside `vue-express-events-auth` and call it `server`.
```bash
mkdir vue-express-events-auth
cd vue-express-events-auth
git clone https://github.com/auth0-blog/vue-events-auth client
mkdir server
```
Here's what the folder structure looks like:
```
├───vue-express-events-auth
└── client
└── server
```
### Client setup
Now that everything is split up nicely, it's time to pull the dependencies into the client app. In your terminal, switch into the `client` folder and run:
```bash
npm install
```
#### Configuring Auth0
This will create a `node_modules` folder and all of the app's dependencies will be installed into it.
The [previous tutorial](https://auth0.com/blog/beginner-vuejs-tutorial-with-user-login/) used [Auth0](https://auth0.com/) to add authentication to the Vue.js app. Auth0 provides a simple way to integrate authentication and authorization into any application. Most of this is already configured for you in the existing repo, but you'll need to sign up for a free Auth0 account to update some of the configuration values.
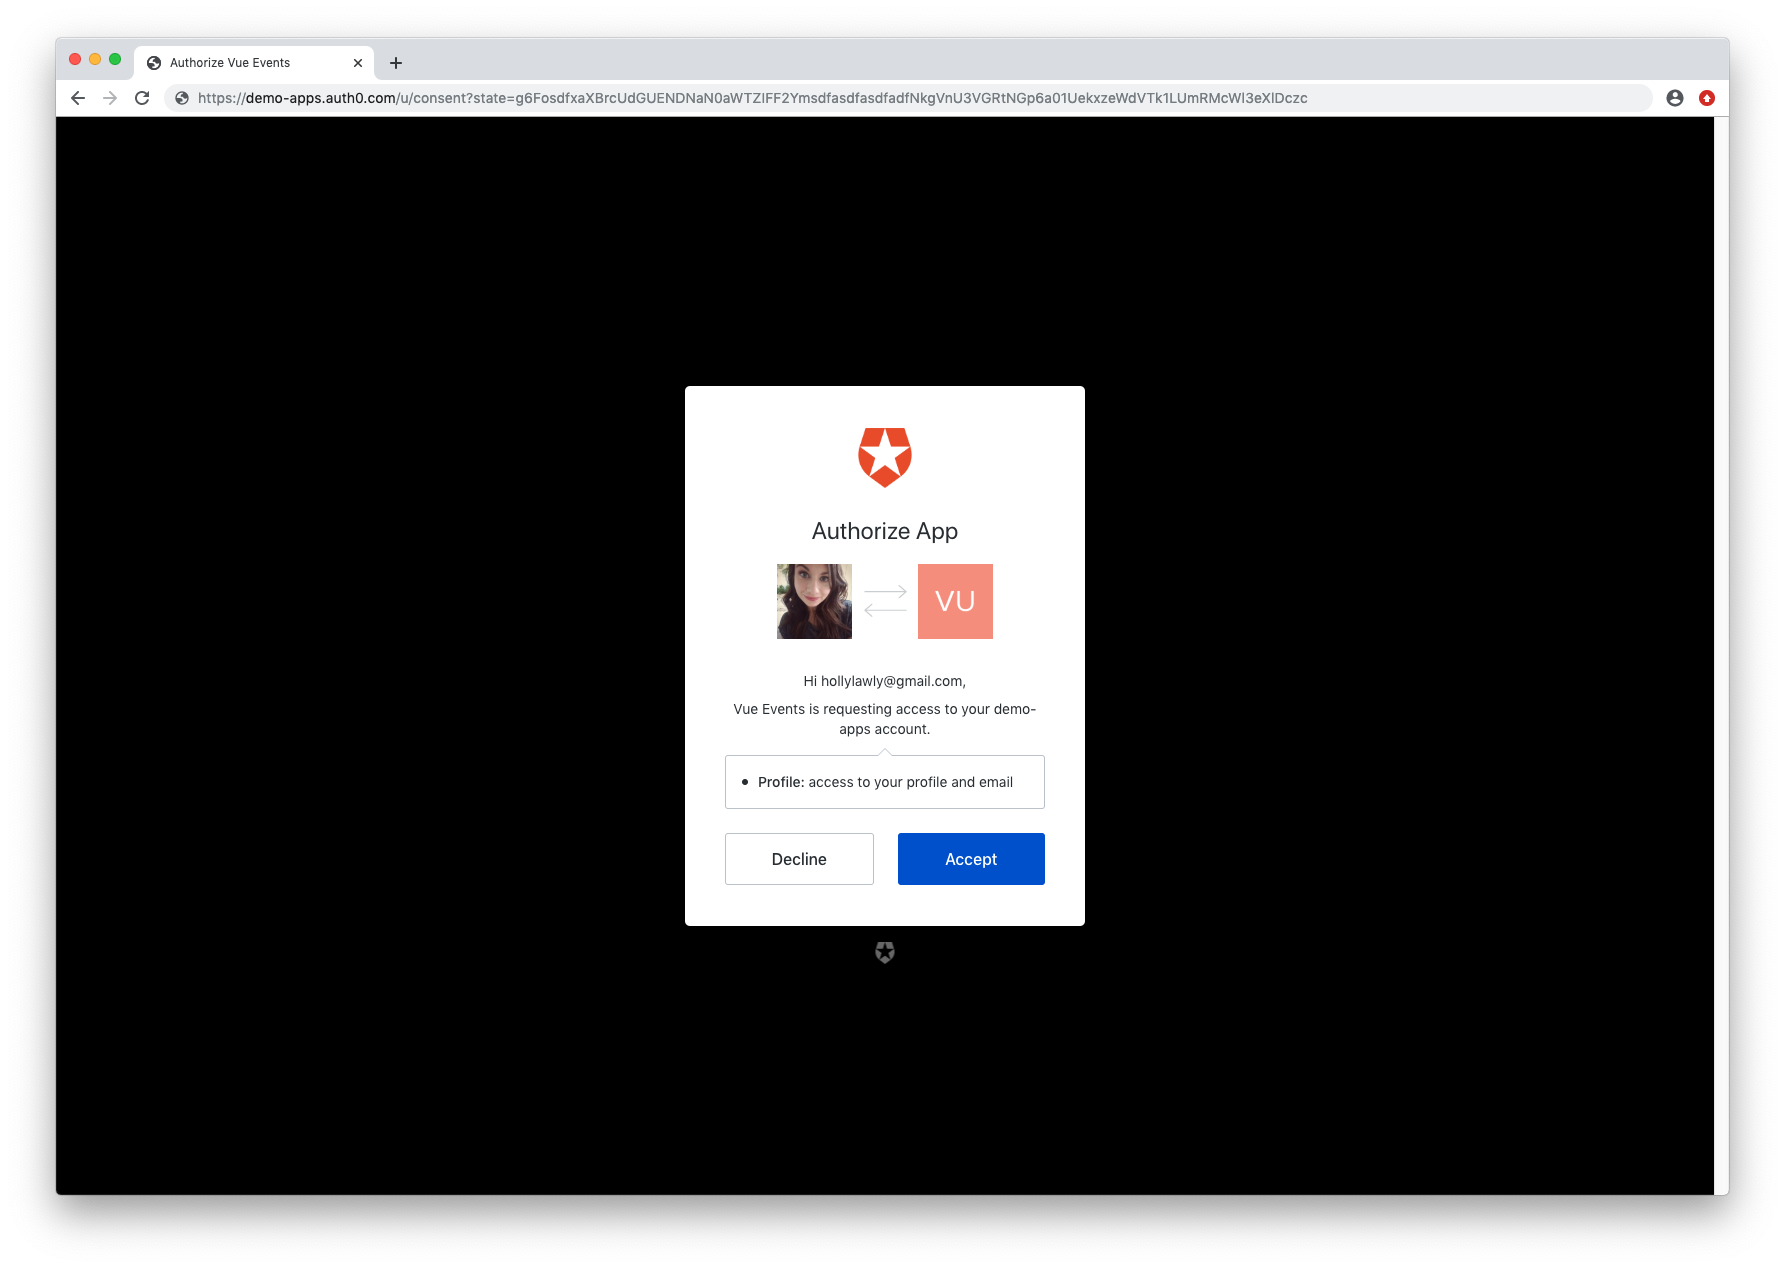
Once you have your free account, head to the [Auth0 dashboard](https://manage.auth0.com/) to set up the Auth0 application for the Vue app.
Click on the red button in the top right corner that says "Create Application". For the name, you can enter "Vue Events" or anything you'd like. Then select "Single Page Web Applications" and click "Create".
Next, click into "Settings". This is where you'll fill out some important information that allows the Auth0 application to connect to your Vue application. Fill these out as follows:
* **Allowed Callback URLs** — `http://localhost:8080`
* **Allowed Logout URLs** — `http://localhost:8080`
* **Allowed Web Origins** — `http://localhost:8080`
These must match the development URL exactly! If you move your application into production in the future, you'll have to update these values to match the production URL.
Now the last thing you need to do before running the existing application is configure it to use your Auth0 variables from this dashboard.
Create a new file called `auth_config.json` in the root of the `client` folder and paste in the following:
```js
// client/auth_config.json
{
"domain": "your-domain.auth0.com",
"clientId": "yourclientid"
}
```
Now you need to fill in the `domain` and `clientId` values for the `auth_config` file. In your Auth0 dashboard, make sure you're on the Application page that you just created ("Vue Events").
* Copy the value for "Domain" and paste it into `domain` in `auth_config.json`
* Copy the value for "Client ID" and paste it into `clientId` in `auth_config.json`
Once that's finished, you can start the application by running:
```bash
npm run serve
```
Make sure you're in the `client` folder when you run the above command.
See it in action at [http://localhost:8080/](http://localhost:8080/)!

You can keep this running in your terminal in the background throughout the rest of the tutorial.
### Server setup
Next, it's time to focus on the server side of things. Inside the `server` folder, make two files: `package.json` and `server.js`:
Open up the `server/package.json` file in your code editor and paste in the following:
```json
{
"name": "events-api",
"version": "1.0.0",
"description": "",
"main": "server.js",
"scripts": {
"start": "nodemon server.js",
"test": "echo \"Error: no test specified\" && exit 1"
},
"author": "",
"license": "ISC",
"dependencies": {
"body-parser": "^1.19.0",
"cors": "^2.8.5",
"express": "^4.17.1",
"nodemon": "^1.19.4"
}
}
```
This will hold all the dependencies required for this project, which will be covered in more detail soon. Switch back to the terminal (still in the `server` folder) and install them with:
```bash
npm install
```
Now you need to add some basic boilerplate so that you can get the server up and running. Open up `server/server.js` and paste in the following:
```js
// server/server.js
const express = require('express');
const bodyParser = require('body-parser');
const cors = require('cors');
const app = express();
const port = 8000;
app.use(bodyParser.json());
app.use(cors());
app.use(express.urlencoded({ extended: true }));
app.get('/', (req, res) => {
res.send(`Hi! Server is listening on port ${port}`)
});
// listen on the port
app.listen(port);
```
This `server.js` file will be the entry point for the Express app. Once it's time to run the app, this file will be read and executed. So what's going on here?
First, you're requiring all of those dependencies that you installed earlier with that `package.json` file:
* [Express](https://expressjs.com) — Express is a lightweight framework for Node.js. It will greatly simplify how you make HTTP requests.
* [body-parser](https://www.npmjs.com/package/body-parser) — `body-parser` is a Node.js middleware that helps us parse incoming HTTP requests by exposing them on `req.body`.
* [CORS](https://www.npmjs.com/package/cors) — If you've ever worked with an API before, you might have come across this pesky message: `The CORS policy for this site does not allow access from the specified Origin.`. The Express CORS package enables [CORS](https://auth0.com/docs/cross-origin-authentication) support, which allows you to manage access to your API from other domains.
In the next lines, you're using all of those dependencies with `app.use()`.
After that, you're setting up your first `GET` request!
```js
app.get('/', (req, res) => {
res.send(`Hi! Server is listening on port ${port}`)
});
```
This `GET` request will be covered more in-depth once you create all of the HTTP requests, but for now, this is just used to make sure the server is running.
If you look back in that `server/package.json` file, there's an object named `scripts` that has this entry:
```js
// ...
{ "start" : "nodemon server.js" }
// ...
```
When you run the app, [Nodemon](https://www.npmjs.com/package/nodemon) will watch for any changes and automatically restart the server when a change is detected. This saves a lot of development time since you won't have to refresh the page manually.
In a new tab in your terminal, navigate to the `server` folder and enter in the following:
```bash
npm start
```
This will start up the server. You can check that it's working by going to [http://localhost:8000](http://localhost:8000) in your browser. You should see `Hi! Server is listening on port 8000`. If not, feel free to reach out in the comments and we can help you debug!
## Creating the API
Now that the folder structure for both the client and server is set up and both apps are running, it's time to get to work on building the API.
For simplicity, you're just going to store the `events` data in a variable instead of connecting to a database to pull it.
Add the following into the `server.js` file right before `app.get()`:
```js
// server/server.js
// dependencies
// ...
// use dependencies
// ...
// mock data to send to our frontend
let events =
[
{
id: 1,
name: 'Charity Ball',
category: 'Fundraising',
description: 'Spend an elegant night of dinner and dancing with us as we raise money for our new rescue farm.',
featuredImage: 'https://placekitten.com/500/500',
images: [
'https://placekitten.com/500/500',
'https://placekitten.com/500/500',
'https://placekitten.com/500/500',
],
location: '1234 Fancy Ave',
date: '12-25-2019',
time: '11:30'
},
{
id: 2,
name: 'Rescue Center Goods Drive',
category: 'Adoptions',
description: 'Come to our donation drive to help us replenish our stock of pet food, toys, bedding, etc. We will have live bands, games, food trucks, and much more.',
featuredImage: 'https://placekitten.com/500/500',
images: [
'https://placekitten.com/500/500'
],
location: '1234 Dog Alley',
date: '11-21-2019',
time: '12:00'
}
];
```
Just to recap in case you skipped the previous [Vue login tutorial](https://auth0.com/blog/beginner-vuejs-tutorial-with-user-login/#Adding-Data-to-Our-Vue-App), the `events` variable is an array of objects, where each object is a single event.
The Vue application uses this data in 2 ways:
* To get a list of all events
* To get the details of a single event
Since the Vue client is going to make an API call to get that data, you have to build out an endpoint for each of those!
### Get all events
Open up `server/server.js` and add the following below the `events` variable:
```js
// server/server.js
// let events = [...]
// ...
// NEW -- get all events
app.get('/events', (req, res) => {
res.send(events);
});
```
In the code snippet above, you're making a `GET` request using the [Express `get()` method](https://expressjs.com/en/4x/api.html#app.get).
The first parameter is the route, `/events`, that you'll use to hit this endpoint. The next parameter is a callback function that's called when a request is made to the `/events` path. This callback function is waiting for a request to this endpoint and once you make the request, the callback function is executed.
This callback function also has two parameters: `req` and `res`:
* `req` — Contains properties about the request being made such as the method (`GET`), body, HTTP headers, and more. You can see the [full list of properties here](http://expressjs.com/en/4x/api.html#req).
* `res` — Contains the HTTP response that is sent after receiving a request. It can take advantage of [several different methods](http://expressjs.com/en/4x/api.html#res). A common one is `res.send()`, which will handle sending this response back after the request is made.
When a `GET` request is made to `/events`, the callback function is called and the `events` data is sent back in the response with `res.send(events)`.
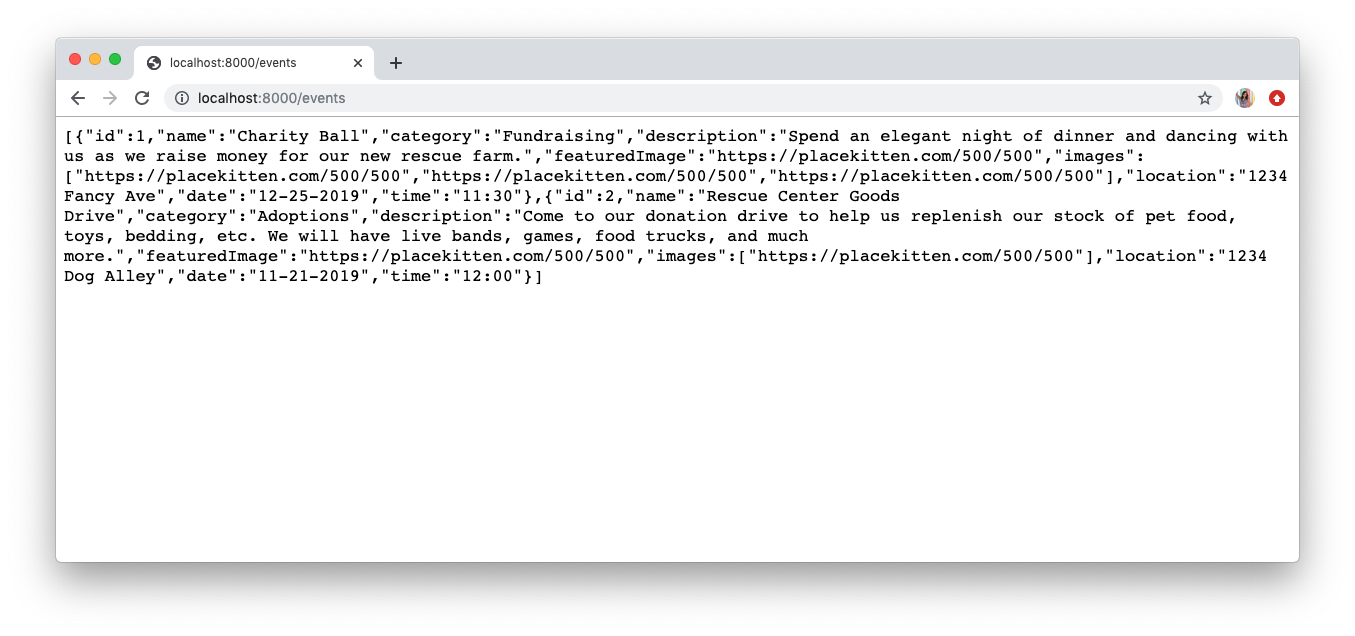
Make sure your Express server is still running and then open up [http://localhost:8000/events](http://localhost:8000/events) in the browser. You should be able to see all of the `events` data returned!
### Get a single event
Next, you need to create an endpoint that returns a single event by `id` from the `events` array.
Paste the following into `server.js` right below `app.get(/events)`:
```js
// server/server.js
app.get('/events/:id', (req, res) => {
const id = Number(req.params.id);
const event = events.find(event => event.id === id);
res.send(event);
});
```
This will respond to a request that hits the route `/events/:id`. This route includes something called a **route parameter**, `:id`. When the client makes a request to this endpoint, it's going to specify the event it wants back by replacing `:id` with the actual `id` of the event.
For example, if you want to get the data for the event with `id` of `1`, then you make a request to `/events/1`.
Typically you would end up querying a database to fulfill this request, but since you have the `events` array in this file for simplicity, you're just going to parse the object for the event where the `id` matches the one in the request.
You can access the specified `id` with the `params` property: `req.params.id`. You're then casting that to a `Number` type so that it can be properly matched as you search the `events` array.
You're also using the [JavaScript `find()` method](https://developer.mozilla.org/en-US/docs/Web/JavaScript/Reference/Global_Objects/Array/find) to grab the event object whose `id` matches the `id` in the request. Once you have that, you're sending the event data back in the response.
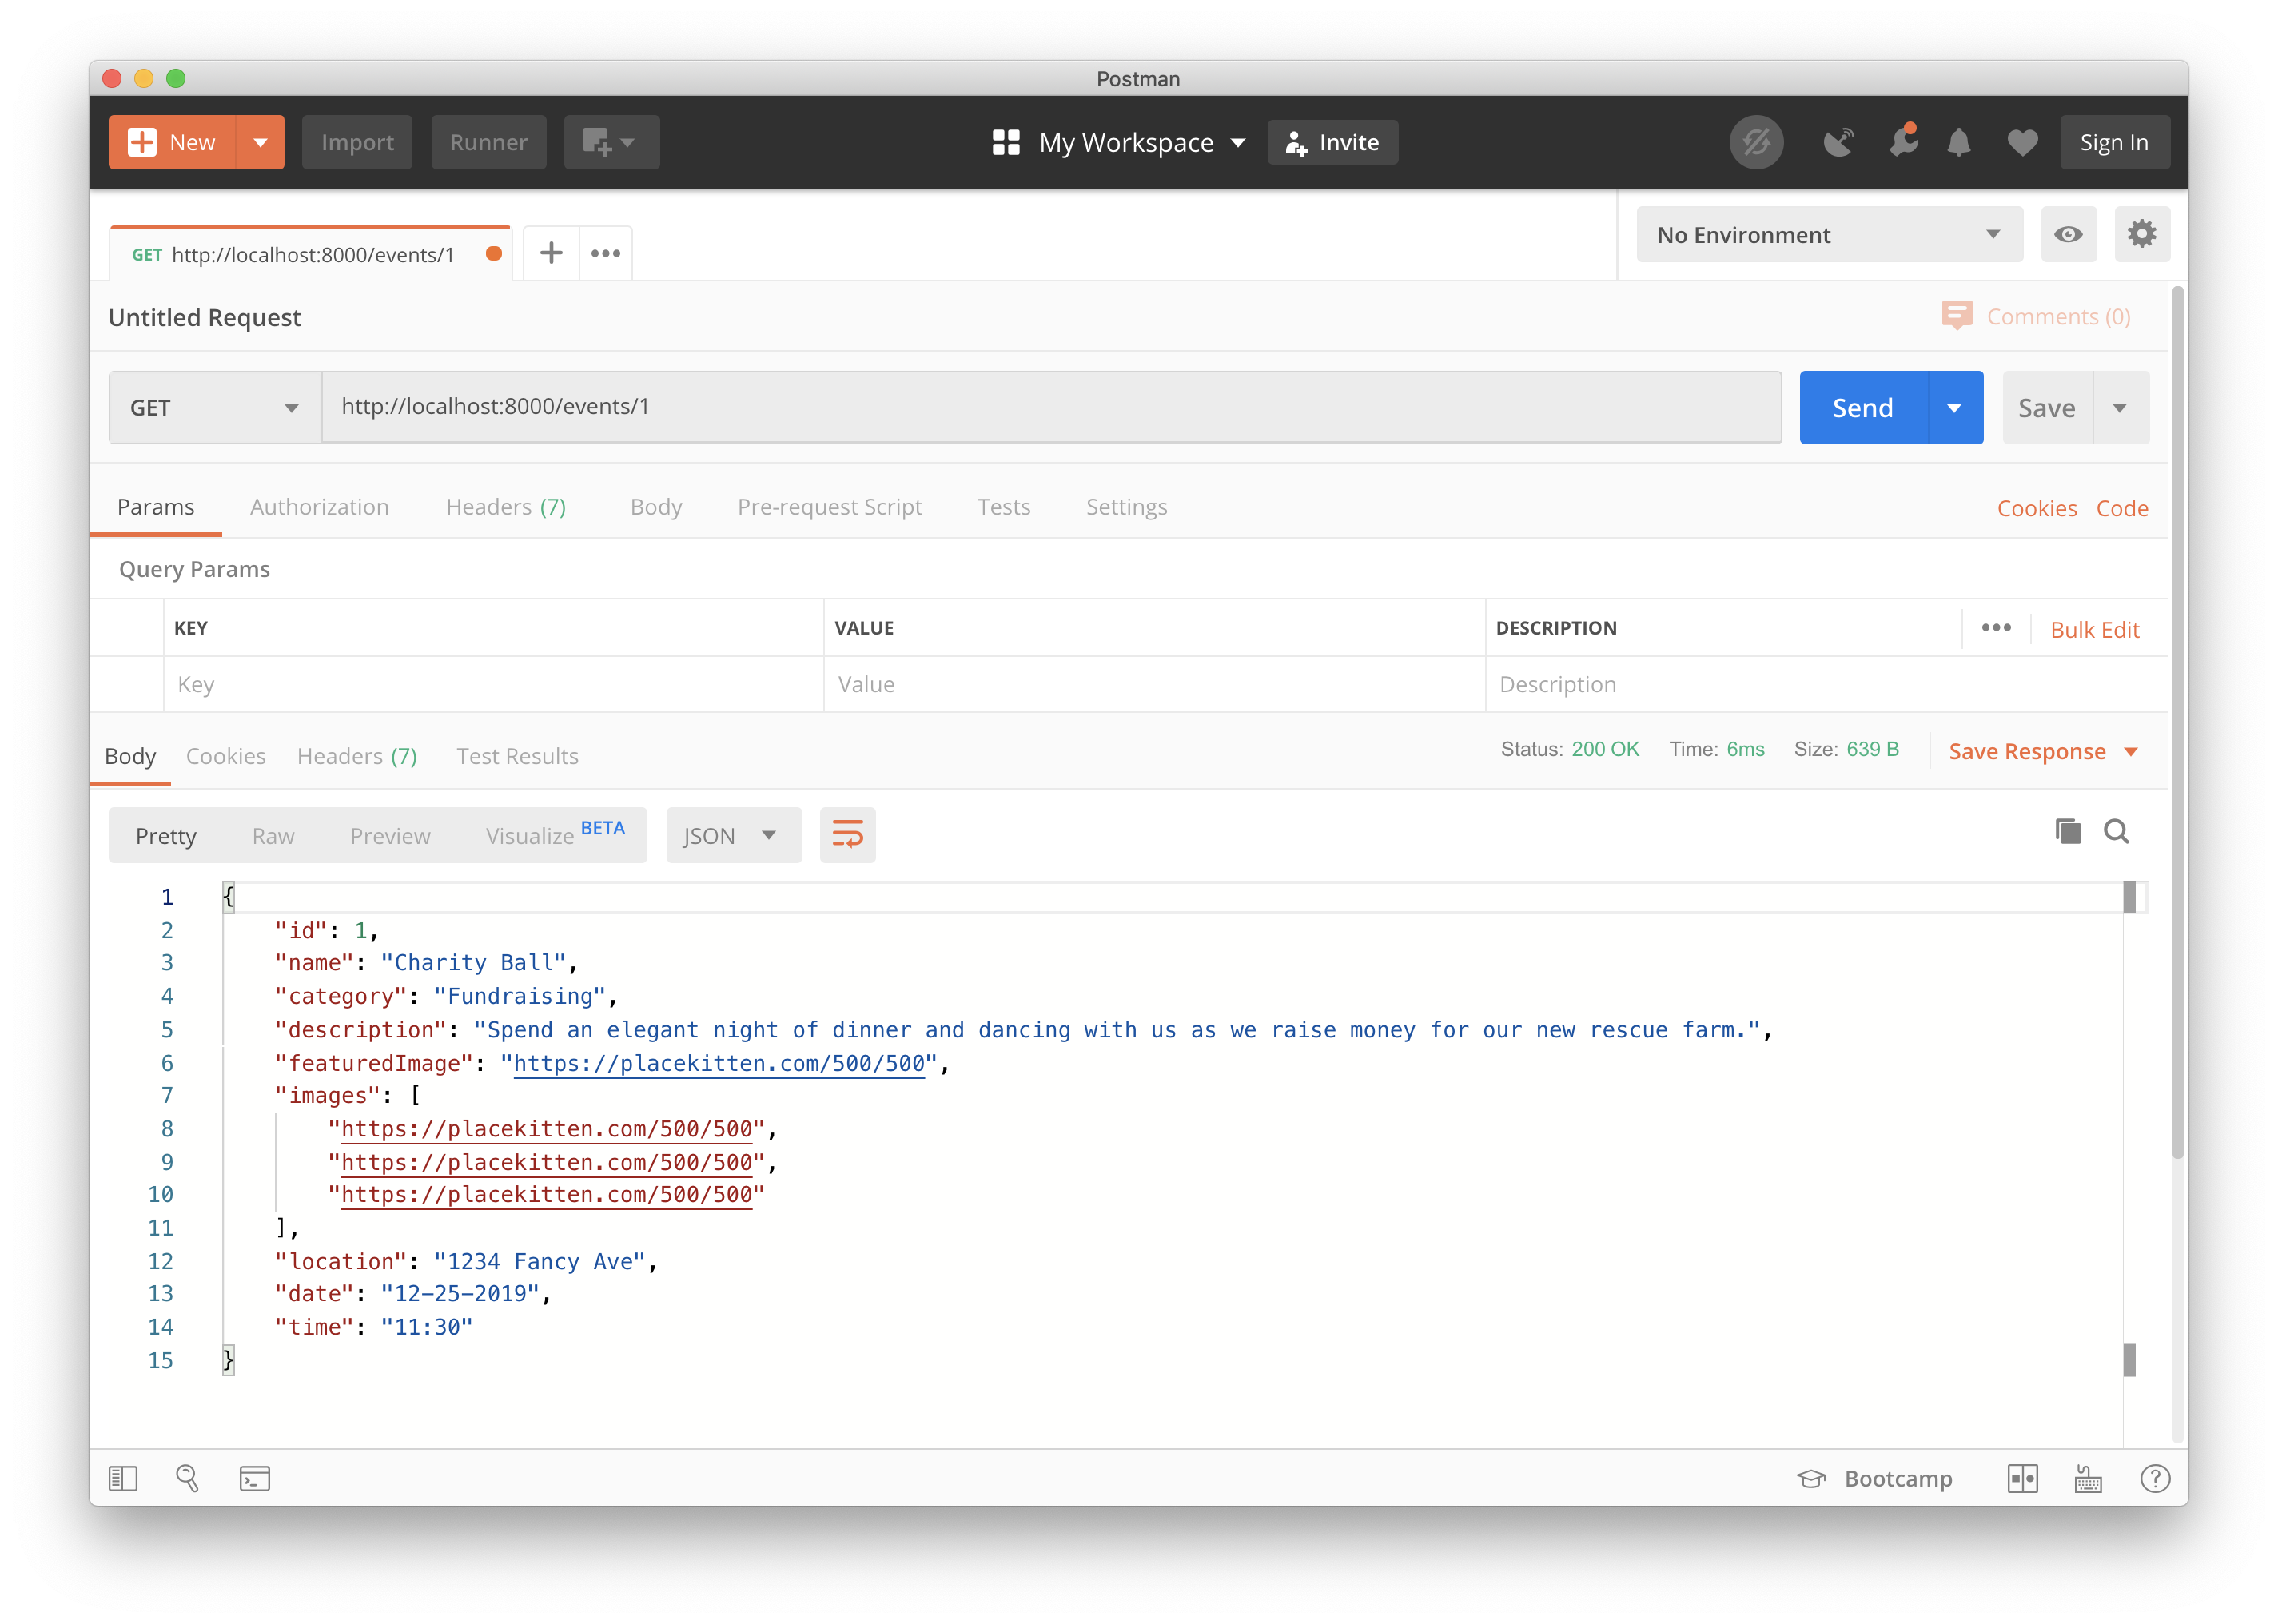
Head to [http://localhost:8000/events/1](http://localhost:8000/events/1) in your browser to test it out. This is the data you should see for the single event:
```
{
id: 1,
name: 'Charity Ball',
category: 'Fundraising',
description: 'Spend an elegant night of dinner and dancing with us as we raise money for our new rescue farm.',
featuredImage: 'https://placekitten.com/500/500',
images: [
'https://placekitten.com/500/500',
'https://placekitten.com/500/500',
'https://placekitten.com/500/500',
],
location: '1234 Fancy Ave',
date: '12-25-2019',
time: '11:30'
}
```
Great! Now that your API is ready to go, you can switch back to the client side and pull this data into your Vue app.
## Connecting the Vue Client to the Express Server
You're going to create a service, `EventService`, to accomplish this. Create a new folder inside of `client/src` and name it `services`. Then inside of that, create a new file called `EventService.js`.
Open up the `EventService.js` file and paste this in:
```js
// client/src/services/EventService.js
import axios from "axios"
export default {
async getEvents() {
let res = await axios.get("http://localhost:8000/events");
return res.data;
},
async getEventSingle(eventId) {
let res = await axios.get("http://localhost:8000/events/" + eventId);
return res.data;
}
}
```
You're going to use a [package called axios](https://github.com/axios/axios), which is a promise-based HTTP client that will assist you in making HTTP requests.
First, you need to install it. Make sure you're in the `client` folder and run:
```bash
npm install axios
```
The first method, `getEvents()`, sends a `GET` request to the server at the `/events` endpoint. Then it waits for the data to come back (`res.data`). The data you're expecting is the same data that you saw earlier when you set up the Express API and [hit that `/events` route](http://localhost:8000/events).
The next method, `getEventSingle(eventId)`, makes a `GET` request to `/events/:id`, where `:id` is some parameter you're passing in.
Now that the client can make API calls, you have to go through the specific components that need this data and let them use this `EventService`.
### HTTP requests from components
First, you need to work on pulling dynamic data into a single event component.
**Single Event Component**
Make sure your Vue application is still running, `npm run serve`, and then open up the event page in the browser for the event with `id` of 1: [http://localhost:8080/event/1](http://localhost:8080/event/1). If it prompts you to log in (as it should), go ahead and sign in now.
The goal is to keep this page looking exactly the same, but cut down the component logic. You'll do this by utilizing `EventService` to get the data.
First, open up the `EventSingle` component in `src/views/EventSingle.vue` and scroll down to the bottom where the `
```
Instead of using the hard-coded `events` array, you're now making a call to the API to get the data.
Right after the Vue instance is created, you're calling `this.getEventData()`, which uses the `getEventSingle()` method that you defined in `eventService.js`. Then you're passing it the event `id` that is plucked from the route parameter (`http://localhost:8080/event/1`). Once the data is returned from the service, you're assigning it to the `event` variable defined in `data()`.
Now there's one more mystical-looking line here:
```js
this.$set(this, "event", event);
```
What does this do (pun intended :P)? `this` is referring to the Vue instance. You're using the `$set` method on the Vue instance to set the `event` object as a property on the Vue instance. This allows Vue to [detect changes](https://vuejs.org/v2/guide/reactivity.html) to the data, which is essential if you want your application to be reactive.
Now, if you look at [the single event page](http://localhost:8080/event/1), it should still look the same, but you've cut your component code down significantly!
**Event List Component**
There is still one other component that's using hard-coded data: `EventsList.vue`. This is the component that's pulling in all of the list data to populate the homepage. Each individual card on the homepage then uses the `EventSingle` component that you just modified to show the data for that specific event.
Open up `src/components/EventsList.vue` and modify it to use `EventService`. Replace everything between the `script` tags with:
``` html
```
This is pretty similar to what you did in the `EventSingle` component, except this time you're calling the `getEvents()` method from `EventService`.
Now if you go back to [the homepage](http://localhost:8080), everything should look the same! And if you ever need to modify data, you can do it in one spot now: the Express API.
## Securing the Express API
In the previous article, one of the requirements of the application was that only authenticated users should be able to access all of the details of an event (beyond those shown on the homepage).
Right now, if you go to a [single event page](http://localhost:8080/event/1), you're kicked to the login page if you aren't already logged in. So you're done, right? Well... not so fast.
Remember when you were testing the API earlier before modifying the Vue application? You went directly to the API endpoint in your browser and you were able to see the event details. Try it out by going to [http://localhost:8000/events/1](http://localhost:8000/events/1) in your browser. You can also use [Postman](https://www.getpostman.com/) to create the `GET` request (or any HTTP requests) and access the same data, as shown in the image below.
The authentication requirement that you implemented in the previous article only stopped the user from accessing that specific view at `/events/:id`, but when you're calling an API, you need to protect that separately.
You're going to accomplish this using the free Auth0 account that you set up earlier.
### Creating the API in the Auth0 dashboard
Head to your [Auth0 management dashboard](https://manage.auth0.com/dashboard) and click on "APIs" in the menu on the left-hand side.
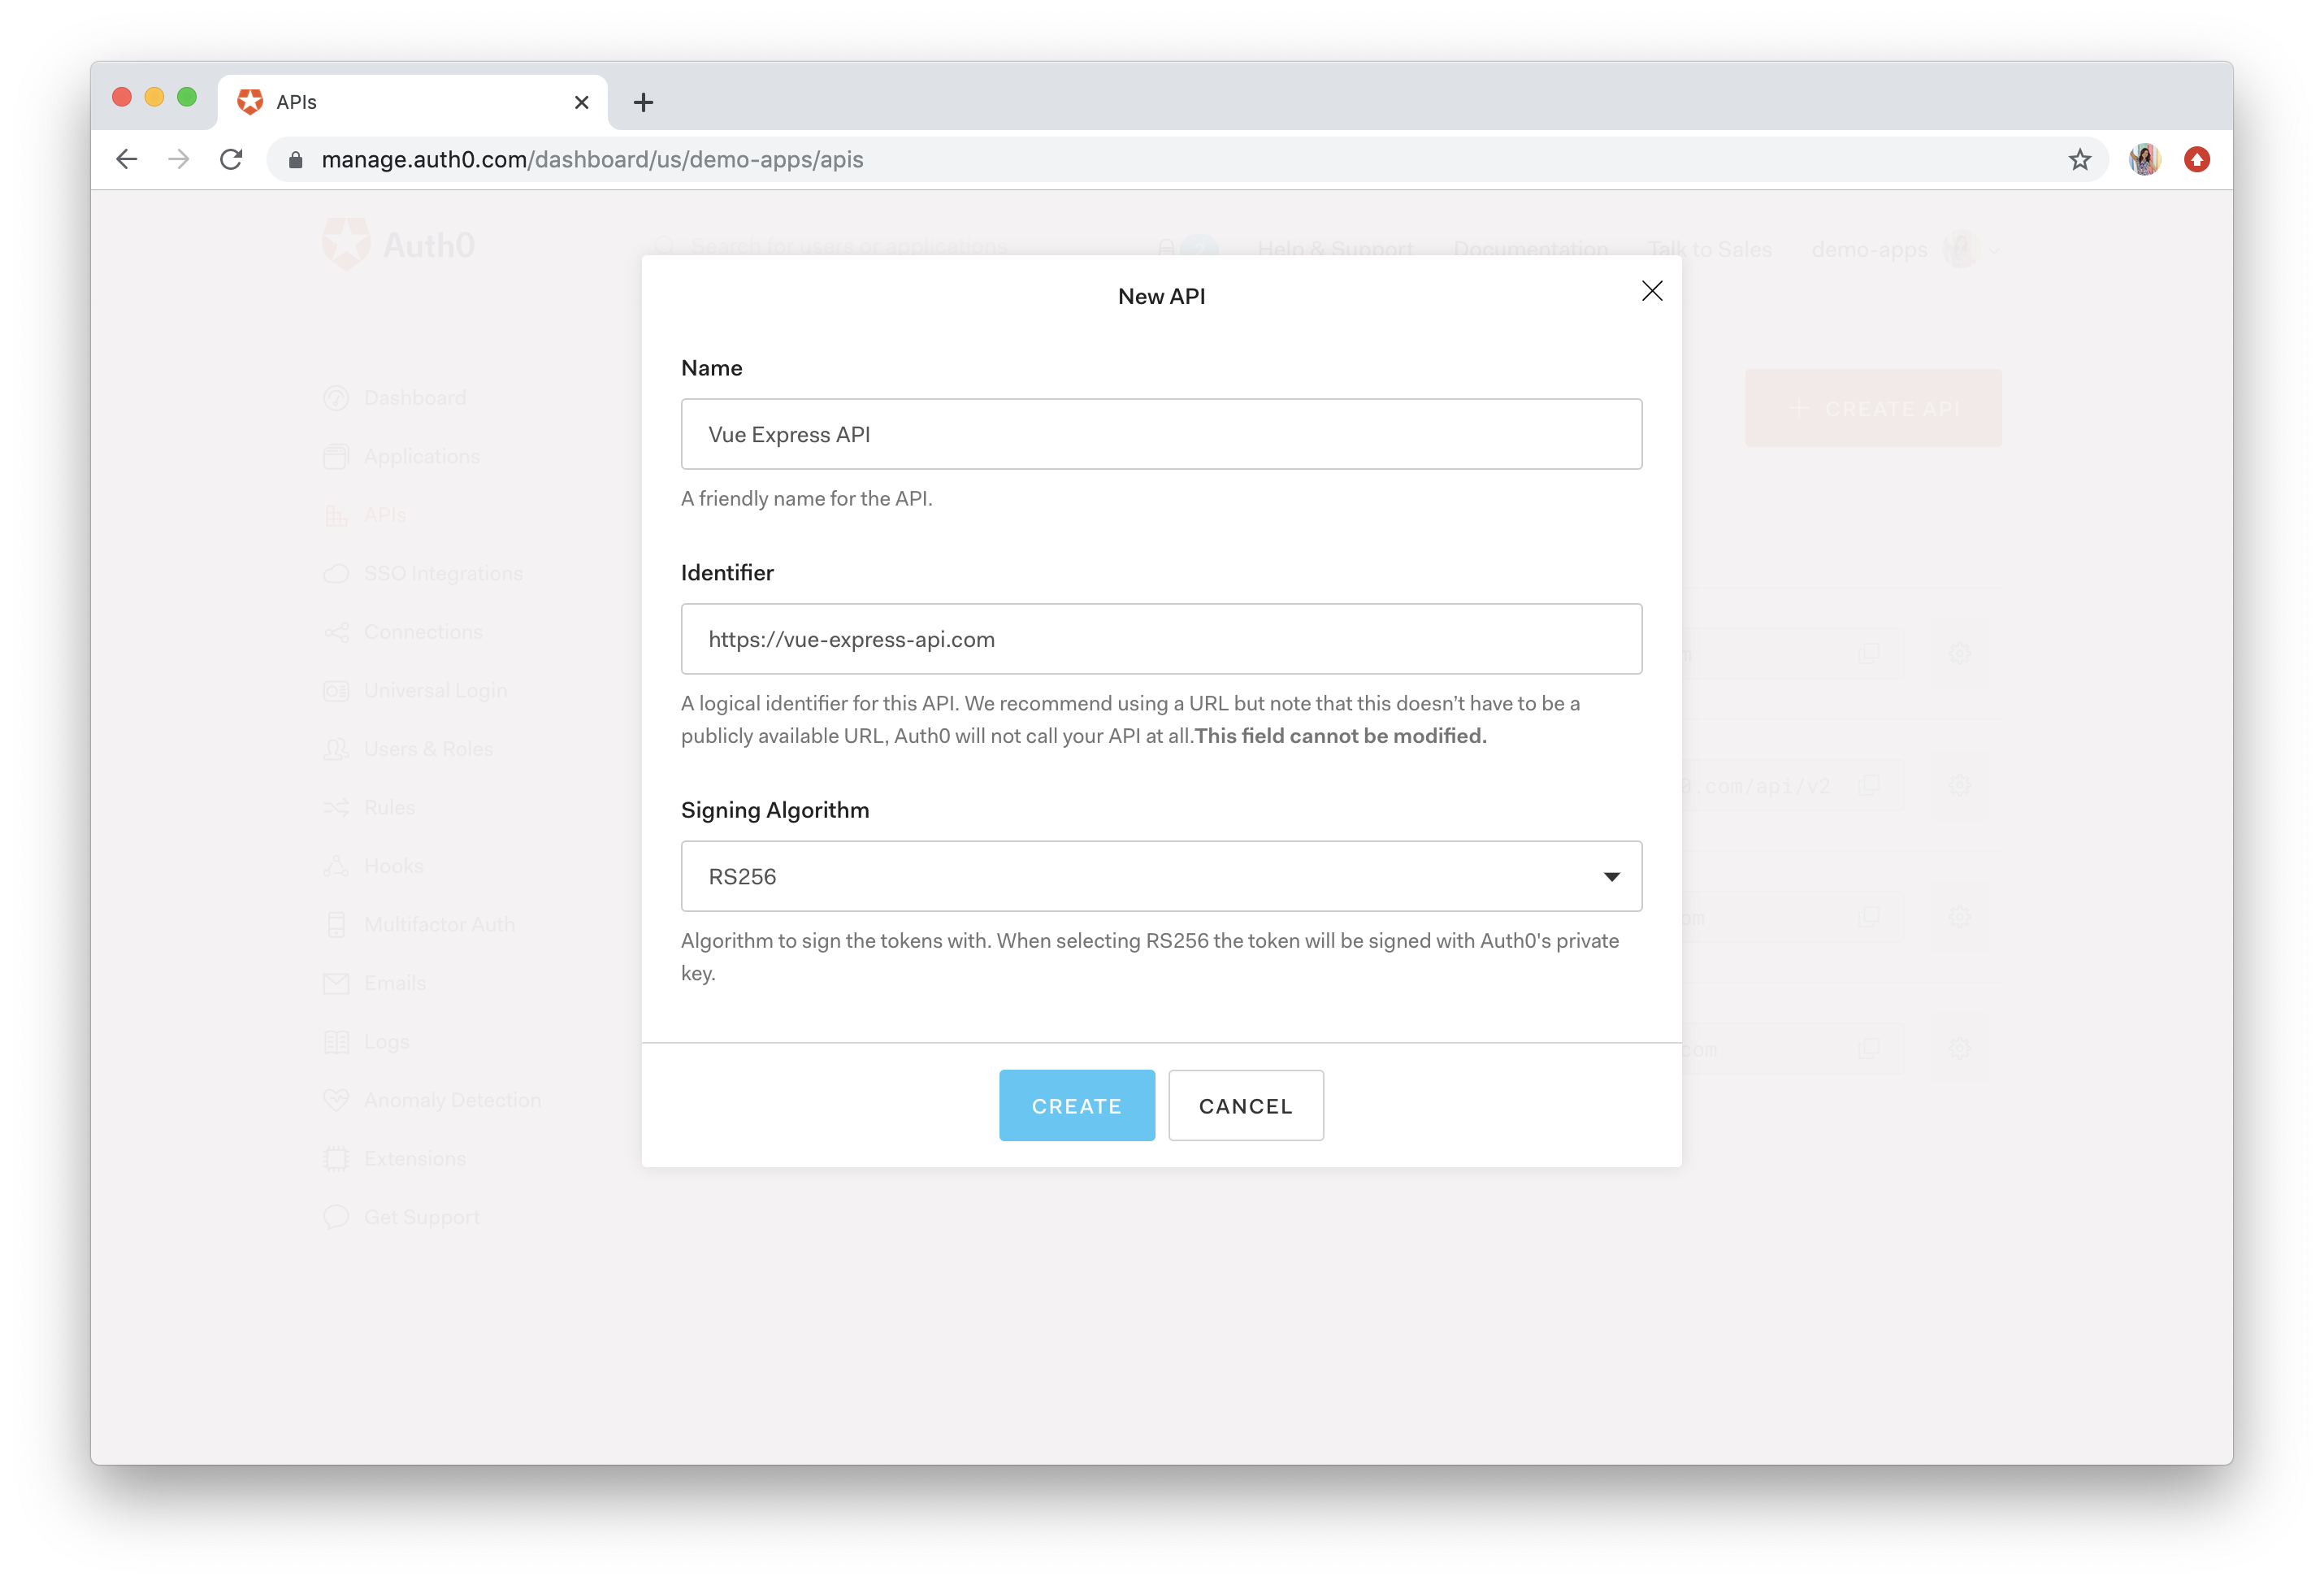
Then click on the big red "Create API" button in the top-right corner to create the API that you'll be connecting to your Express application.
Fill out the following information and then press "Create":
* **Name**: `Vue Express API` or something similar
* **Identifier**: `https://vue-express-api.com` or something similar
> Note: This is just an identifier for the API. We recommend using a URL, but it will never be called and doesn't have to be a publicly available URL.
* **Signing Algorithm**: `RS256`
### Integrating Auth0 into the Express App
The end goal is to require the client to have a validated [access token](https://auth0.com/docs/tokens/access-tokens) every time it makes a request to the API. You'll handle getting that access token later on in the client code.
Right now, you need to switch your focus back to that `server/server.js` file on the Express side. The client is going to make a request to the API and in that request will be an access token. You need to modify the `server.js` file to make sure that the token is valid.
Here's what you need to do to secure the API:
1. Create a middleware function to validate the access token
2. Enable the middleware in the routes you want to be protected
Once that's done, you'll switch back to the client and work on issuing the access token and adding it to the API request.
In your terminal, make sure you're in the `server` folder and run:
```bash
npm install express-jwt jwks-rsa
```
* `express-jwt` — middleware used to validate [JWTs (JSON Web Tokens)](https://jwt.io/)
* `jwks-rsa` — retrieves RSA signing keys from a [JWKS (JSON Web Key Set)](https://auth0.com/docs/jwks) endpoint
**JWT** — A [JSON Web Token is an open standard](https://auth0.com/docs/jwt) that defines a compact and self-contained way to securely transmit information between two parties as a JSON object. It's small enough that it can be sent in an HTTP header and it also contains all information needed about an entity, which means you don't need multiple database queries to validate it.
**JWKS** — A [JSON Web Key Set is a set of keys](https://auth0.com/docs/jwks) that contains the public keys needed to verify any JWT issued by an authorization server (Auth0 in this case). Auth0 created a JWKS endpoint for you after you created your tenant, which can be found at [`https://YOUR_DOMAIN/.well-known/jwks.json`](https://YOUR_DOMAIN/.well-known/jwks.json).
This is a more detailed look at what you're going to do in the `server.js` file:
* Import the `express-jwt` and `jwks-rsa` dependencies
* Add **your** configuration variables from the Auth0 dashboard: `domain` and `audience`
* Create the middleware, `checkJwt`, to validate the JWT using `express-jwt`
* Get signing keys using `jwksRsa`, the key identifier from the header claim (this shows which key was used), and your JWKS endpoint from Auth0
* Validate the audience, issuer, and signing algorithm (these values should match those in your Auth0 dashboard)
* Add the middleware to all of the routes that you want to protect
Open up `server/server.js` and modify it as follows. The new code is marked with a `NEW` comment.
```js
// server/server.js
// import dependencies
const jwt = require("express-jwt"); // NEW
const jwksRsa = require("jwks-rsa"); // NEW
// app.use()
// NEW
// Set up Auth0 configuration
const authConfig = {
domain: "YOUR_DOMAIN",
audience: "YOUR_API_IDENTIFIER"
};
// NEW
// Create middleware to validate the JWT using express-jwt
const checkJwt = jwt({
// Provide a signing key based on the key identifier in the header and the signing keys provided by your Auth0 JWKS endpoint.
secret: jwksRsa.expressJwtSecret({
cache: true,
rateLimit: true,
jwksRequestsPerMinute: 5,
jwksUri: `https://${authConfig.domain}/.well-known/jwks.json`
}),
// Validate the audience (Identifier) and the issuer (Domain).
audience: authConfig.audience,
issuer: `https://${authConfig.domain}/`,
algorithms: ["RS256"]
});
// let events = [...]
// get all events
app.get('/events', (req, res) => {
res.send(events);
});
// NEW (updated)
// For this app, we only want to protect the route that returns the details of an event
app.get('/events/:id', checkJwt, (req, res) => {
const id = Number(req.params.id);
const event = events.find(event => event.id === id);
res.send(event);
});
```
Make sure to modify `domain` and `audience` inside `authConfig`. These values can be found in your [Auth0 dashboard](https://manage.auth0.com/dashboard/) where `domain` is found in any of your Applications and `audience` is the `Identifier` value under "APIs" > "Vue Express API" (or whatever you named it).
Just to recap, whenever a route is hit that has the `checkJwt` middleware, the process of checking and validating the token begins.
You created the `checkJwt` middleware with `express-jwt`, which decodes the token and then passes the request and payload to `jwksRsa.expressJwtSecret()`. Then you use the `jwks-rsa` package to download all of the signing keys from your Auth0 JWKS endpoint. It will check if any of the signing keys from your JWKS endpoint match the key identifier that came through in the header. If so, you pass the correct signing key to `express-jwt` and it continues its validation of the token. If not, an error is thrown.
You're all ready to handle when a token comes through! Now you need to switch to the client so that you can create and attach tokens to your HTTP requests.
## Making Vue HTTP Requests with an Access Token
First, you need to tell Auth0 to issue a JSON Web Token to your client.
Open `client/auth_config.json` and add a new value for the `audience`. This can be found in the Auth0 dashboard under "APIs" > Your API ("Vue Express API") > `Identifier`. It's the same value you used on the Express side.
```js
{
"domain": "YOUR_DOMAIN",
"clientId": "YOUR_CLIENT_ID",
"audience": "YOUR_API_IDENTIFIER"
}
```
This will tell Auth0 which API you want to access.
Next, open up `client/src/main.js` and add the `audience` value to the plugin. Make sure you add it to the import at the top as well.
```js
// client/src/main.js
// NEW
// Import the Auth0 configuration
import { domain, clientId, audience } from "../auth_config.json";
// ...
// Install the authentication plugin here
Vue.use(Auth0Plugin, {
domain,
clientId,
audience,
onRedirectCallback: appState => {
router.push(
appState && appState.targetUrl
? appState.targetUrl
: window.location.pathname
);
}
});
```
Now you just need to add the access token to your API calls!
You're going to modify the `axios` request for `getEventSingle(eventId)` so that when the request is made, the token is sent in the Authorization header along with it. The token will be passed in from the `EventSingle` component. It's coming from the global `Auth0Plugin` that was configured in the previous article, but this can only be accessed by Vue components, so you have to get the token from inside the component and pass it to the service to make the HTTP request.
Open up `client/src/services/EventService.js` and modify `getEventSingle()` as follows:
```js
// client/src/services/EventService.js
async getEventSingle(eventId, accessToken) {
let res = await axios.get("http://localhost:8000/events/" + eventId, {
headers: {
Authorization: `Bearer ${accessToken}`
}
});
return res.data;
}
```
Now the last thing to do is modify that `EventSingle` component to get the access token. Open up `client/src/views/EventSingle.vue` and update `methods` as follows:
```js
// client/src/views/EventSingle.vue
// UPDATED - Get the access token from the auth wrapper and pass it
// to EventService
methods: {
async getEventData() {
// Get the access token from the auth wrapper
const accessToken = await this.$auth.getTokenSilently()
// Use the eventService to call the getEventSingle method
EventService.getEventSingle(this.$route.params.id, accessToken)
.then(
(event => {
this.$set(this, "event", event);
}).bind(this)
);
}
}
```
You're grabbing this token from the auth wrapper in `client/src/auth/index.js` and sending it through to the service.
When a user goes to a single event page, they'll be kicked to the login page if unauthenticated. This was done in [the previous Vue Login tutorial](https://auth0.com/blog/beginner-vuejs-tutorial-with-user-login/#Require-Users-to-Sign-in-to-View-Events) by modifying the router file to run the `authGuard` before the user can access that route.
If you're following this tutorial to secure your own API, make sure you include `beforeEnter: authGuard` in the routes you want to protect. You can see an example of this in `client/src/router/index.js`.
Now it's time to test it out! Go to [`http://localhost:8080/event/1`](http://localhost:8080/event/1) and if you're not logged in, you should be kicked to a login screen.
Once you sign in, you'll be issued an access token. The client will then make a request to the API with that access token, the server will validate it, and if it's valid, it will pass the data back!
Just to confirm that the access token is required, run that same HTTP request from earlier through Postman.
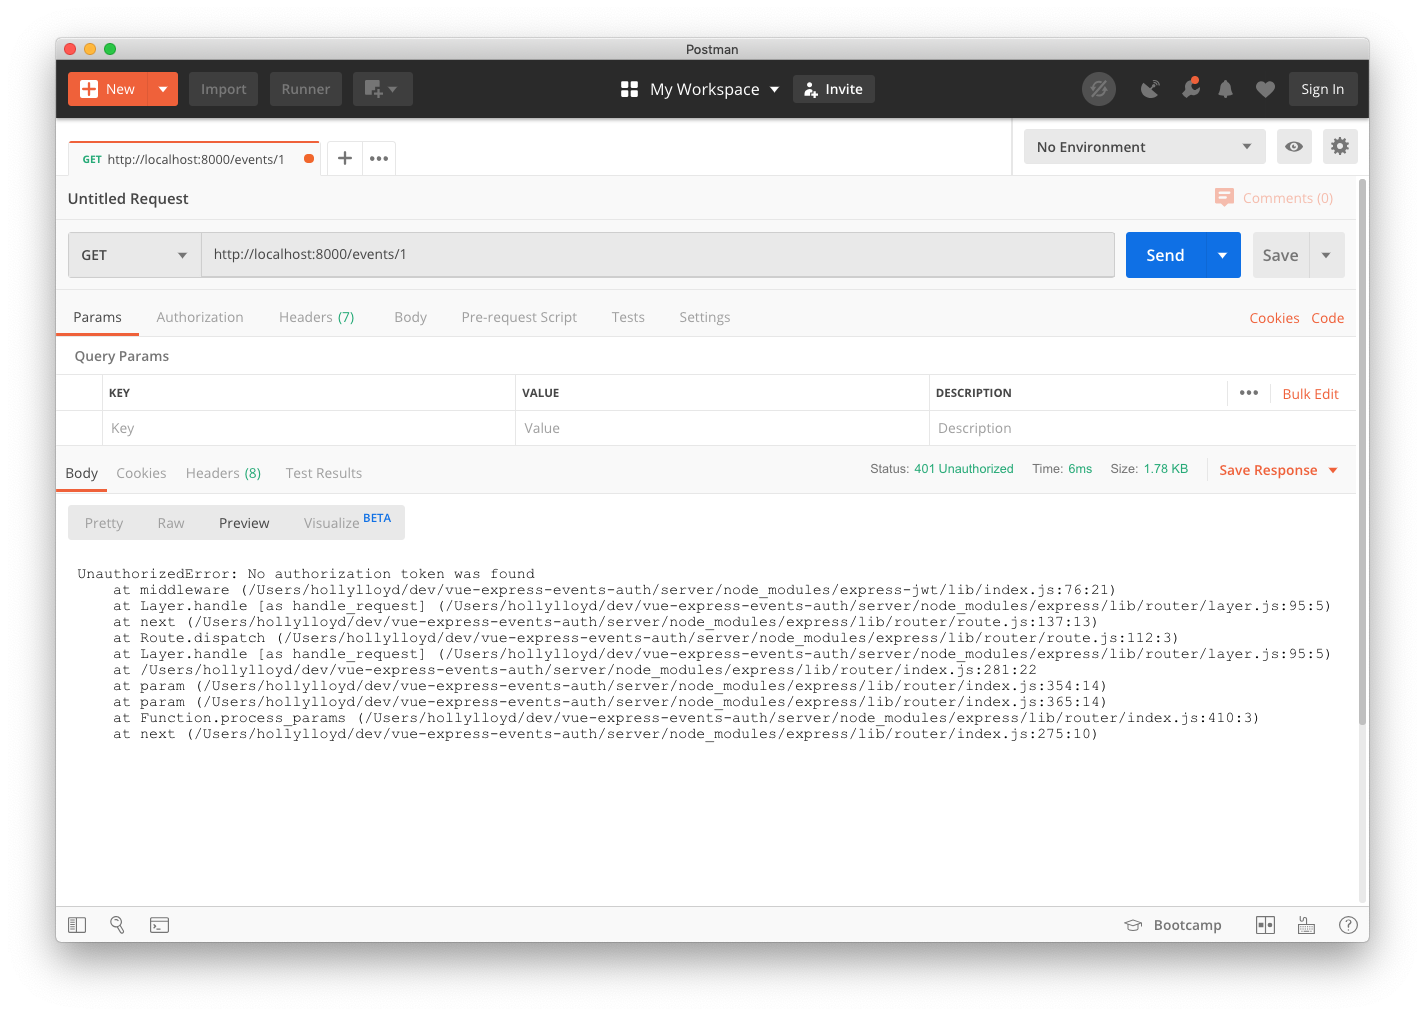
Perfect! No authorization token was provided, so the data isn't returned.
This time, include an Authorization header with the Bearer token in the request. To quickly get the access token, add `console.log(accessToken)` to the app right after it's declared. Then refresh and you'll now see the access token in the console. Make sure to delete this code once you're done. This is a valid token, so the event data should be returned.
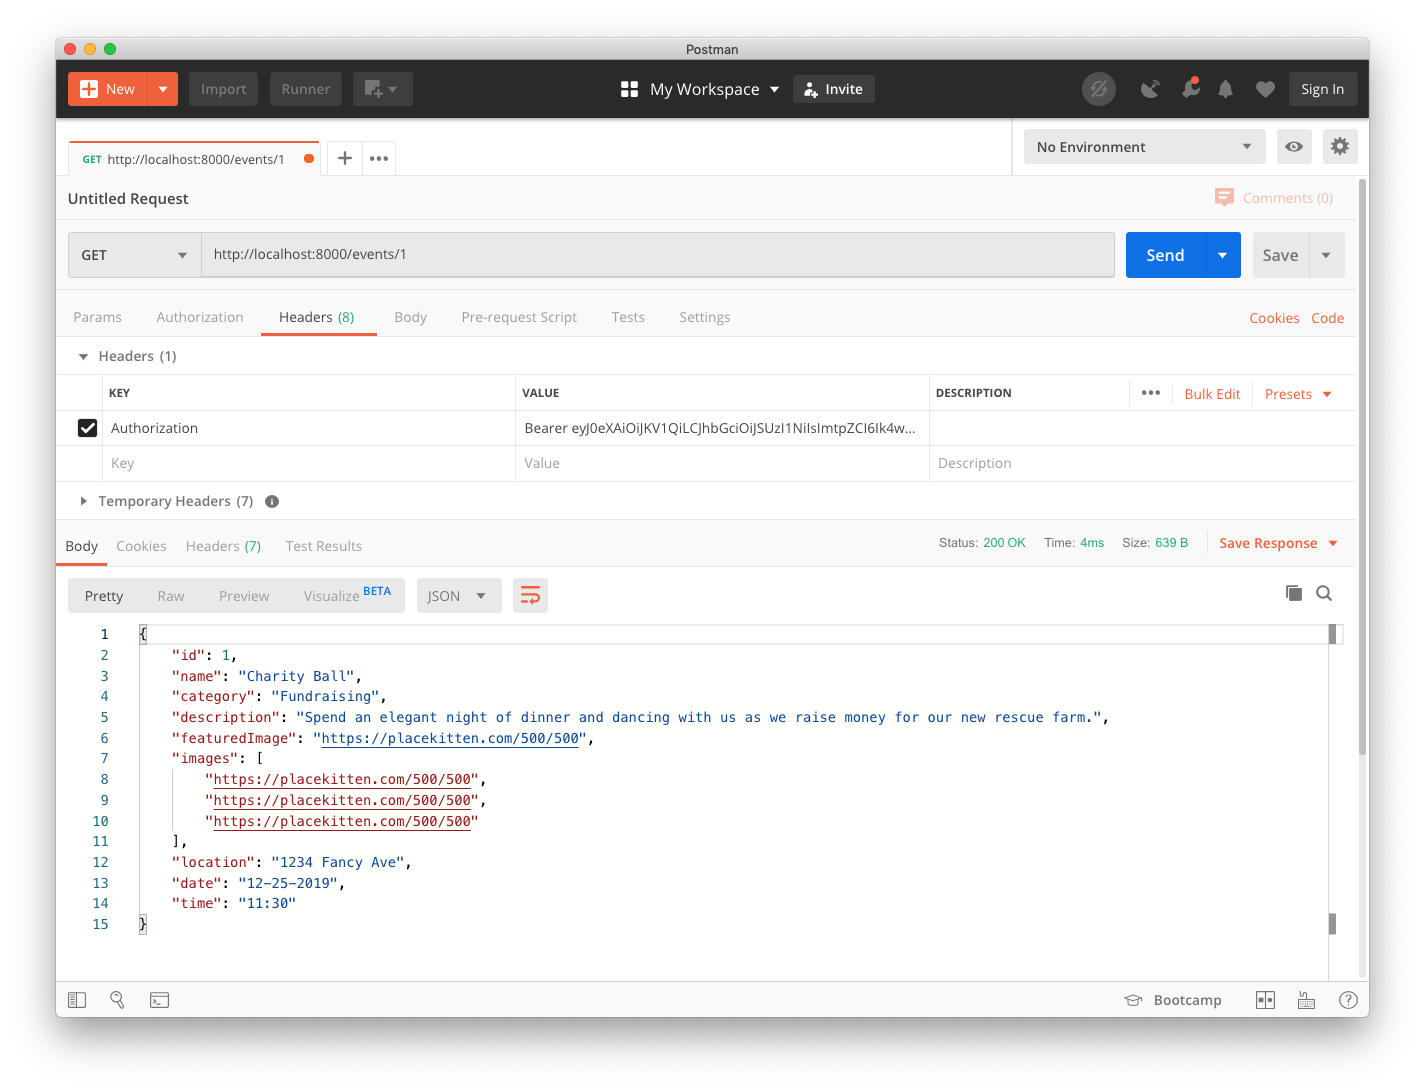
And it is! So as you can see, a valid access token is now required to view the single events data.
Of course in this instance, people could always go to the publicly available endpoint, [`http://localhost:8000/events`](http://localhost:8000/events) and view all of the data there, which includes specific event details, but this application was just meant to demonstrate how you can protect specific routes.
If you wanted to, you could easily go back into the `server.js` file and add the `checkJwt` middleware to protect the route that returns all events as well. In a real application, you'd likely be pulling this data from a database, so the private data would probably include extra information not available in a public endpoint anyway.
## Wrap Up
If you made it to the end, congratulations! Let's just recap all the things you covered:
* Creating an Express API
* Configuring an API in the Auth0 dashboard
* Making HTTP requests from a Vue.js app to an API
* Securing API endpoints using Express and Vue.js
You can download the full [GitHub repository with the final code here](https://github.com/auth0-blog/vue-express-auth). I hope this was helpful and of course, feel free to ask any questions below! Thanks for reading!