---
title: "Developing RESTful APIs with Loopback"
description: "Learn how to build and secure RESTful APIs with Loopback."
authors:
- name: "Prosper Otemuyiwa"
url: "https://auth0.com/blog/authors/prosper-otemuyiwa/"
date: "Sep 7, 2017"
category: "Developers,Tutorial,Loopback"
tags: ["loopback", "backend", "javascript", "authentication", "auth0", "nodejs", "restful", "api"]
url: "https://auth0.com/blog/developing-restful-apis-with-loopback/"
---
# Developing RESTful APIs with Loopback
---
**TL;DR:** In this tutorial, I'll show you how to leverage [Loopback](https://loopback.io/) to build out your REST APIs quickly. Check out the [repo](https://github.com/auth0-blog/loopback-starwars-api) to get the code.
---
## RESTful API Overview
API (Application Programming Interface) endpoints are the connections between your application and the rest of the developer community. You can decide to open up your data source to the world by crafting API endpoints that developers can consume. Furthermore, developing an application that will require clients for different platforms such as Desktop, Android, iOS and Windows platform will most likely need a RESTful API for all the clients to access data seamlessly. Unless of course you are engaging [GraphQL](http://graphql.org), the alternate option to RESTful APIs.
If you have built a RESTful API from scratch before now, you'll understand that there are a lot of processes you have to follow, a lot of code to write, and a lot of testing to do to ensure your APIs work correctly. Loopback was designed to fast-track those processes and take away the pain of developing RESTful APIs from scratch.
## What is Loopback
**Loopback** is a highly extensible open-source Node.js framework that can be used to build dynamic end-to-end REST APIs. With little or no code, Loopback hands you the power to:
* Quickly create APIs.
* Connect your APIs to data sources such as relational databases, MongoDB, REST APIs, etc.
* Incorporate model relationships and access controls for complex APIs.
* Extend your APIs.
**Loopback** runs on-premises or in the cloud. It also provides several [add-on components](https://loopback.io/doc/en/lb2/LoopBack-components.html) for file management, 3rd-party login, OAuth2, Storage providers e.t.c. Simply put, Loopback allows you to create REST APIs in minutes. It does that by:
* Providing a CLI tool for use.
* Providing a built-in API explorer.
* Allowing a developer create models based on a particular schema.
* Allowing a developer to create dynamic models in the absence of a schema.
* Providing SDKs for iOS, Android, and AngularJS to easily create client apps.
## Application Overview
In this tutorial, we'll build a RESTful API for Star Wars. A Star Wars API, **[SWAPI](https://swapi.co/)** already exists. Rather than crafting an entirely different API, we'll build a clone of the Star Wars API. The objective of building the API clone is to learn how to craft APIs quickly with Loopback. Consider a case where you are assigned the task of designing an API for a new interesting HBO show, e.g Game of Thrones, that has caught the attention of Google & Facebook.
## Explore SWAPI (Star Wars API) Design
We will explore the API endpoints for SWAPI(Star Wars API). There are six endpoints for the Star Wars API:
* Planets - `/planets`
* People - `/people`
* Starships - `/starships`
* Species - `/species`
* Vehicles - `/vehicles`
* Films - `/films`
1. **Planets** - This resource is about the planetary bodies in the Star Wars Universe.
* GET - `/planets` returns a list of all the planets.
* GET - `/planets/` returns the details of a specific planet.
2. **People** - This resource deals with characters in the Star Wars Universe.
* GET - `/people` returns a list of all the characters.
* GET - `/planets/` returns the details of a specific character.
3. **Starships** - This resource is about the transport crafts that have hyperdrive capability in the Star Wars Universe.
* GET - `/starships` returns a list of all the starships.
* GET - `/starships/` returns the details of a specific starship.
4. **Vehicles** - This resource is about the transport crafts that do not have hyperdrive capability.
* GET - `/vehicles` returns a list of all the vehicles.
* GET - `/vehicles/` returns the details of vehicle.
5. **Species** - This resource is about the type of characters in the Star Wars Universe.
* GET - `/species` returns a list of all the species.
* GET - `/species/` returns the details of a specific specie.
6. **Films** - This resource is about the episodes of the Star Wars film.
* GET - `/films` returns a list of all the episodes.
* GET - `/films/` returns the details of a specific film.
In the analysis above, you'll observe that all the calls for the endpoints are `GET` requests. We'll ensure that the other HTTP verbs, `POST`, `PUT`, and `DELETE` will be active for these endpoints when building the API.
## Getting Started: Building Star Wars API
Let's get started. Go ahead and install Loopback:
```bash
npm install -g loopback-cli
```
Once you are done installing, go ahead and run the loopback command:
```bash
lb
```
The Loopback CLI is an interactive wizard. A series of questions will be asked such as the name of the application, directory to store the project, the version of loopback you prefer and the kind of application you want loopback to provision. Answer the questions:

Next, move into the `starwars` directory from the terminal.
## Create Models
We'll create all the models needed for this API. As mentioned earlier, we have 6 resources, `People`, `Films`, `Starships`, `Species`, `Vehicles` and `Planets`. In our API, we'll deal with just 5.
```bash
lb model
```
It will prompt you for a model name: Enter `People`. Next, select `db(memory)` as the data source. Go ahead and select `PersistedModel` as the model's base class. Hit `Enter` to expose People via the REST API.
Next, select `common` model. Selecting this ensures that the models are stored in the `common` directory. You can also decide to store them in the `server` directory only. The server directory is used to store server-side models while the common directory stores models that can potentially used by both server and client Loopback APIs.
Now, you are going to define properties for the `People` model. The properties are:
* Property name: name, Property type: string, Required? Yes
* Property name: height, Property type: number, Required? Yes
* Property name: mass, Property type: number, Required? Yes
* Property name: gender, Property type: string, Required? Yes
Repeat the same process for the `Films`, `Starships`, `Species` and `Planets` models with these properties:
**Note:** You'll have to run `lb model` on your terminal everytime you need to create a new model.
#### Film
* Property name: title, Property type: string, Required? Yes
* Property name: opening_crawl, Property type: string, Required? Yes
* Property name: director, Property type: string, Required? Yes
* Property name: producer, Property type: string, Required? Yes
#### Starship
* Property name: name, Property type: string, Required? Yes
* Property name: model, Property type: string, Required? Yes
* Property name: manufacturer, Property type: string, Required? Yes
* Property name: passengers, Property type: number, Required? Yes
* Property name: class, Property type: string, Required? Yes
#### Specie
* Property name: name, Property type: string, Required? Yes
* Property name: classification, Property type: string, Required? Yes
* Property name: designation, Property type: string, Required? Yes
* Property name: average_height, Property type: number, Required? Yes
* Property name: skin_color, Property type: string, Required? Yes
* Property name: language, Property type: string, Required? Yes
#### Planet
* Property name: name, Property type: string, Required? Yes
* Property name: rotation_period, Property type: number, Required? Yes
* Property name: orbital_period, Property type: number, Required? Yes
* Property name: diameter, Property type: number, Required? Yes
* Property name: population, Property type: nunber, Required? Yes
Once you are done provisioning all the models, head over to the `common/models` directory. In this directory, you'll see all the models in `.js` and `.json` files. For example, `people.js` and `people.json` file.
Next, test the API. Run the command below in the root path of the project:
```bash
node .
```
Check out your API explorer.
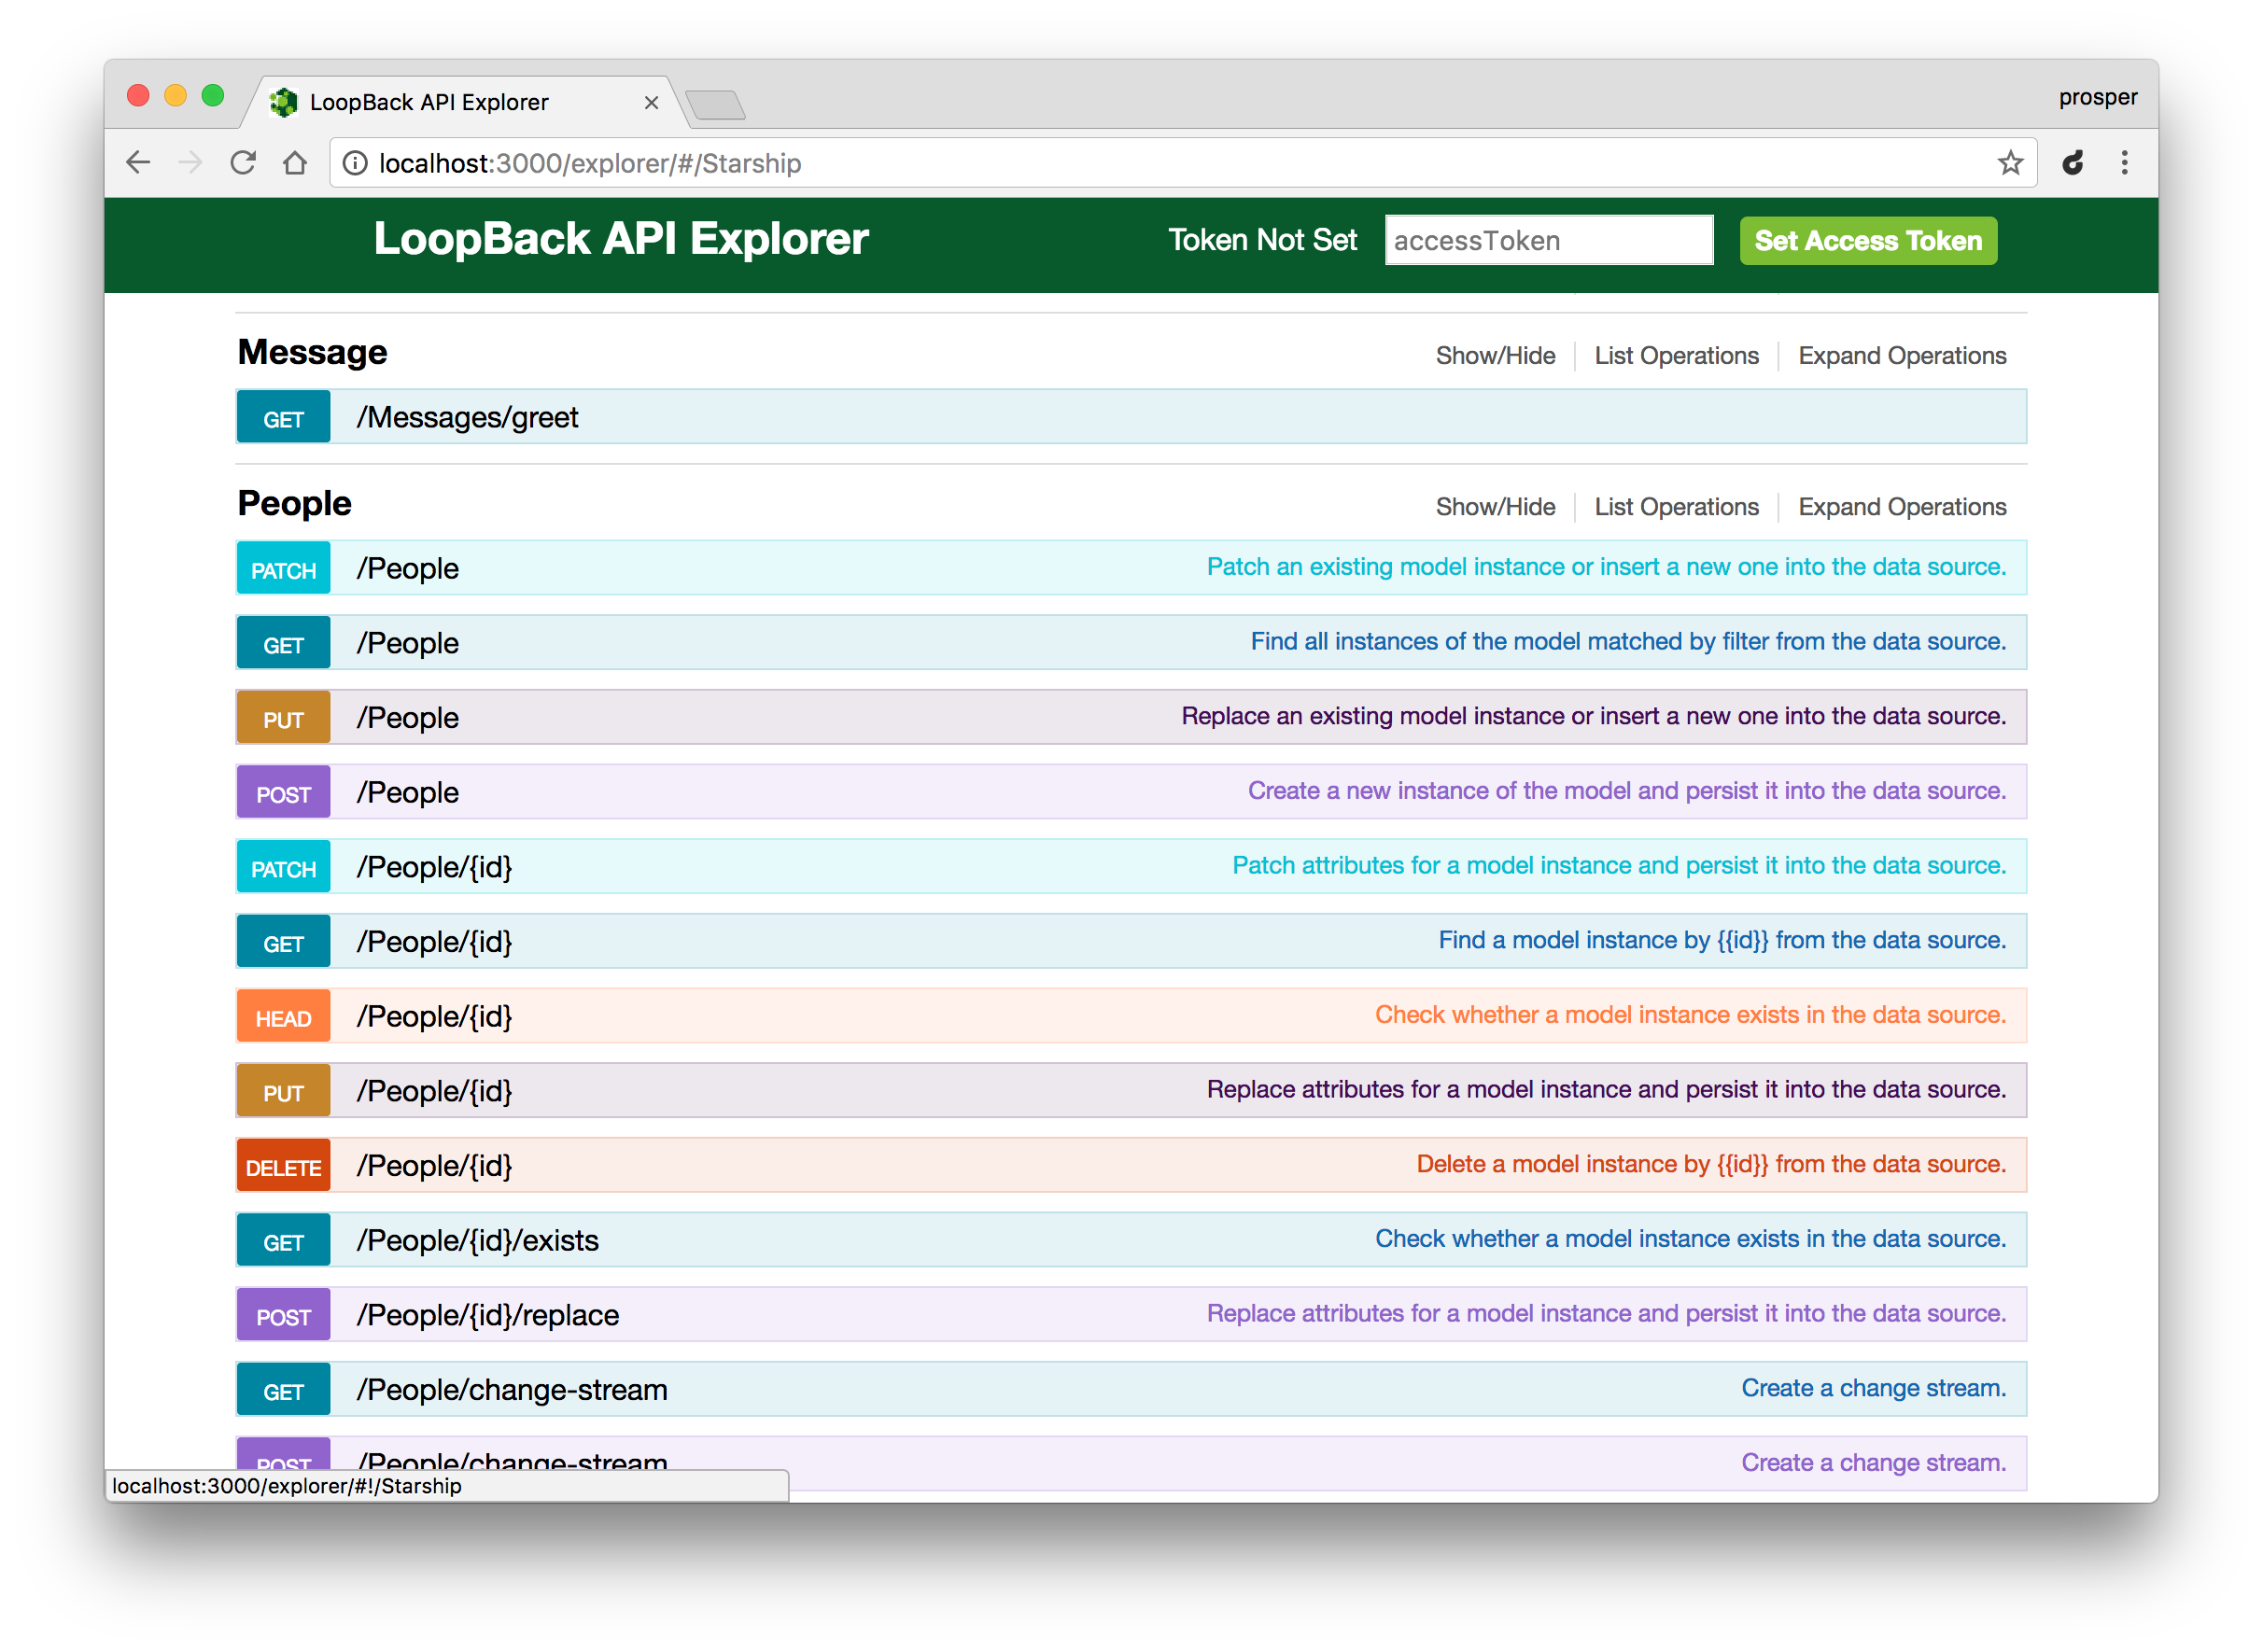
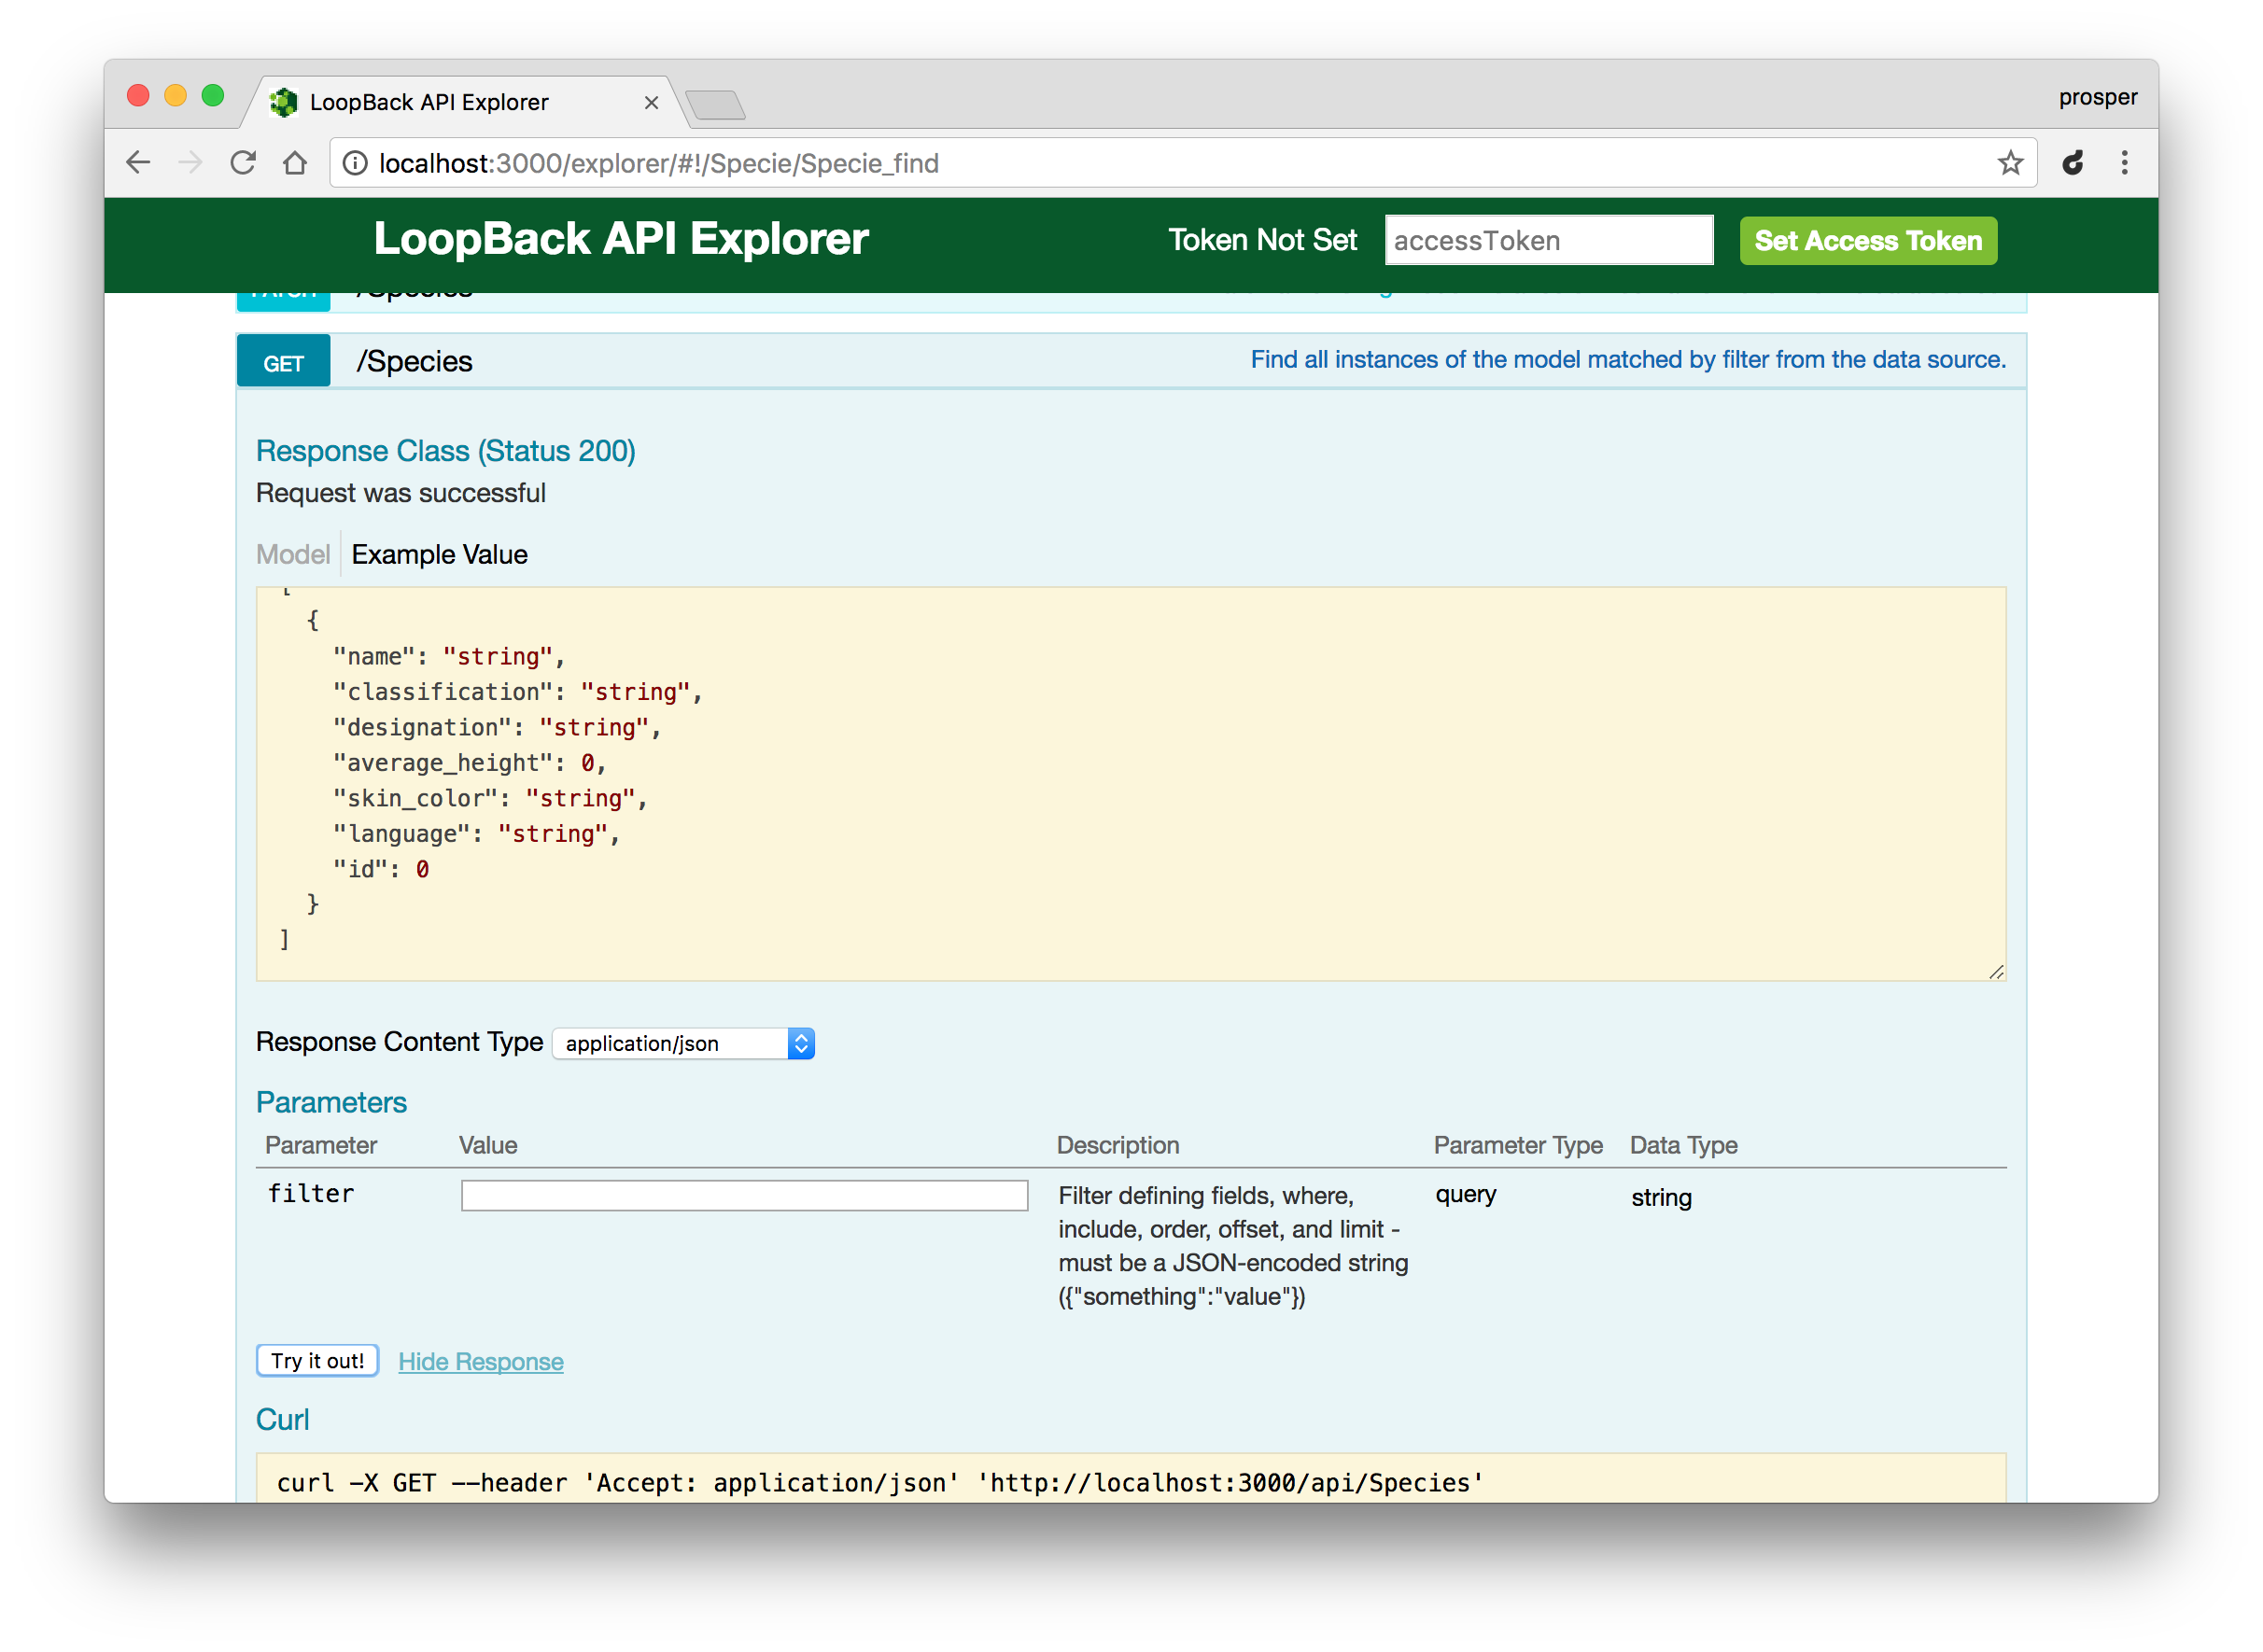
Here, you can see the structure of the Species resource. Clicking the `Try it out` button hits the `/api/species` endpoint and returns a result. Right now, there is no data so it returns an empty array.
**Note:** The API explorer allows you test the REST API operations during development.
Let's make a POST request to the `/api/film` endpoint using the explorer. Head over to `http://localhost:3000/explorer/#!/Films/Films_create`.
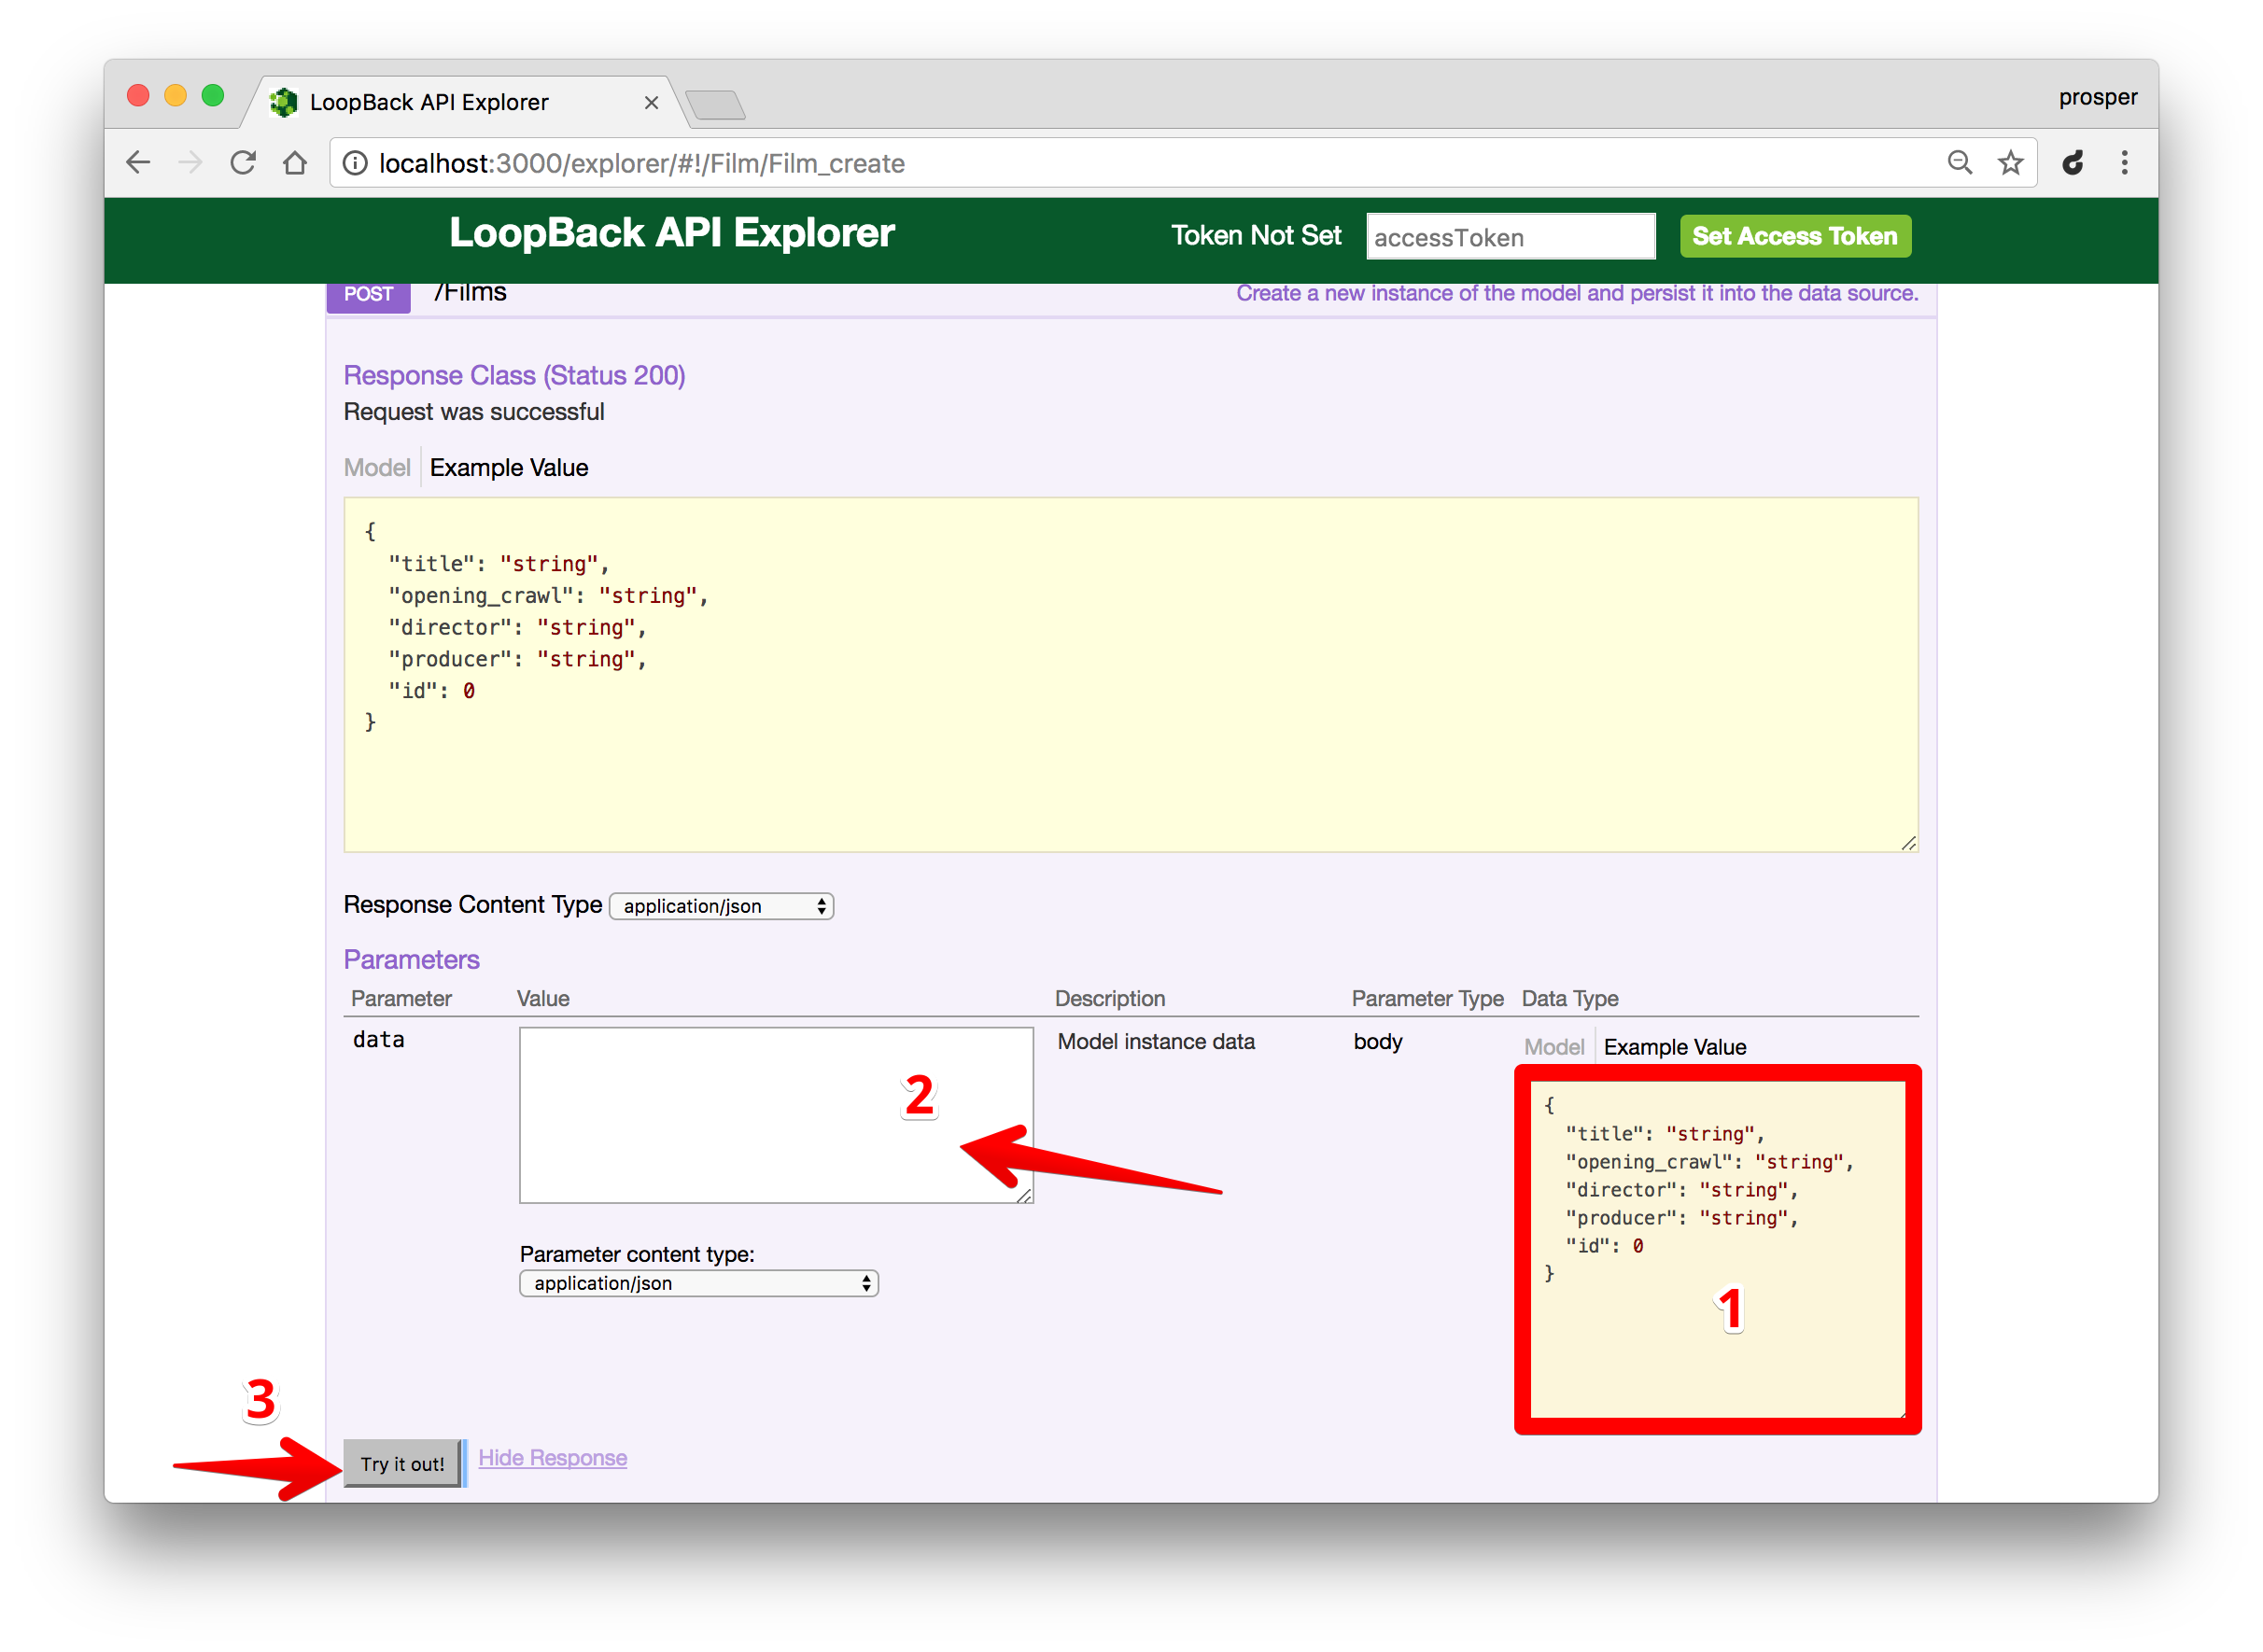
In the diagram above, I highlighted three steps:
1. Click on the text-area box that contains the parameter type. Once clicked, it immediately appears in box 2.
2. Edit the JSON in the box.
3. Click the `Try it out` button to execute the POST operation
**Note:** If you are making a POST request to create a new record, remove the `id` attribute and value from the JSON in the box. `id` is automatically assigned.

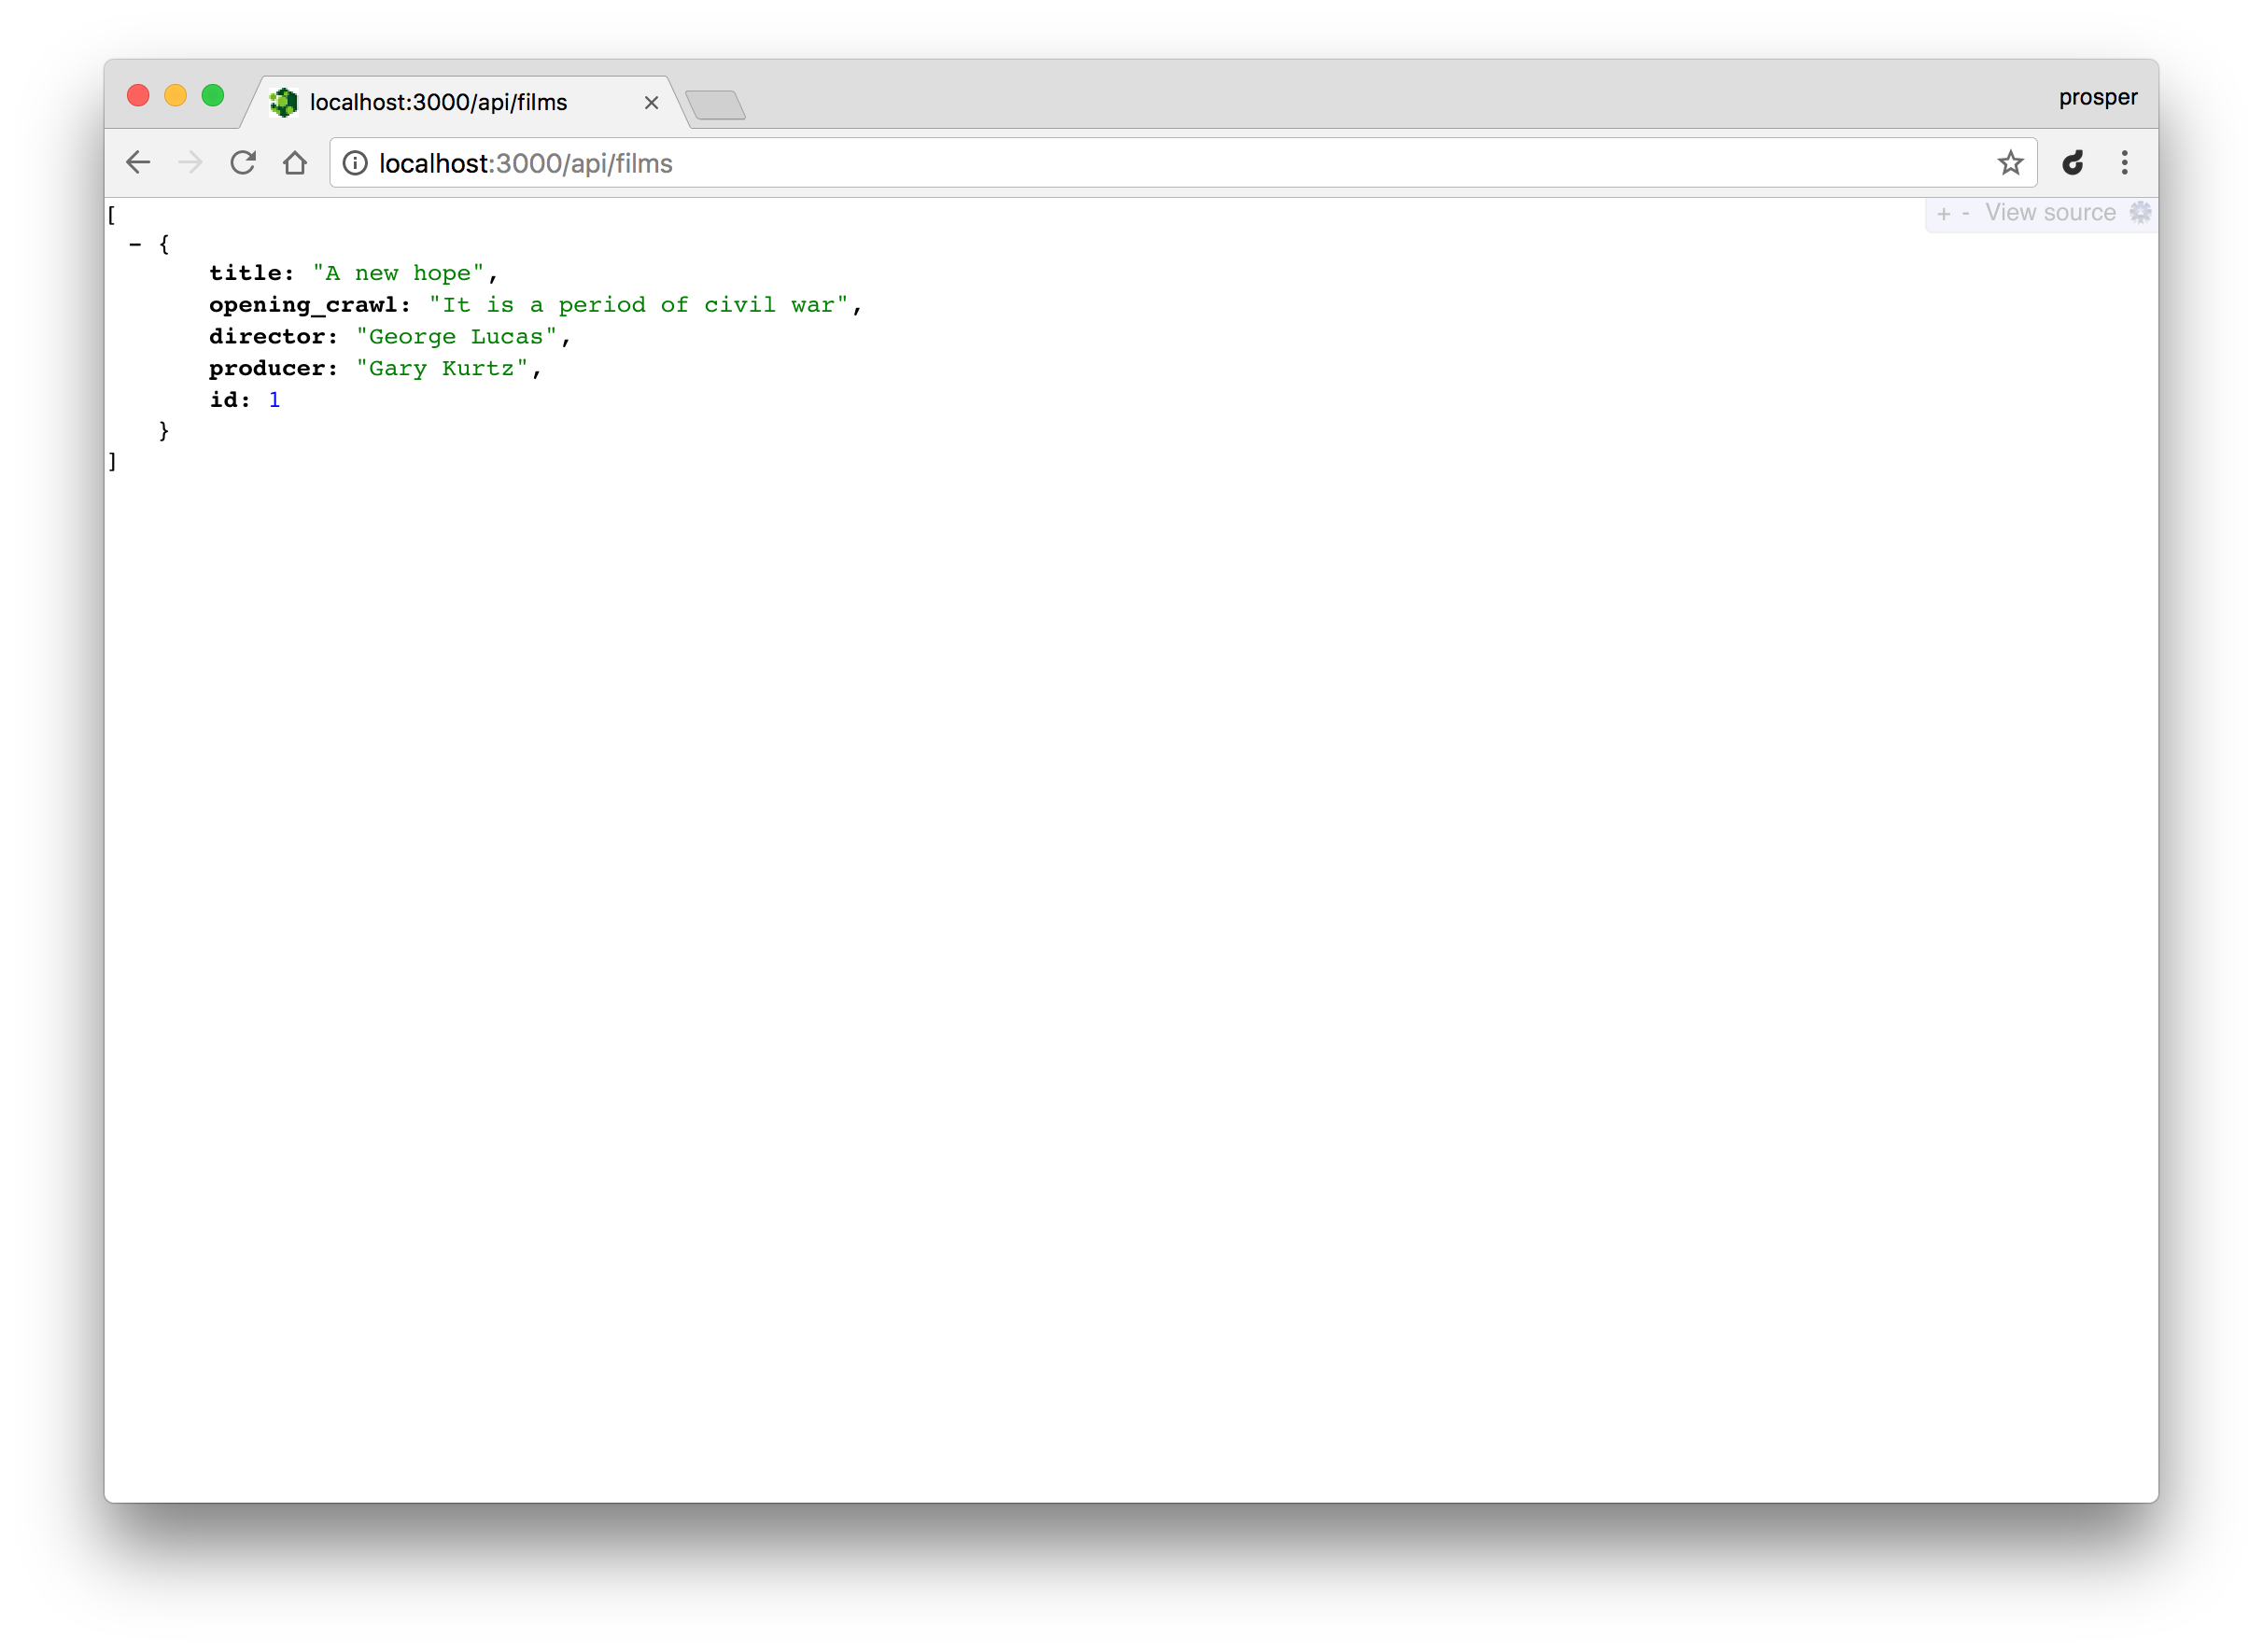
_Result of POST operation_
Now check out the URL, `http://localhost:3000/api/films`.
Try making a POST request to the films endpoint with Postman.
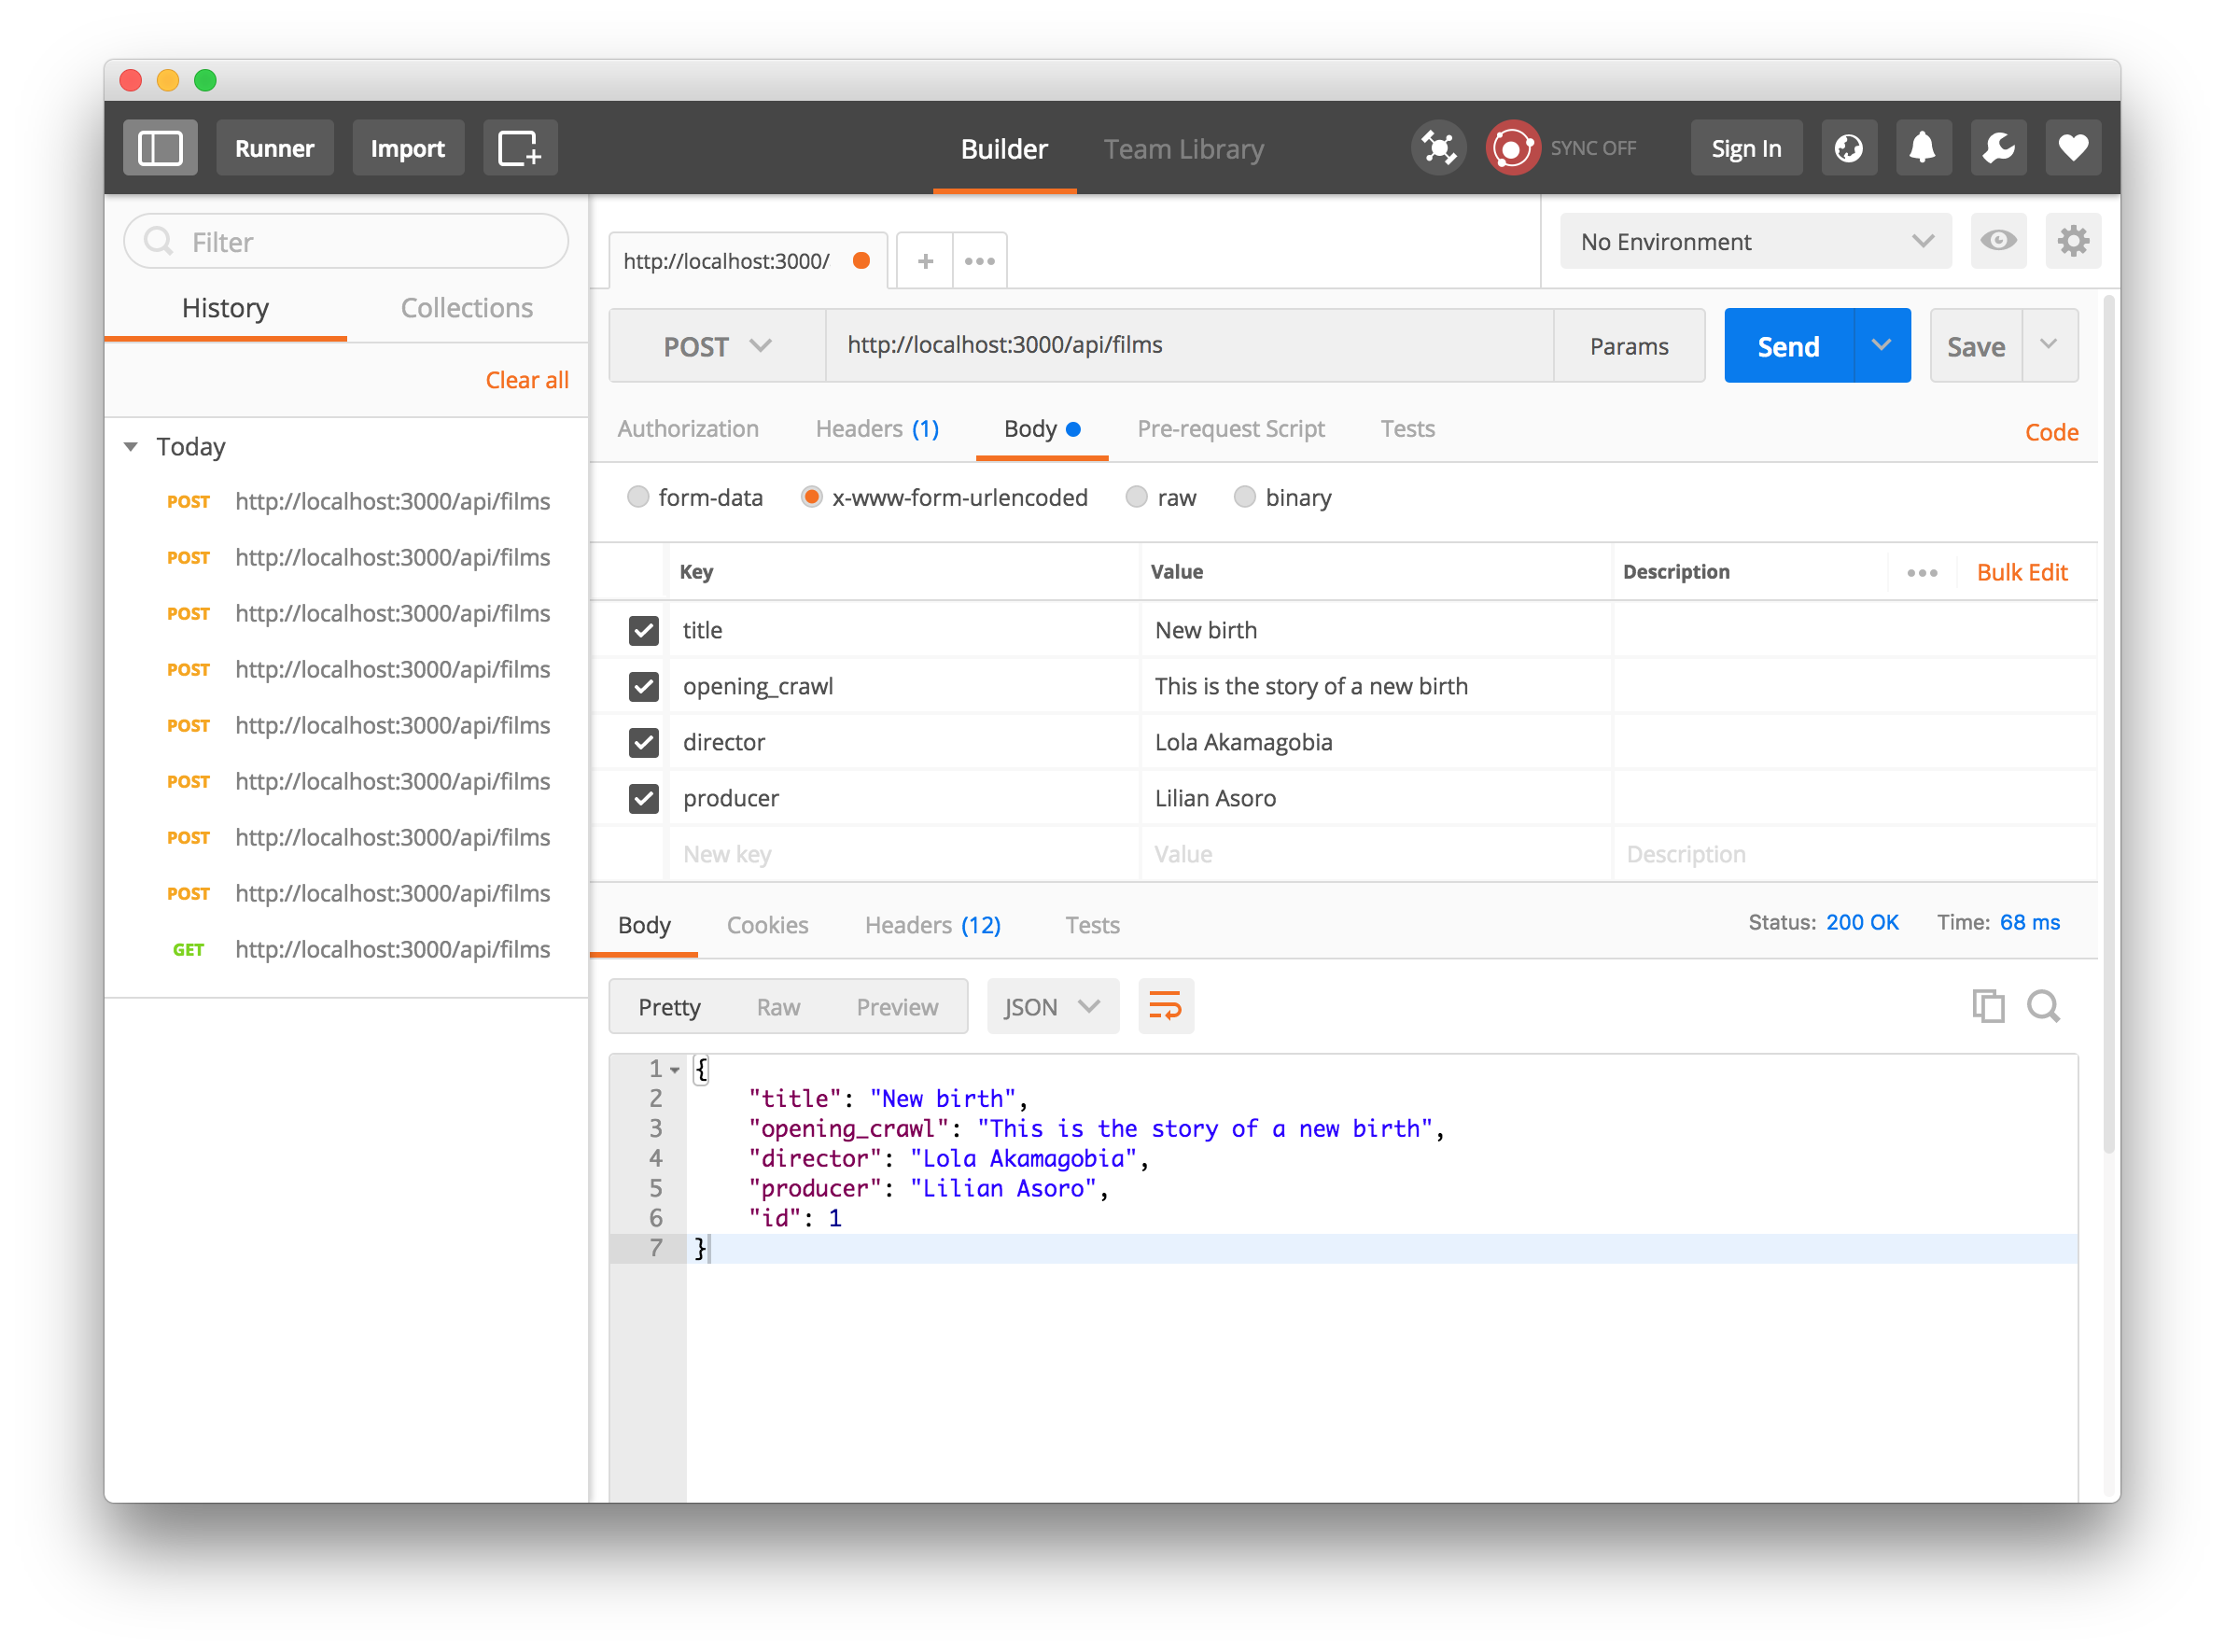
Voila! Be careful, our API is not connected to any data source yet.
Next, let's connect our API to a data source.
## Connect API to Data Source
Let's connect our API to a database. Luckily for us, loopback supports a lot of data sources. Head over to your terminal and run the following command:
```bash
lb datasource
```
It will prompt you for a name. Enter `mysqlDs`.
`mysqlDs` is MySQL Datasource for short. Yes, we'll make use of MySQL. So, make sure you have [MySQL database](https://www.mysql.com/downloads/) installed on your machine.
Next, select `MySQL`as the connector for `mysqlDs` and hit Enter. Go ahead and supply the `host`, `port`, `user` and `password` values for the connection string. And enter `Yes` to install the **loopback-connector-mysql** tool.
The connection details can be found at `server/datasources.json`. Feel free to edit the file anytime.
## Connect API to MySQL
Open up `server/model-config.json` and change the value of the `dataSource` property from `db` to `mysqlDs` for each of the models.
_server/model-config.json_
```js
...
"People": {
"dataSource": "db",
"public": true
},
"Film": {
"dataSource": "db",
"public": true
},
"Starship": {
"dataSource": "db",
"public": true
},
"Specie": {
"dataSource": "db",
"public": true
},
"Planet": {
"dataSource": "db",
"public": true
}
```
**After changing to mysqlDs**
_server/model-config.json_
```js
...
"People": {
"dataSource": "mysqlDs",
"public": true
},
"Film": {
"dataSource": "mysqlDs",
"public": true
},
"Starship": {
"dataSource": "mysqlDs",
"public": true
},
"Specie": {
"dataSource": "mysqlDs",
"public": true
},
"Planet": {
"dataSource": "mysqlDs",
"public": true
}
```
## Create Model Tables in MySQL
We'll go ahead and create tables for each of the models in MySQL. There are two approaches:
* Create tables manually in MySQL database
* Programmatically create the tables.
Let's go with the second option. It's more effective. And we need test data. We'll write an automigration script to programmatically create the tables.
Create a new file, `server/boot/create-data-tables.js` and add code to it:
```js
module.exports = function(app) {
app.dataSources.mysqlDs.automigrate('People', function(err) {
if (err) throw err;
app.models.People.create([{
name: 'Luke Skywalker',
height: 172,
mass: 77,
gender: 'Male'
}, {
name: 'C-3PO',
height: 167,
mass: 75,
gender: 'Undetermined'
}], function(err, People) {
if (err) throw err;
console.log('Models created: \n', People);
});
});
app.dataSources.mysqlDs.automigrate('Film', function(err) {
if (err) throw err;
app.models.Film.create([{
title: 'A New Hope',
opening_crawl: 'It is a period of civil war',
director: 'George Lucas',
producer: 'Gary Kurtz'
}, {
title: 'The Empire Strikes Back',
opening_crawl: 'It is a dark time for the rebellion',
director: 'Irvin Kershner',
producer: 'Rick McCallum'
}], function(err, People) {
if (err) throw err;
console.log('Models created: \n', People);
});
});
app.dataSources.mysqlDs.automigrate('Starship', function(err) {
if (err) throw err;
app.models.Starship.create([{
name: 'Death Star',
model: 'DS-1 Orbital Battle Station',
manufacturer: 'Imperial Department of Military Research',
passengers: 843342,
class: 'Deep Space Mobile Battlestation'
}, {
name: 'Sentinel-class landing craft',
model: 'Sentinel-class landing craft',
manufacturer: 'Sienar Fleet Systems, Cyngus Spaceworks',
passengers: 75,
class: 'Landing Craft'
}], function(err, Starship) {
if (err) throw err;
console.log('Models created: \n', Starship);
});
});
app.dataSources.mysqlDs.automigrate('Specie', function(err) {
if (err) throw err;
app.models.Specie.create([{
name: 'Droid',
classification: 'artificial',
designation: 'sentient',
average_height: 34,
skin_color: "brown",
language: "Galacticus"
}, {
name: 'Human',
classification: 'Mammal',
designation: 'sentient',
average_height: 180,
skin_color: 'black',
language: 'Galactic Basic'
}], function(err, Specie) {
if (err) throw err;
console.log('Models created: \n', Specie);
});
});
app.dataSources.mysqlDs.automigrate('Planet', function(err) {
if (err) throw err;
app.models.Planet.create([{
name: 'Yavin IV',
rotation_period: 24,
orbital_period: 4818,
diameter: 10200,
population: 1000
}, {
name: 'Hoth',
rotation_period: 23,
orbital_period: 549,
diameter: 7200,
population: 12500
}], function(err, Planet) {
if (err) throw err;
console.log('Models created: \n', Planet);
});
});
};
```
The bunch of code above simply creates the tables and seeds them with the data provided. Whenever your app is initialized, the script will run and ensure the tables exist and are seeded with the right data.
Head over to your console and start your app again:
```bash
node .
```
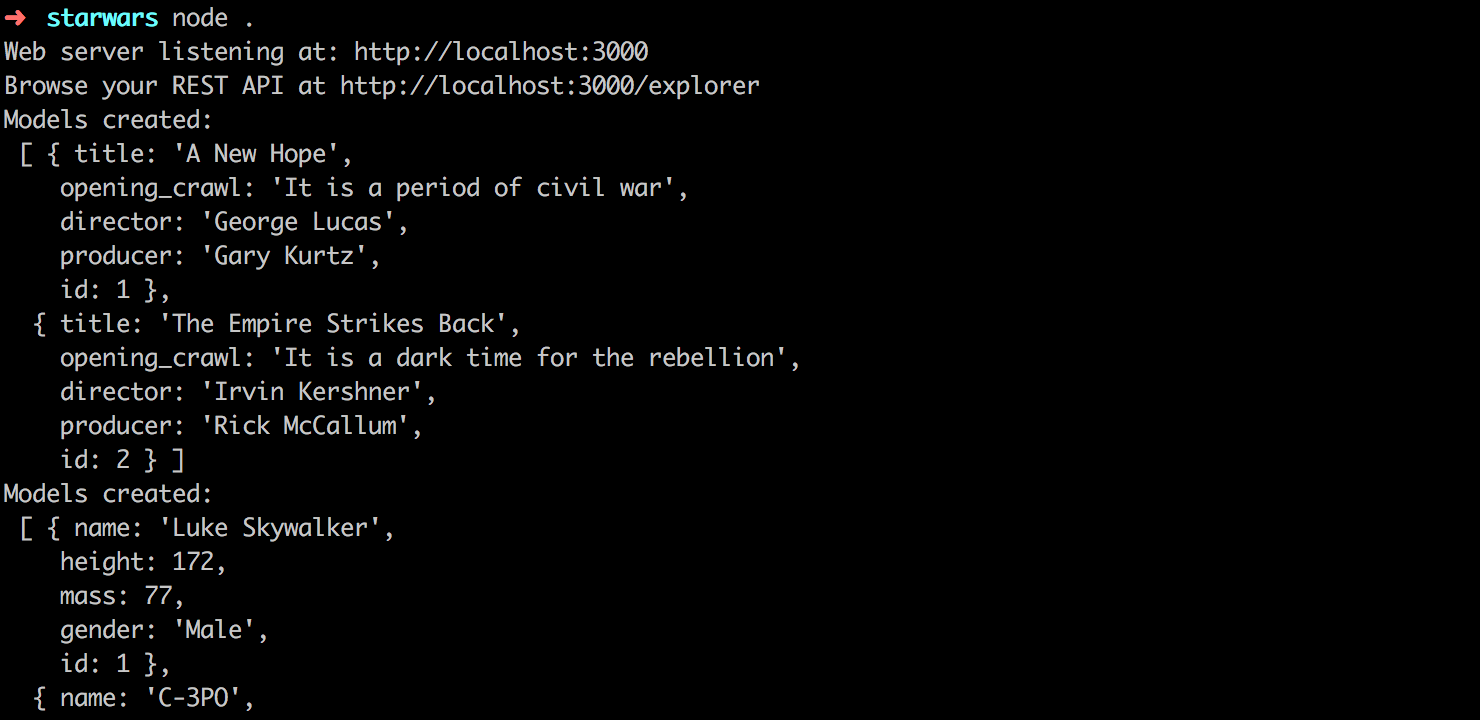
_Create Tables and seed data_
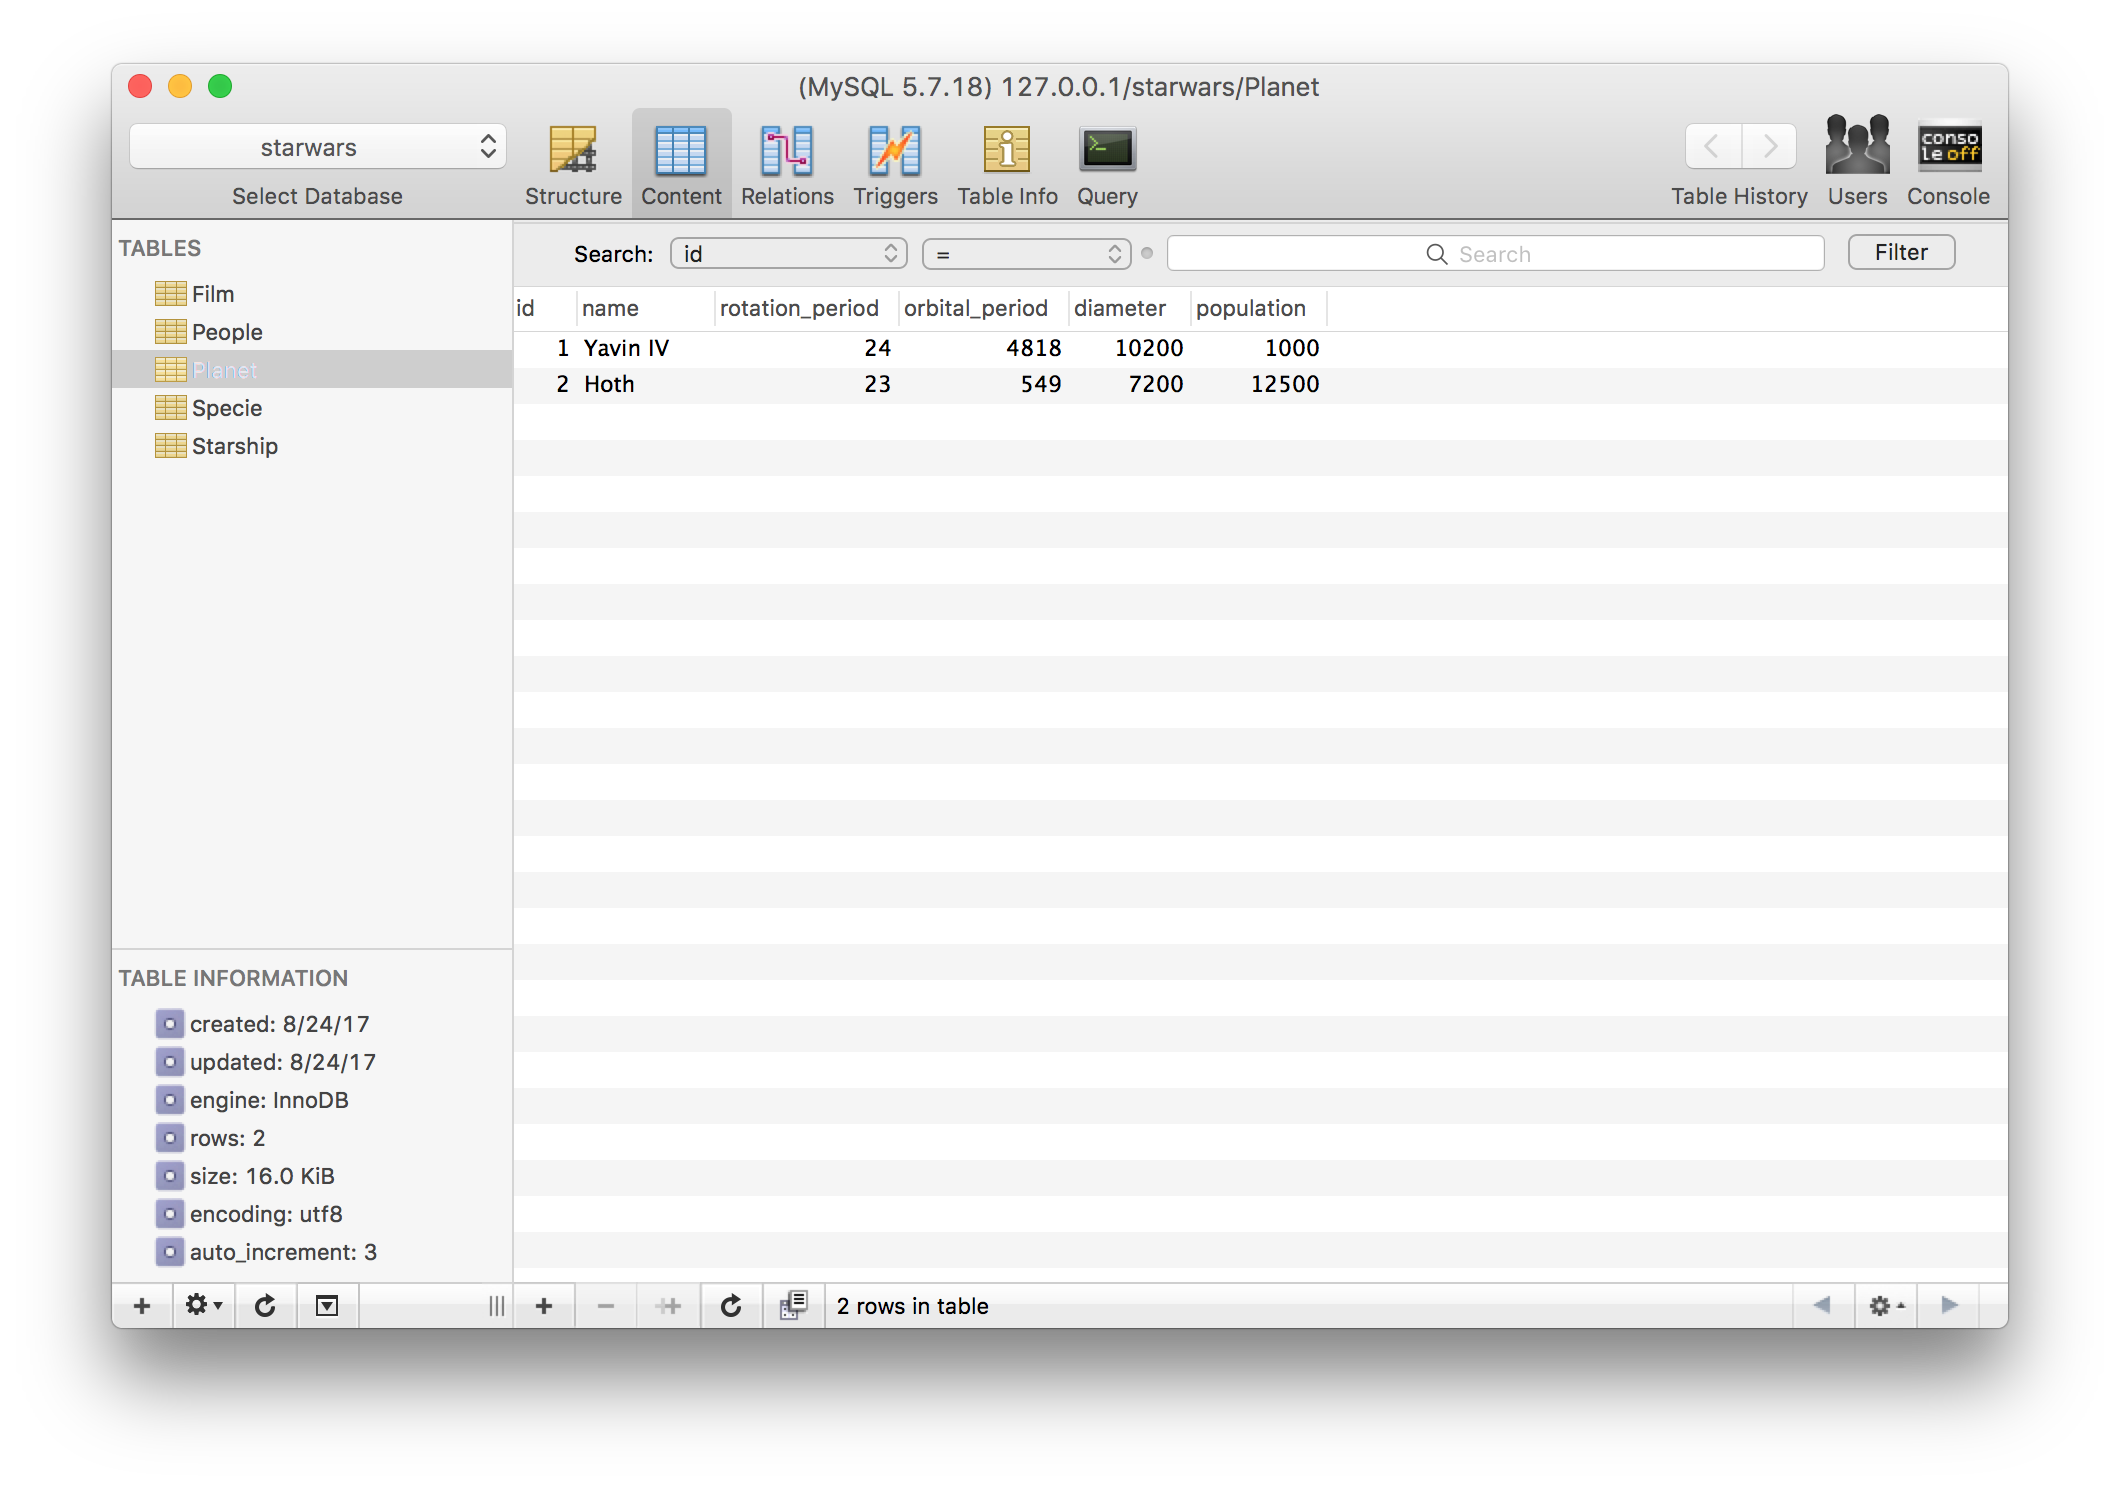
Check your database. The new tables and data should reflect there.
## Test the API
Now that our API is connected to MySQL. Let's test our API for persistence. Make a `GET` request to `http://localhost:3000/api/planets`.
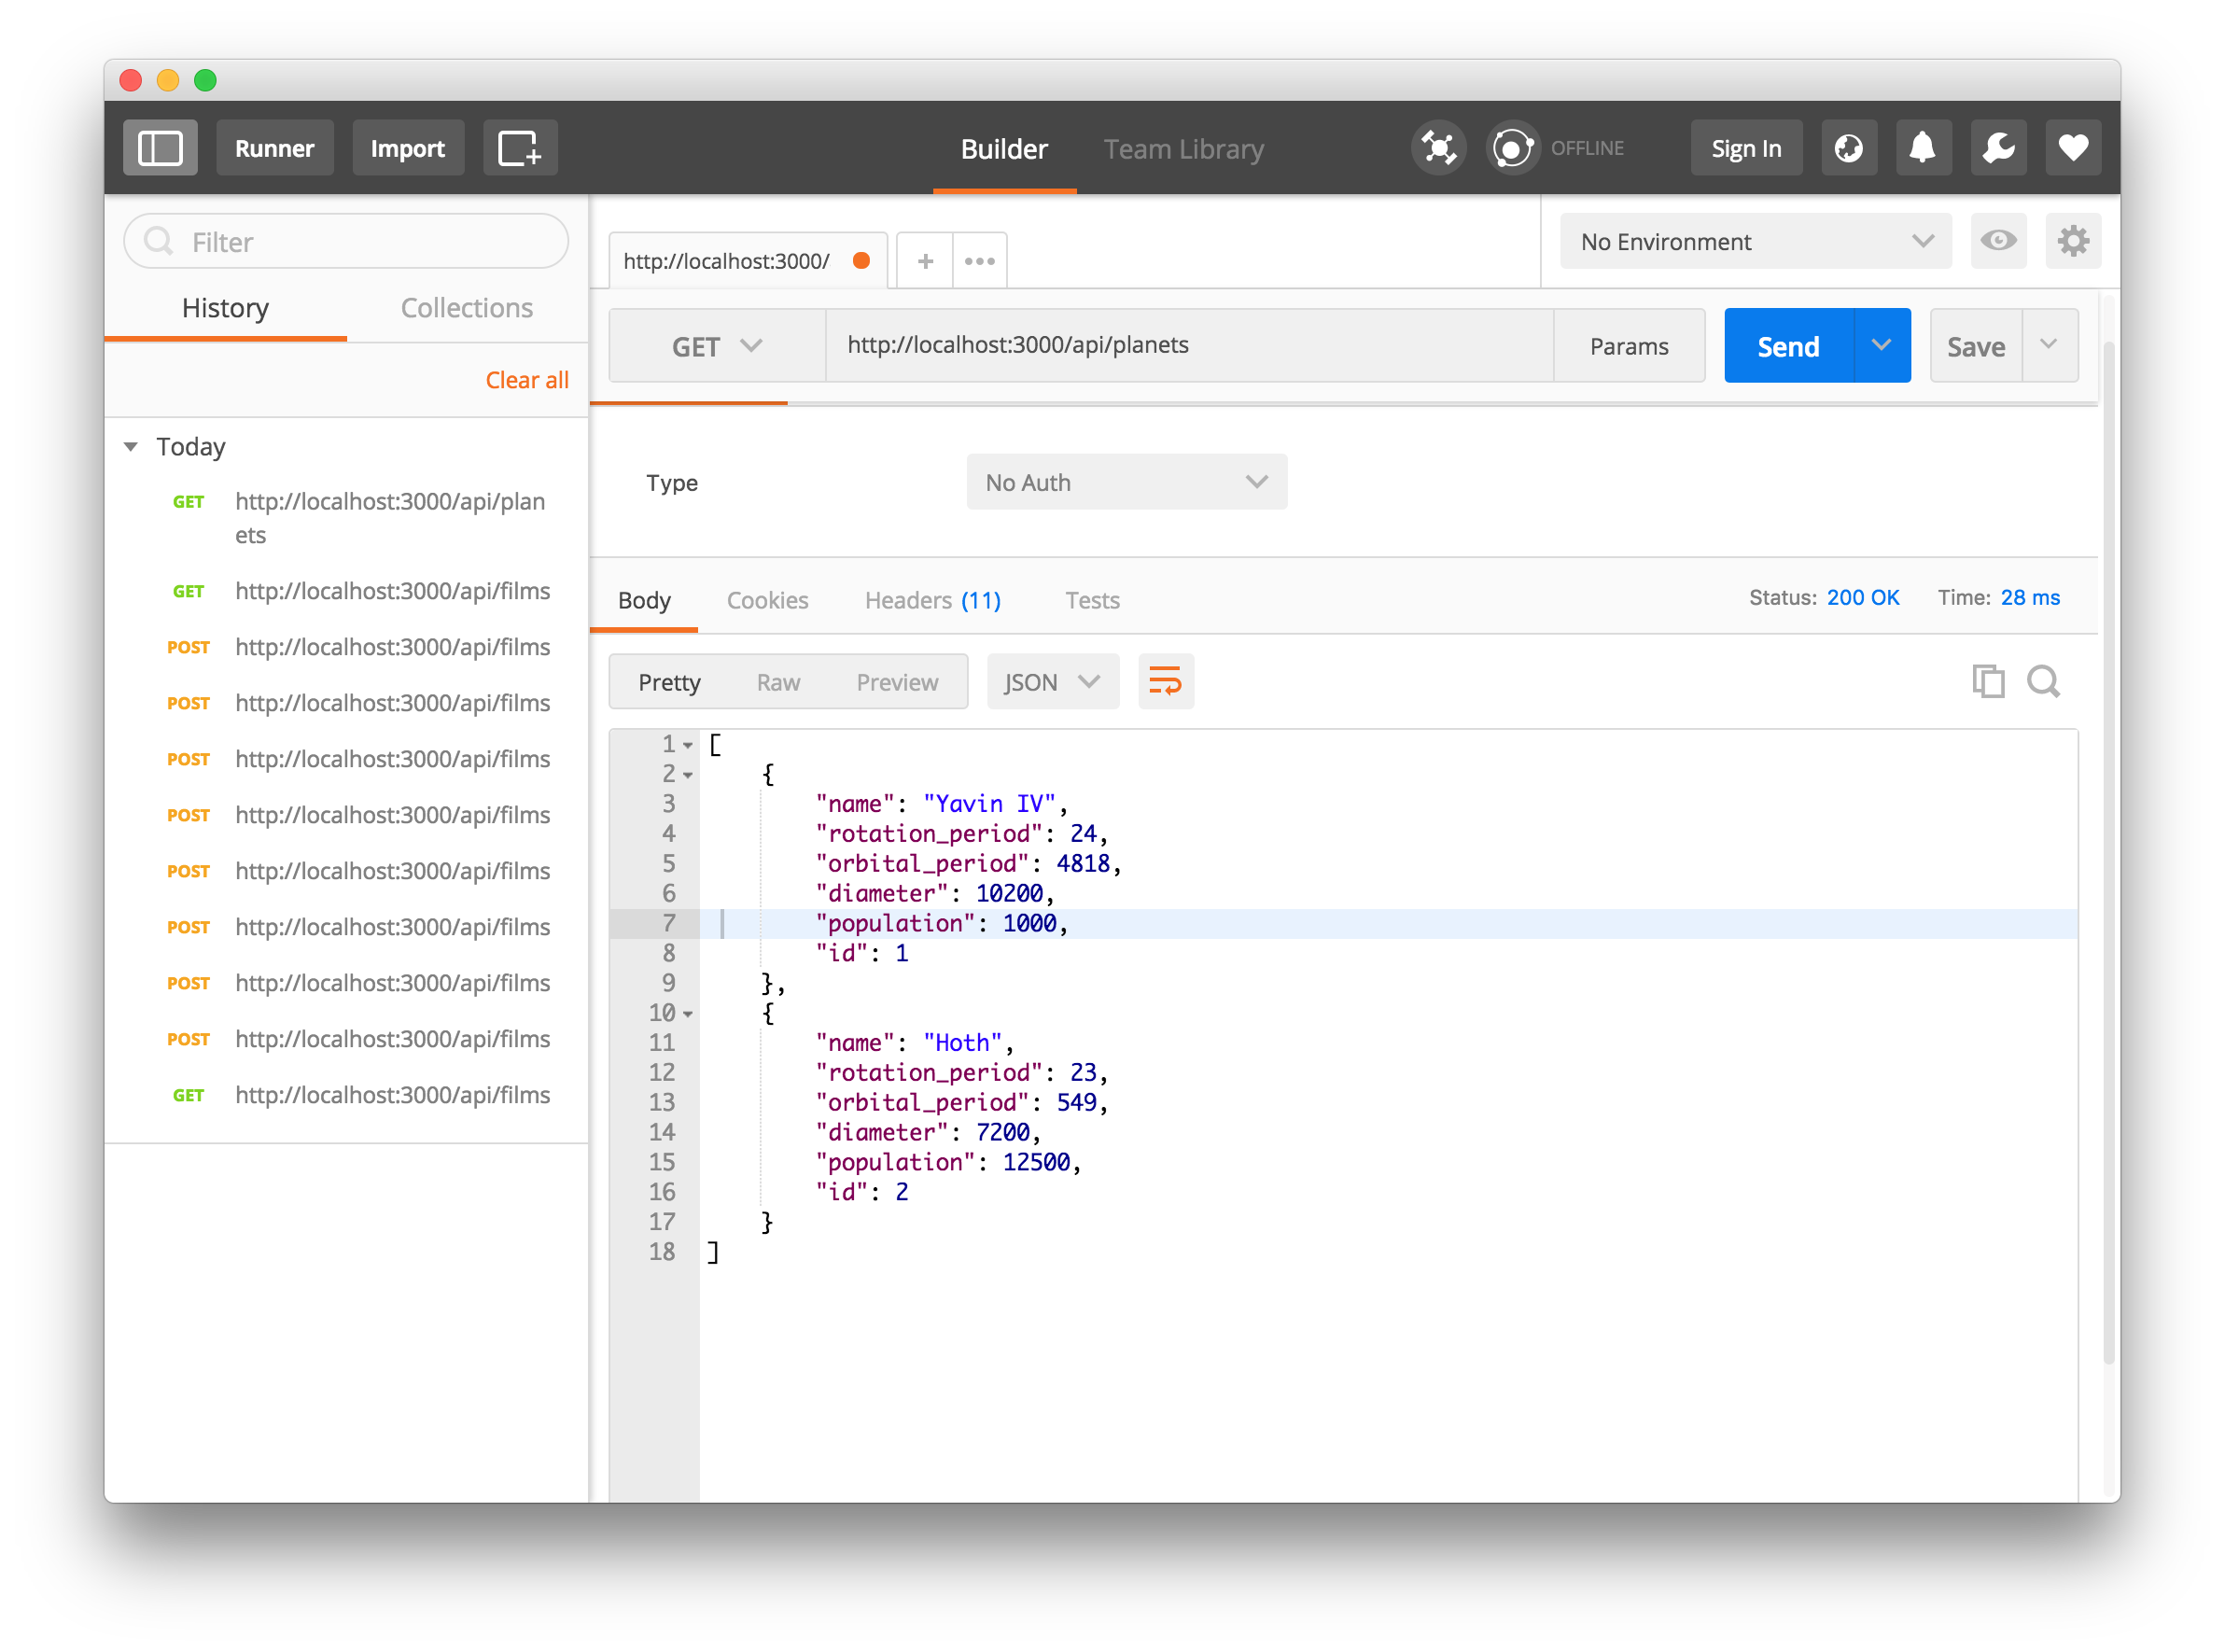
_Initial GET Request_
Go ahead and make a `POST` request to the URL.
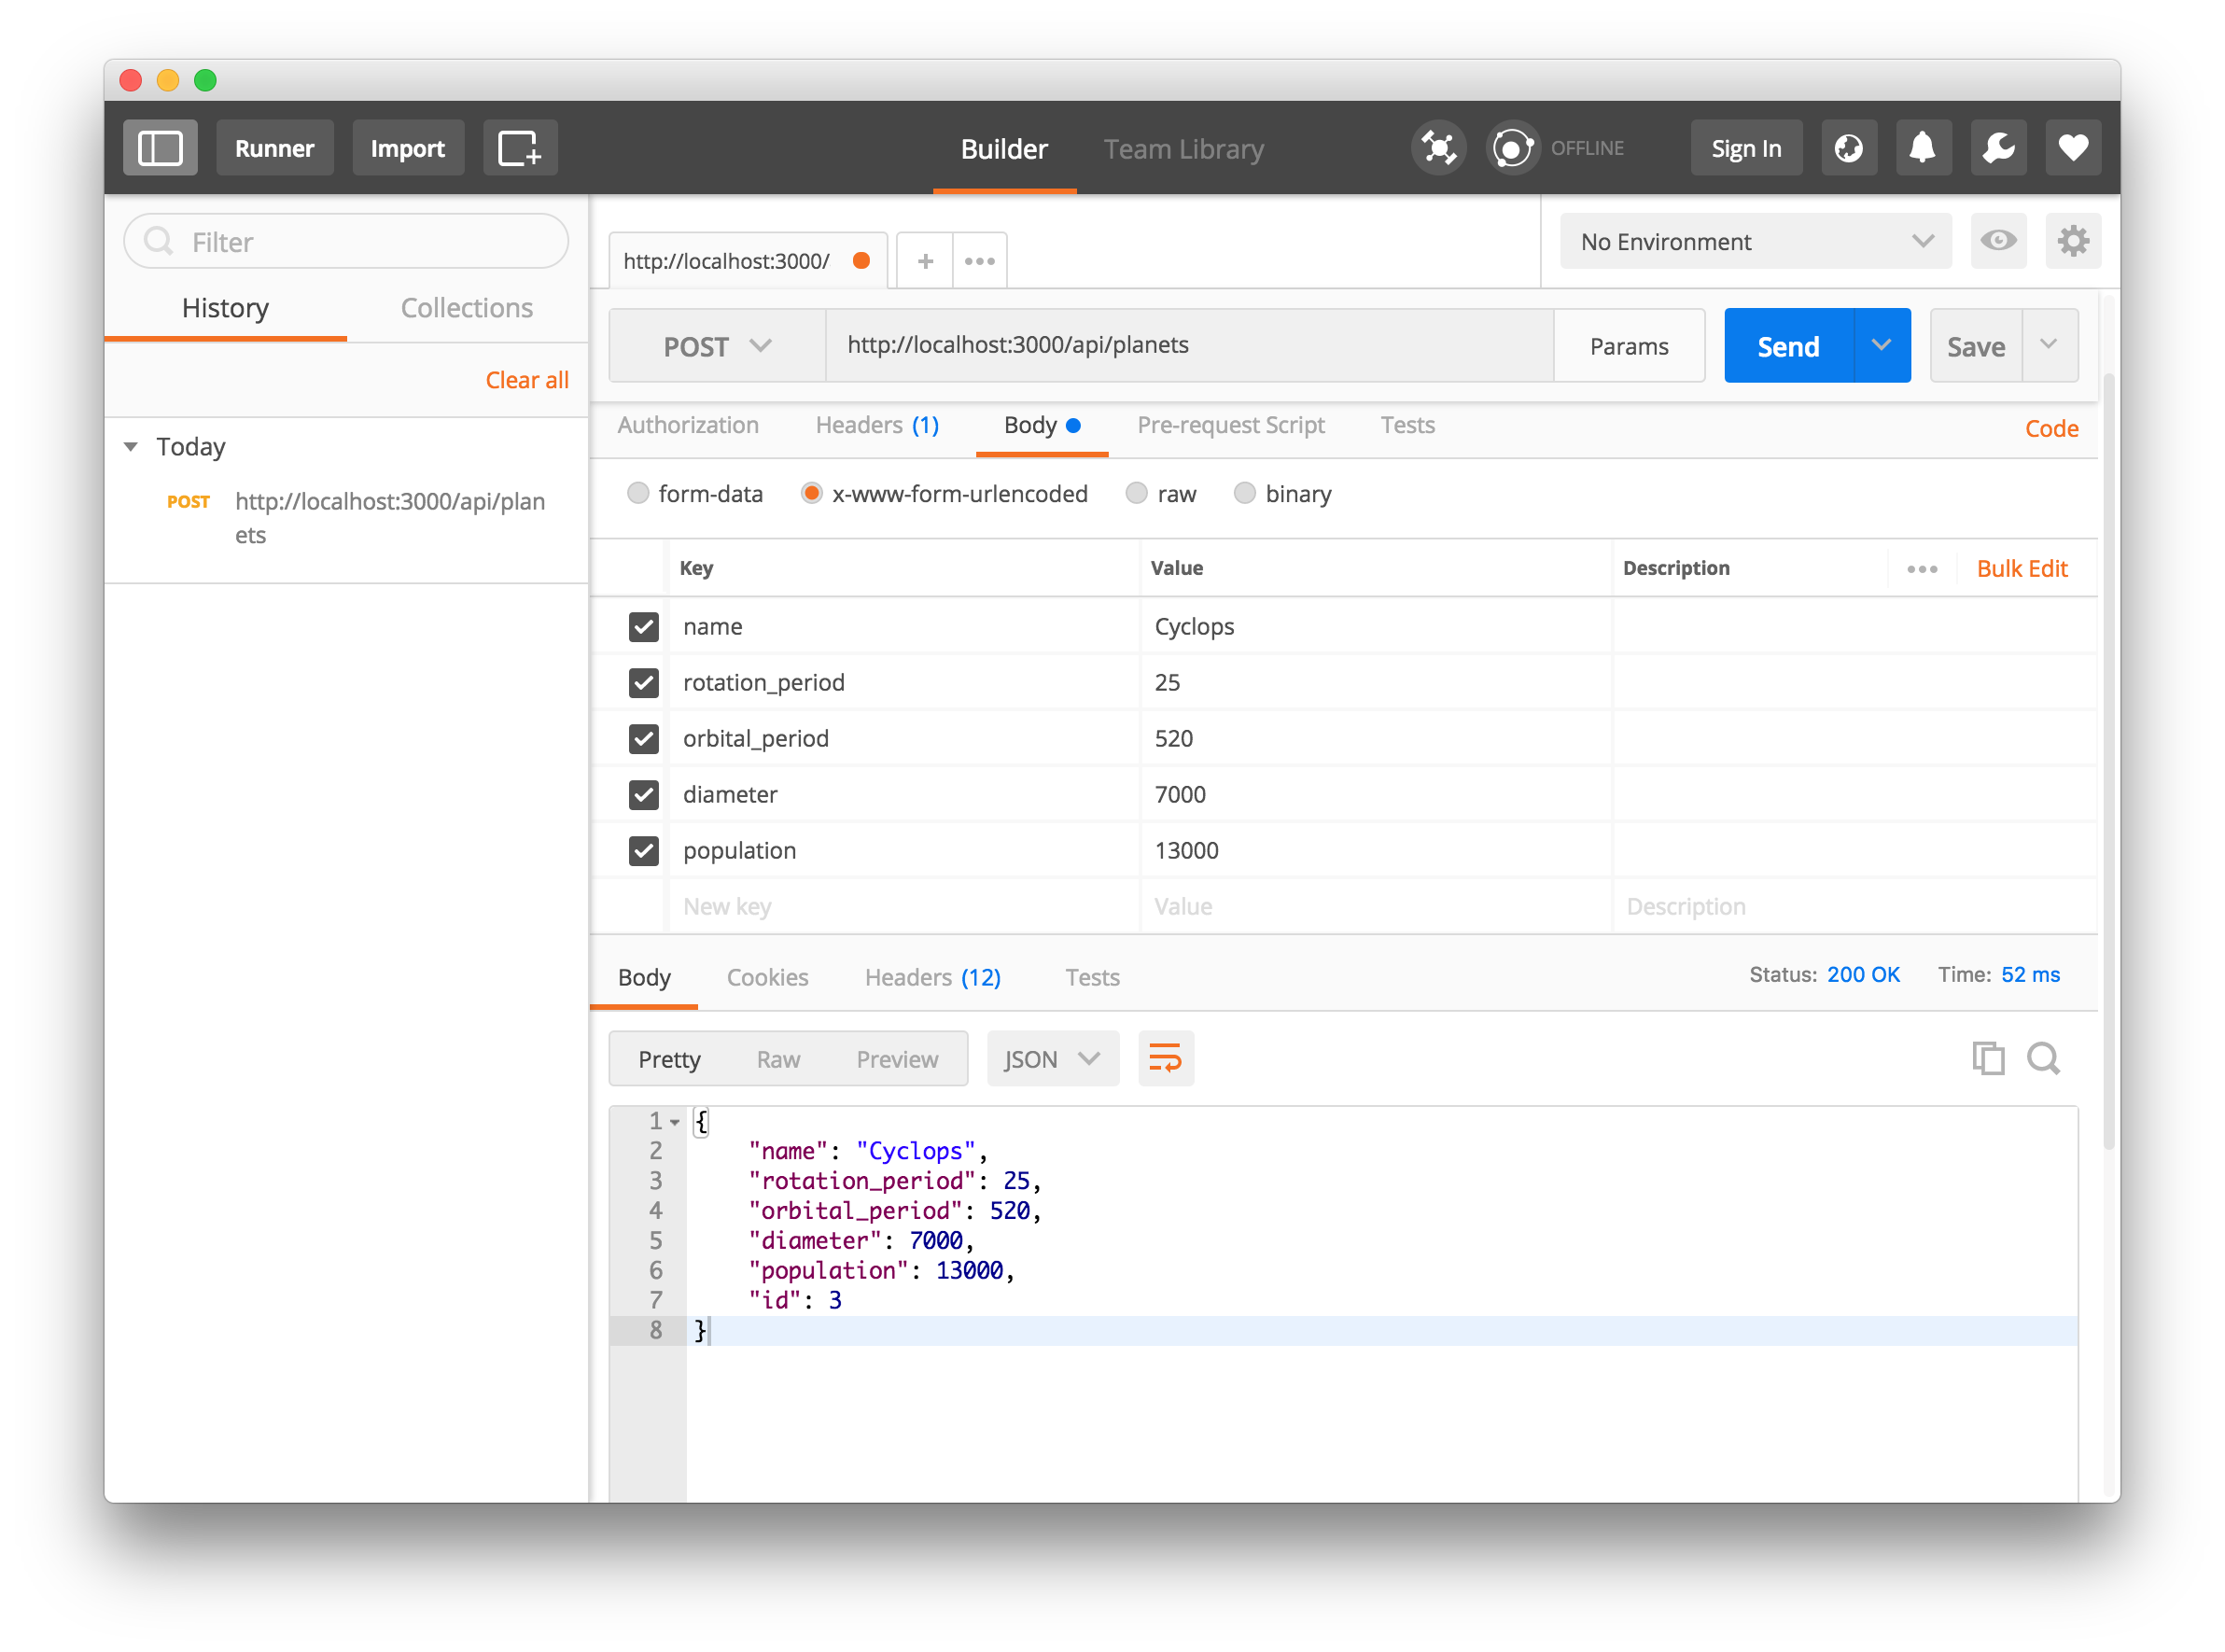
_POST Request_
Now, make another `GET` request to the URL
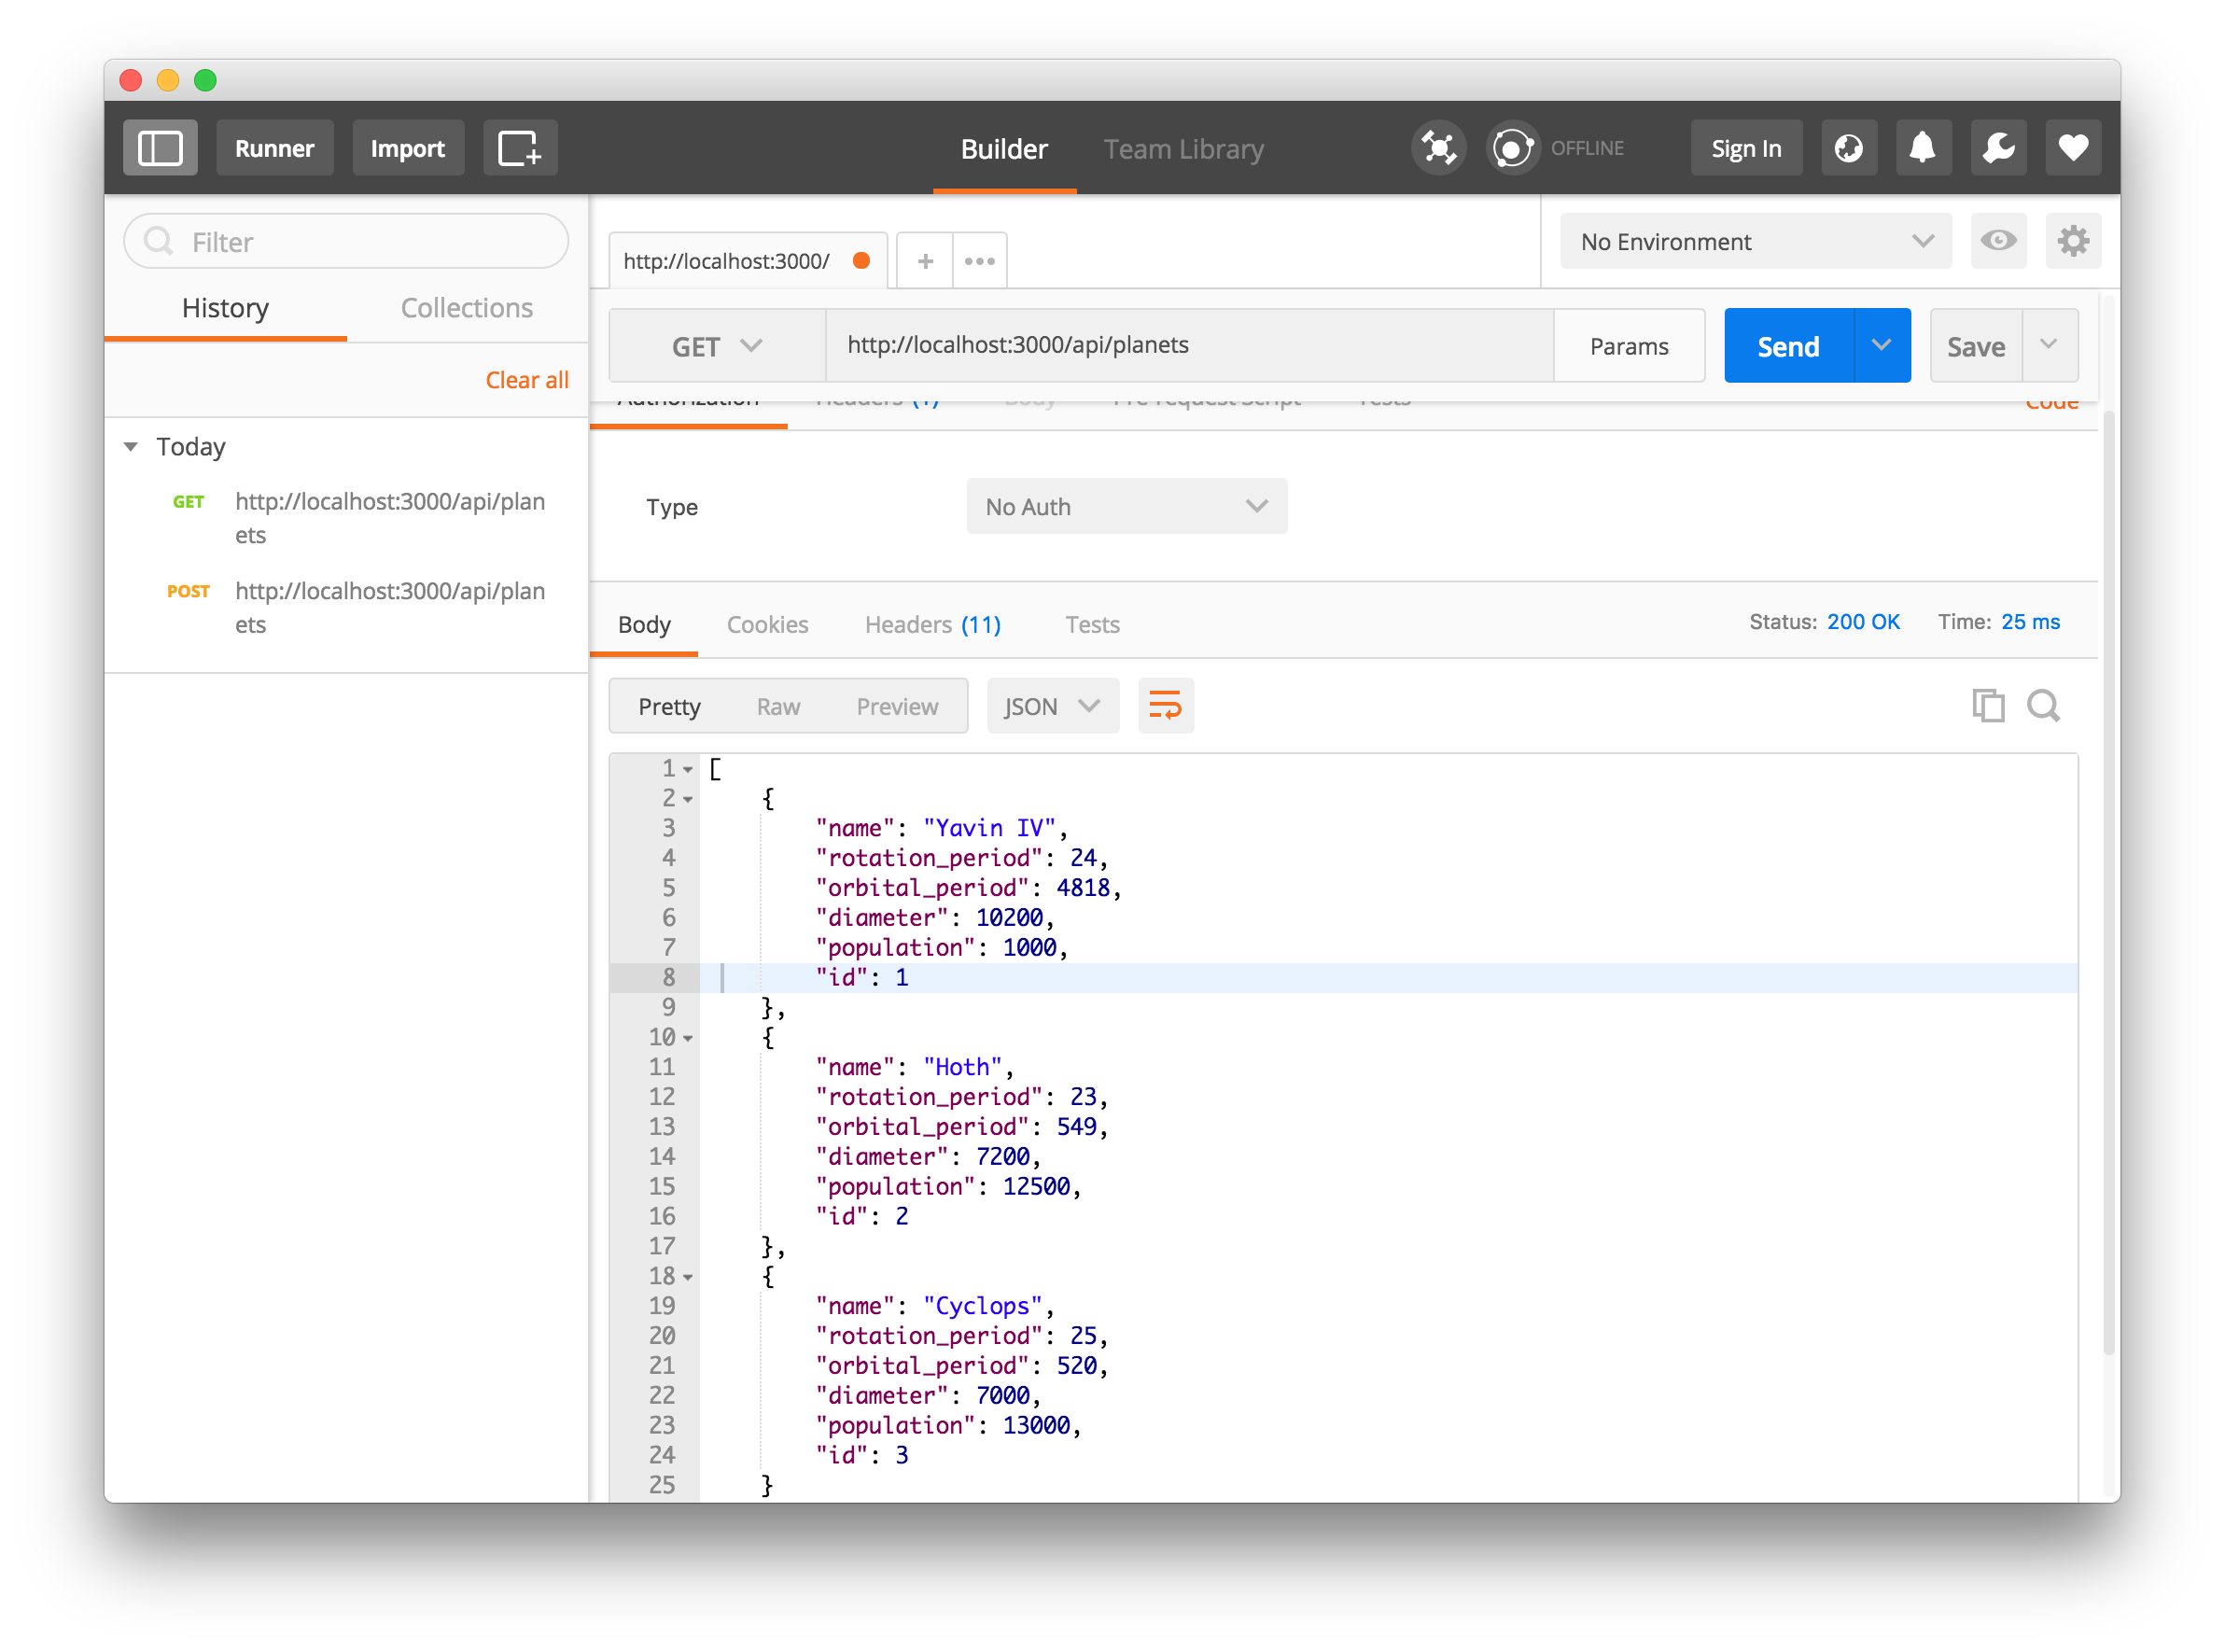
_Another GET Request_
Yes, we see three records. Our data was persisted successfully. You can test out the `PUT`, `PATCH`, and `DELETE` operations for the `Planets` and other API endpoints.
## Secure the Star Wars API
The majority of the APIs we use on a daily basis have a means of authorizing users to make changes to them. We'll go ahead and secure some of these API endpoints with JSON Web Tokens.
*JSON Web Tokens*, commonly known as JWTs, are tokens that are used to authenticate users on applications. This technology has gained popularity over the past few years because it enables backends to accept requests simply by validating the contents of these JWTs. That is, applications that use JWTs no longer have to hold cookies or other session data about their users. This characteristic facilitates scalability while keeping applications secure.
Whenever the user wants to access a protected route or resource (an endpoint), the user agent must send the JWT, usually in the `Authorization` header using the [*Bearer schema*](http://self-issued.info/docs/draft-ietf-oauth-v2-bearer.html), along with the request.
When the API receives a request with a JWT, the first thing it does is to validate the token. This consists of a series of steps, and if any of these fails then, the request must be rejected. The following list shows the validation steps needed:
- Check that the JWT is well formed
- Check the signature
- Validate the standard claims
- Check the Client permissions (scopes)
[More information about JWTs can be found here](https://auth0.com/docs/jwt).
Now, we will make use of Auth0 to issue our JSON Web Tokens. With Auth0, we have to write just a few lines of code to get a solid [identity management solution](https://auth0.com/docs/identityproviders), including [single sign-on](https://auth0.com/docs/sso/single-sign-on), [user management](https://auth0.com/docs/user-profile), support for [social identity providers (like Facebook, GitHub, Twitter, etc.)](https://auth0.com/docs/identityproviders), [enterprise (Active Directory, LDAP, SAML, etc.)](https://auth0.com/enterprise), and your [own database of users](https://auth0.com/docs/connections/database/mysql).
For starters, if you haven't done so yet, this is a good time to sign up for a free Auth0 account. Having an Auth0 account, the first thing that we must do is to [create a new API on the dashboard](https://manage.auth0.com/#/apis). An API is an entity that represents an external resource, capable of accepting and responding to protected resource requests made by clients. And we are dealing with an API here, SWAPI (Star Wars API).
> [Auth0 offers a generous **free tier**](https://auth0.com/pricing) to get started with modern authentication.
Login to your Auth0 [management dashboard](https://manage.auth0.com) and create a new API client.
Click on the APIs menu item and then the **Create API** button. You will need to give your API a name and an identifier. The name can be anything you choose, so make it as descriptive as you want. The identifier will be used to identify your API, this field cannot be changed once set. For our example, I'll name the API, **Star Wars API**, and for the identifier I'll set it as **https://starwarsapi.com**. We'll leave the signing algorithm as **RS256** and click on the **Create API** button.
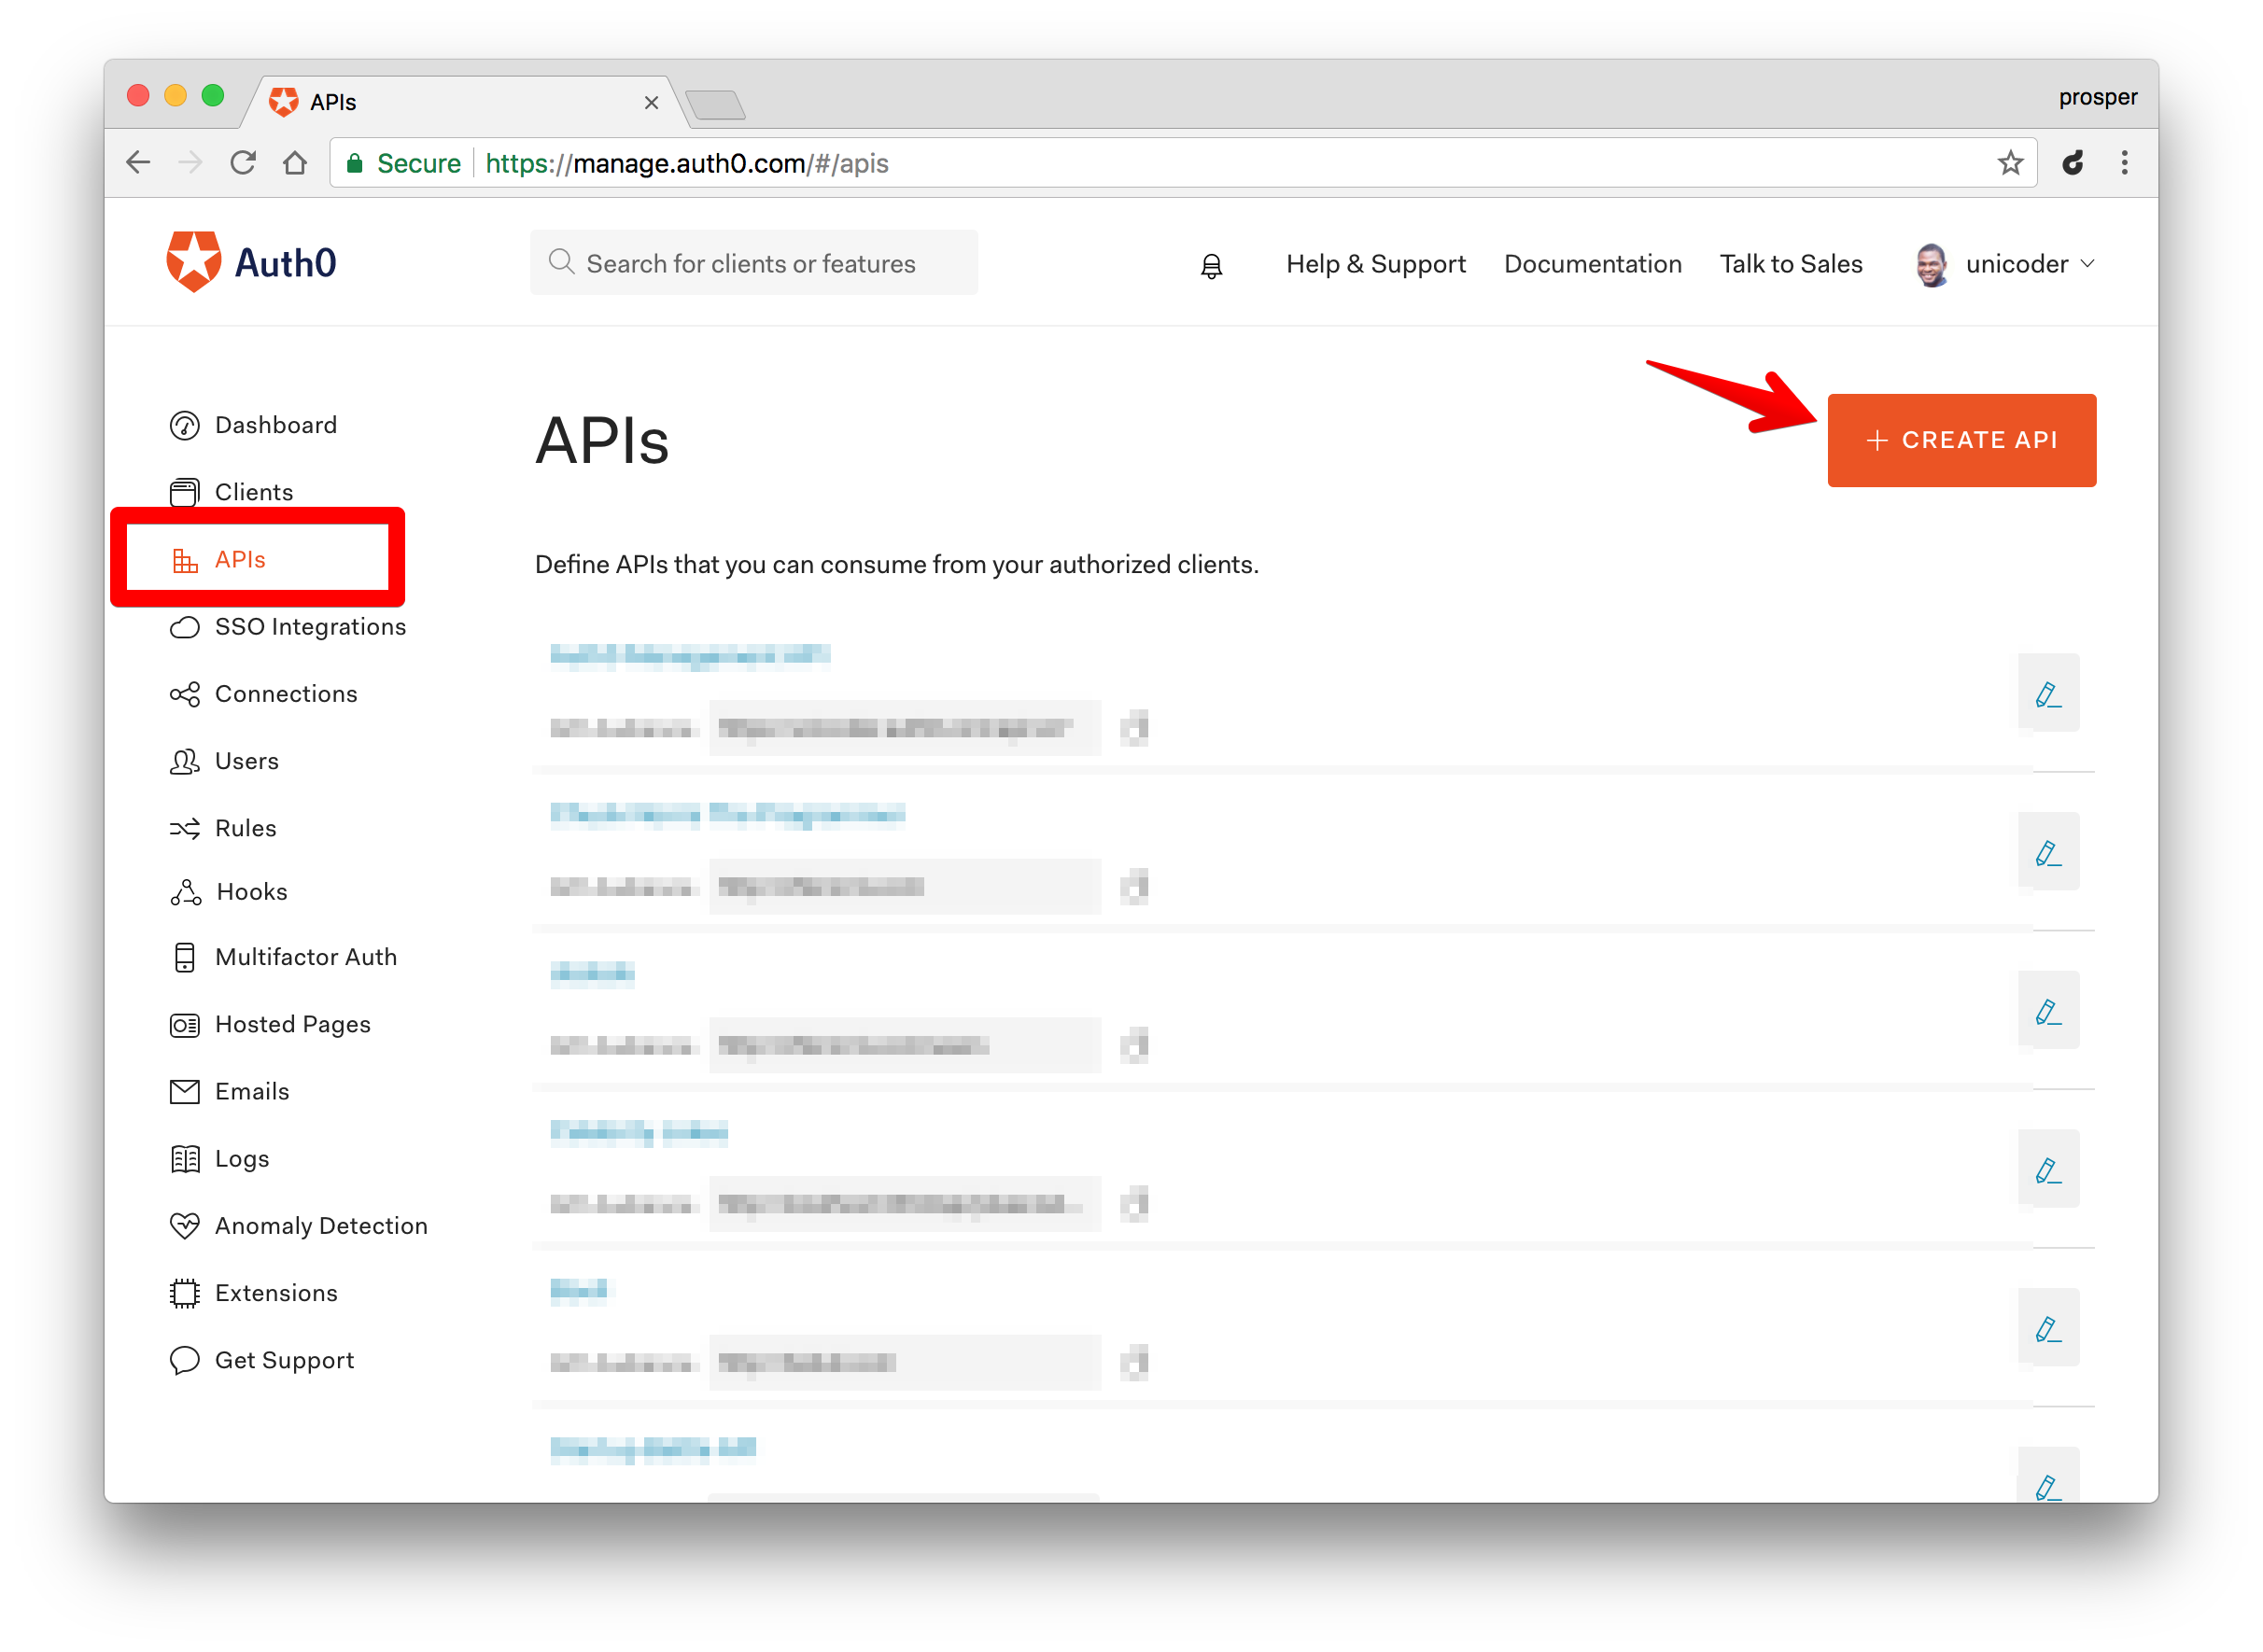
_Create a New API_
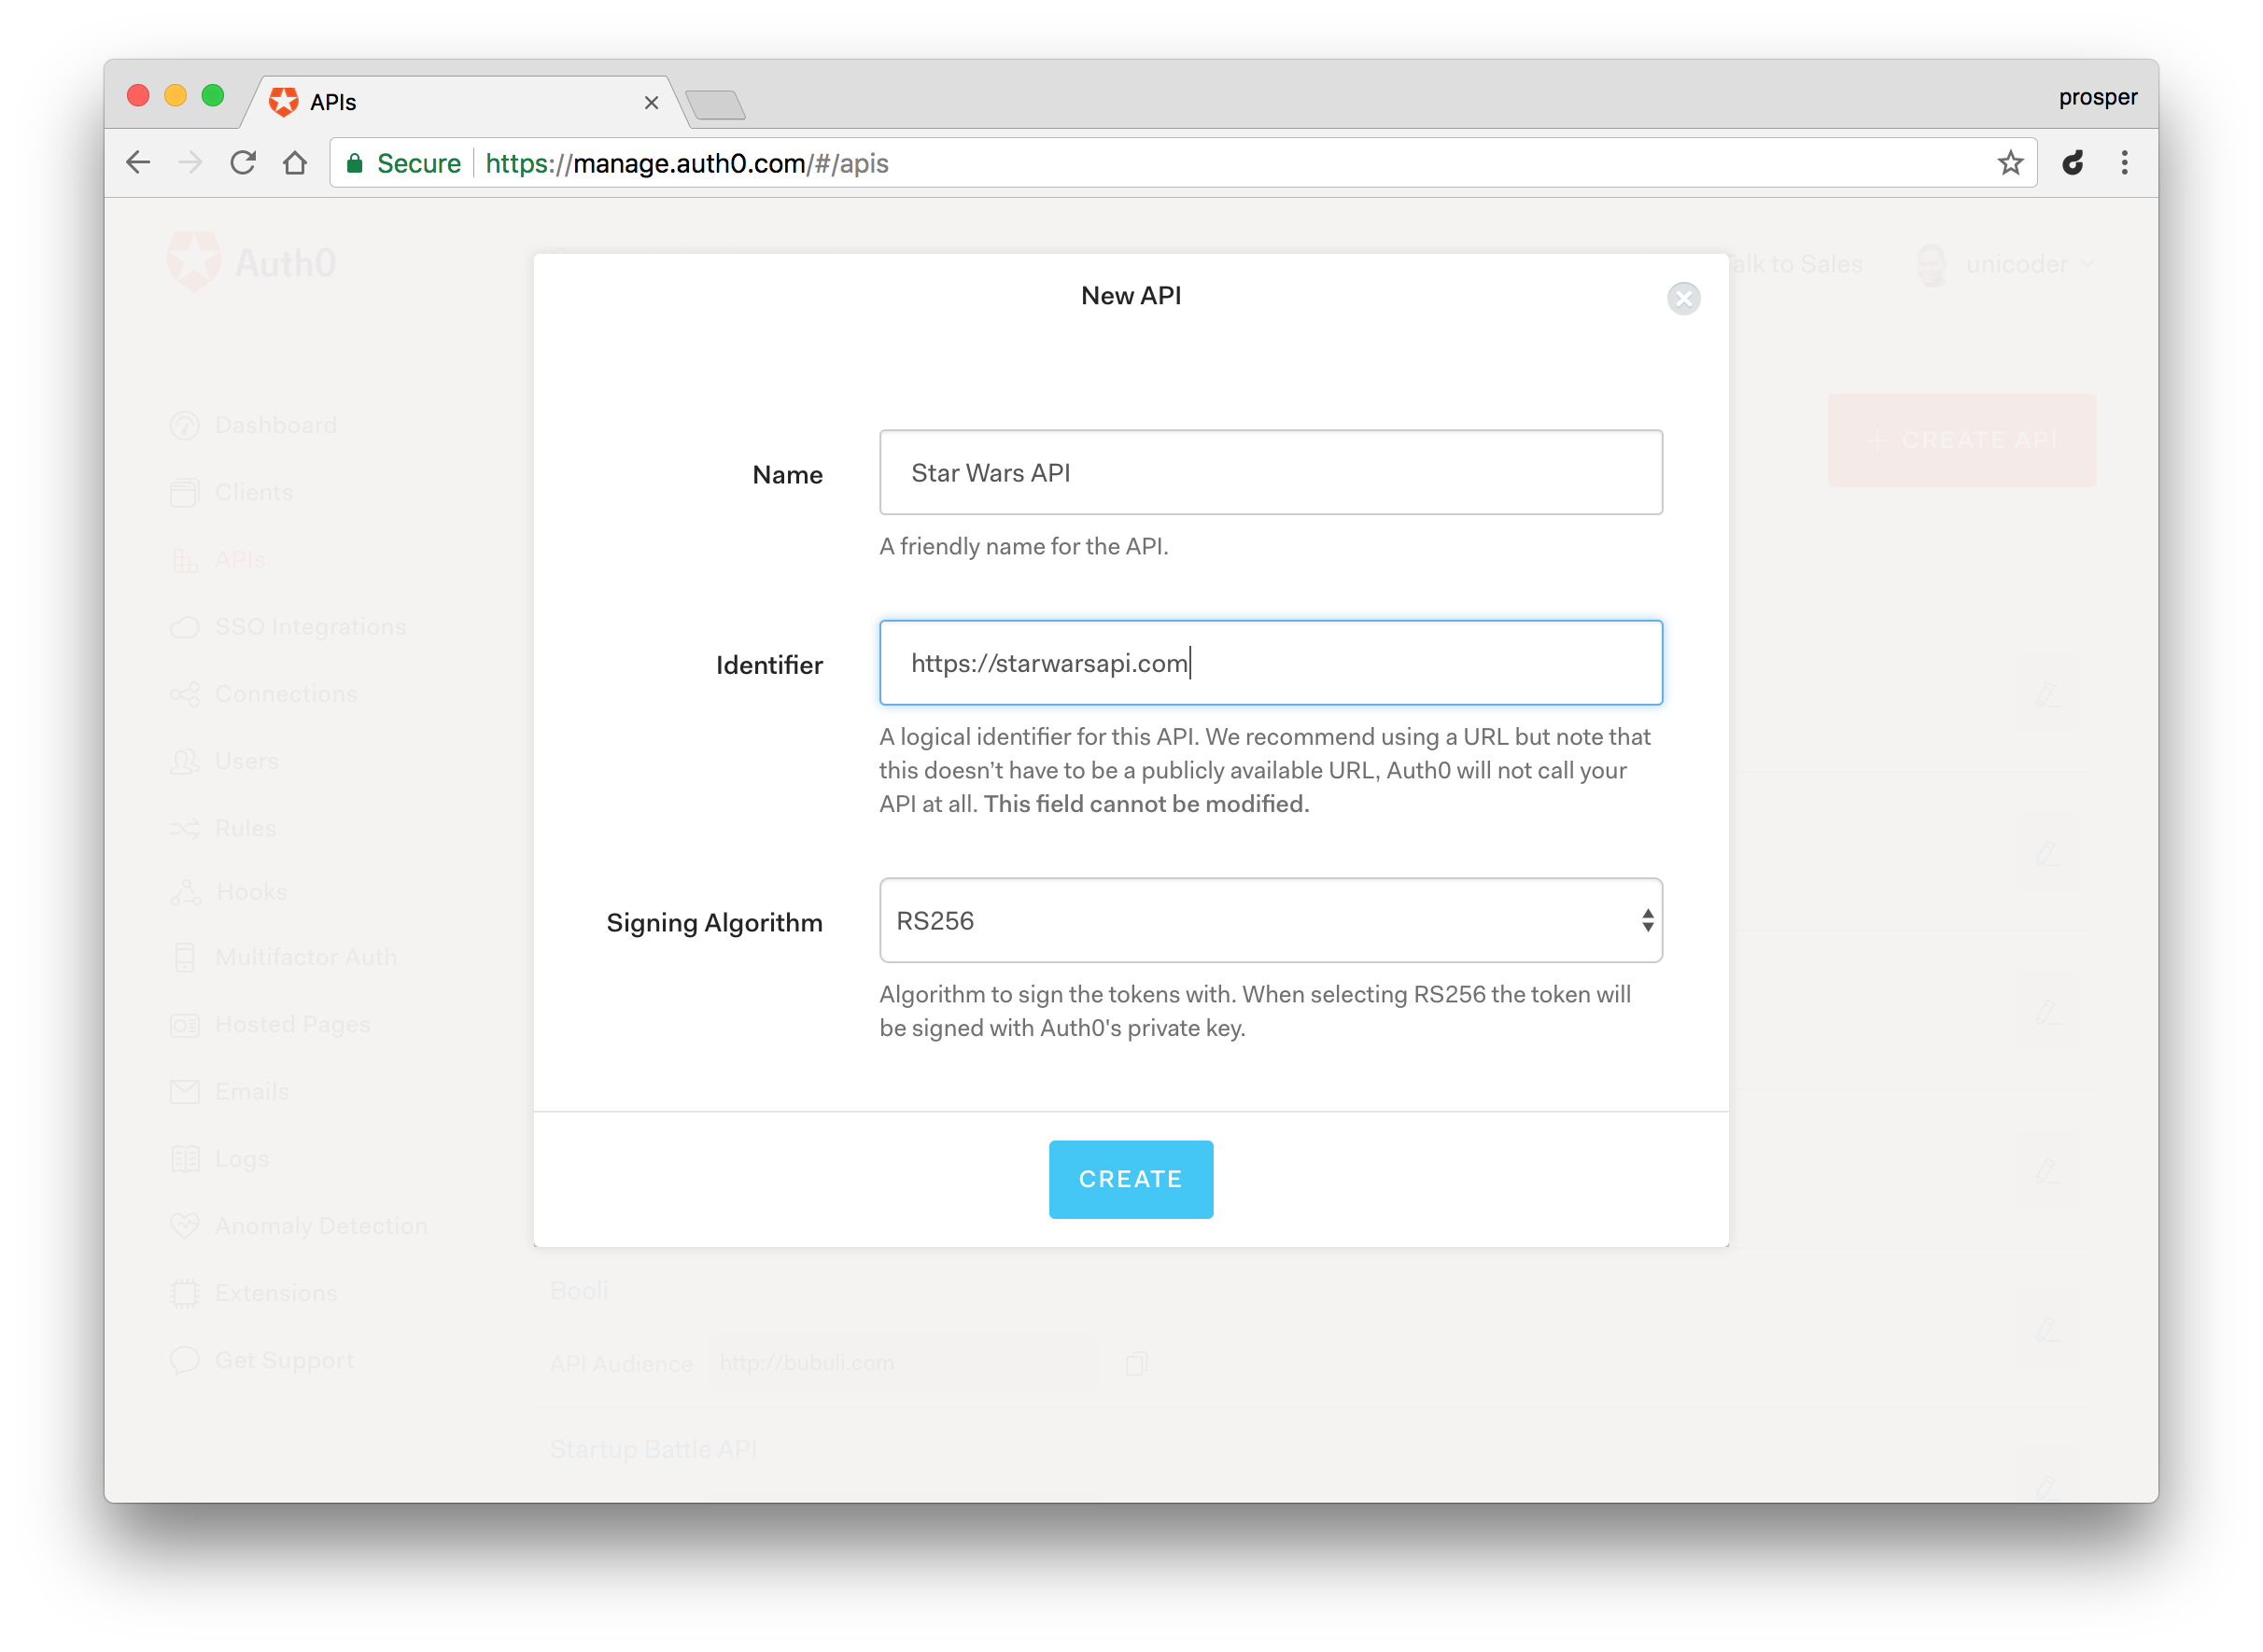
_Creating the Star Wars API_
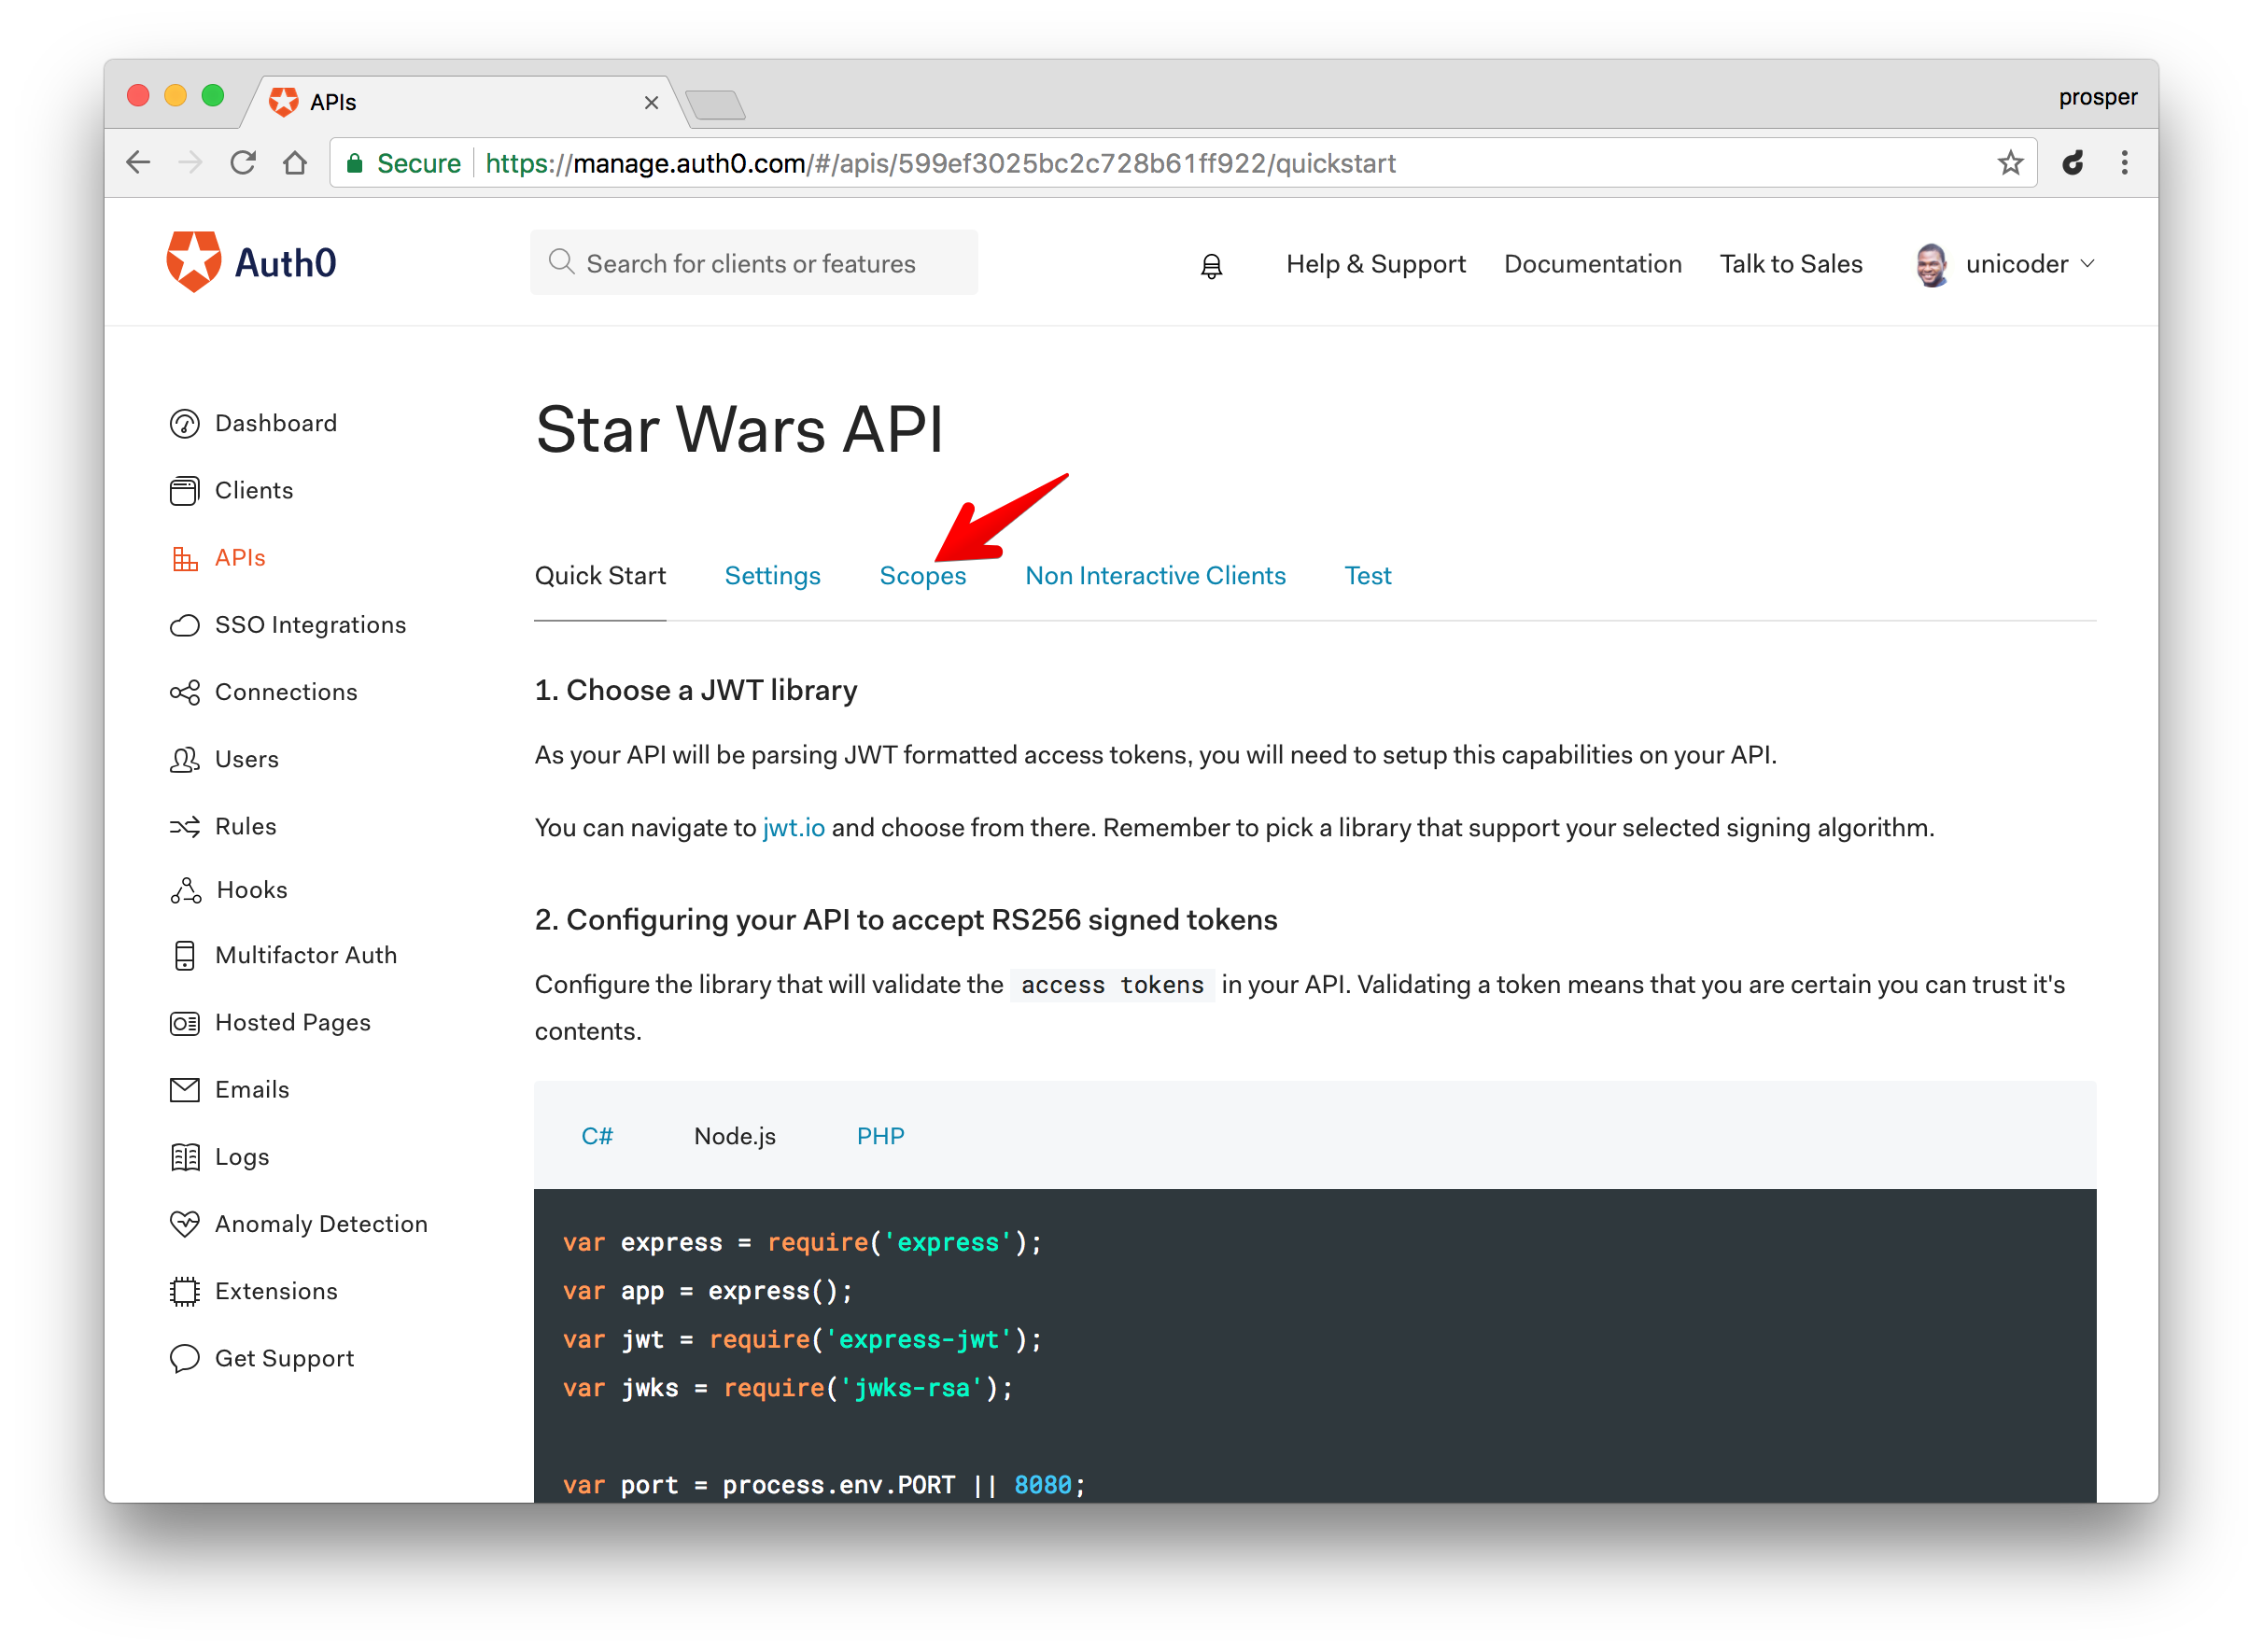
_You can define scopes in this section_
Head over to your terminal and install the following node modules:
```bash
npm install express-jwt jwks-rsa --save
```
Open up your `server/server.js` file and modify the code to look like this:
```js
'use strict';
var loopback = require('loopback');
var boot = require('loopback-boot');
var jwt = require('express-jwt');
var jwks = require('jwks-rsa');
var app = module.exports = loopback();
var authCheck = jwt({
secret: jwks.expressJwtSecret({
cache: true,
rateLimit: true,
jwksRequestsPerMinute: 5,
// YOUR-AUTH0-DOMAIN name e.g https://prosper.auth0.com
jwksUri: "{YOUR-AUTH0-DOMAIN}/.well-known/jwks.json"
}),
// This is the identifier we set when we created the API
audience: '{YOUR-API-AUDIENCE-ATTRIBUTE}',
issuer: '{YOUR-AUTH0-DOMAIN}',
algorithms: ['RS256']
});
app.use(authCheck);
// apply to a path
app.use('/api/films', function(req, res, next) {
res.json("It has valid token", req.user);
});
// catch error
app.use(function (err, req, res, next) {
if (err.name === 'UnauthorizedError') {
res.status(401).send('Invalid token, or no token supplied!');
} else {
res.status(401).send(err);
}
});
app.start = function() {
// start the web server
return app.listen(function() {
app.emit('started');
var baseUrl = app.get('url').replace(/\/$/, '');
console.log('Web server listening at: %s', baseUrl);
if (app.get('loopback-component-explorer')) {
var explorerPath = app.get('loopback-component-explorer').mountPath;
console.log('Browse your REST API at %s%s', baseUrl, explorerPath);
}
});
};
// Bootstrap the application, configure models, datasources and middleware.
// Sub-apps like REST API are mounted via boot scripts.
boot(app, __dirname, function(err) {
if (err) throw err;
// start the server if `$ node server.js`
if (require.main === module)
app.start();
});
```
In the code above, we required `express-jwt` and `jwks-rsa` modules.
* The `expres-jwt` module is an express middleware that validates a JSON Web Token and set the `req.user` with the attributes.
* The `jwks-rsa` module is a library that helps retrieve RSA public keys from a JSON Web Key Set endpoint.
The `authCheck` variable does the check to validate the access tokens that are sent as Authorization headers. It validates the `audience`, `issuer` and algorithm used to sign the token.
**Note:** Replace the `YOUR-API-AUDIENCE-ATTRIBUTE` and `YOUR-AUTH0-DOMAIN` placeholders with the API audience and Auth0 domain values from your Auth0 dashboard.
```js
app.use(authCheck);
```
Here, we used `authCheck` as a middleware. So, if a user accesses any API endpoint/route without a valid access token or no token at all, it returns an error. Try it out.
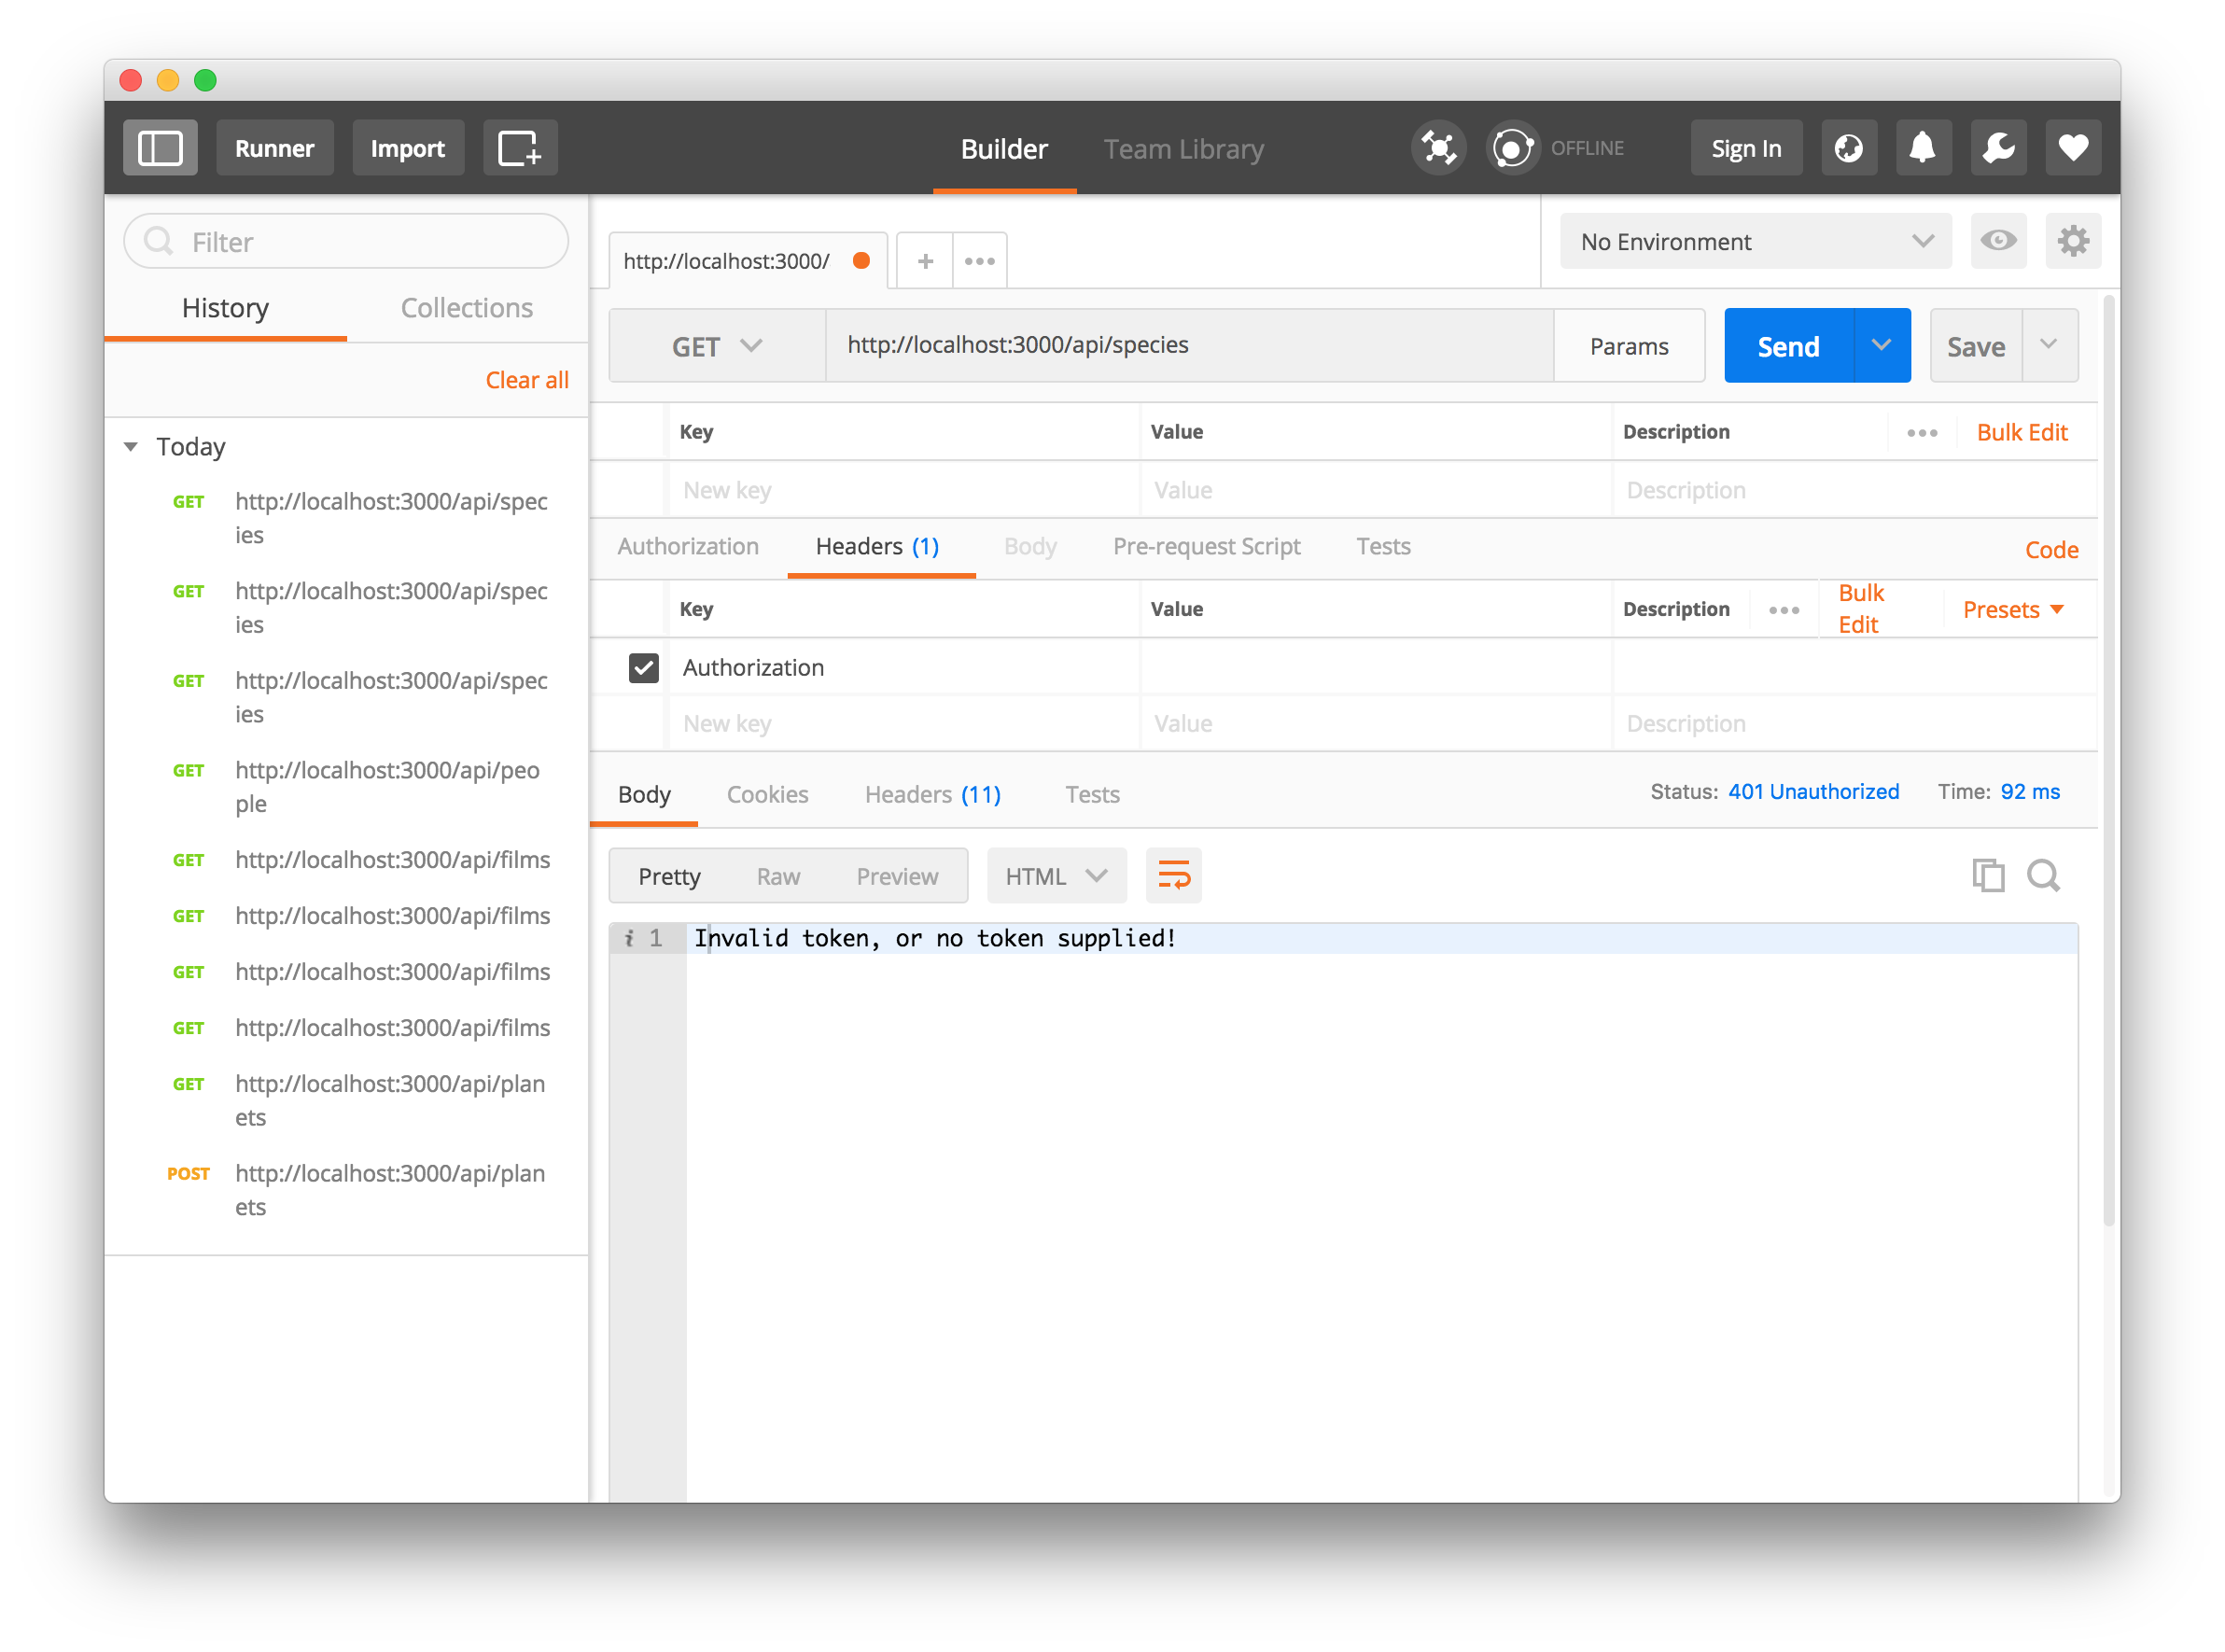
_Accessing the species endpoint without a token_
Now, let's test it with a valid access token. Head over to the `test` tab of your newly created API on your Auth0 dashboard.
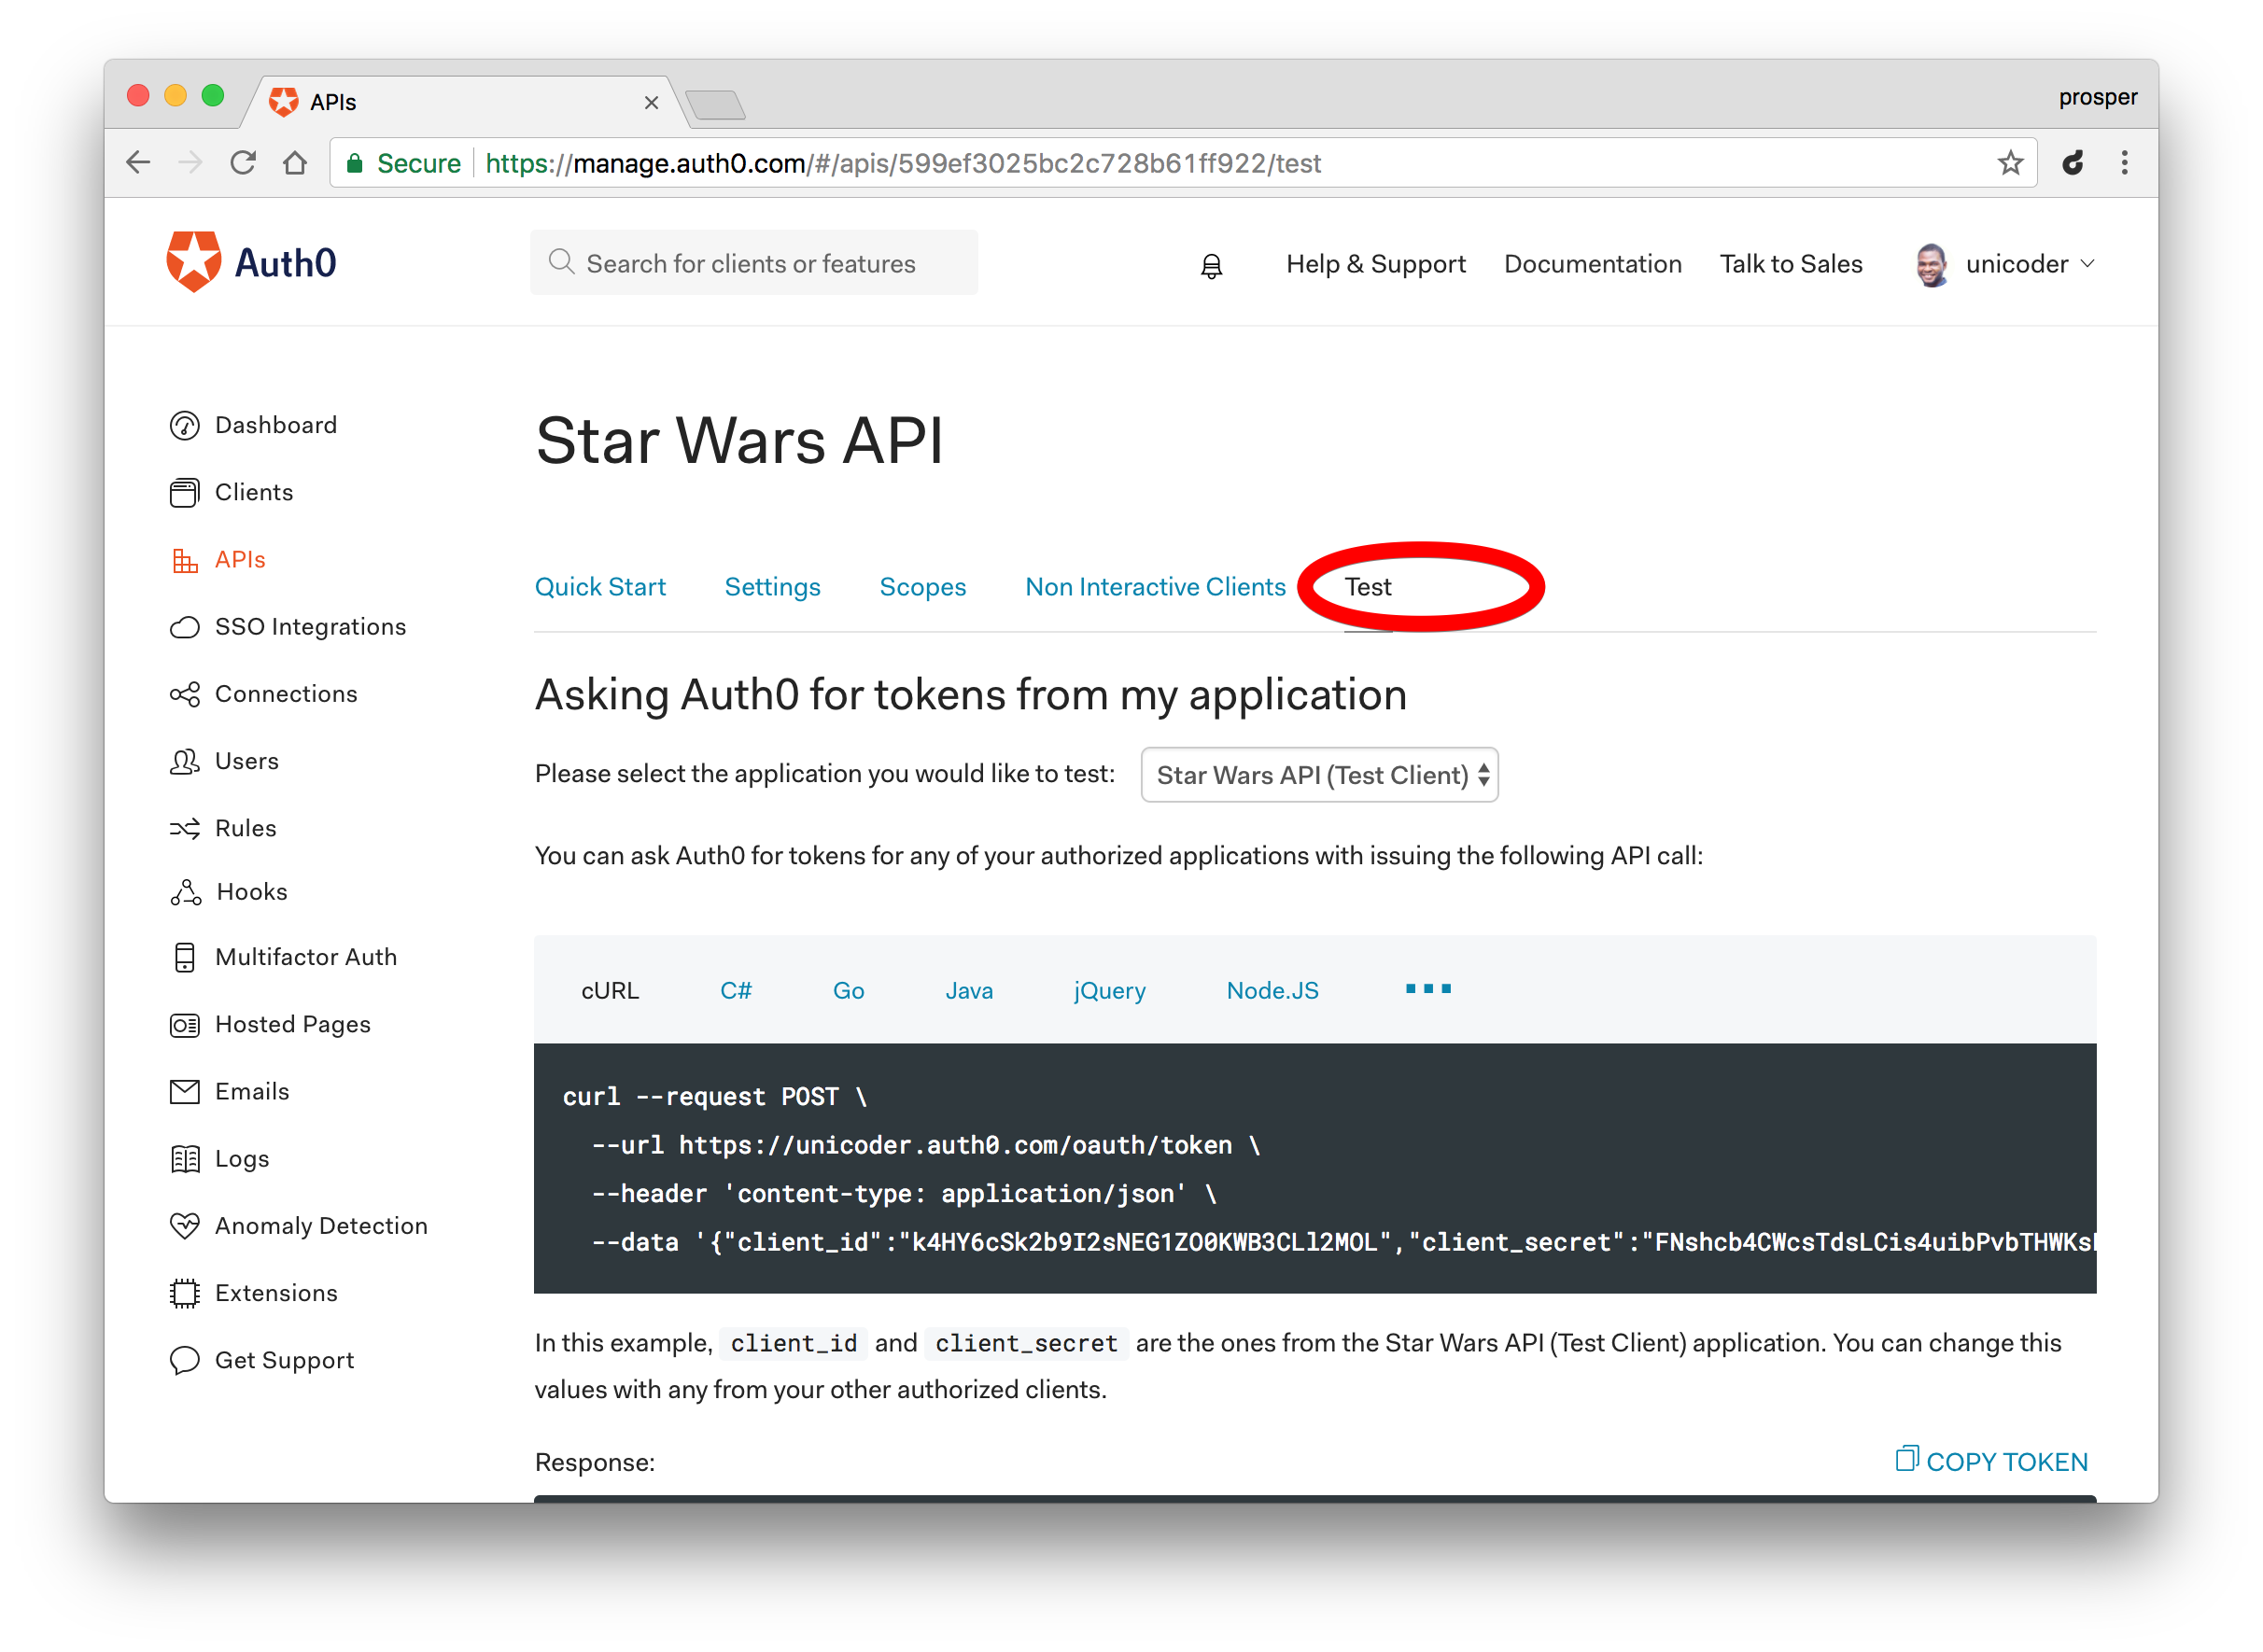
_Click on the Test tab_
Grab the Access token
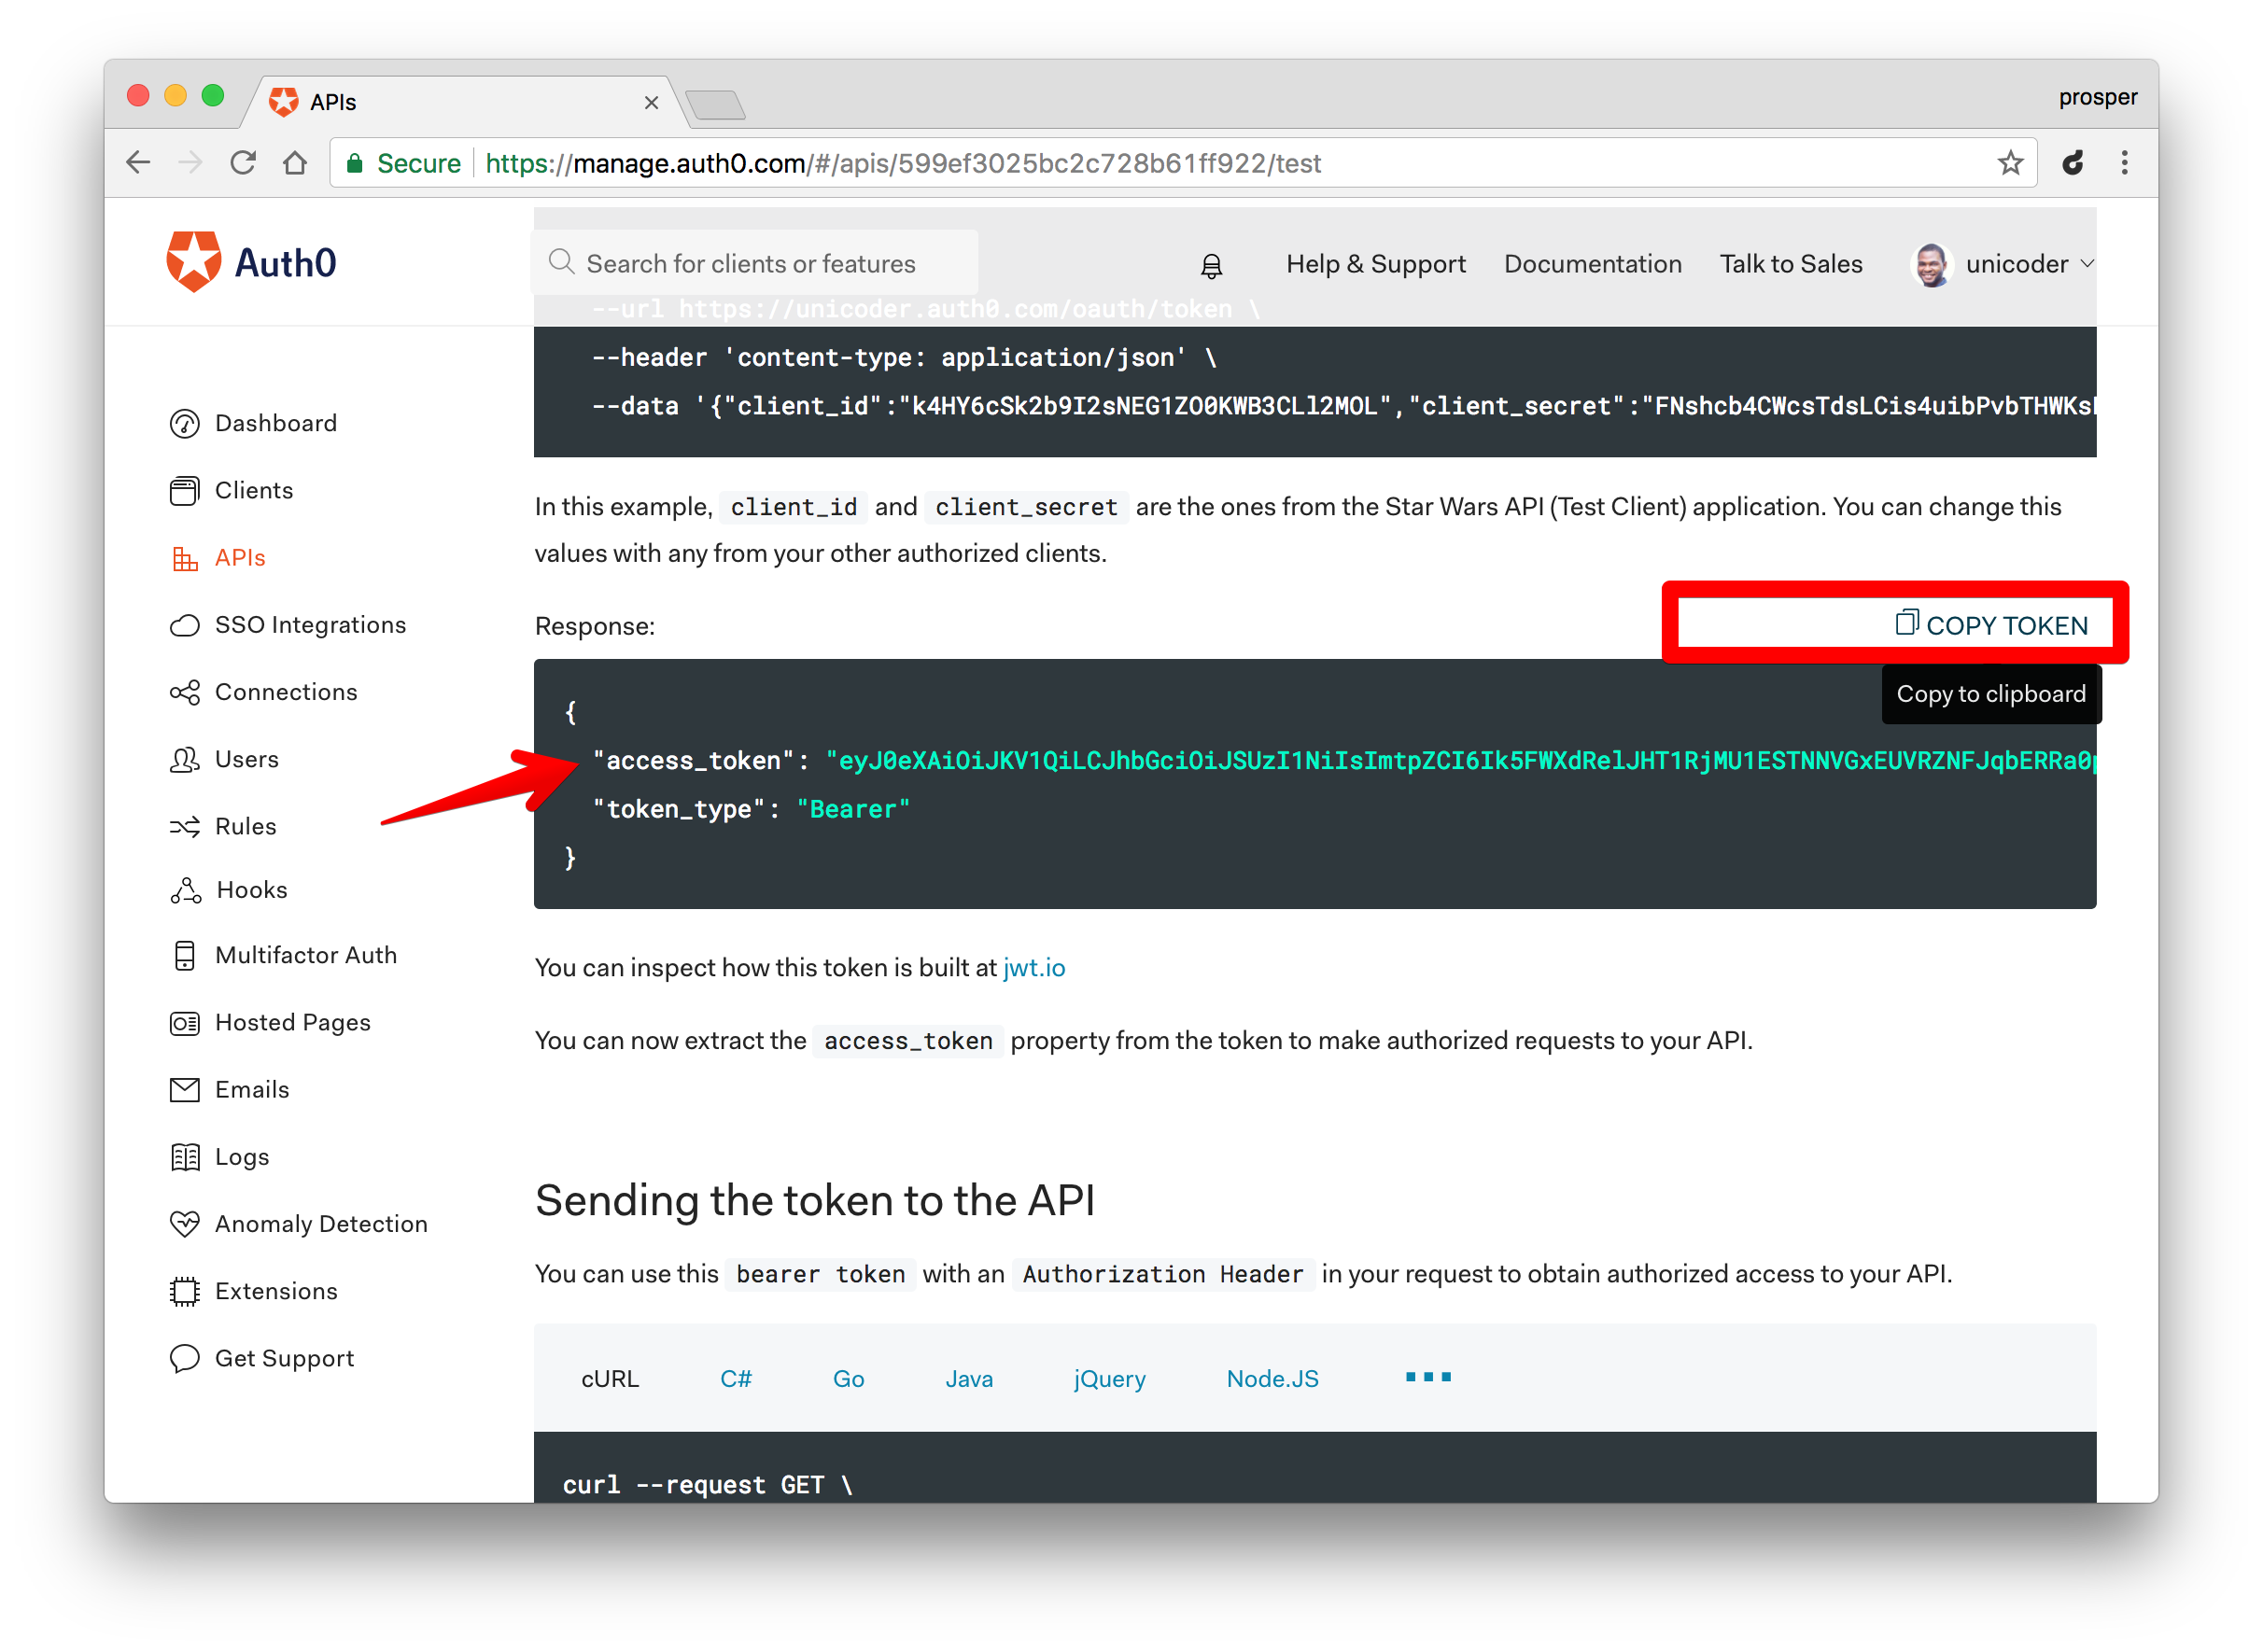
_Grab the Access Token_
Now use this `access token` in Postman by sending it as an Authorization header to access `api/species` endpoint.

_Accessing the endpoint securely_
Aha! It validates the access token and returns the right data.
Wondering how to integrate the secure API with a frontend? Check out our amazing [React](https://auth0.com/blog/reactjs-authentication-tutorial/) and [Vue.js authentication tutorials](https://auth0.com/blog/vuejs2-authentication-tutorial/).
## Conclusion
**Loopback** is a great Node.js framework that can be used to design and build your APIs quickly as shown in this tutorial. It is a project backed up by IBM and the Strongloop team. They are committed to maintaining and improving on this amazing open source project.
In addition, Auth0 can help secure your **API** easily. Auth0 provides more than just username-password authentication. It provides features like [multifactor auth](https://auth0.com/multifactor-authentication), [breached password detection](https://auth0.com/breached-passwords), [anomaly detection](https://auth0.com/docs/anomaly-detection), [enterprise federation](https://auth0.com/docs/identityproviders), [single sign on (SSO)](https://auth0.com/docs/sso), and more. Sign up today so you can focus on building features unique to your app.