---
title: "Cypress: Write Automated Tests to Validate Web Applications"
description: "Learn how to use Cypress to write automated tests that run on browsers to validate web applications."
authors:
- name: "RC"
url: "https://auth0.com/blog/authors/rc/"
date: "Jun 5, 2018"
category: "Developers,Tutorial,Cypress"
tags: ["web", "cypress", "integration-tests", "automated-tests", "web", "frontend", "react"]
url: "https://auth0.com/blog/cypress-write-automated-tests-to-validate-web-applications/"
---
# Cypress: Write Automated Tests to Validate Web Applications
**TL;DR:** This post is an introduction on using [Cypress](https://www.cypress.io/) for writing browser-based automation tests for web applications. This tutorial uses a React application as an example to illustrate the testing framework, but you can apply the learnings to write integration tests for any web application.
The source code for the React application and the corresponding Cypress tests are available in [this repository](https://github.com/auth0-blog/cypress-todo-example). The `master` branch contains the code needed to start this tutorial and [the `cypress-tests` branch](https://github.com/auth0-blog/cypress-todo-example/tree/cypress-tests) contains the final setup with all Cypress tests.
## The Test Pyramid and Importance of E2E tests
A typical test suite for your application can generally consist of three layers (you could have many more depending on the nature of the application):
* [Unit tests](http://softwaretestingfundamentals.com/unit-testing/).
* [Integration tests](https://en.wikipedia.org/wiki/Integration_testing).
* [End-to-end tests](https://www.techopedia.com/definition/7035/end-to-end-test).
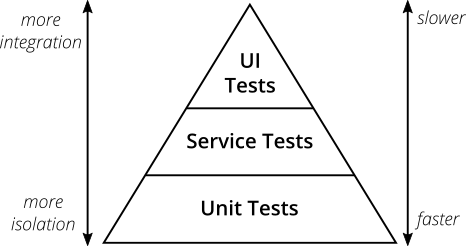
Numerous tools and libraries help you write tests that offer a safety net to your application at each of the layers listed above. But, when it comes to the level of redundancy to test coverage and which layer should assert what, the following two rules might help:
1. Write tests with different granularity.
2. The more high-level you get the fewer tests you should have.
Also, the feedback cycle for tests in each of the layers can vary. The unit tests offer the lowest latency on feedback and the latency increases as you go up the pyramid. For this post, we will focus on E2E tests and specifically on [user interface tests](https://en.wikipedia.org/wiki/Graphical_user_interface_testing).
User Interface (UI) tests, or UI tests, are tests that use the system just like a real user would interact with the application on the browser. They use scripts to mimic users' actions and they basically interact with the app just as a regular user would. Cypress is one of the many web automation tools available to help you write effective user interface tests.
## How Is Cypress Different as a UI Testing Tool?
Most browser-based automation tools are [selenium-based](https://www.seleniumhq.org/), which works by implementing a web driver that remotely executes commands on the browser through the network. Whereas, Cypress runs in the same run-loop as your parent application. Also, Cypress tests are only written in JavaScript. While you can compile down to JavaScript from any other language, ultimately the test code is executed inside the browser itself.
These architectural improvements unlock the ability to run tests much faster in browser mode as well as headless mode. You can read more about [the internal details of Cypress here](https://www.cypress.io/how-it-works/). As you start writing more Cypress tests and build the pipeline with a test suite, you will see that many aspects of writing automation tests have improved with this library.
## Writing Your First Cypress Test
To see Cypress in action, you will take advantage of an existing to-do app written with React. Don't worry if you don't have experience with React per se. Cypress can be used with any other front-end technology like Vue.js or Angular and you will use an existing React app here just to avoid having to set up too much stuff before diving into Cypress.
Below, you can see a screenshot of the application that you are going to use while learning about Cypress.

As you can see, this app has a list of to-do items that are either open or completed. A to-do item can be completed or deleted using the action icons present on the item. The text field and the button can be used to add a new to-do item.
To get started, you will first clone the sample application and install its dependencies:
```bash
git clone https://github.com/auth0-blog/cypress-todo-example.git
cd cypress-todo-example
yarn install
```
> **Note:** You could easily use `npm` instead of `yarn`. It is more a matter of taste here.
When you are done installing all the dependencies, run `yarn start` to run the application in the browser to make sure it looks good. The same application is also available in [codesandbox](https://codesandbox.io/s/4j5m27o8ox) if you have trouble running it on your machine.
Now, you will bootstrap Cypress and write your first test. With the application running, open another terminal session and run the following commands inside the same folder (`cypress-todo-example`):
```bash
yarn add --dev cypress
yarn cypress open
```
Cypress will sense that you are running it for the first time and create a folder called `cypress` with necessary files to get you going. It would also launch the cypress test runner. Think of it as a GUI for running/debugging your automation specs.
After that, you will create a file called `todo_spec.js` in the `cypress/integration` directory. You might need a third terminal for this (one for running the sample, one for Cypress, and one for creating new files. Or, even better, you can use an IDE like WebStorm or Visual Studio Code for this last task.
> **Note:** You should already see an `example_spec.js `file that contains tests for the sample [Kitchen Sink](https://example.cypress.io/) application with plenty of documentation for various scenarios. It is recommended that you read through the file at a later point in time for reference.
In this new file, add the following code:
```javascript
//cypress/integration/todo_spec.js
describe('Todo App', function () {
it('.should() - allow adding a new todo item', function () {
cy.visit('http://localhost:3000');
cy.get('input[data-cy=newItemField]').type('Write Test');
cy.get('#addBtn').click();
cy.get('tr[data-cy=todoItem]:nth-child(1)').should('contain', 'Write Test')
})
});
```
The test is pretty self-explanatory. It just connects to your app (`cy.visit('http://localhost:3000');`), then it types `'Write Test'` to the `input[data-cy=newItemField]` field, then it clicks on the `#addBtn` button so it can validate that the first `tr` element contains the `'Write Test'` string.
The `cy` variable that you are using to interact with your application is a global Cypress object that drives the tests. It has various helper methods to visit web pages, interact with web elements, and also to fetch data present in the DOM.
To learn more, you can check the [excellent documentation on Cypress](https://docs.cypress.io/guides/overview/why-cypress.html) and [the sample application](https://example.cypress.io/) that you would be frequently referring to as you add more test cases to your application.
Also, note that Cypress bundles the [`chai`](https://docs.cypress.io/api/commands/should.html#Syntax) assertion library and the matchers you see in the test is chained to the Cypress helper methods seamlessly for readability.
## Using the Cypress Test Runner
When you have saved the`todo_spec.js` file, it will start appearing in the Cypress test runner.

When you click on `todo_spec.js` in the test runner, a new browser instance will open up and run the test visually. You can observe Cypress hop through each step that you wrote in the `todo_spec.js` test.
If everything works properly (as it should), you will see something similar to this screen:
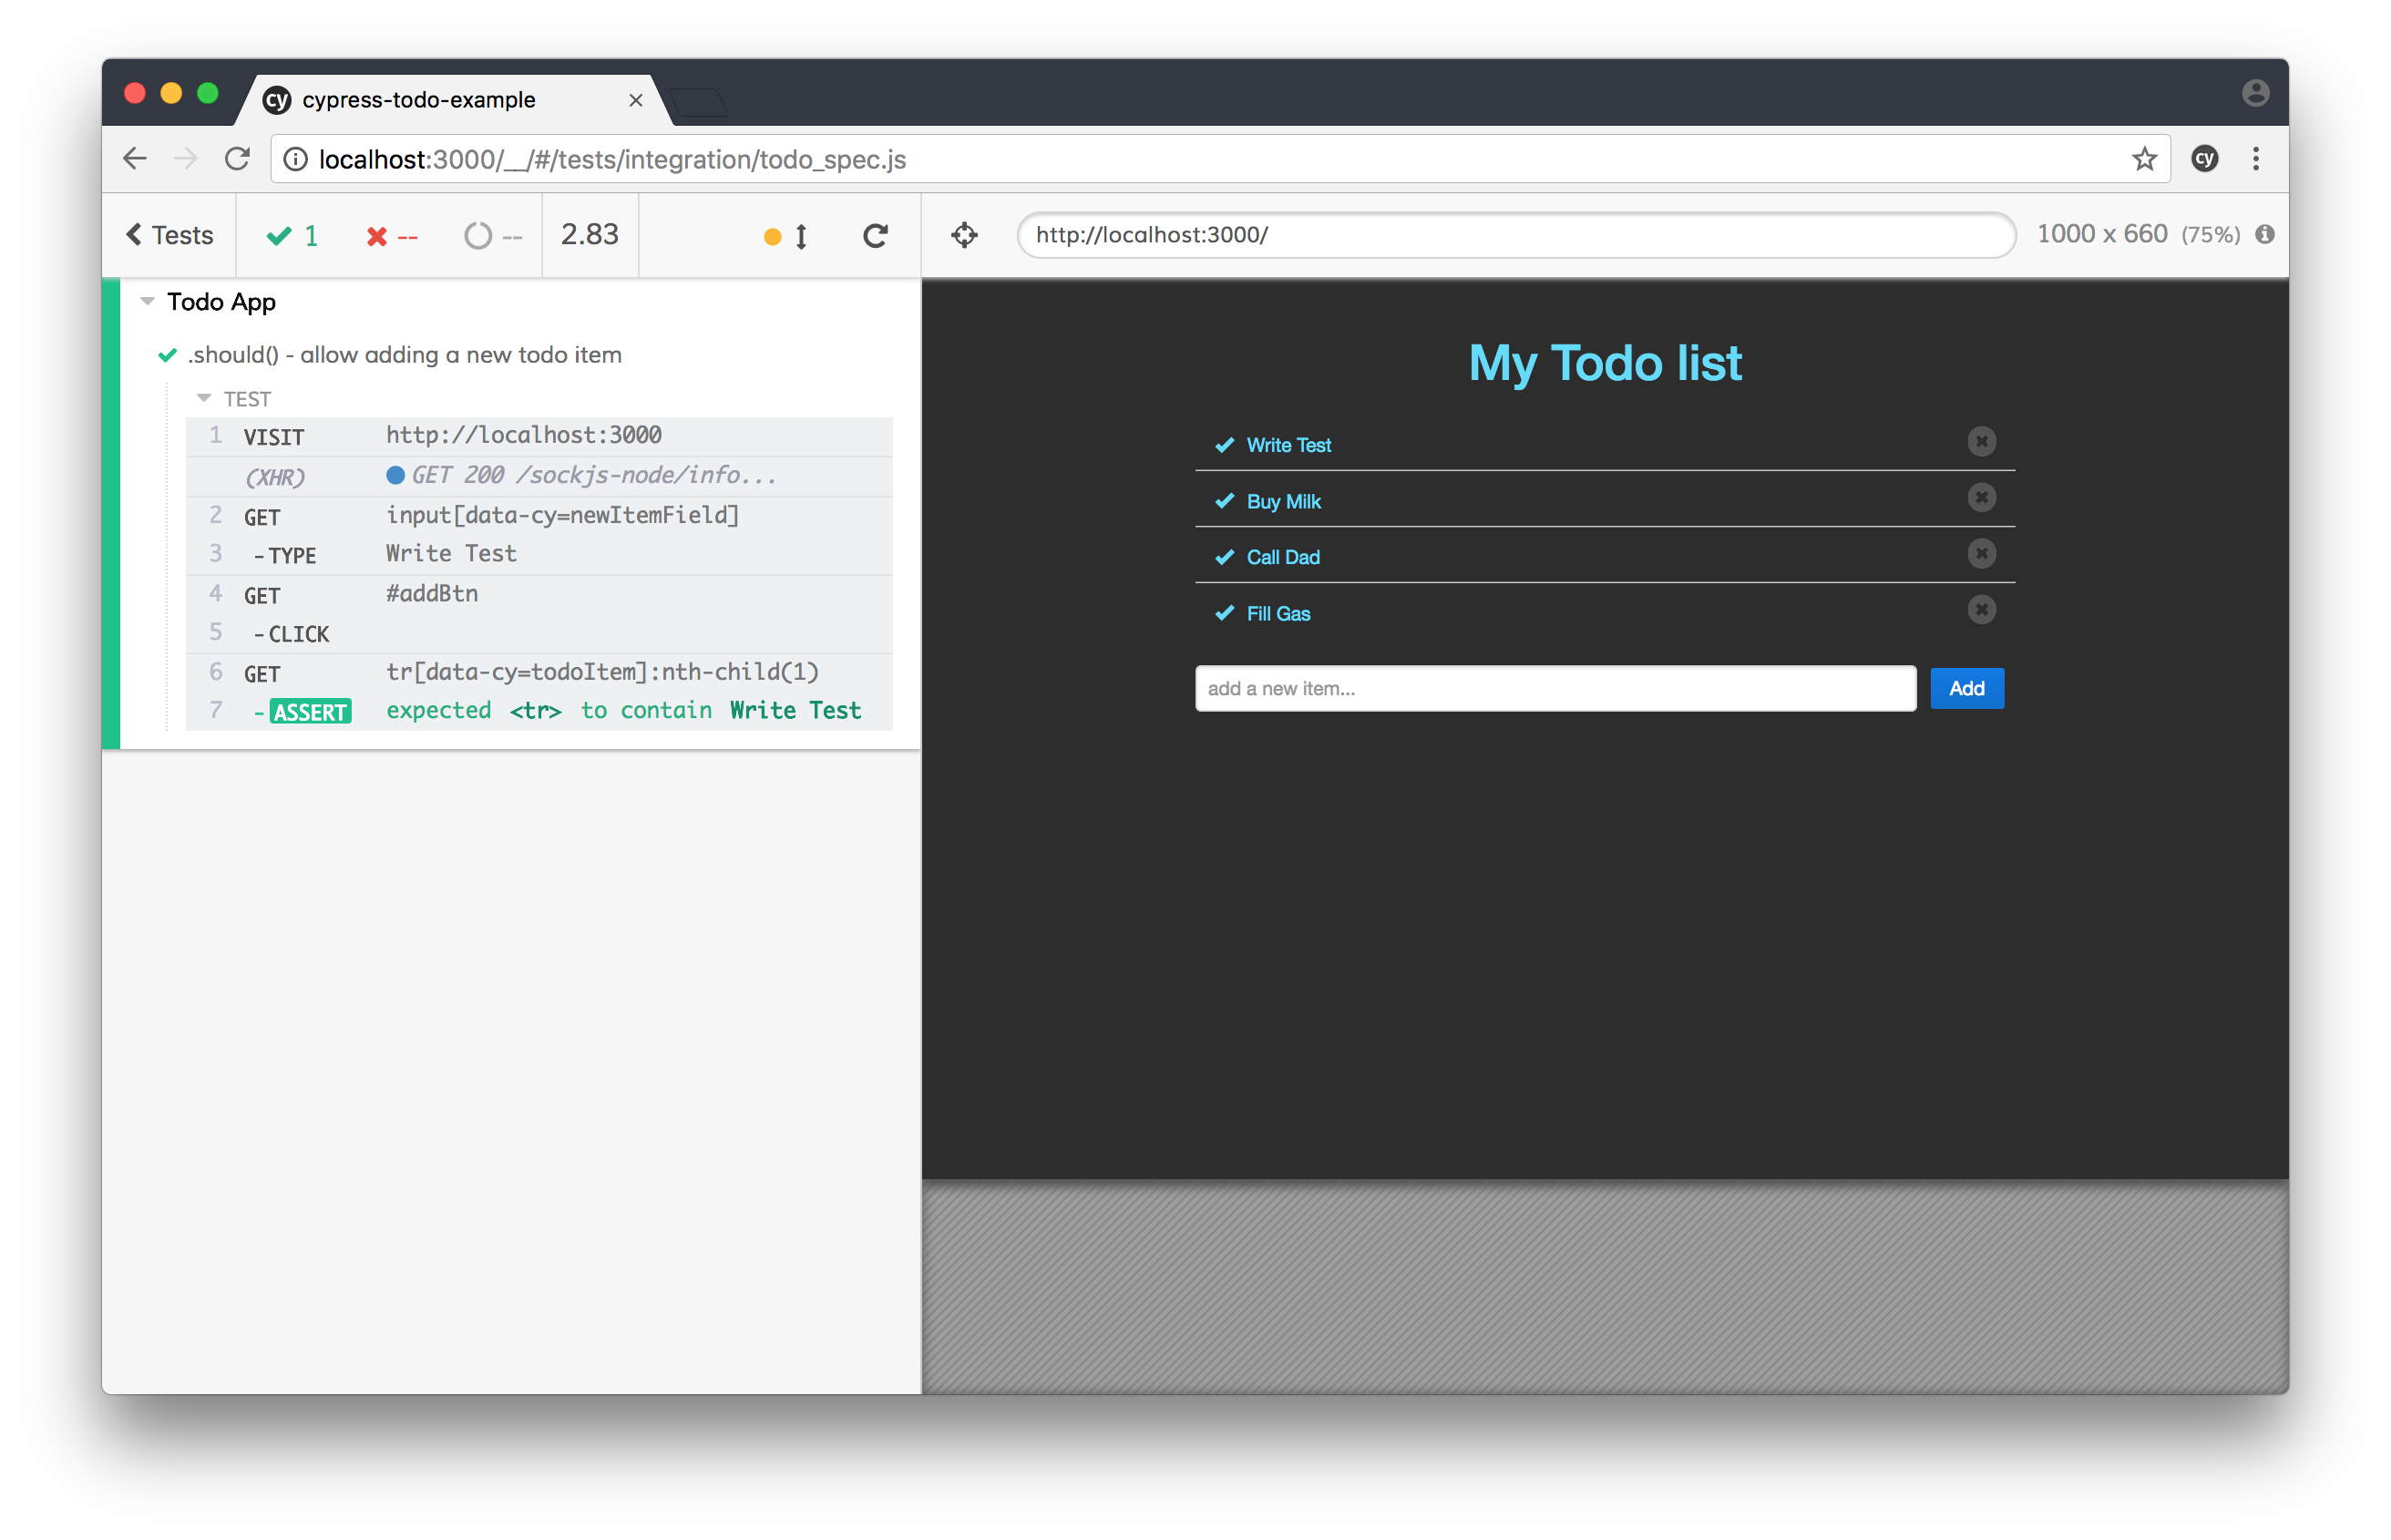
The left pane is called the _Command Log_ and lists the name of the test followed by each step in sequence and its outcome. When the test runs, you can see Cypress interacting with the application on the browser webview to the right and you see that the new todo item is added to the list successfully. Lastly, you can see that the last step on the left is the assertion to verify if our new item is present in the list.
One very helpful feature on the browser view is the DOM selector that is shown highlighted below the internal URL address bar (not the real one from the browser, but the one from the inner browser). It will appear when you click on the _Open Selector Playground_ icon to the left of this address bar. You can type in a selector in the textbox like you have entered `#addBtn` and Cypress will highlight the selected item for you. Or you can select an element from the screen and Cypress will try to find the optimal selector for you to use in your test.
## Setting up Continuous Integration for Cypress
The whole point of writing and maintaining browser-based automation tests is to test the application for any flows that break and give early feedback to the team. You can set up the suite of Cypress tests to run on your continuous integration (CI) server to run on every check-in or as a nightly build.
In this section, you will go through the steps needed to set up the build and to any particular CI tool.
Most CI build agents are servers and not workstations, so you cannot expect them to have a GUI or X Window system to launch a real browser UI. So, it is a common practice to run web automation tests in [headless mode](https://en.wikipedia.org/wiki/Headless_browser). To keep it simple, you will use a virtual GUI buffer like [`xvfb`](http://elementalselenium.com/tips/38-headless) to fire a web browser virtually, launch the target application, and run Cypress tests against it.
Assuming, you are setting up a Docker agent on the CI server to run the tests, this is the specification for the `Dockerfile`:
```dockerfile
FROM cypress/base
// Clone your code base here
RUN npm install
RUN $(npm bin)/cypress run
```
Refer to this [page](https://docs.cypress.io/guides/guides/continuous-integration.html#) for setting up Cypress on your favorite CI server.
## Time Travel and Debugging with Cypress
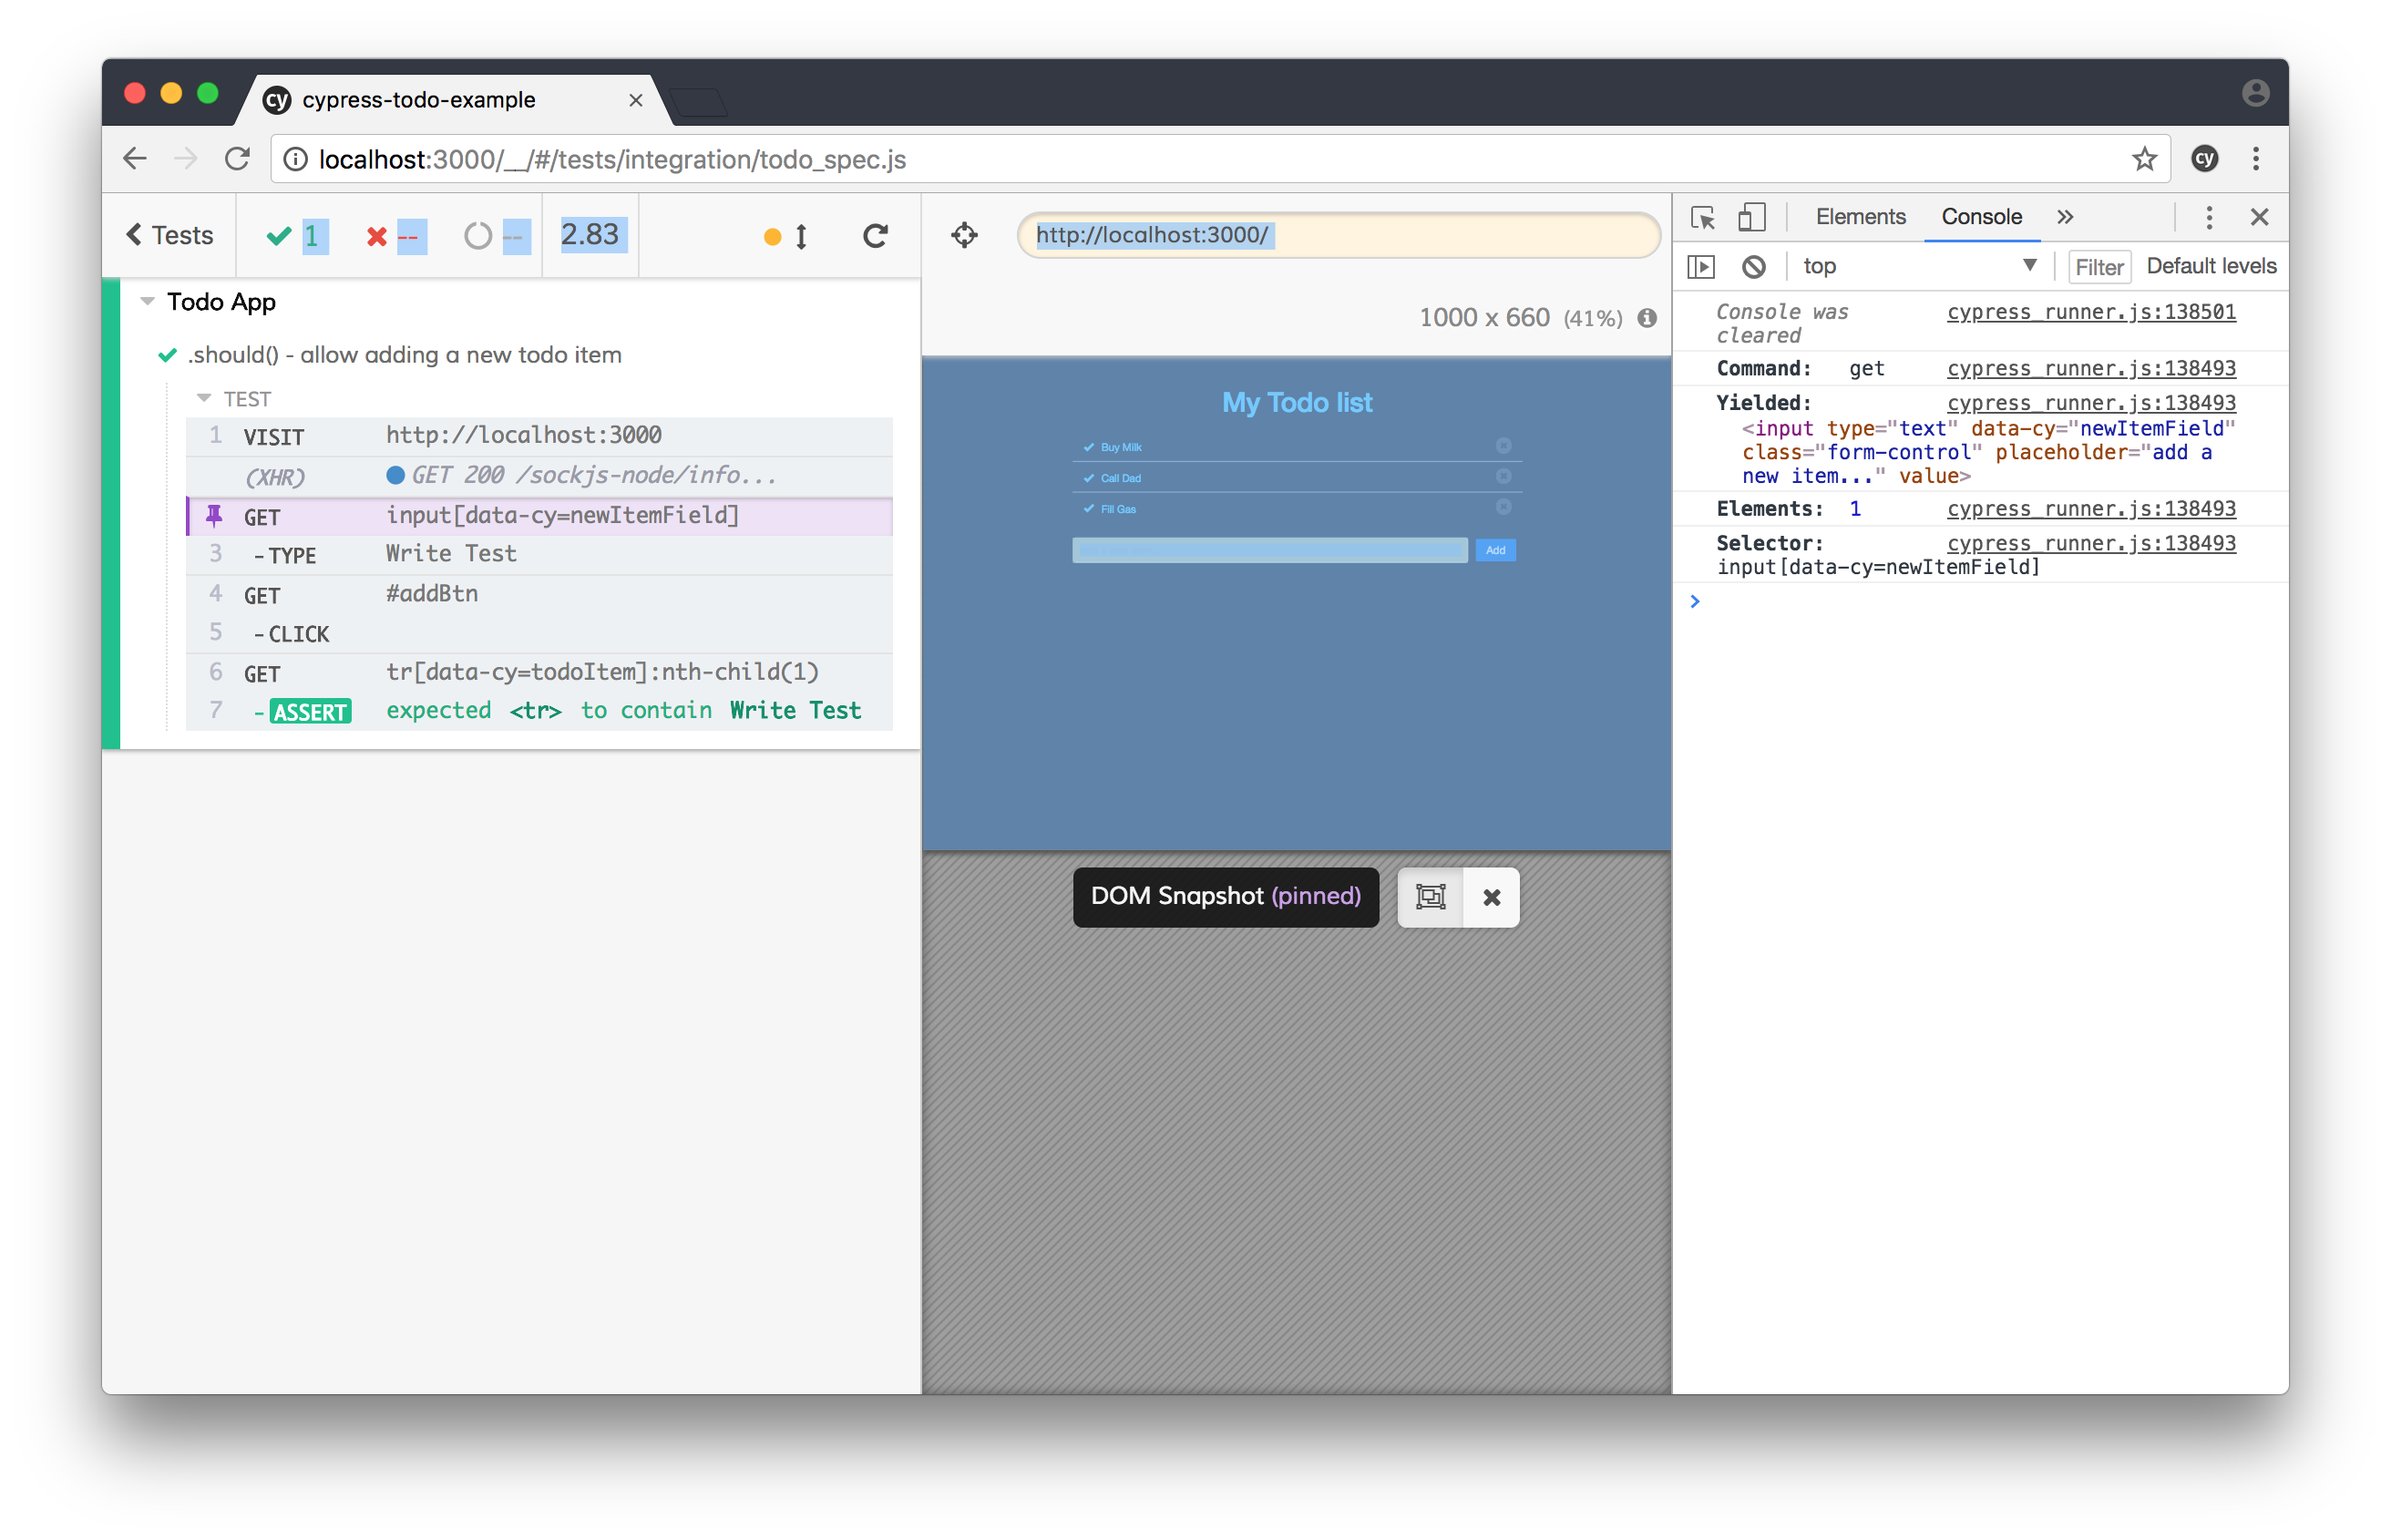
Another cool feature present in the Cypress Test Runner tool is that as you hover through the command log on the left, for each step in the test, you can check the state of the application on the right. You can also click on the pin icon to freeze the runner for that particular step, open the developer console and get insights into the specific web interactions that happened, the selectors used, parameters passed and results.
## Postmortem Analysis on Cypress
The last thing you want with a browser automation test is false positives. By that, a test case failing because of the way the automation test was written and not because something in the actual application is broken. When that frequently happens, the test suite loses its credibility and a red build is not worth its attention anymore!
So, when a test fails on the CI, you need enough trails and artifacts to understand what really went wrong. Like most automation frameworks in the market, Cypress generates screenshots and videos of the entire test runs if configured correctly. All of these settings can be tweaked using the `cypress.json` configuration file generated in the root of your project. By default, screenshots and video recording are turned on and you can see them generated inside the `cypress` folder after running the tests.
Check out the [configuration documentation](https://docs.cypress.io/guides/references/configuration.html#Videos) for additional settings and options.
## Conclusion and Further Reading
As you could see throughout this article, Cypress is an amazing tool that facilitates end-to-end tests on web applications. If you want to learn more about Cypress, the following list will lead you to some references that you might find useful:
1. [Practical Test Pyramid](https://martinfowler.com/articles/practical-test-pyramid.html).
2. [Most common Selenium challenges](https://crossbrowsertesting.com/blog/selenium/problems-selenium-webdriver/).
3. [Cypress architecture](https://www.cypress.io/how-it-works/).