---
title: "How to Create Your .NET Project Template"
description: "How to create your .NET project template to use with .NET CLI and Visual Studio."
authors:
- name: "Andrea Chiarelli"
url: "https://auth0.com/blog/authors/andrea-chiarelli/"
date: "Oct 15, 2021"
category: "Developers,Tutorial,.NET"
tags: ["dotnet", "csharp", "authentication", "project-template"]
url: "https://auth0.com/blog/create-dotnet-project-template/"
---
# How to Create Your .NET Project Template
.NET comes with several project templates that help to quickly scaffold applications in different contexts. You may need to create your own project template in specific contexts. The article explains how you can create your own project template to use with .NET CLI and Visual Studio.
## Working with Templates
Templates improve developer productivity and may help to promote best practices. As a .NET developer, you have many built-in templates to start a new project or add a new item to an existing project, including console apps, class libraries, unit test projects, ASP.NET Core apps, and so on. Of course, you can use them both in [Visual Studio](https://visualstudio.microsoft.com/) and in the [.NET CLI](https://docs.microsoft.com/dotnet/core/tools/). This article will focus on project templates, that is, templates that allow you to create a new project with specific features.
While in Visual Studio you can explore the project template list by simply selecting the *New* menu item, in the .NET CLI, you can work with templates by using the [`dotnet new`](https://docs.microsoft.com/dotnet/core/tools/dotnet-new) command. For example, running the following command, you will get the list of templates available on your machine:
``` bash
dotnet new --list
```
The following is an example of a template list you will get on your console:
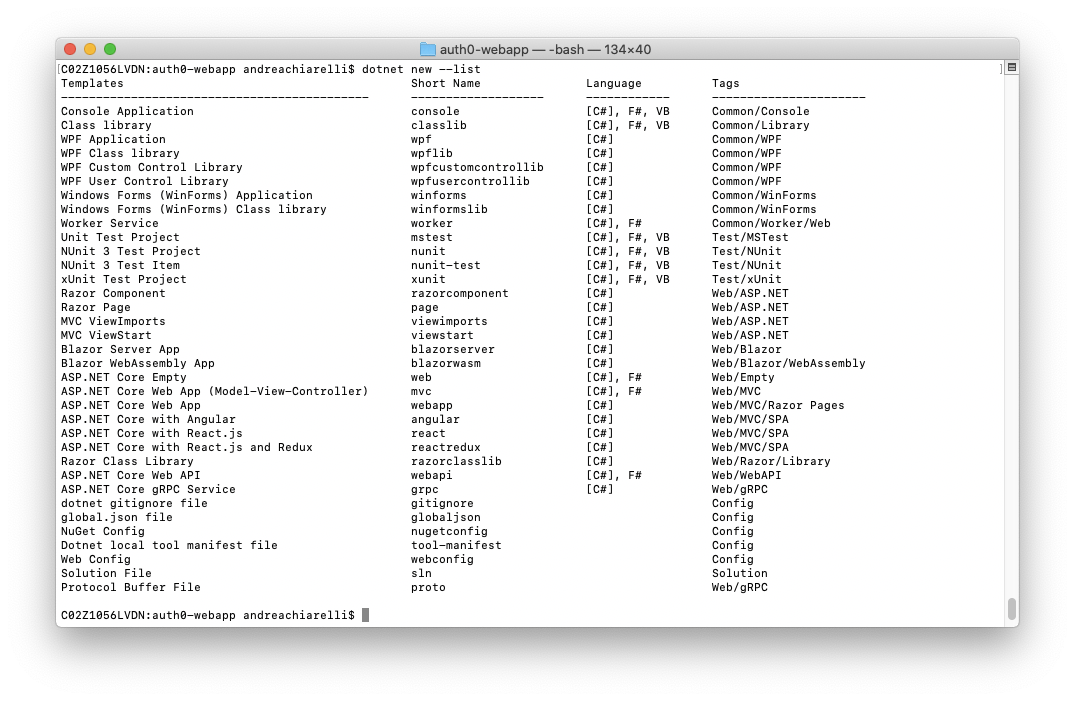
So, for example, if you want to create a new console application, you can run the command `dotnet new console`, which uses the short name of the template in the list above. You can find [a description of the built-in templates starting from the official documentation](https://docs.microsoft.com/en-us/dotnet/core/tools/dotnet-new#arguments).
`dotnet new` can also help you in many other template management tasks, like installing and uninstalling other templates from the [NuGet repository](https://www.nuget.org/) or your own machine. You will learn how to use it throughout this article.
## Creating a Basic Template
The project template you are going to create is an ASP.NET web application template using [Auth0](https://auth0.com/) for authentication. This template allows developers to have a ready-to-run Auth0-enabled starter web application.
> The project template you are going to implement requires .NET Core 3.1 or higher (.NET 5.0). Also, the template is supported by [Visual Studio 2019 starting from version 16.8 Preview](https://devblogs.microsoft.com/visualstudio/visual-studio-2019-v16-8-preview-2/) and [Visual Studio 2019 for Mac starting from version 8.8](https://devblogs.microsoft.com/visualstudio/visual-studio-2019-for-mac-version-8-8-is-now-available/).
### Preparing the working environment
Before building the project template, let's prepare our working environment by creating a few folders. First of all, create your root folder: `templates-playground`. Then move to this folder and creates two subfolders: `templates` and `test`.
At the end of this process, you should get the following folder structure:
```
templates-playground
├── templates
└── test
```
The `templates` folder will contain the source code of your project template. You can put multiple templates there.
You will use the `test` folder to create new projects from that project template.
### Setting up the project template
A .NET Core project template simply consists of:
1. the source files of the project
2. a configuration file named `template.json`.
For the purposes of this article, you are *not* going to build the .NET project that will act as the basis for your template from scratch. You will use a ready-made project instead.
So, move to the `templates-playground/templates` folder and clone the project from GitHub with the following commands:
``` bash
cd templates-playground/templates
git clone \
-b starting-point \
https://github.com/auth0-blog/auth0-aspnet-webapp-project-template.git \
auth0-webapp
```
These commands will create the `auth0-webapp` subfolder under your `templates-playground/templates` folder and clone the `starting-point` branch of [this GitHub repository](https://github.com/auth0-blog/auth0-aspnet-webapp-project-template) there.
As mentioned before, the project you will find in that folder is an ASP.NET web application with Auth0 authentication. If you'd like to learn more about how this project was built, take a look at the article [Using C# Extension Methods for Auth0 Authentication](https://auth0.com/blog/using-csharp-extension-methods-for-auth0-authentication/).
Now, create a subfolder named `.template.config` within the project's root folder (`templates-playground/templates/auth0-webapp`). Then, add a new file named `template.json` to this newly created folder with the following content:
``` json
{
"$schema": "http://json.schemastore.org/template",
"author": "Andrea Chiarelli",
"classifications": [ "Web", "MVC", "Razor Pages" ],
"identity": "Auth0.NET.Mvc",
"name": "Auth0 ASP.NET Core App",
"shortName": "auth0webapp",
"tags": {
"language": "C#",
"type": "project"
}
}
```
This file is the key item for building your template. It contains the meta-information that transforms your .NET project into a project template. In the example above, you'll find the minimum required properties:
- **$schema**: It defines the schema for the current JSON file; its value is fixed to `http://json.schemastore.org/template`.
- **author**: This property defines the author of the template.
- **classifications**: It declares the context where to use this template. It is an array of strings that help to classify the template itself. Users will find your template in groups based on these strings.
- **identity**: This is a unique identifier for your template.
- **name**: The name for the template seen by the user.
- **shortName**: This is the template's name to be used with `dotnet new` when creating a new project from it.
- **tags**: A set of values defining the target of the template. In the example, you declare that this template is for projects (`type` property) in C# (`language` property).
Check out [this document for the complete list of the available configuration properties](https://github.com/dotnet/templating/wiki/Runnable-Project-Templates#configuration).
### Installing the template
With the simple steps performed so far, you have a working project template! Let's install it locally by running the following command in the `templates-playground/templates/auth0-webapp` folder:
``` bash
dotnet new --install .
```
This command lets the .NET template engine to consider the current folder (`.`) as a template package. You will learn how to create a package later on.
Once you install your template, run `dotnet new --list`. You should see the newly installed template among the existing ones, similar to the following picture:
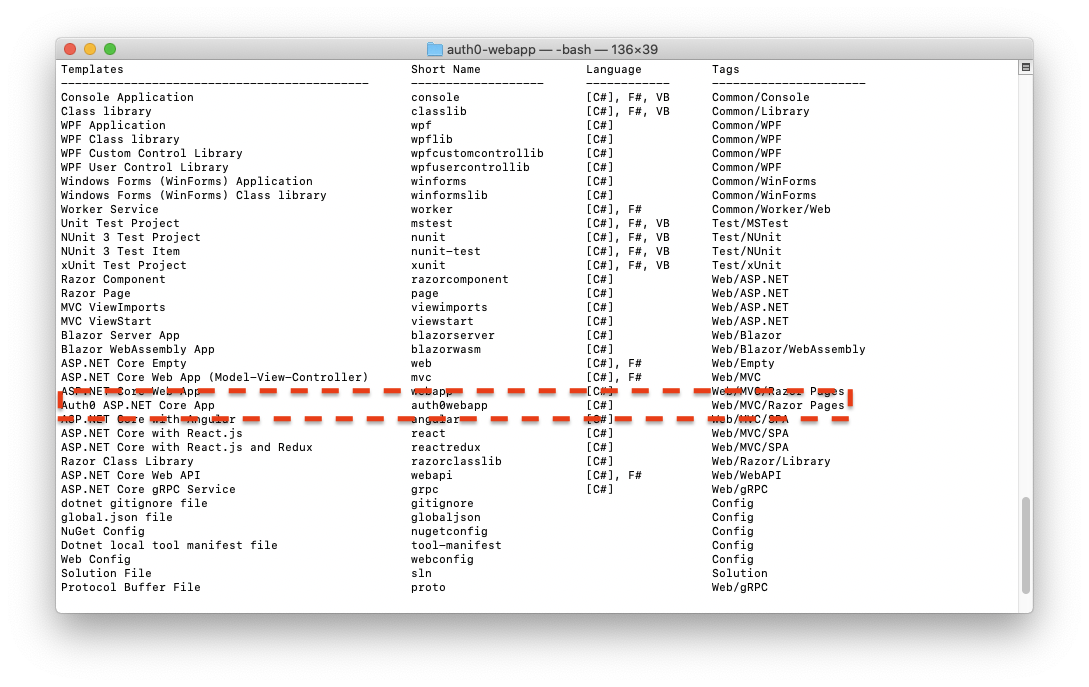
Awesome! Your first .NET project template is ready to run.
### Testing the template
To see your project template in action, move to the `templates-playground/test` folder and run this command:
``` bash
dotnet new auth0webapp -o myAuth0WebApp
```
You should get a `myAuth0WebApp` folder with the ASP.NET project's source files.
To check that it is ready to run, you need to register the application with Auth0 and configure it with a few parameters. This step allows your application users to authenticate with Auth0.
To do this, you need an Auth0 account. You can sign up here for a free one.
Then, access your [Auth0 Dashboard](https://manage.auth0.com/), move to the [Applications section](https://manage.auth0.com/#/applications), and follow these steps to register your application with Auth0:
1. Click the *Create Application* button.
2. Provide a friendly name for your application (for example, *My Web Application*) and select *Regular Web Application* as the application type.
3. Finally, click the *Create* button.
After you create the application, move to the *Settings* tab and take note of your Auth0 **Domain**, **Client ID**, and **Client Secret**. You will need these values to configure your application and allow it to communicate with Auth0.
Then, assign the value `https://localhost:5001/callback` to the *Allowed Callback URLs* field and the value `https://localhost:5001/` to the *Allowed Logout URLs* field. The first value tells Auth0 which URL to call back after users authenticate. The second value tells Auth0 which URL users should be redirected to after they log out.
Finally, click the *Save Changes* button to apply them.
After registering your application with Auth0, you need to configure it with a few parameters from the Dashboard. So head to your ASP.NET project's root folder and open the `appsettings.json` file. Its content should look like the following:
``` json
{
"Logging": {
"LogLevel": {
"Default": "Information",
"Microsoft": "Warning",
"Microsoft.Hosting.Lifetime": "Information"
}
},
"AllowedHosts": "*",
"Auth0": {
"Domain": "{DOMAIN}",
"ClientId": "{CLIENT_ID}",
"ClientSecret": "{CLIENT_SECRET}"
}
}
```
Replace the `{DOMAIN}`, `{CLIENT_ID}`, and `{CLIENT_SECRET}` placeholders with the corresponding values from the Auth0 Dashboard, and save the file.
> Consider the client secret to be the password of your application. Take care of it, and don't spread it around. Here, you are storing the client secret in the `appsettings.json` file because the sample application is meant to run on the server, and users have no access to it.
Now you can launch your application by running:
``` bash
dotnet run
```
Once the application starts, point your browser to [https://localhost:5001](https://localhost:5001). You should see the following page:
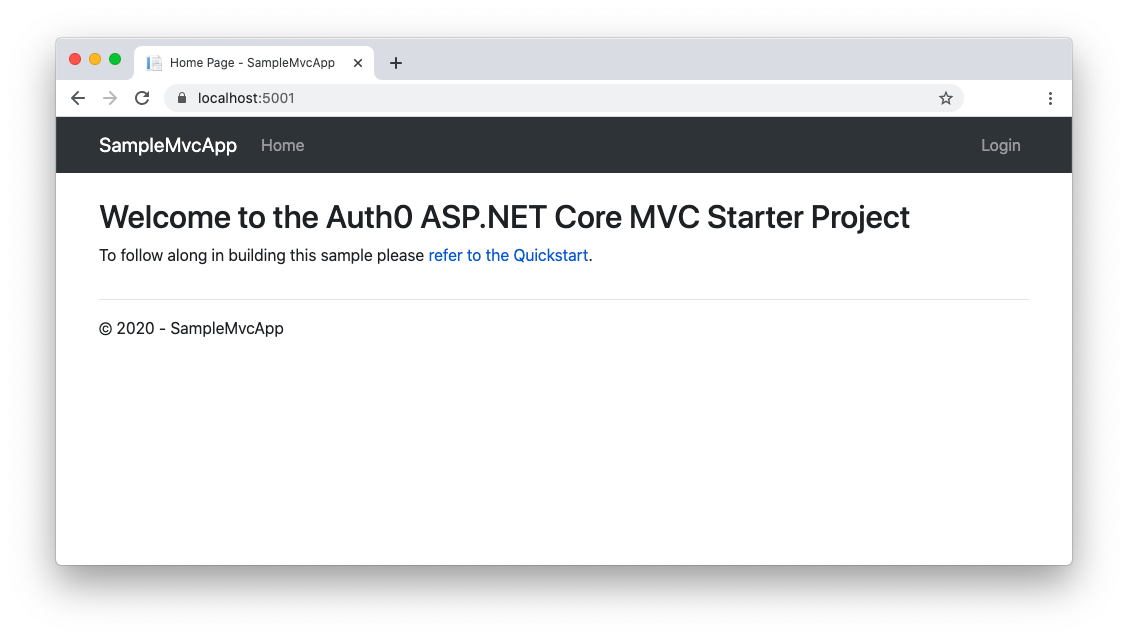
By clicking the *Login* link on the upper right corner of the page, you will be redirected to the [Auth0 Universal Login](https://auth0.com/docs/universal-login) page to authenticate and access the user profile page. In other words, your application is ready to run with all the Auth0 authentication logic already integrated.
## Adding Parameters to Your Template
So far, you have a working project template, but it doesn't look so exciting since it just copies the original project's source files into a new folder. You would like to customize the new project like the built-in templates let you do.
Fortunately, you can work on the *template.json* configuration file to modify the template generator's default behavior. The basic principle is that you can define some settings that the user can override by passing options to the `dotnet new ` command.
Let's take a look.
### Assigning a custom application name
Using the `dotnet new` command with the built-in templates, you can specify the name to assign to your new project. This allows you to provide your own global namespace for the application, for example. Usually, you can carry out this by using the `-o` option. You've already used this option before, when running the following command:
``` bash
dotnet new auth0webapp -o myAuth0WebApp
```
However, this command created the `myAuth0WebApp` folder with the new project inside. If you take a look at the source code, you notice that the global namespace has not been changed.
To make your template compliant with the common behavior, you need to add a couple of properties to the `template.json` configuration file, as shown below:
``` json
{
"$schema": "http://json.schemastore.org/template",
"author": "Andrea Chiarelli",
"classifications": [ "Web", "MVC", "Razor Pages" ],
"identity": "Auth0.NET.Mvc",
"name": "Auth0 ASP.NET Core App",
"shortName": "auth0webapp",
"sourceName": "Auth0.NET.Mvc",
"preferNameDirectory":true,
"tags": {
"language": "C#",
"type": "project"
}
}
```
You added the `sourceName` and the `preferNameDirectory` properties.
The `sourceName` property represents the name of the project, that is, the global namespace of the application. You assigned the `Auth0.NET.Mvc` value to this property, which matches the current application namespace. This value also acts as a placeholder that will be replaced with the value from the user, if they provide one.
The `preferNameDirectory` parameter allows you to match the output folder name with the project name.
This means that now you can create a new project by providing a custom name the same way the built-in project templates.
Before testing the modified template, uninstall the project template with the following command:
``` bash
dotnet new -u
```
### Adding custom parameters
You can even configure your project template to accept custom parameters. For example, you can allow the users of your Auth0 template to provide the Auth0 configuration parameters while creating the new project. Let's replace the content of the `template.json` configuration file with the following:
``` json
{
"$schema": "http://json.schemastore.org/template",
"author": "Andrea Chiarelli",
"classifications": [ "Web", "MVC", "Razor Pages" ],
"identity": "Auth0.NET.Mvc",
"name": "Auth0 ASP.NET Core App",
"shortName": "auth0webapp",
"sourceName": "Auth0.NET.Mvc",
"preferNameDirectory":true,
"tags": {
"language": "C#",
"type": "project"
},
"symbols":{
"domain": {
"type": "parameter",
"description": "Your Auth0 domain.",
"defaultValue": "{DOMAIN}",
"replaces":"{DOMAIN}"
},
"clientId": {
"type": "parameter",
"description": "Your Auth0 client id.",
"defaultValue": "{CLIENT_ID}",
"replaces":"{CLIENT_ID}"
},
"clientSecret": {
"type": "parameter",
"description": "Your Auth0 client secret.",
"defaultValue": "{CLIENT_SECRET}",
"replaces":"{CLIENT_SECRET}"
}
}
}
```
You added the `symbol` property, which defines three custom parameters: `domain`, `clientId`, `clientSecret`. These parameters represent the Auth0 configuration data you learn above.
Each parameter is defined through four properties:
- `type`: This defines the type of symbol (it's `parameter` in this case).
- `description`: The description of the value to be assigned to the parameter.
- `defaultValue`: This is the default value for the parameter if the user doesn't assign any.
- `replaces`: This property defines a placeholder in your project template's source code. The template engine will look for this placeholder and replace it with the value provided by the user.
So, to test these parameters, be sure to uninstall the current installed version of the project template and reinstall it:
``` bash
cd templates-playground/templates/auth0-webapp
dotnet new -u
dotnet new -i .
```
Once you install your template, check its available parameters by running the following command:
``` bash
dotnet new auth0webapp -h
```
Apart from the standard options for `dotnet new`, you should see the following output:
``` bash
...
Auth0 ASP.NET Core App (C#)
Author: Andrea Chiarelli
Options:
-d|--domain Your Auth0 domain.
string - Optional
Default: {DOMAIN}
-c|--clientId Your Auth0 client id.
string - Optional
Default: {CLIENT_ID}
-cl|--clientSecret Your Auth0 client secret.
string - Optional
Default: {CLIENT_SECRET}
```
You enabled your template to use the three custom parameters. Notice that they have automatically been assigned a short version.
So, move to the `templates-playground/test` folder, and type the following command to test this new feature:
``` bash
dotnet new auth0webapp \
-o mySecureWebApp \
-d \
-c \
-cl
```
The values provided as parameters will replace the matching placeholders in `appsettings.json`, so your application will be ready to run.
### Allowing options
In addition to generic string parameters, you can configure parameters that are restricted to a limited set of values. For example, if you want your users to choose the target framework for a new project, you should change the content of your `template.json` file as follows:
``` json
{
"$schema": "http://json.schemastore.org/template",
"author": "Andrea Chiarelli",
"classifications": [ "Web", "MVC", "Razor Pages" ],
"identity": "Auth0.NET.Mvc",
"name": "Auth0 ASP.NET Core App",
"shortName": "auth0webapp",
"sourceName": "Auth0.NET.Mvc",
"preferNameDirectory": true,
"tags": {
"language": "C#",
"type": "project"
},
"symbols":{
"domain": {
"type": "parameter",
"description": "Your Auth0 domain.",
"defaultValue": "{DOMAIN}",
"replaces":"{DOMAIN}"
},
"clientId": {
"type": "parameter",
"description": "Your Auth0 client id.",
"defaultValue": "{CLIENT_ID}",
"replaces":"{CLIENT_ID}"
},
"clientSecret": {
"type": "parameter",
"description": "Your Auth0 client secret.",
"defaultValue": "{CLIENT_SECRET}",
"replaces":"{CLIENT_SECRET}"
},
"Framework": {
"type": "parameter",
"description": "The target framework for the project.",
"datatype": "choice",
"choices": [
{
"choice": "netcoreapp3.1",
"description": "Target .NET Core 3.1"
},
{
"choice": "net5.0",
"description": "Target .NET 5"
}
],
"defaultValue": "netcoreapp3.1",
"replaces": "netcoreapp3.1"
}
}
}
```
You added a new parameter definition: `Framework`. Actually, this is a built-in parameter, but the approach defining a custom parameter with restricted values is just as valid.
> Notice that the name of the parameter is capitalized. Since this is a built-in parameter, you need to keep this case; otherwise, you may experience issues using this template in Visual Studio.
In addition to the parameter's properties you already know, you have two more:
- `datatype`: By assigning the `choice` value, this property enables the value restriction.
- `choices`: This is an array of the valid values for the parameter. Each item with two properties: the valid value (`choice`) and its `description`.
The `Framework` definition above states that its valid values are `netcoreapp3.1` and `net5.0`, with the former as the default value. Consider that, in this specific case, the valid values for the Framework parameter have to match [the official .NET target frameworks](https://docs.microsoft.com/en-us/dotnet/standard/frameworks).
Now, if you want to generate a new project, say, targeting .NET 5.0 from the `auth0webapp` template, you can achieve it by running this command:
``` bash
dotnet new -auth0webapp -o MySecureWebApp -f net5.0
```
> In this sample project, the project's code remains the same for both .NET 3.1 and .NET 5.0.
> If your code changes depending on the framework, you may need to adapt it by [using the `#if` preprocessor directive](https://devblogs.microsoft.com/dotnet/how-to-create-your-own-templates-for-dotnet-new/#add-optional-content).
## Packing and Publishing Your Template
So far, you have tested your .NET project template locally by simply installing it from its working folder. Now you will learn how to create a NuGet package to distribute it or publish on the NuGet repository. By the way, creating a NuGet package is a prerequisite for using your template in Visual Studio.
Creating a NuGet package for your template is pretty easy. To start, move to the `templates-playground` folder. Then, add a new file named `TemplatePack.csproj` with the following content:
``` xml
Template
1.0
Auth0.Templates
Auth0 Templates
Andrea Chiarelli
Template for creating an ASP.NET web application with Auth0 authentication.
dotnet-new;templates;auth0
netcoreapp3.1
true
false
content
$(NoWarn);NU5128
```
As you can see, this is a C# project file. However, instead of containing settings to compile code and produce an assembly, it contains settings to produce a NuGet package.
In the `` section of the file, you have a few settings that define the package, such as the type of package, the title, the author, and so on. In particular, the `` setting identifies your package, and it is used to manage it on your machine, as you will see in a moment. The `` setting allows you to define some tags to classify your package on the NuGet repository.
The `` section describes the files to take into account (``) and the action to perform on them (``).
The `` setting specifies that all the files under the `templates` folder should be included and that any generated file should be excluded. The `` setting actually prevents any compilation.
> While the package you are creating in this example contains just one project template, template packages can have multiple templates in one file.
Now, in the same folder of the `TemplatePack.csproj` file, run the following command to create your NuGet package:
``` bash
dotnet pack
```
This command will generate a package named `Auth0.Templates.1.0.0.nupkg` in the `templates-playground/bin/Debug` folder. This is the file you should upload to [the official NuGet repository](https://www.nuget.org/packages/manage/upload) or any other NuGet repository instance if you want to publish it.
To test your package locally, ensure you have uninstalled the `auth0webapp` template from your machine and run the following command in the `templates-playground` folder:
``` bash
dotnet new -i ./bin/Debug/Auth0.Templates.1.0.0.nupkg
```
Otherwise, if you uploaded your NuGet package to a NuGet repository, you can install it with the following command:
``` bash
dotnet new -i Auth0.Templates
```
Remember that the `Auth0.Templates` value is the value of the `` setting from the `TemplatePack.csproj` file. You will use the same identifier to uninstall your package from your machine, independently of the way you installed it:
``` bash
dotnet new -u Auth0.Templates
```
## Making Your Template Available for Visual Studio
You just completed the steps to have a working and customizable project template for the .NET CLI. However, to make your project template available also for Visual Studio, you need to apply some additional configuration steps.
### About template visibility
As said before, templates installed with `dotnet new -i` are not visible on Visual Studio, which displays only templates installed as NuGet packages. You need to take an extra step to make these templates visible on Visual Studio.
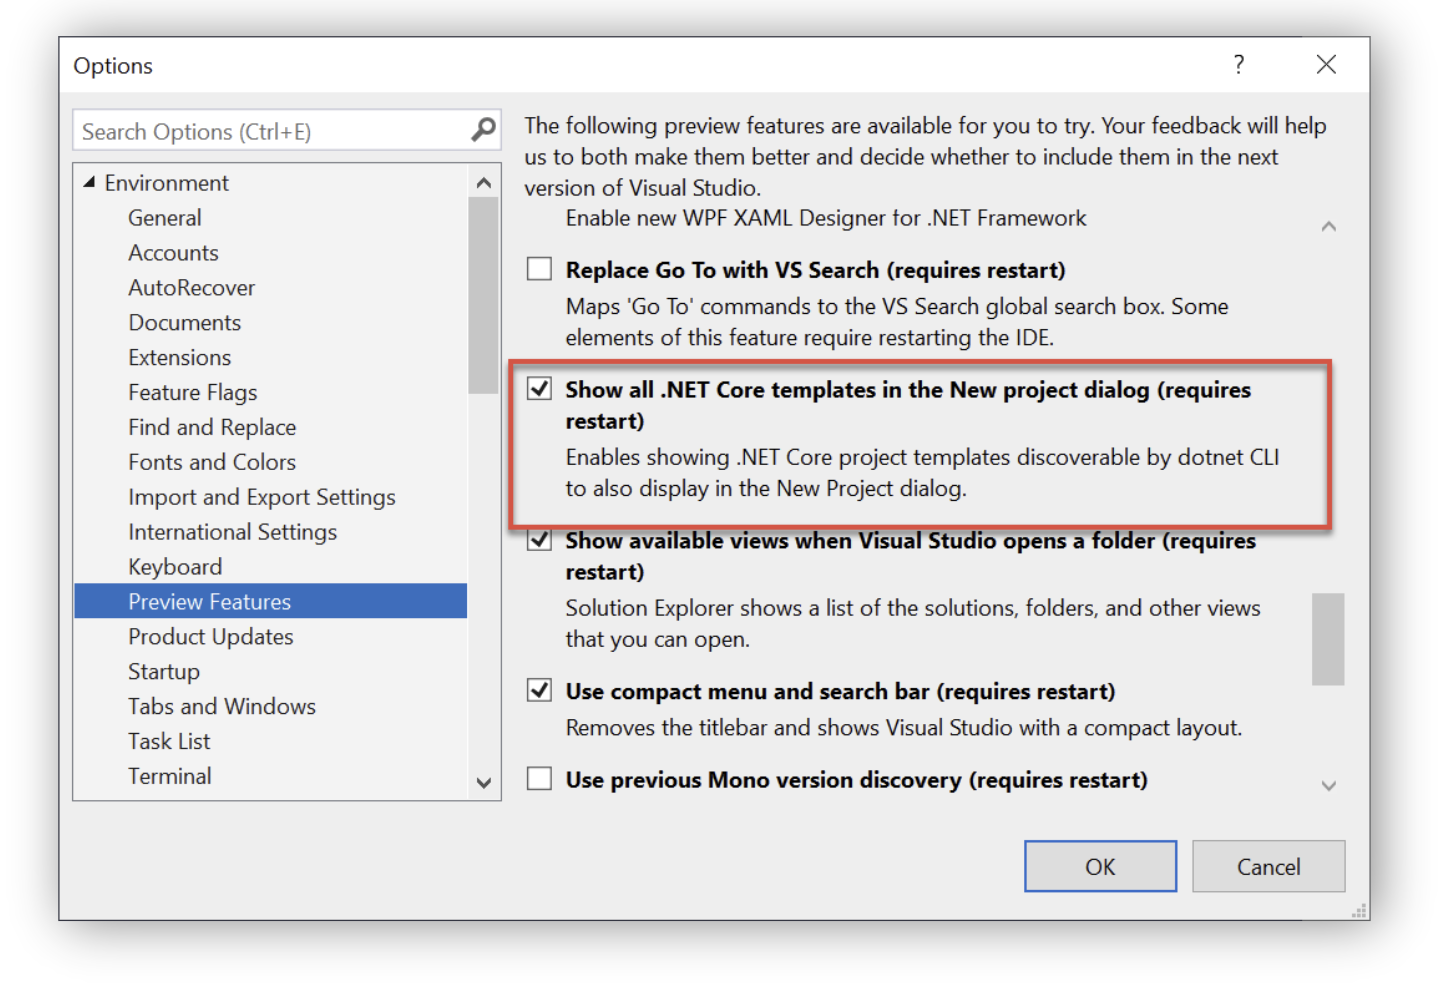
On Windows, open the *Options* dialog via the *Tools/Options* menu item. In that dialog, select the *Environment/Preview Feature* item and check the *Show all .NET Core templates in the New project dialog* checkbox, as shown in the following picture:
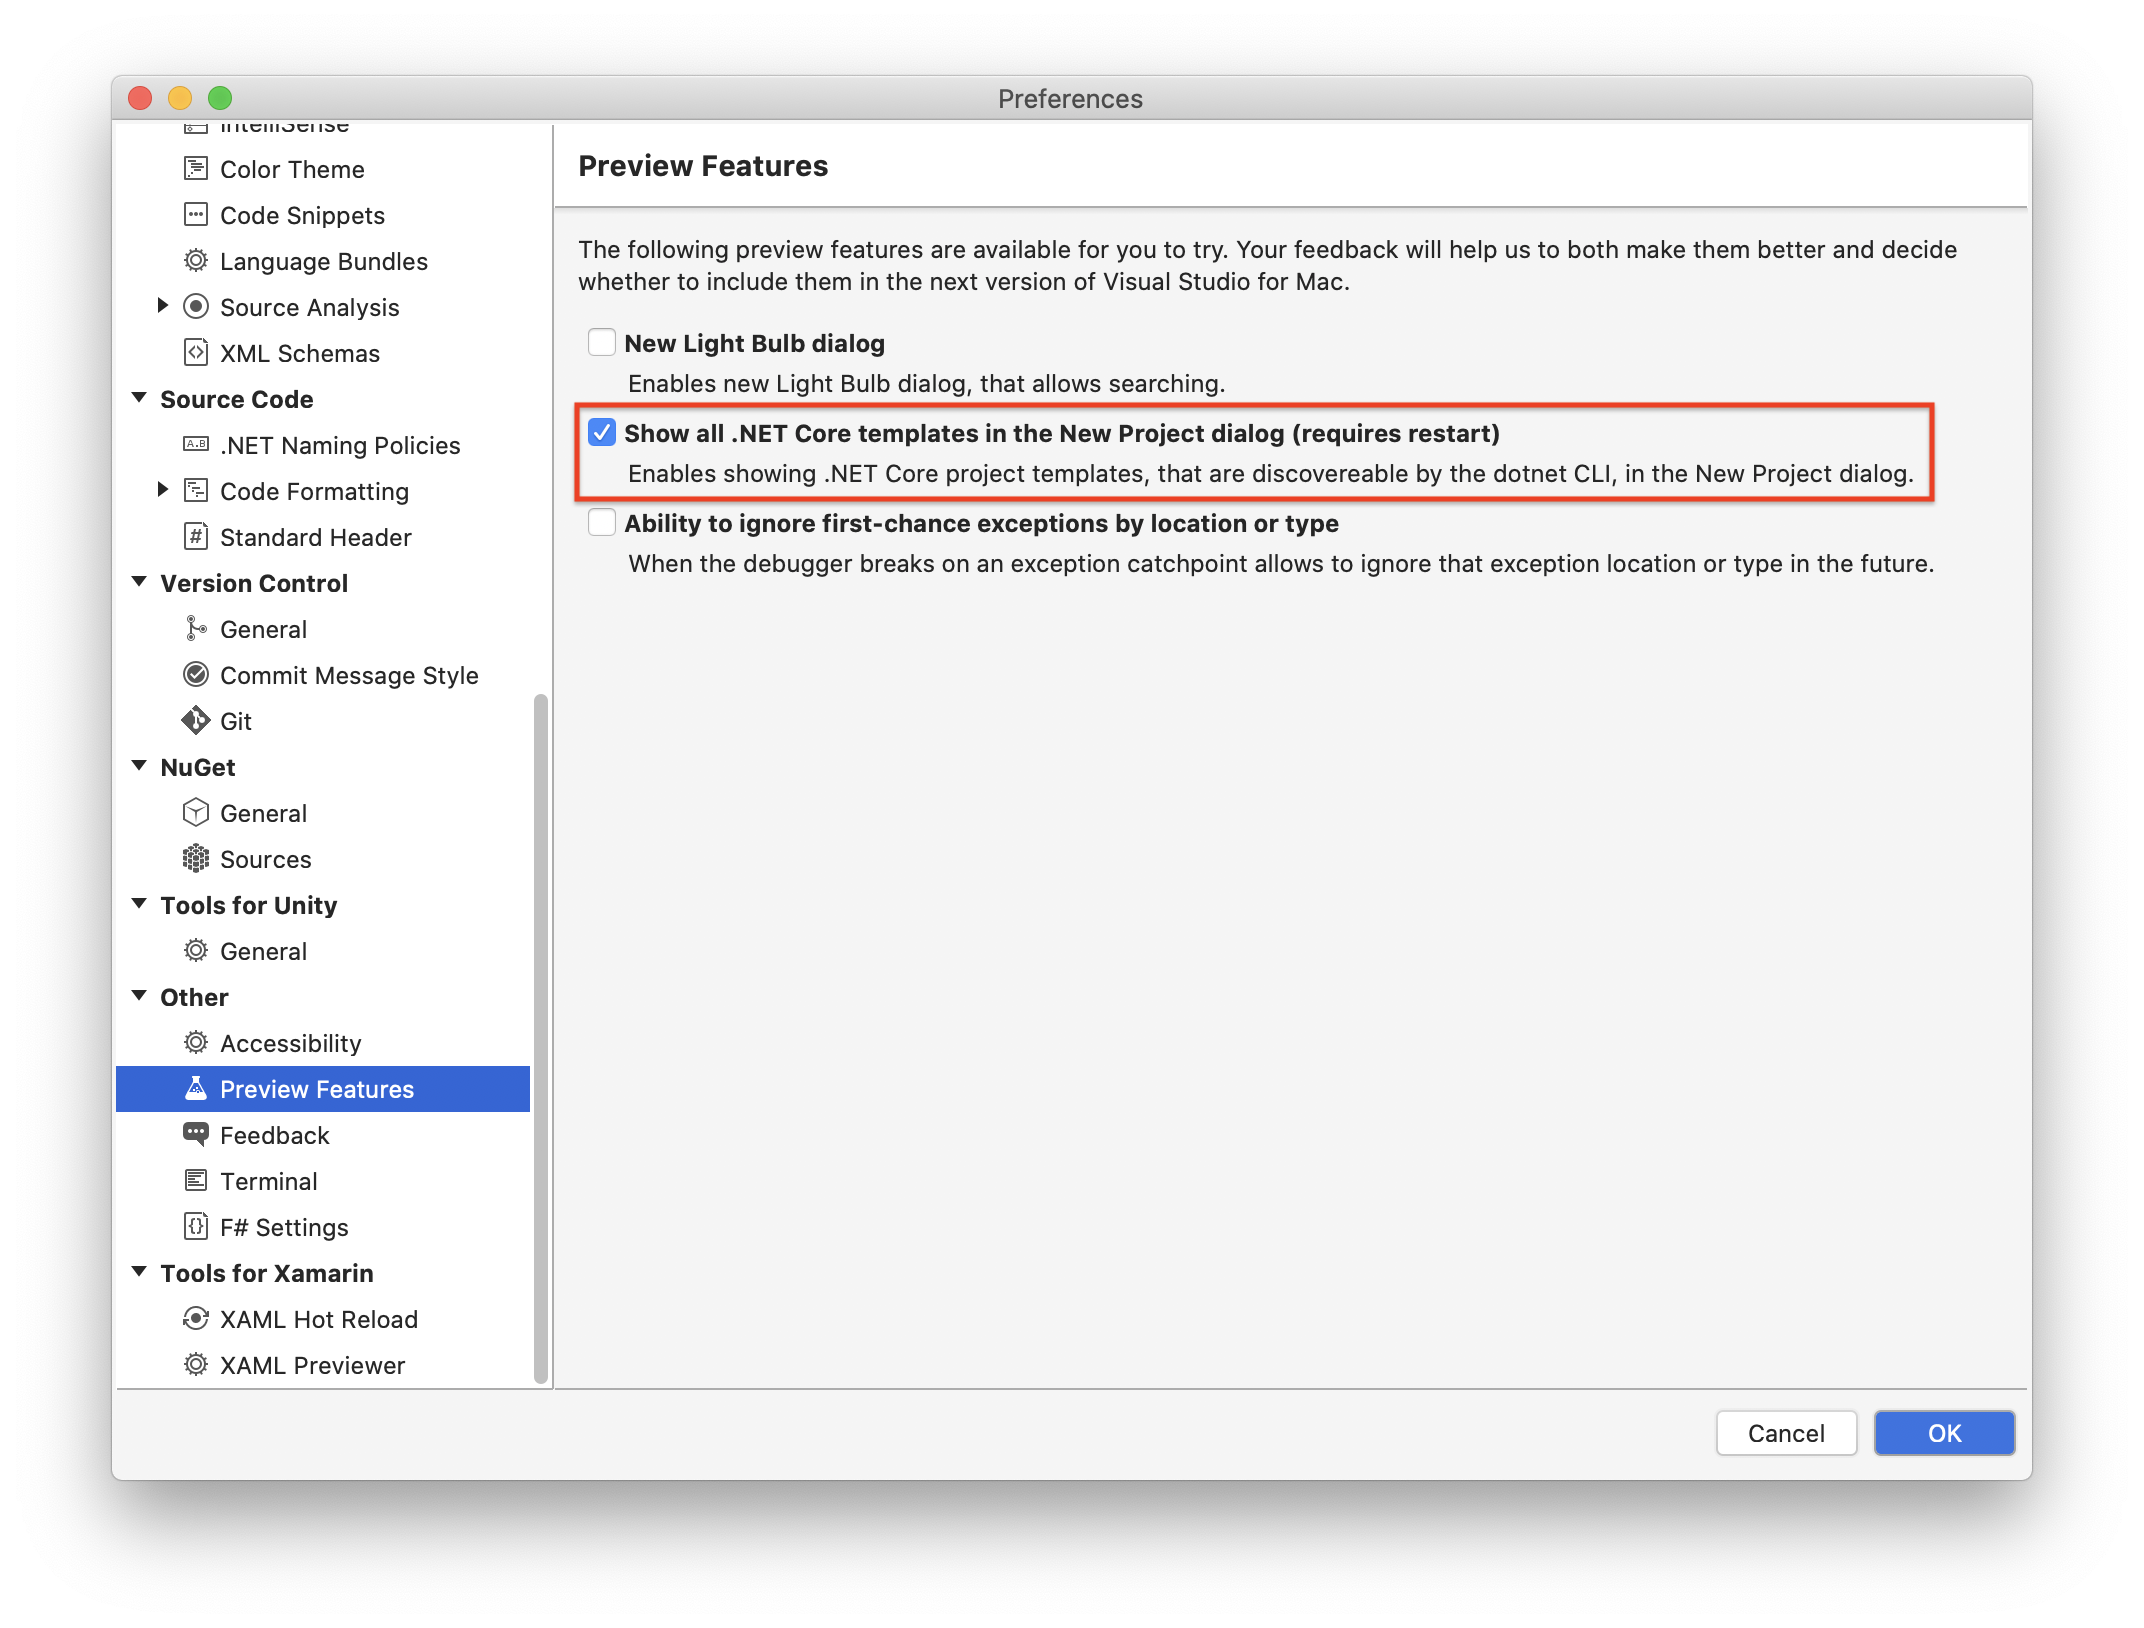
On Visual Studio for Mac, you need to open the *Preference* dialog from the *Visual Studio/Preferences...* menu item. There, select the *Preview Features* under the *Other* item and check the *Show all .NET Core templates in the New project dialog* checkbox, as in the following picture:
For more information about enabling template visibility, [check out this document](https://devblogs.microsoft.com/dotnet/net-cli-templates-in-visual-studio/).
### Adapting your template for Visual Studio
After enabling .NET CLI templates visibility, you should be able to use your template in Visual Studio. However, without a few more tweaks, the user experience will not be the best. For example, by leaving the template configuration as is, you will not see the custom parameters in the Visual Studio's project creation dialog.
To fill this gap, you need to add an `ide.host.json` file in your `templates-playground/templates/auth0-webapp/template.config` folder with the following content:
``` bash
{
"$schema": "http://json.schemastore.org/vs-2017.3.host",
"icon": "auth0.png",
"symbolInfo": [
{
"id": "domain",
"name": {
"text": "Auth0 Domain"
},
"isVisible": "true"
},
{
"id": "clientId",
"name": {
"text": "Auth0 Client Id"
},
"isVisible": "true"
},
{
"id": "clientSecret",
"name": {
"text": "Auth0 Client Secret"
},
"isVisible": "true"
}
]
}
```
The `ide.host.json` file is responsible for keeping relevant data for Visual Studio.
Besides a reference to the schema it is based on, you may notice the `icon` property. This property allows you to customize your template's appearance in the template list. If it is not provided, a default generic icon will be associated with your project template. The property's value is the file name of the *.png* image to use as the template icon. The file should be located in the `.template.config` folder.
The `symbolInfo` property is an array of items that integrate the custom parameters information in the context of Visual Studio. In particular, the `id` property should match the symbol item in the `template.json` file, and the `name.text` property defines the label to show for that symbol. Finally, the `isVisible` property enables the custom parameter visibility. The default value of the `isVisible` property is `false`, so you need to assign `true` explicitly.
As you may notice, you don't need to also specify the `Framework` parameter in the `ide.host.json` file. As mentioned before, the `Framework` parameter is a special one, and the template engine automatically recognizes it.
### Testing the template from Visual Studio
Now you are ready to use your project template in Visual Studio. As usual, first, move to the `templates-playground` folder and uninstall any previous version of the package. Then, build the new package, and finally install it. These are the commands you should run:
``` bash
cd templates-playground
dotnet new -u Auth0.Templates
dotnet pack
dotnet new -i ./bin/Debug/Auth0.Templates.1.0.0.nupkg
```
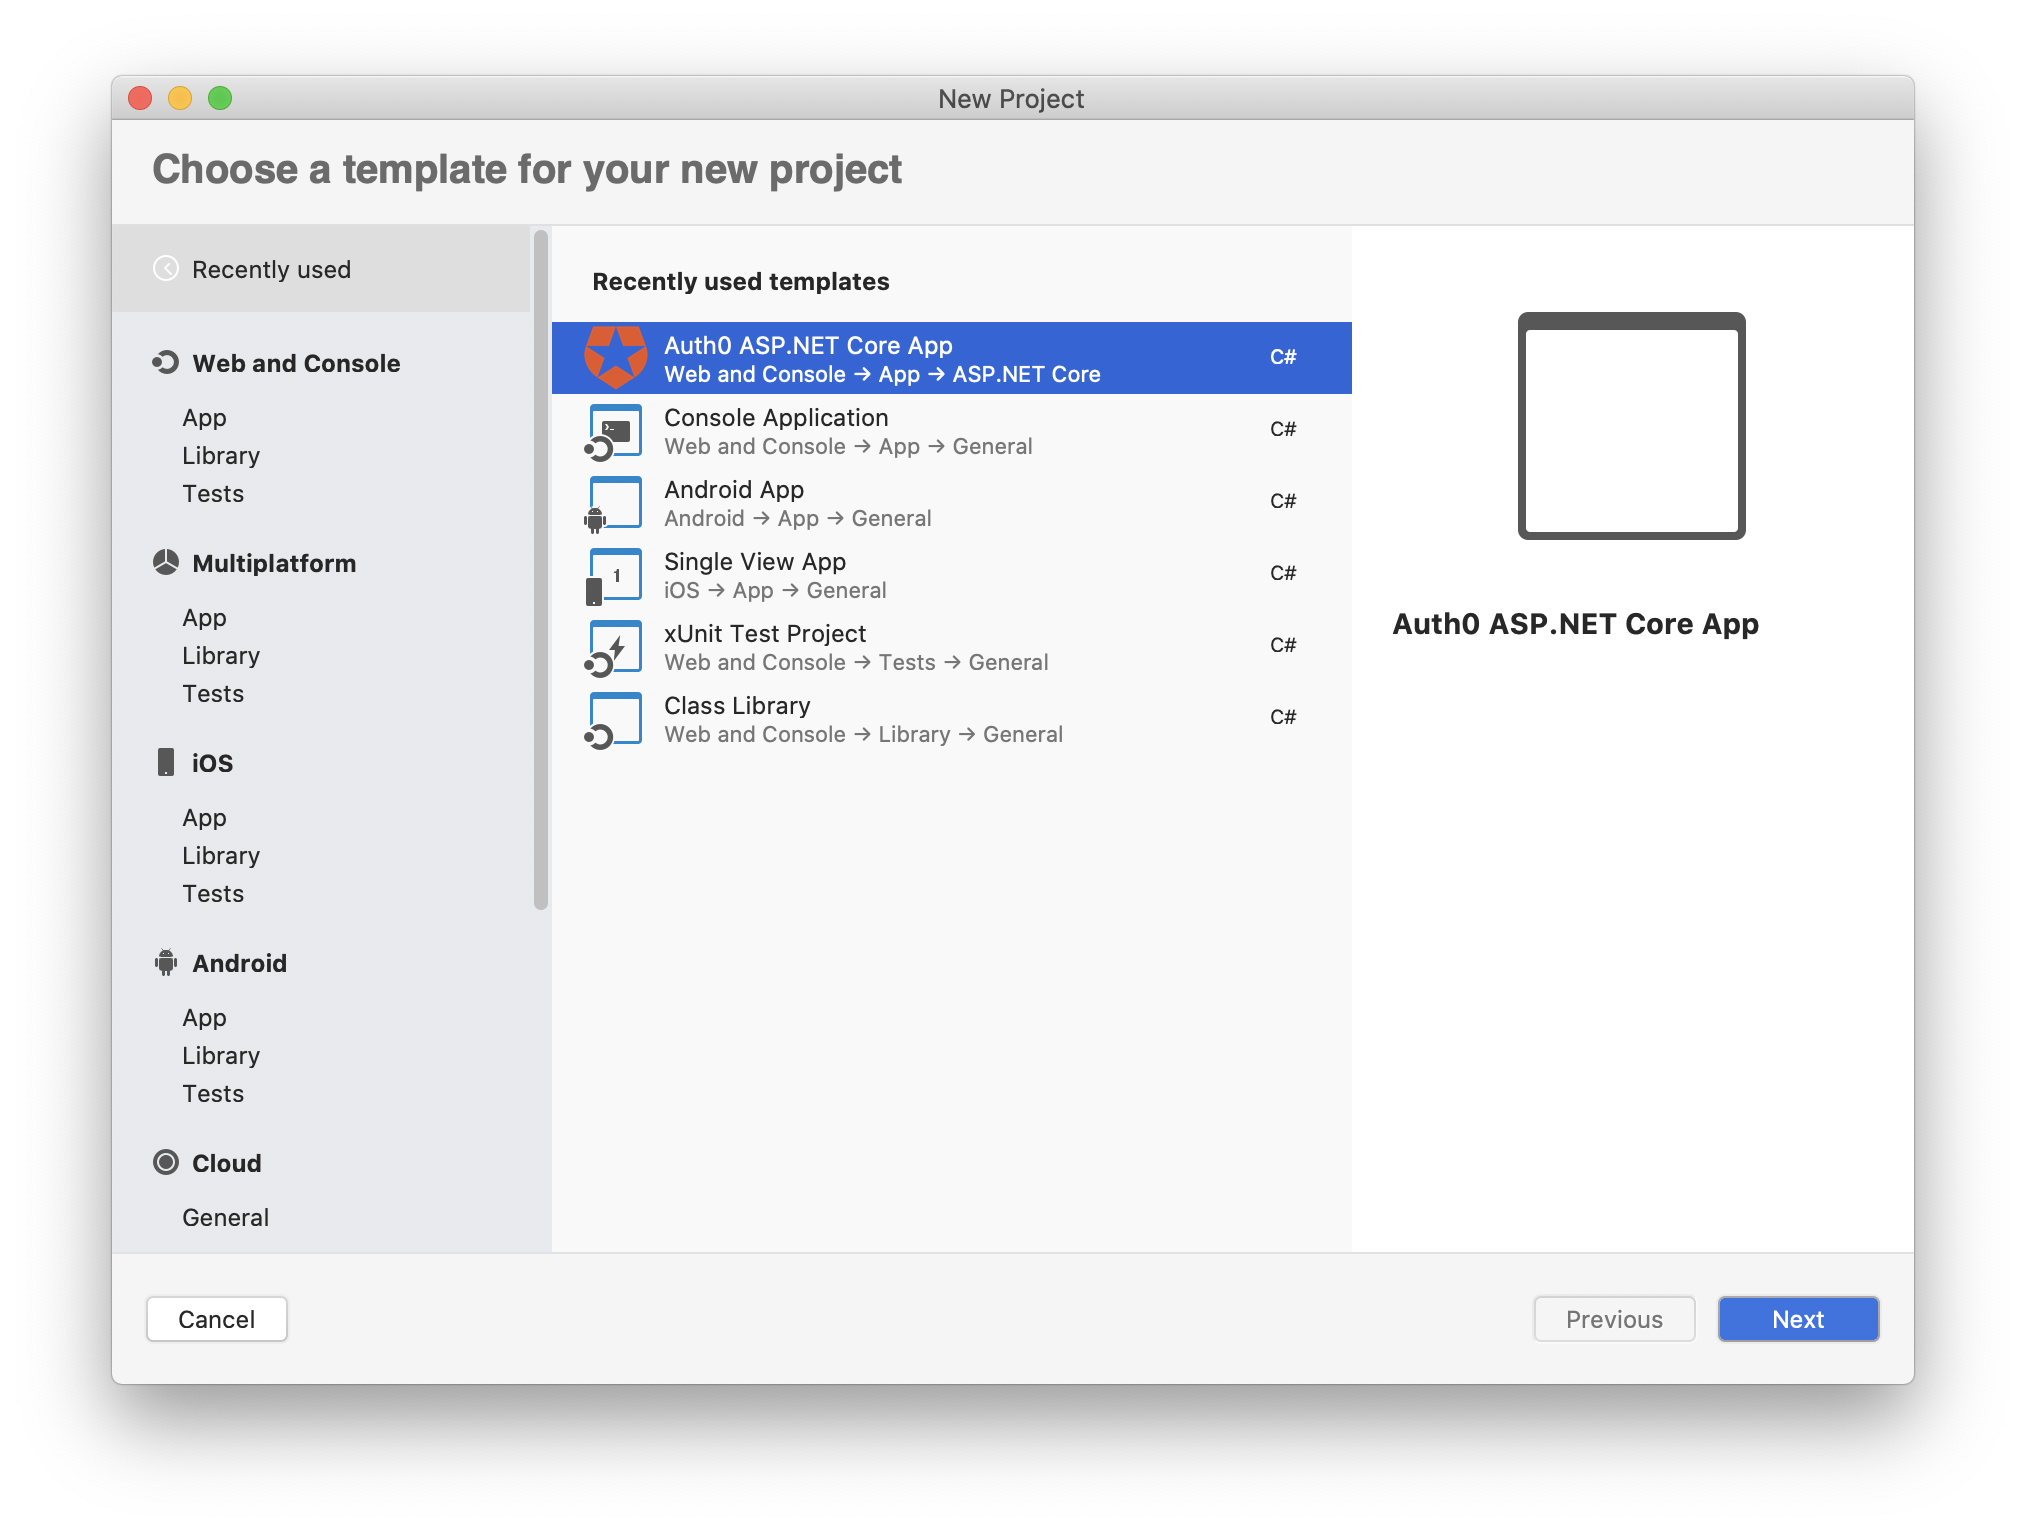
At this point, start Visual Studio and create a new project. In the list of the available templates, you should have the *Auth0 ASP.NET Core App* template, as shown below:
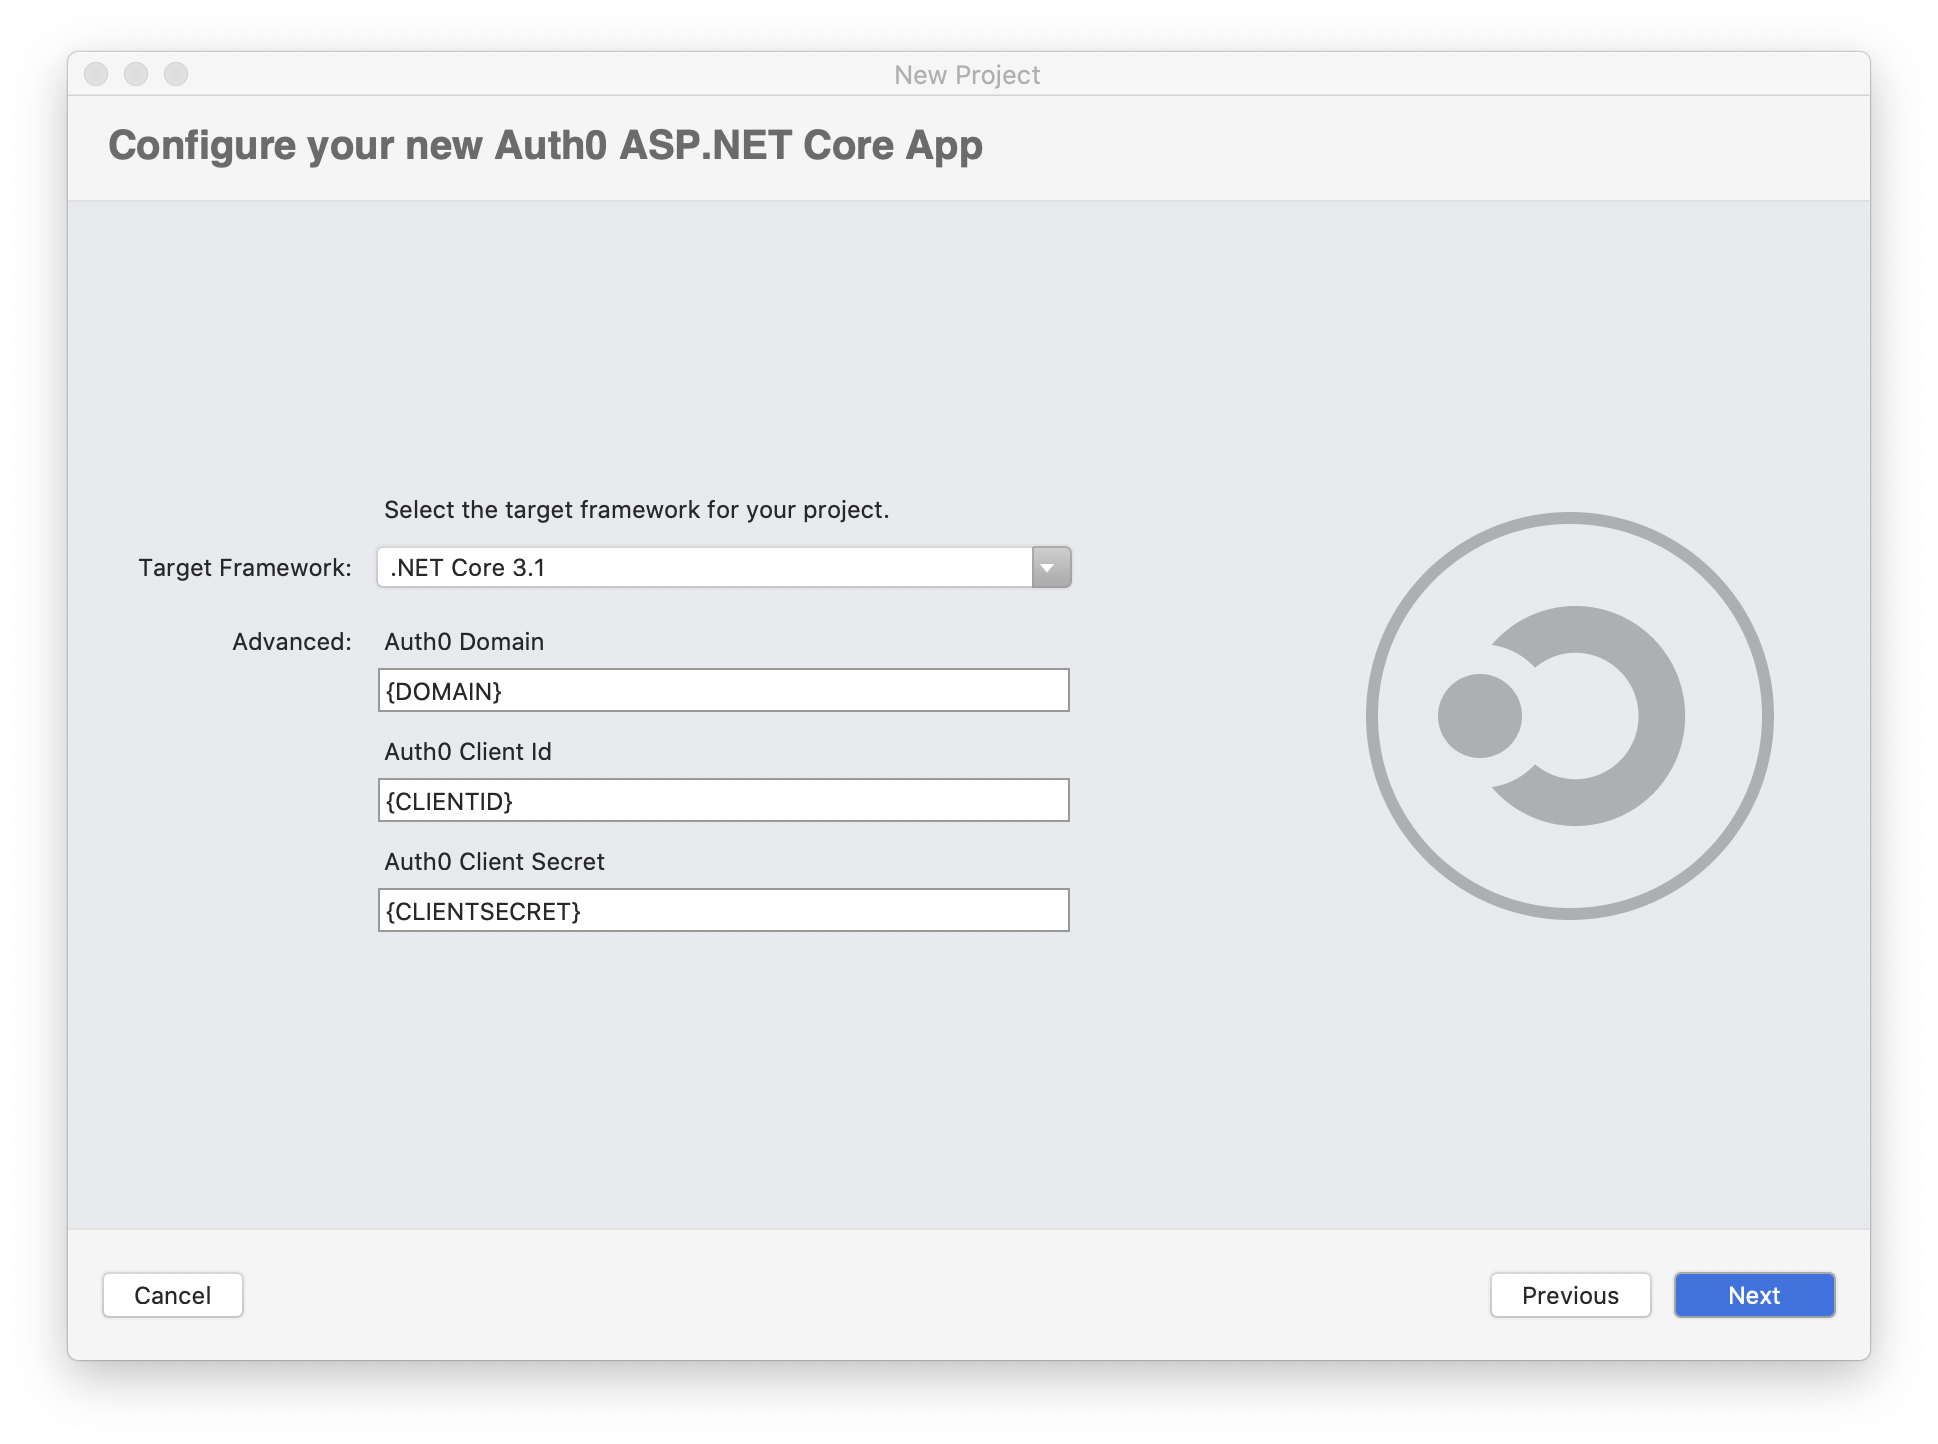
If you select your project template, you will be asked for the custom parameters:
Your .NET project template is ready to use.
## Summary
Throughout this tutorial, you learned a bunch of interesting things.
You learned how to use `dotnet new` (maybe) more extensively than before, using it also for installing and uninstalling templates. You discovered how to convert a standard .NET project into a project template for the .NET CLI. You also saw how to customize the project creation by supporting custom parameters.
You created a NuGet package for your project template and used it to share your template with Visual Studio. Also, you learned how to complete your project template configuration to be fully usable in Visual Studio.
Now you have the basics to build your own project templates. You can find the final version of the sample project in [this GitHub repository](https://github.com/auth0-blog/auth0-aspnet-webapp-project-template.git).