---
title: "Build an API in Rust with JWT Authentication using Nickel.rs"
description: "Learn how to implement a simple REST API with JWT Authentication in Rust using the Nickel.rs web framework and the MongoDB Rust Driver."
authors:
- name: "Ryan Chenkie"
url: "https://auth0.com/blog/authors/ryan-chenkie/"
date: "Nov 30, 2015"
category: "Developers,Tutorial,Rust"
tags: ["rust", "cargo", "mongodb", "api", "rest", "nickel.rs", "rust-jwt", "hyper"]
url: "https://auth0.com/blog/build-an-api-in-rust-with-jwt-authentication-using-nickelrs/"
---
# Build an API in Rust with JWT Authentication using Nickel.rs
---
**TL;DR:** Open source crates like **[Nickel.rs](http://nickel.rs/)** and the **[MongoDB Rust Driver](https://github.com/mongodb-labs/mongo-rust-driver-prototype)** make it possible to create RESTful APIs in the Rust language. In this article, we cover how to do `GET`, `POST`, and `DELETE` requests on user data. Check out the [repo](https://github.com/auth0/rust-api-example) to get the code.
---
[Rust](https://www.rust-lang.org/) is a fairly new **systems** programming language that is developed and maintained by Mozilla. It surfaced in 2010 and has been gaining a lot of traction since.
Rust has many concepts that are familiar and seen frequently in other languages and some that aren't. A unique feature that Rust has is the way it enforces memory safety. It doesn't have a garbage collector like some other languages do, but rather handles memory allocation with the concept of **ownership**. With ownership, the compiler automatically deallocates memory when something goes out of scope.
While Rust is a general-purpose programming language, there are many packages available that make it possible to spin up a web server with it. This means that Rust might be the ideal choice for a web project if memory safety and speed are non-trivial.
In this article, we'll see how we can create a simple RESTful API with Rust. We'll also connect it to MongoDB so we can get a feel for a full end-to-end API solution. It's possible that many readers will be familiar with JavaScript and, in particular, NodeJS. For this reason, we'll intentionally draw some comparisons between our Rust implementation and how an API would be created in NodeJS. While this won't be a crash course in the Rust language itself, we'll also take some time to explain syntax and semantics in certain places.
## Getting Started
To create and serve our API, we'll use **[Nickel.rs](http://nickel.rs/)**, and to interact with the database, we'll use the **[MongoDB Rust Driver](https://github.com/mongodb-labs/mongo-rust-driver-prototype)**. There are other crates (aka packages) available, especially for creating a server and API, but Nickel.rs offers an abstraction that provides a similar feel to NodeJS and, in particular, Express. This can be helpful for those coming from a Node background.
If you don't already have Rust installed, you can check out the [installation instructions](https://doc.rust-lang.org/stable/book/installing-rust.html) to get going.
Let's declare our dependencies in the `Cargo.toml` file.
```bash
[package]
name = "rust-users"
version = "0.0.1"
authors = [ "Firstname Lastname " ]
[dependencies]
nickel = "*"
mongodb = "*"
bson = "*"
rustc-serialize = "*"
```
We've already mentioned that we need **Nickel.rs** and the **MongoDB Rust Driver**. We also need the **BSON** crate to encode and decode BSON data, as well as **rustc-serialize** for formatting the JSON that will be returned by the API.
## Setting Up the API
Our API will have three endpoints:
* **GET** `/users` - retrieves a JSON string of all the users
* **POST** `/users/new` - saves a new user
* **DELETE** `/users/:id` - deletes a user based on the record's objectId
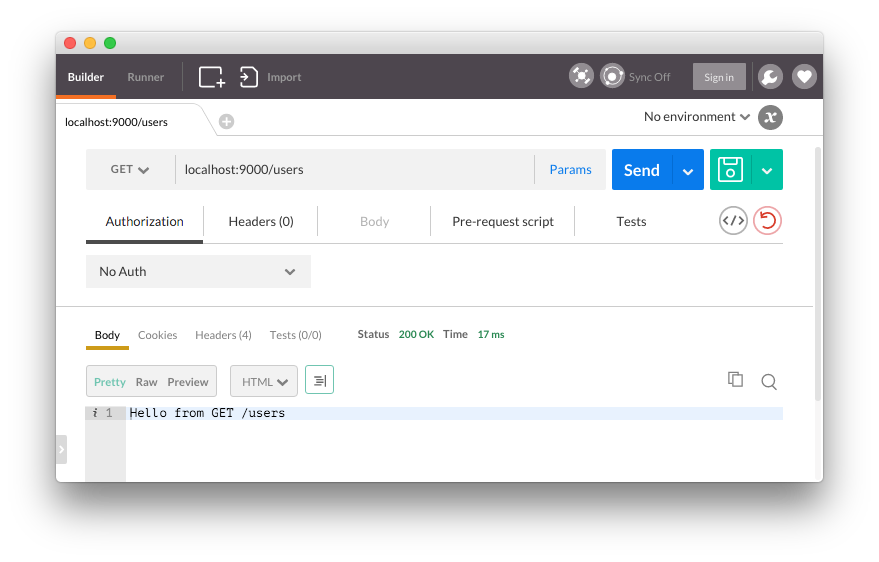
To take things one step at a time, let's first get the API running and simply return a message to confirm things are working from each endpoint.
```rust
// src/main.rs
#[macro_use]
extern crate nickel;
use nickel::{Nickel, JsonBody, HttpRouter, Request, Response, MiddlewareResult, MediaType};
fn main() {
let mut server = Nickel::new();
let mut router = Nickel::router();
router.get("/users", middleware! { |request, response|
format!("Hello from GET /users")
});
router.post("/users/new", middleware! { |request, response|
format!("Hello from POST /users/new")
});
router.delete("/users/:id", middleware! { |request, response|
format!("Hello from DELETE /users/:id")
});
server.utilize(router);
server.listen("127.0.0.1:9000");
}
```
Starting at the top, we're referencing the external **Nickel.rs** crate and loading in all of its macros with `#[macro_use]`. Like functions, macros in Rust let us abstract away code into reusable blocks. One of the differences with a macro is that it can be abstracted at the syntactic level, which can offer some benefits over functions.
In the `main` function, we first assign **server** and **router** instances to mutable variables. Next, we set up our endpoint routing and provide a simple message in the `format!` macro to be displayed when these endpoints are accessed. The `middleware!` macro is provided by Nickel.rs and reduces the amount of boilerplate code needed for each route. Double-pipe characters represent a closure in Rust, and this is where our `request` and `response` parameters go.
Finally, we need to `utilize` the server and `listen` for it on `localhost:9000`.
At this point, it's easy to see some similarities between Nickel.rs and Express. This is by design and is nice for those coming to Rust from NodeJS.
If we compile the program with `cargo run`, we can see the API is working.
## Connecting to a MongoDB Collection
The MongoDB Rust Driver provides a nice interface for interacting with databases, collections, and cursors. With it, we can establish a database connection and create, read, update, and delete documents as we typically would.
MongoDB will need to be installed and running at this point, which we won't cover in this article. To get set up with MongoDB, follow the [getting started guide](https://docs.mongodb.org/getting-started/shell/).
Let's start by establishing a connection and getting the **POST** `/users/new` route working. We'll need to bring in the dependencies we have yet to reference and `use` their components.
```rust
// src/main.rs
#[macro_use]
extern crate nickel;
extern crate rustc_serialize;
#[macro_use(bson, doc)]
extern crate bson;
extern crate mongodb;
// Nickel
use nickel::{Nickel, JsonBody, HttpRouter};
use nickel::status::StatusCode::{self};
// MongoDB
use mongodb::{Client, ThreadedClient};
use mongodb::db::ThreadedDatabase;
use mongodb::error::Result as MongoResult;
// bson
use bson::{Bson, Document};
use bson::oid::ObjectId;
// rustc_serialize
use rustc_serialize::json::{Json, ToJson};
...
```
We need to create a `struct` that is encodable and decoable and that models our user data.
```rust
// src/main.rs
...
#[derive(RustcDecodable, RustcEncodable)]
struct User {
firstname: String,
lastname: String,
email: String
}
```
A `struct` in Rust give us a way to create data types that can be arbitrarily complex.
### Saving User Data
Now within our `/users/new` route, we can connect to the database and insert a document.
```rust
// src/main.rs
...
router.post("/users/new", middleware! { |request, response|
// Accept a JSON string that corresponds to the User struct
let user = request.json_as::().unwrap();
let firstname = user.firstname.to_string();
let lastname = user.lastname.to_string();
let email = user.email.to_string();
// Connect to the database
let client = Client::connect("localhost", 27017)
.ok().expect("Error establishing connection.");
// The users collection
let coll = client.db("rust-users").collection("users");
// Insert one user
match coll.insert_one(doc! {
"firstname" => firstname,
"lastname" => lastname,
"email" => email
}, None) {
Ok(_) => (StatusCode::Ok, "Item saved!"),
Err(e) => return response.send(format!("{}", e))
}
});
...
```
We accept the request as a JSON string that should conform to the `User` struct and create some variables to hold its data. The `unwrap` method is one of several ways that Rust provides for assigning a value. While Rust provides a `match` statement to check for a value's existence and then respond with both a success and error case, `unwrap` is a quick way of assuming that the value will be present. We can see the `match` statement at work when we use `coll.insert_doc` to insert the user data. In the `Ok` condition, we respond with a success message, and in the `Err` condition we respond with an error.
For this route, we need to send a JSON string to the endpoint to save the data.

We should get a success message and be able to see the user saved in the database.

### Fetching User Data
It's easy to return JSON data from an endpoint when building a NodeJS app with MongoDB and Express, but it's a bit trickier with the current MongoDB driver implementation. One way to return JSON data effectively is to format MongoDB documents as a JSON string and then return the string. This would then need to be parsed on the front end with `JSON.parse`.
```rust
// src/main.rs
...
fn get_data_string(result: MongoResult) -> Result {
match result {
Ok(doc) => Ok(Bson::Document(doc).to_json()),
Err(e) => Err(format!("{}", e))
}
}
router.get("/users", middleware! {
// Connect to the database
let client = Client::connect("localhost", 27017)
.ok().expect("Error establishing connection.");
// The users collection
let coll = client.db("rust-users").collection("users");
// Create cursor that finds all documents
let mut cursor = coll.find(None, None).unwrap();
// Opening for the JSON string to be returned
let mut data_result = "{\"data\":[".to_owned();
for (i, result) in cursor.enumerate() {
match get_data_string(result) {
Ok(data) => {
let string_data = if i == 0 {
format!("{}", data)
} else {
format!("{},", data)
};
data_result.push_str(&string_data);
},
Err(e) => return response.send(format!("{}", e))
}
}
// Close the JSON string
data_result.push_str("]}");
// Set the returned type as JSON
response.set(MediaType::Json);
// Send back the result
format!("{}", data_result)
});
...
```
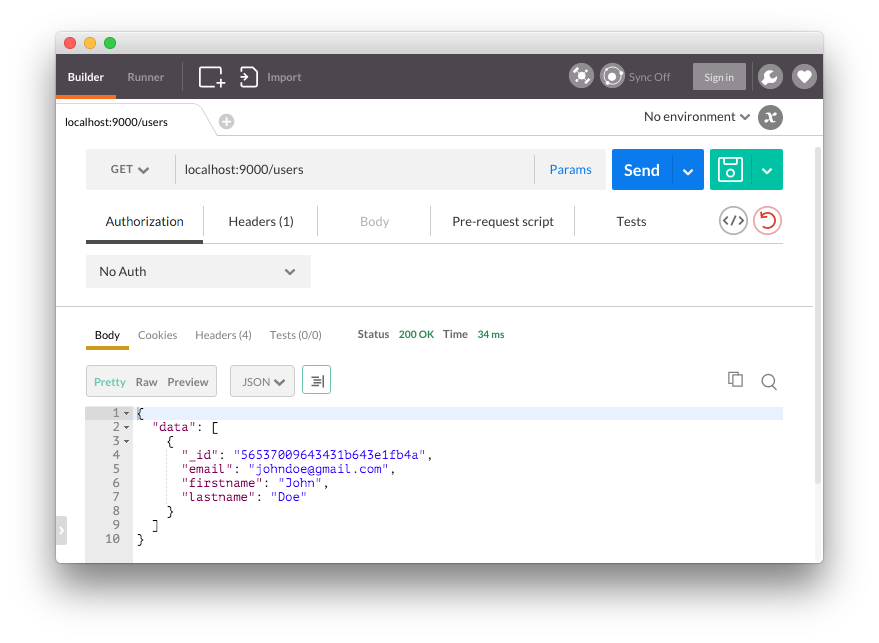
For our **GET** `/users` route, we establish a `cursor` for the endpoint that uses the `find` method to get all the documents in the `users` collection. We then iterate over the results with a `for` loop and match the results against a function called `get_data_string`. This function expects an argument of type `MongoResult` and returns a JSON string using `Bson::Document` for decoding, which happens in the `Ok` branch of the `match` statement.
After pushing any results onto the `data_result` string and closing it off, we set the `MediaType` as `Json` so that it is returned in JSON form instead of a string.
### Deleting User Data
The final step for this example API is to allow for users to be deleted by their `objectId`. We can do this with the MongoDB Rust Driver's `delete_one` method.
```rust
// src/main.rs
...
router.delete("/users/:id", middleware! { |request, response|
let client = Client::connect("localhost", 27017)
.ok().expect("Failed to initialize standalone client.");
// The users collection
let coll = client.db("rust-users").collection("users");
// Get the objectId from the request params
let object_id = request.param("id").unwrap();
// Match the user id to an bson ObjectId
let id = match ObjectId::with_string(object_id) {
Ok(oid) => oid,
Err(e) => return response.send(format!("{}", e))
};
match coll.delete_one(doc! {"_id" => id}, None) {
Ok(_) => (StatusCode::Ok, "Item deleted!"),
Err(e) => return response.send(format!("{}", e))
}
});
...
```
We use the `ObjectId::with_string` helper to decode the string representation of the `objectId`, after which it can be used in the `delete_one` method to remove the document for that user.
With the **DELETE** `/users/:id` route in place, we should be able to remove users from the database when we make a request to it and include the `objectId` as a parameter.
## Implementing JWT Authentication for the Rust API
JWT authentication can be implemented for a Nickel.rs API by using a crate like **[rust-jwt](https://github.com/mikkyang/rust-jwt)** to encode and decode tokens, along with a custom middleware to protect the API routes.
### Step 1: Bring in Additional Dependencies
To start, let's add **rust-jwt**, **hyper**, and **rust-crypto** to our `Cargo.toml` file.
```bash
...
jwt = "*"
hyper = "*"
rust-crypto = "*"
```
### Step 2: Create a Login Route
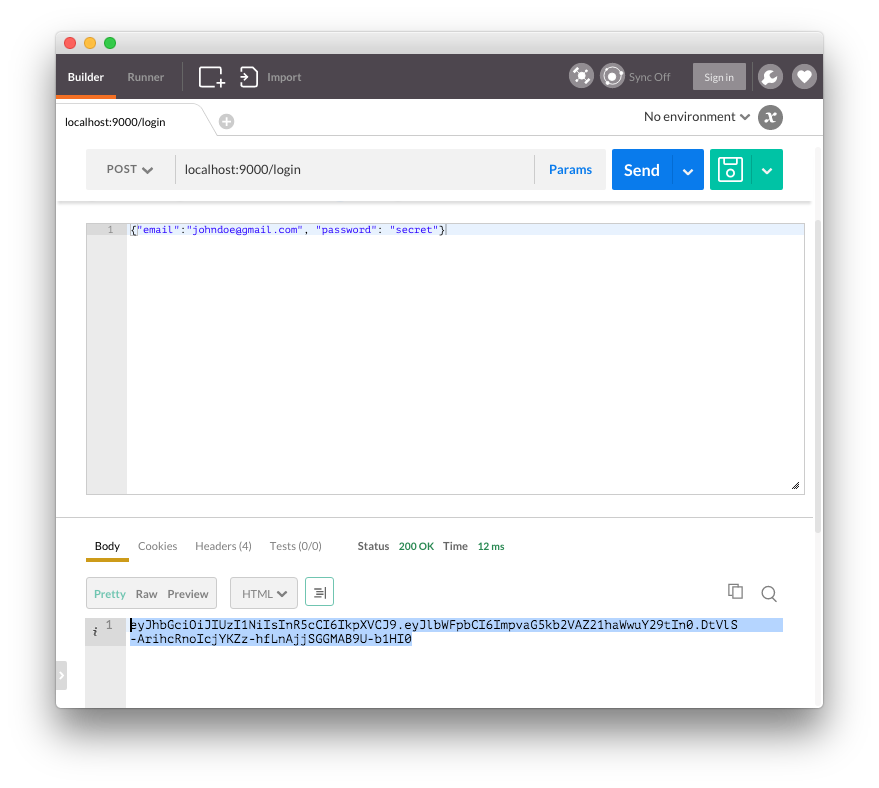
We need a `login` route that accepts a username and password and returns a JWT if authentication is valid.
> **Note:** For simplicity, we are checking against a locally-stored placeholder password in this example.
```rust
// src/main.rs
...
extern crate jwt;
extern crate hyper;
extern crate crypto;
...
// Nickel
use nickel::status::StatusCode::{self, Forbidden};
// hyper
use hyper::header;
use hyper::header::{Authorization, Bearer};
// jwt
use std::default::Default;
use crypto::sha2::Sha256;
use jwt::{
Header,
Registered,
Token,
};
...
static AUTH_SECRET: &'static str = "some_secret_key"; '
...
#[derive(RustcDecodable, RustcEncodable)]
struct UserLogin {
email: String,
password: String
}
...
router.post("/login", middleware! { |request|
// Accept a JSON string that corresponds to the User struct
let user = request.json_as::().unwrap();
// Get the email and password
let email = user.email.to_string();
let password = user.password.to_string();
// Simple password checker
if password == "secret".to_string() {
let header: Header = Default::default();
// For the example, we just have one claim
// You would also want iss, exp, iat etc
let claims = Registered {
sub: Some(email.into()),
..Default::default()
};
let token = Token::new(header, claims);
// Sign the token
let jwt = token.signed(AUTH_SECRET.as_bytes(), Sha256::new()).unwrap();
format!("{}", jwt)
} else {
format!("Incorrect username or password")
}
});
...
```
This route accepts a JSON object from a **POST** request and checks it against the `UserLogin` struct, which requires a `username` and `password` to be provided. We're accepting all email addresses and using "secret" as our placeholder password here, but you would of course want to check your users against a database with hashed passwords.
If the password passes, a new token is created with `Token::new()` and is signed with the **secret**. In this example, we're only putting the `sub` (subject) claim in the payload, but in a real app we would need other claims such as `iat` (issued at) and `exp` (expiry). The token is sent in the response so that it can be saved and used to access protected routes.
### Step 3: Implement Middleware to Protect the API Routes
The next step is to protect our API endpoints so that only requests with a valid JWT in the `Authorization` header are able to access them. We can create our own custom middleware to accomplish this, which will be used by the Nickel.rs server to protect the routes.
We need a function to act as the middleware, and in this case, we'll call it `authenticator`.
```rust
// src/main.rs
...
fn authenticator<'mw>(request: &mut Request, response: Response<'mw>, ) ->MiddlewareResult<'mw> { '
// Check if we are getting an OPTIONS request
if request.origin.method.to_string() == "OPTIONS".to_string() {
// The middleware should not be used for OPTIONS, so continue
response.next_middleware()
} else {
// We do not want to apply the middleware to the login route
if request.origin.uri.to_string() == "/login".to_string() {
response.next_middleware()
} else {
// Get the full Authorization header from the incoming request headers
let auth_header = match request.origin.headers.get::>() {
Some(header) => header,
None => panic!("No authorization header found")
};
// Format the header to only take the value
let jwt = header::HeaderFormatter(auth_header).to_string();
// We don't need the Bearer part,
// so get whatever is after an index of 7
let jwt_slice = &jwt[7..];
// Parse the token
let token = Token::::parse(jwt_slice).unwrap();
// Get the secret key as bytes
let secret = AUTH_SECRET.as_bytes();
// Verify the token
if token.verify(&secret, Sha256::new()) {
response.next_middleware()
} else {
response.error(Forbidden, "Access denied")
}
}
}
}
...
```
Our `authenticator` function takes a `request` and `response` and returns a `MiddlewareResult`. For our purposes, the result will either be `next_middleware`, which lets the request pass through to the endpoint, or `error`, which will stop the request.
We shouldn't have the middleware apply to `OPTIONS` requests, and the user doesn't need to be authenticated to access the `/login` route, so we check against those conditions first. For all other routes, we need to get hold of the `Authorization` header, which we do with the getter provided by **Hyper**. To make use of the JWT in the header, we need to get it as a string, which we do with `HeaderFormatter`. This string will be of the form `Bearer `, and we don't need the `Bearer` part, so we take a subset of the string from index 7 onward and save it in `jwt_slice`. Taking only the token from the string could also be done with a regular expression to be more robust, but using the index operator to take the slice is a quick and convenient way of accomplishing it.
To get the token as the correct type, we use **rust-jwt**'s `parse` method. Finally, we use `verify` on the token and pass in the `AUTH_SECRET` in byte form. If the token checks out, `next_middleware` is called to send the user through to the endpoint. If the token is invalid, a `Forbidden` error is thrown.
Last, we need to make sure the server is using this middleware.
```rust
// src/main.rs
...
server.utilize(authenticator);
...
```
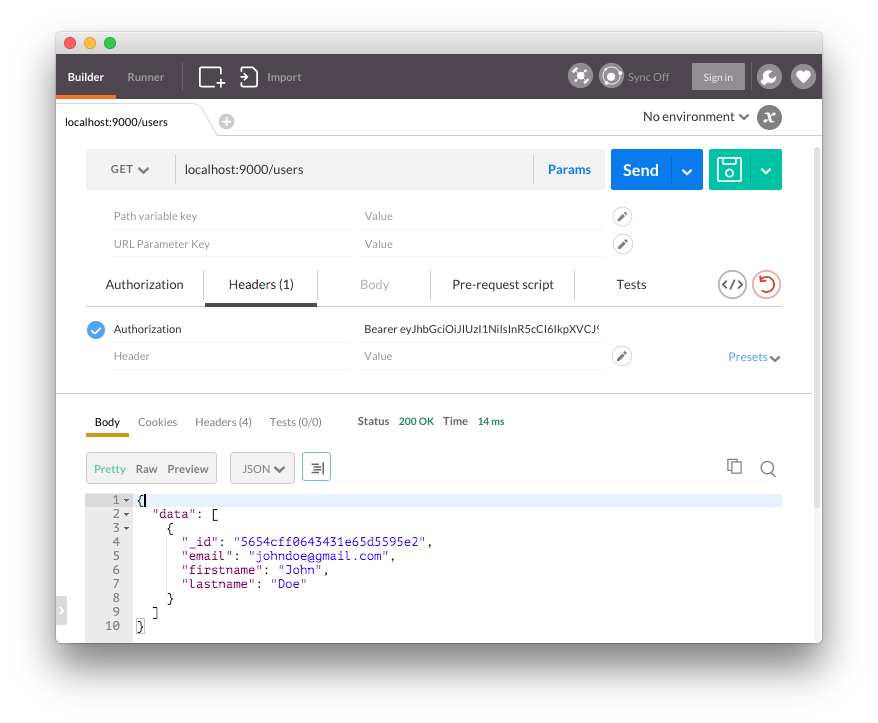
We can test everything out by including the JWT as a header when making a request to `/users`.
## Aside: Authenticating Your Rust API with Auth0
Auth0 issues [JSON Web Tokens](http://jwt.io) on every login for your users. Adding authentication to your Rust API based on your Auth0 account is simple--just replace the secret key in the example above with your Auth0 secret key.
```rust
// src/main.rs
...
static AUTH_SECRET: &'static str = "your_auth0_secret_key";
...
```
With this, you no longer need to implement a `/login` route for your API--we take care of authenticating your users for you.
To obtain tokens for your users, you can use our drop-in [Lock Widget](https://auth0.com/lock) on the front end of your app, or you can make requests to the [Auth0 API](https://auth0.com/docs/api/v2) with your settings and user's credentials.
Once a token is obtained, you can use it with **rust-jwt**. However, you need to base64 decode the `AUTH_SECRET` first.
```rust
// src/main.rs
...
// Get the secret base64 decoded
let secret = AUTH_SECRET.as_bytes().from_base64().unwrap();
...
```
> **Note:** The token's expiry isn't checked in these examples. This could be done by comparing the `exp` claim to the current time and responding with a `401` if the token has expired.
## Wrapping Up
As a language, Rust offers some great benefits, especially around memory safety, pattern matching, and data-race avoidance. This can be really important in some applications. For projects that also need to expose a data API, crates like **Nickel.rs** and the **MongoDB Rust Driver** can work well together. We can also add JWT authentication to our API by tapping into Nickel.rs's middleware and using **rust-jwt** to issue and decode tokens.
Typically, an API written in Rust will require more code than if it were written in NodeJS using Express. Ultimately, any decision regarding which to use comes down to the tradeoffs associated with both, as well as what is most appropriate for a given project. Developing an API with NodeJS can be faster and more concise, but Rust offers guarantees around memory safety that make it attractive.