[[*Source: Thoughtworks*](https://www.thoughtworks.com/insights/blog/test-driven-development-best-thing-has-happened-software-design)]
- First, you make a test for a new feature. Initially, the **test will fail**. - Then, you write the minimum amount of code that **makes the test pass**. - Lastly, you **refactor** the code to make the implementation more solid. Simple, isn't it? It creates a feedback loop where you write code incrementally to fulfill the task. Moreover, it ensures that you build testability, meaning you write your code so that it can be tested. To show how to use TDD, let's add authorization to your application step by step, starting with tests. I will use [OAuth](https://auth0.com/docs/protocols/protocol-oauth2), a battle-tested and widely used authorization framework for web applications, to authorize requests to the API via Auth0. In this context, Auth0 fulfills the role of the _authorization server_ and abstracts a significant part of the work away from you. That way, you can focus on delivering value to your users. ## Getting Started We're getting started with our base application. [This branch](https://github.com/auth0-blog/securing-api-rails/tree/starter) is a good starting point. You can download it by running the following command in a terminal window: ``` git clone -b starter --single-branch https://github.com/auth0-blog/securing-api-rails.git ``` The API has three endpoints with different levels of protection: - `/api/messages/public`: Public route. - `/api/messages/protected`: Requires a valid access token. - `/api/messages/admin`: Requires a valid access token. Since Auth0 uses JWT as its access token format, we can inspect it and make sure it has a `permissions` claim that contains the scope `read:admin-messages`. ### Running the Application To run the application, we first need the correct ruby version. The easiest way to do so is to use a version manager like [rbenv](https://github.com/rbenv/rbenv). Once you install it, run this command inside the repository to install the right version of ruby: ```shell rbenv install ``` Install the dependencies for the application: ```shell bundle install ``` And finally, run the application: ```shell bin/rails s ``` You can verify that the application is working correctly with `curl`: ```shell curl localhost:6060/api/messages/public ``` The command will return a 200 code plus the message: ```json {"message": "The API doesn't require an access token to share this message."} ``` ## Creating an API on Auth0 To secure the API with Auth0, you need an Auth0 account. If you haven't one, you can sign up for free right now. In the *APIs* section of the [Auth0 dashboard](https://manage.auth0.com/), click *Create API*. Provide a name and an identifier for your API. You will use the identifier as an `audience` later when configuring the access token verification. Leave the *Signing Algorithm* as RS256. 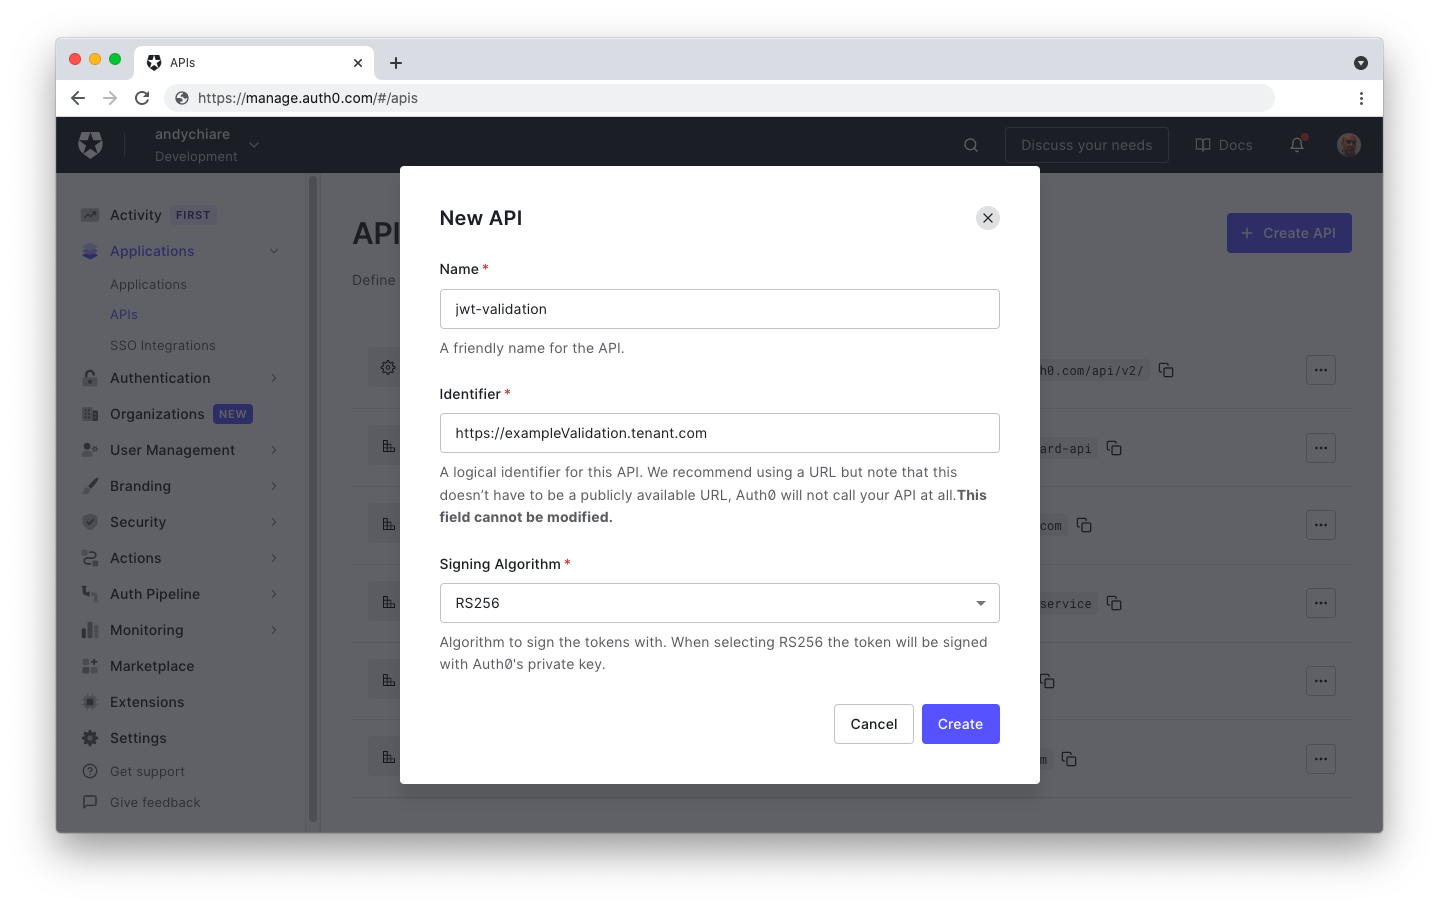 Once you create the API, go to the _Permissions_ tab in the API details and add permission called `read:admin-messages`. 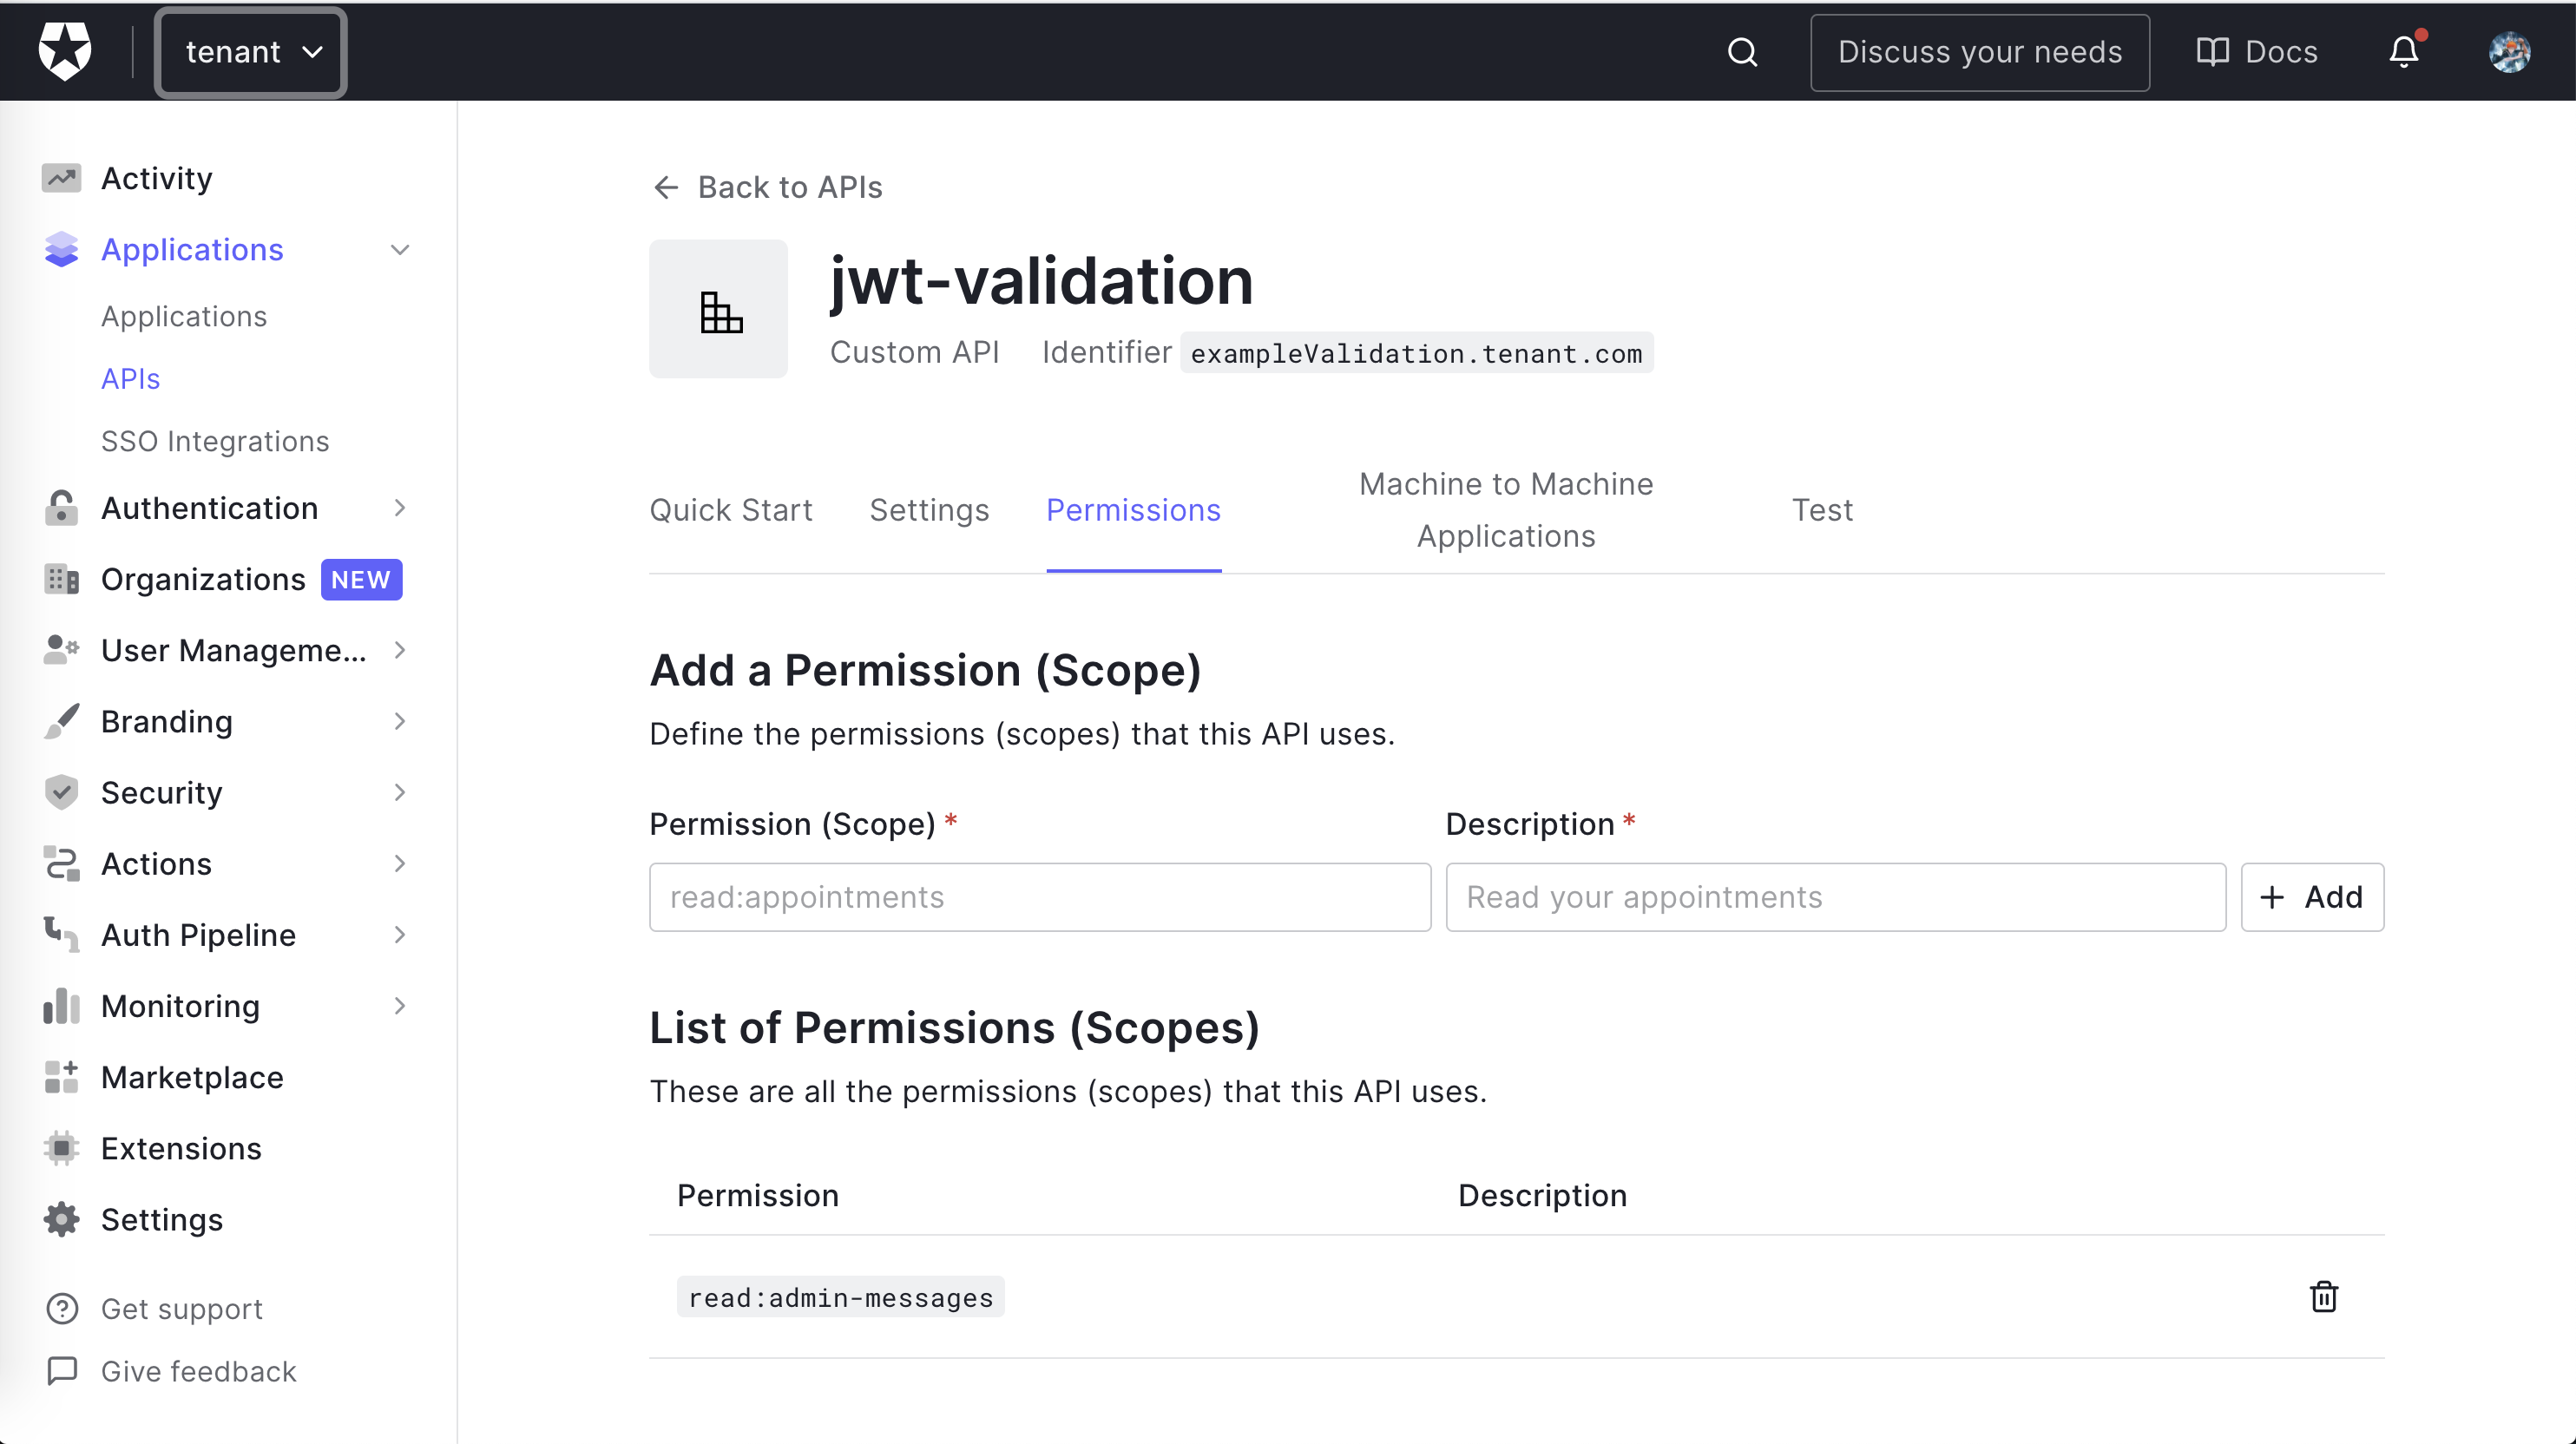 > **Note**: While in the Auth0 Dashboard, take note of your Auth0 domain. You will need it soon. The domain is a string in the form `YOUR-TENANT-NAME.auth0.com` where `YOUR-TENANT-NAME` is the name you provided when you created your account with Auth0. For more information, [check the documentation](https://auth0.com/docs/getting-started/the-basics#domains). ### Connecting the application to Auth0 All right, your application is ready to go and in dire need of some _security_. Before that, you need to add some configurations. After creating the API, you dutifully stored the `domain` and the `audience`, right? Let's use them. The convention in the _Rails_ world is to add this in the `config` folder using [YAML](https://yaml.org/). The file is called `config/auth0.yml`. You don't want to store credentials in our code, so you'll export the values as environment variables, named `AUTH0_DOMAIN` and `AUTH0_AUDIENCE`. The configuration uses those values and keeps them safely away from source control! ```yaml development: issuerUri: <%= ENV["AUTH0_DOMAIN"] %> audience: <%= ENV["AUTH0_AUDIENCE"] %> ``` Now, set `AUTH0_DOMAIN` and `AUTH0_AUDIENCE` environment variables to your API's `domain` and `audience` values. I used the [`dotenv-rails`](https://github.com/bkeepers/dotenv) gem, but you can use what works best for you. ## The Initial Tests Let's start by decoding the access token in the [JWT](https://jwt.io/introduction) format you get from Auth0. You're leveraging the excellent [jwt](https://github.com/jwt/ruby-jwt) gem. You don't want to test that the library works, so you will be relatively sparse with the testing. You want to make sure that incorrect requests fail. First, start by adding the `jwt` gem to your Gemfile: ```ruby gem 'jwt' ``` Then make sure that it installs successfully by running in your terminal: ```bash bundle install ``` If you go to `spec/api/messages_controller_spec.rb`, you'll find the baseline tests for the `MessagesController` routes that were described above: ```ruby # spec/api/messages_controller_spec.rb require 'rails_helper' describe Api::MessagesController, type: :controller do describe '#public' do subject { get :public, params: { format: :json } } it 'returns an accepted answer for the public endpoint' do subject expect(response).to be_ok message = 'The API doesn\'t require an access token to share this message.' expect(json_response!).to include('message' => message) end end describe '#protected' do subject { get :protected, params: { format: :json } } it 'returns an accepted answer for the protected endpoint' do subject expect(response).to be_ok message = 'The API successfully validated your access token.' expect(json_response!).to include('message' => message) end end describe '#admin' do subject { get :admin, params: { format: :json } } it 'returns an accepted answer for the admin endpoint' do subject expect(response).to be_ok message = 'The API successfully recognized you as an admin.' expect(json_response!).to include('message' => message) end end end ``` You're not enforcing authorization yet. The requests work, but that'll change soon enough. At this point, you can launch the tests. Move to the project's root folder and run the following command: ```shell ./go test ``` The `go` script allows you to execute different tasks, but you will use it here to run our tests. For now, you have a pleasant list of green tests, as you can see in the following screenshot: 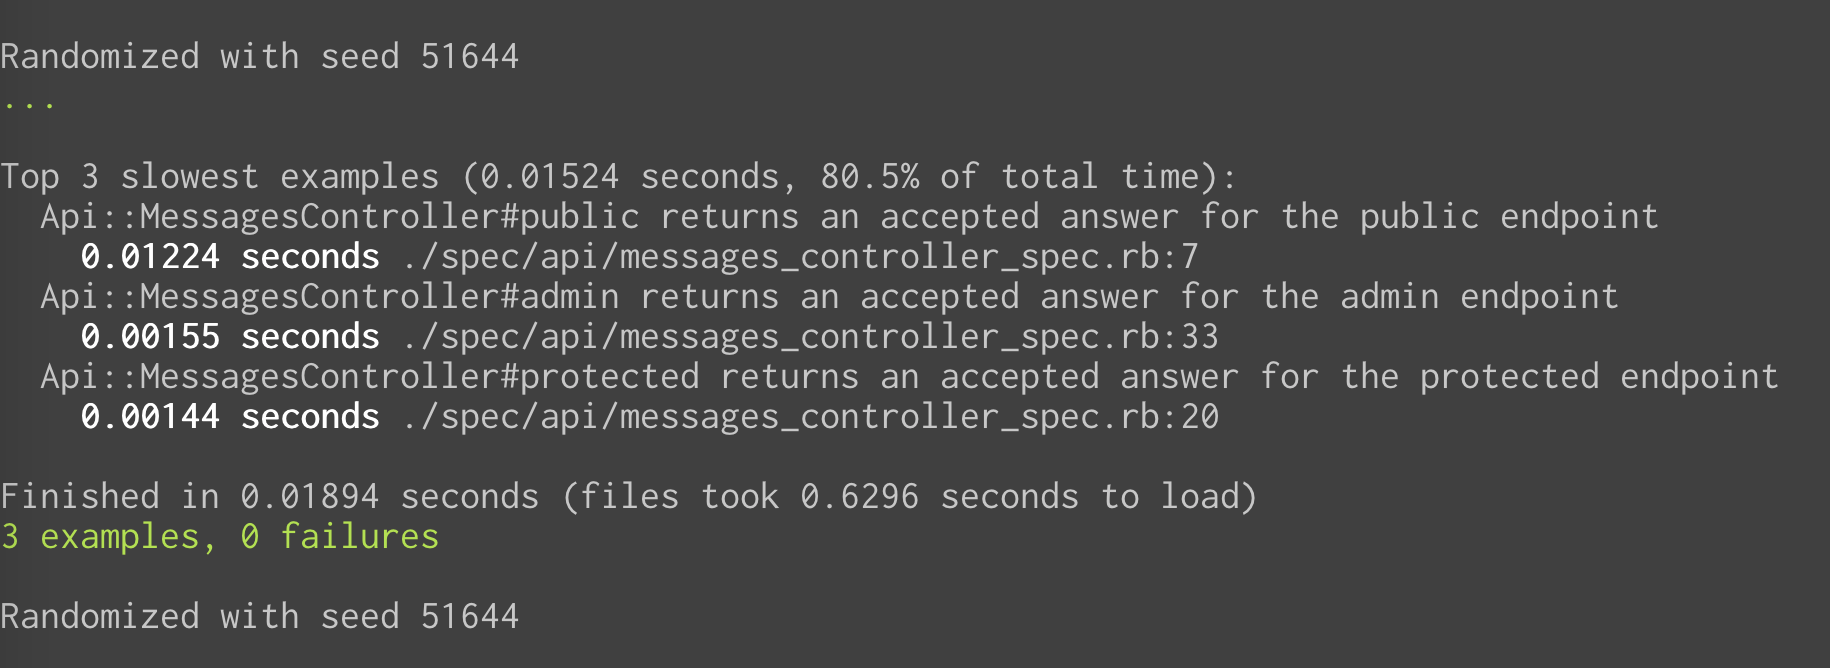 Once the gem has been installed and you have seen the tests run, create a `lib` folder under the `spec` folder and add a file named `json_web_token_spec.rb` with the following content: ```ruby # spec/lib/json_web_token_spec.rb require 'rails_helper' require 'json_web_token' describe JsonWebToken do subject { described_class } # rubocop:disable Layout/LineLength let(:token) do 'eyJ0eXAiOiJKV1QiLCJhbGciOiJSUzI1NiIsImtpZCI6Ik5FTXpRakpEUTBSRk4wUXlNemxETmpVME1VRTFNak00TWpsQ09UWXdNamMzTlVWQk9UUkVSZyJ9.eyJpc3MiOiJodHRwczovL2hjZXJpcy5ldS5hdXRoMC5jb20vIiwic3ViIjoiZ29vZ2xlLW9hdXRoMnwxMTE0NjA0MTk0NTcyODg5MzU3ODciLCJhdWQiOiJzaGVsZjIuaGNlcmlzLmNvbSIsImlhdCI6MTU1NTcxNzM1MywiZXhwIjoxNTU1NzI0NTUzLCJhenAiOiJxMU1Ebmhwa0VDRGJqU2RBOU1Tc2ROUmJYRUtoV0lZaiIsInNjb3BlIjoicHJvZmlsZSBjcmVhdGU6Ym9va3MifQ.HTPZ3ISGdzUYc190vq8rN8lfQKvgg47uIbxGfBmrbJfsQOEg2TQ-oMlTV3j8e486zhlu1NAHh2neIhMmgfJpxuXkMQrnxCwSb_sSHpNU7TNwNY9hnATvU3nslqz-4VW1FwOxtjF38k7uVqZ9Xusm2skH5DR6BPh3lU2T-I79OMVHfQb47vzNBfbCu6xx9cGBzdeJdu9ADHJOnhE8PRp4fpdQ8lDm3hNAMDaKrKXBS49HfxSsEswC5u6WR5FnWm7hCe4CFNBuosMohRkDSGRWGwQcVIAzaQASXMx1NsWpkBSBytlCsQkxYaVK7dV1syXeXqJSCoZKcRHpF-hL50xrOw' end let(:jwks_raw) do # rubocop:disable Style/StringLiterals "{\"keys\":[{\"alg\":\"RS256\",\"kty\":\"RSA\",\"use\":\"sig\",\"x5c\":[\"MIIDATCCAemgAwIBAgIJUehs79ahslK3MA0GCSqGSIb3DQEBCwUAMB4xHDAaBgNVBAMTE2hjZXJpcy5ldS5hdXRoMC5jb20wHhcNMTkwNDE2MTkwNzQ3WhcNMzIxMjIzMTkwNzQ3WjAeMRwwGgYDVQQDExNoY2VyaXMuZXUuYXV0aDAuY29tMIIBIjANBgkqhkiG9w0BAQEFAAOCAQ8AMIIBCgKCAQEAso5viNLtITh86OESO6njyqbtf+iPBEcQNmWohKEKMSDTeeWxJP15mWDUPB+EAKTakudsJ/Rs/MiTiEHOJubJ6BVMYyPd/3E9G2fj5KCbHF9140H4UyJfGk9jlYtKZGPJ1QlzxEZ1Krr4LSMO+P/PjD606wPSW6bd9dAUufmYTTJOpNQW/dw0V6meAr1fm1267f5XCJfjMkzQQmFtSpxDN/IpzJgWcjEsQU/0r+KSdzKf7viqotfK9soDuvni292dNzrLDiwMLWth9+6JVi6TMV5uJPfbJInQgOoaRowPWVquavNxXk/hrur4aBdP229jUe9wX+wk5MGV/uzGbEj59QIDAQABo0IwQDAPBgNVHRMBAf8EBTADAQH/MB0GA1UdDgQWBBS9AsVL15G7Z9uI6p/7I7O7aHaCPDAOBgNVHQ8BAf8EBAMCAoQwDQYJKoZIhvcNAQELBQADggEBALIBpf5Aizfgw2Dge8xJyKELO6kRO0nrBFNyP0viajcRA3jwl9LuV316TjE8eIitmEM0nP4U9AeSkeEPksJBHMak4w+GuE7SkeZ5z6fjpNcZ/1nzJVZMDftjJDNbLeCXO/5bq6ySzYVl53pg5I3auLwEEDcrZKHhRjW0IHxBSqmhYZGajymAaBltHsYS8NP6TfDaT1dXw2EQwgIjxXeoGaQTieX0blGjrJ2y8IRBp1EZ9w2OdHaLEbkD08ndn1m5mQrkX/+F2cSiDZTtrm5Isw1TEJusBbM0j+kEsdwz2VijWIL5K2wjgLMm+tBd5OtibDSoeCNqBW+F/sjtBlMcTq4=\"],\"n\":\"so5viNLtITh86OESO6njyqbtf-iPBEcQNmWohKEKMSDTeeWxJP15mWDUPB-EAKTakudsJ_Rs_MiTiEHOJubJ6BVMYyPd_3E9G2fj5KCbHF9140H4UyJfGk9jlYtKZGPJ1QlzxEZ1Krr4LSMO-P_PjD606wPSW6bd9dAUufmYTTJOpNQW_dw0V6meAr1fm1267f5XCJfjMkzQQmFtSpxDN_IpzJgWcjEsQU_0r-KSdzKf7viqotfK9soDuvni292dNzrLDiwMLWth9-6JVi6TMV5uJPfbJInQgOoaRowPWVquavNxXk_hrur4aBdP229jUe9wX-wk5MGV_uzGbEj59Q\",\"e\":\"AQAB\",\"kid\":\"NEMzQjJDQ0RFN0QyMzlDNjU0MUE1MjM4MjlCOTYwMjc3NUVBOTRERg\",\"x5t\":\"NEMzQjJDQ0RFN0QyMzlDNjU0MUE1MjM4MjlCOTYwMjc3NUVBOTRERg\"}]}" # rubocop:enable Style/StringLiterals end # rubocop:enable Layout/LineLength let(:jwks_response) { Net::HTTPSuccess.new(1.0, '200', body: jwks_raw) } describe '.verify' do before do allow(Net::HTTP).to receive(:get_response).and_return(jwks_response) allow(jwks_response).to receive(:body).and_return(jwks_raw) allow(Rails.configuration).to receive_message_chain('auth0.domain').and_return('AUTH0_DOMAIN_STUB') allow(Rails.configuration).to receive_message_chain('auth0.audience').and_return('AUTH0_AUDIENCE_STUB') end it 'shows an error if the token is incorrect' do expect(subject.verify('').error.message).to eq("Not enough or too many segments") end it 'shows an error if the token is expired' do expect(subject.verify(token).error.message).to eq("Signature has expired") end end end ``` In this test, you are using [RSpec's `allow` method](https://relishapp.com/rspec/rspec-mocks/v/2-14/docs/method-stubs/allow-with-a-simple-return-value), what `allow` does is *allow* us to test the class `Net::HTTP` for example, to receive a method called `get_response` and return a `Net::HTTPSuccess`. You are also mocking the response of the [`.well-known` endpoint](https://auth0.com/docs/secure/tokens/json-web-tokens/json-web-key-sets) and its body and also the Rails configuration. You could load your env variables to be accessed from the test, but for the sake of this blog post, we are going to mock them. Next, you need to wrap the [jwt](https://github.com/jwt/ruby-jwt) library with a little bit of code. For this purpose, add a file named `json_web_token.rb` to the `lib` folder in the project's root. Put the following code in that file: ```ruby # lib/json_web_token.rb require 'jwt' require 'net/http' class JsonWebToken class << self Error = Struct.new(:message, :status) Response = Struct.new(:decoded_token, :error) def domain_url "https://#{Rails.configuration.auth0.domain}/" end def verify(token) jwks_uri = URI("#{domain_url}.well-known/jwks.json") jwks_response = Net::HTTP.get_response jwks_uri unless jwks_response.is_a? Net::HTTPSuccess error = Error.new('Unable to verify credentials', :internal_server_error) return Response.new(nil, error) end jwks_hash = JSON.parse(jwks_response.body).deep_symbolize_keys decoded_token = JWT.decode(token, nil, true, { algorithm: 'RS256', iss: domain_url, verify_iss: true, aud: Rails.configuration.auth0.audience.to_s, verify_aud: true, jwks: { keys: jwks_hash[:keys] } }) Response.new(decoded_token, nil) rescue JWT::VerificationError, JWT::DecodeError => e error = Error.new(e.message, :unauthorized) Response.new(nil, error) end end end ``` Here you are using a couple of Ruby `Struct` to represent a response and error. In a nutshell, the `verify` method calls the `.well-known` endpoint in order to retrieve the JWKS. Then, the `JWT.decode` method attempts to decode the token passed as a parameter. If everything goes well, you return the decoded token. Otherwise, you return an error. If you want to learn more about the arguments of the `JWT.decode` function and the JSON Web Key Set (JWKS) you can read more about it in the [Rails Authorization Guide by Example, specifically the section "What is the Auth0Client Class doing under the hood"](https://developer.auth0.com/resources/guides/api/rails/basic-authorization#validate-a-json-web-token-jwt-in-rails). ## Testing Authorization Let's build our tests to verify that the protected endpoint works as expected. Note you don't want to test actual tokens. What you want to test is that your code works. In this case, the `verify` method works. It could be a bit tricky in this scenario because the `verify` method is only used as a *wrapper* for the `JWT.decode` function, so it might give you the impression you need to test the `JWT.decode` method, but this is not the idea of unit testing. Let's go ahead and add the stub in `messages_controller_spec.rb`: ```ruby # spec/api/messages_controller_spec.rb require 'rails_helper' describe Api::MessagesController, type: :controller do # ...existing code... subject { get :protected, params: { format: :json } } it 'returns an accepted answer for the protected endpoint' do # 👇 new code allow(JsonWebToken).to receive(:verify).and_return(double(decoded_token: :valid, error: nil)) # 👆 new code subject expect(response).to be_ok # 👇 new code message = 'The API successfully validated your access token.' expect(json_response!).to include('message' => message) # 👆 new code end # ...existing code... subject { get :admin, params: { format: :json } } it 'returns an accepted answer for the admin endpoint' do # 👇 new code allow(JsonWebToken).to receive(:verify).and_return(double(decoded_token: :valid, error: nil)) # 👆 new code subject expect(response).to be_ok # 👇 new code message = 'The API successfully recognized you as an admin.' expect(json_response!).to include('message' => message) # 👆 new code end # ...existing code... end ``` These tests will prevent regressions when we enforce authorization. Let's add some tests to define the expectations you want to enforce in the protected route: ```ruby # spec/api/messages_controller_spec.rb require 'rails_helper' describe Api::MessagesController, type: :controller do # ...existing code... describe '#protected' do context 'with error' do it 'returns an error for the protected endpoint if the token has the wrong audience' do message = 'Invalid audience' error_struct = double(message: message, status: :unauthorized) response_struct = double(decoded_token: nil, error: error_struct) allow(JsonWebToken).to receive(:verify).and_return(response_struct) subject expect(response).to be_unauthorized expect(json_response!).to include('message' => message) end it 'returns an error for the protected endpoint if there is no token' do message = 'Nil JSON web token' error_struct = double(message: message, status: :unauthorized) response_struct = double(decoded_token: nil, error: error_struct) allow(JsonWebToken).to receive(:verify).and_return(response_struct) subject expect(response).to be_unauthorized expect(json_response!).to include('message' => message) end it 'returns an error for the protected endpoint if the token is expired' do error_struct = double(message: message, status: :unauthorized) response_struct = double(decoded_token: nil, error: error_struct) allow(JsonWebToken).to receive(:verify).and_return(response_struct) subject expect(response).to be_unauthorized expect(json_response!).to include('message' => message) end it 'returns an error for the protected endpoint if the token has the wrong issuer' do message = 'Invalid issuer' error_struct = double(message: message, status: :unauthorized) response_struct = double(decoded_token: nil, error: error_struct) allow(JsonWebToken).to receive(:verify).and_return(response_struct) subject expect(response).to be_unauthorized expect(json_response!).to include('message' => message) end end # ...existing code... end ``` For reasons of space, I'm grouping them, but to remain closer to the spirit of TDD, you should add them one by one. Note the tests are under a [context](https://relishapp.com/rspec/rspec-core/v/3-8/docs/example-groups/basic-structure-describe-it#nested-example-groups-(using-%60context%60) called `with error` which will group the tests and make it more organized so you can go ahead and add a `valid` context for the missing test like so: ```ruby # spec/api/messages_controller_spec.rb require 'rails_helper' describe Api::MessagesController, type: :controller do # ...existing code... # 👇 new code context 'valid' do it 'returns an accepted answer for the protected endpoint' do allow(JsonWebToken).to receive(:verify).and_return(double(decoded_token: :valid, error: nil)) subject expect(response).to be_ok message = 'The API successfully validated your access token.' expect(json_response!).to include('message' => message) end end # 👆 new code # ...existing code... ``` If you look at the tests under the `with error` context, they look pretty similar to each other, except for the `message` string. This could be a hint for you to use a [shared example](https://relishapp.com/rspec/rspec-core/docs/example-groups/shared-examples). Go ahead and create a new file under `spec/support/shared` and call it `invalid_token.rb` and fill it out with the following code: ```ruby RSpec.shared_examples 'invalid token' do |message| it message.to_s do error_struct = double(message: message, status: :unauthorized) response_struct = double(decoded_token: nil, error: error_struct) allow(JsonWebToken).to receive(:verify).and_return(response_struct) subject expect(response).to be_unauthorized expect(json_response!).to include('message' => message) end end ``` You call the shared example an `invalid token` and pass a `message` argument. You are adding a test inside where the `JsonWebToken.verify` method returns a response with the error message set as the one in the argument. Finally, the test expects that the response is unauthorized and includes the same error message. Note this test might look a bit weird. You are mocking the exception with a message and expecting the response to have the same message. This happens because this code is simple, and it doesn't add much functionality around the validation process other than calling the `JWT.decode` function. **This code is meant to be used as an example of how to implement TDD and use the RSpec gem. For a real-life application, you'll probably have a much more complex codebase.** To use your new shared example, go to the `messages_controller_spec.rb` and add the following: ```ruby # spec/api/messages_controller_spec.rb require 'rails_helper' describe Api::MessagesController, type: :controller do describe '#protected' do subject { get :protected, params: { format: :json } } # 👇 new code context "with error" do include_examples "invalid token", "Invalid audience" include_examples "invalid token", "Nil JSON web token" include_examples "invalid token", "Signature has expired" include_examples "invalid token", "Invalid issuer" end # 👆 new code # ✨ You can delete the following code! 👇 # # context 'with error' do # it 'returns an error for the protected endpoint if the token has the wrong audience' do # message = 'Invalid audience' # error_struct = double(message: message, status: :unauthorized) # response_struct = double(decoded_token: nil, error: error_struct) # allow(JsonWebToken).to receive(:verify).and_return(response_struct) # subject # expect(response).to be_unauthorized # expect(json_response!).to include('message' => message) # end # it 'returns an error for the protected endpoint if there is no token' do # message = 'Nil JSON web token' # error_struct = double(message: message, status: :unauthorized) # response_struct = double(decoded_token: nil, error: error_struct) # allow(JsonWebToken).to receive(:verify).and_return(response_struct) # subject # expect(response).to be_unauthorized # expect(json_response!).to include('message' => message) # end # it 'returns an error for the protected endpoint if the token is expired' do # error_struct = double(message: message, status: :unauthorized) # response_struct = double(decoded_token: nil, error: error_struct) # allow(JsonWebToken).to receive(:verify).and_return(response_struct) # subject # expect(response).to be_unauthorized # expect(json_response!).to include('message' => message) # end # it 'returns an error for the protected endpoint if the token has the wrong issuer' do # message = 'Invalid issuer' # error_struct = double(message: message, status: :unauthorized) # response_struct = double(decoded_token: nil, error: error_struct) # allow(JsonWebToken).to receive(:verify).and_return(response_struct) # subject # expect(response).to be_unauthorized # expect(json_response!).to include('message' => message) # end # end # ... existing code end end ``` ### Implementing authorization To implement the authorization, you're using a [before_action](https://api.rubyonrails.org/v6.1.3.2/classes/AbstractController/Callbacks/ClassMethods.html#method-i-before_action) callback. You pick the token from the header and verify it with the library. Traditionally, this helper method goes in the `ApplicationController`, the base class for all controllers. Here is the code: ```ruby # app/controllers/application_controller.rb require 'json_web_token' class ApplicationController < ActionController::API def authorize! token = raw_token(request.headers) validation_response = JsonWebToken.verify(token) @token ||= validation_response.decoded_token return unless (error = validation_response.error) render json: { message: error.message }, status: error.status end private def raw_token(headers) return headers['Authorization'].split.last if headers['Authorization'].present? end end ``` And you ensure it's used only for the routes you want: ```ruby # app/controllers/api/messages_controller.rb module Api class MessagesController < ApplicationController before_action :authorize!, except: %i[public] end end ``` Now you see the tests passing: TODO: Update this image 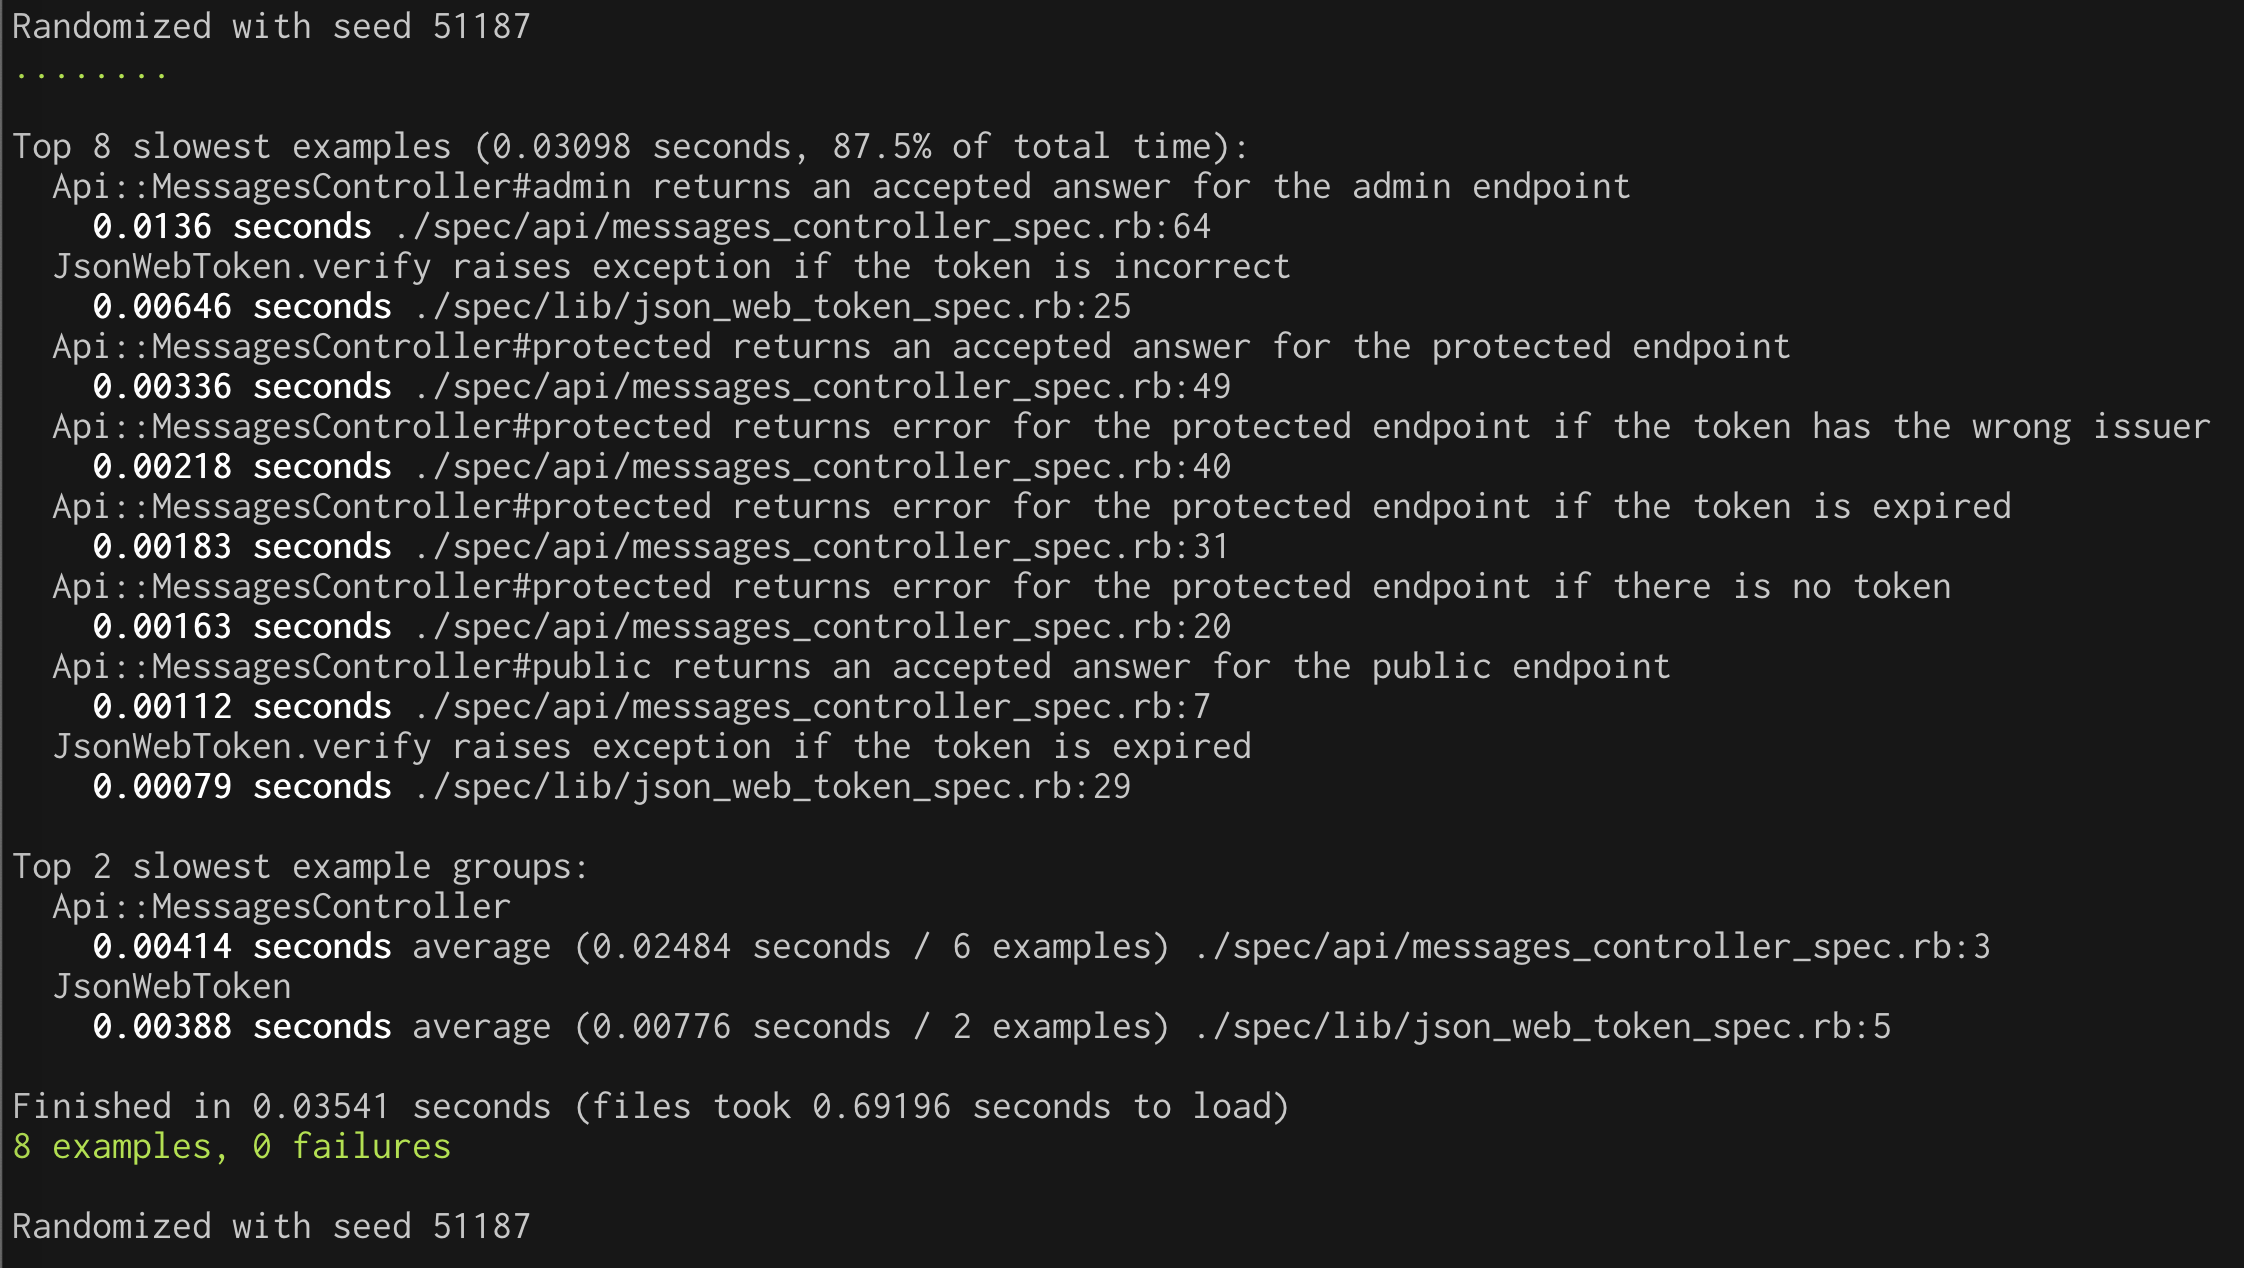 ## Testing Permissions At this point, you've got the protected route covered. Now, we shall focus on the admin route. The next step is checking for the token's correct `permission` claim. Your regular token doesn't have the claim, so you'll stub it to be a valid token but not add permissions to it. The test should fail: ```ruby # spec/api/messages_controller_spec.rb require 'rails_helper' describe Api::MessagesController, type: :controller do # ...existing code... describe '#admin' do subject { get :admin, params: { format: :json } } it 'returns an error for the admin endpoint if the token does not have permissions' do allow(JsonWebToken).to receive(:verify).and_return(double(decoded_token: {valid: :token, 'permissions' => ''}, error: nil)) subject expect(response).to be_unauthorized expect(json_response!['message']).to include('Access is denied') end end # ...existing code... end ``` Now, let's implement the permission check in the controller: ```ruby # app/controllers/application_controller.rb require 'json_web_token' class ApplicationController < ActionController::API # ...existing code... def can_read_admin_messages! check_permissions(@token, 'read:admin-messages') end def check_permissions(token, permission) permissions = token['permissions'] || [] permissions = permissions.split if permissions.is_a? String unless permissions.include?(permission) render json: { message: 'Access is denied' }.to_json, status: :unauthorized end end # ...existing code... end ``` To make sure the check is applied to the correct route, you follow a similar approach to before, based on a `before_action`: ```ruby # app/controllers/api/messages_controller.rb module Api class MessagesController < ApplicationController # ...existing code... before_action :can_read_admin_messages!, only: %i[admin] end ``` Now you can run the tests to make sure everything works as expected. ## You Got There! Writing code following TDD is all about having a tight feedback loop. This isn't easy to show in writing due to many small changes, but I hope I have given you a good glimpse. Using TDD brings several benefits: - You've confirmed that the implementation, you know, works - The test suite describes the application's behavior in an executable way instead of potentially misleading documentation - You're incorporating testability into your code from the beginning - Often, we tend to build things that we might need for a future that never comes. If you encode your expectations as tests, that becomes more visible, and it helps prevent it from happening. Perhaps not every line of code you write needs to be covered by tests. Nevertheless, a focus on testability helps to deliver better products [more reliably](https://itrevolution.com/book/accelerate/). You can download the sample project shown in this article from [this GitHub repository](https://github.com/auth0-blog/securing-api-rails).