---
title: "Adding Custom Claims to ID Tokens with Auth0 Actions"
description: "Learn how to create a new custom action that will add a custom claim to your Auth0-issued ID Token"
authors:
- name: "Jessica Temporal"
url: "https://auth0.com/blog/authors/jessica-temporal/"
date: "Feb 1, 2022"
category: "Developers,Tutorial,Actions"
tags: ["actions", "auth0", "id-tokens"]
url: "https://auth0.com/blog/adding-custom-claims-to-id-token-with-auth0-actions/"
---
# Adding Custom Claims to ID Tokens with Auth0 Actions
Did you know that you can use Actions to customize the user ID token? Well, if you need to add custom claims to your users' ID tokens, you came to the right place! With this tutorial, you'll learn how to use the power of Actions to include custom claims to users' ID tokens.
If you prefer, you can also watch the videos below with me explaining to add custom claims to your users' ID tokens using Actions 👇!
## Auth0 Issued ID Tokens and Custom Claims
[ID Tokens](https://auth0.com/docs/secure/tokens/id-tokens) are commonly used in token-based authentication to pass user information to a client application. At Auth0, ID Tokens follow the [JSON Web Token (JWT)](https://auth0.com/docs/secure/tokens/json-web-tokens) standard; this means that all ID tokens Auth0 issues are JWTs.
Claims are pieces of information about a given subject. In the case of ID Tokens, claims will contain information about the user, such as the user's name. Using custom claims can give your ID token extra information that can improve your application, for example, storing a user ID from a third party or system.
In this example, you'll see how to use Actions to make a request to an external API and store back the obtained information as a custom claim to ID token payload to be used on the sample application.
## The Sample Application
Before you begin, you will need a sample code to customize.
> For this blog post, you will use the React single-page application (SPA) sample. Keep in mind that you can use what you'll learn here and apply it to your app no matter what language or framework it uses.
You can clone the sample application from GitHub with the following command:
```bash
git clone https://github.com/auth0-blog/assign-random-dog.git
```
After the cloning finishes, follow the [README.md file](https://github.com/auth0-blog/assign-random-dog/blob/main/README.md) instructions to configure it to use Auth0. You'll need an Auth0 account, and if you don't have it, you can get one for free here.
After configuring the sample application, you can go into the app root folder and run it with the following command:
```bash
npm start
```
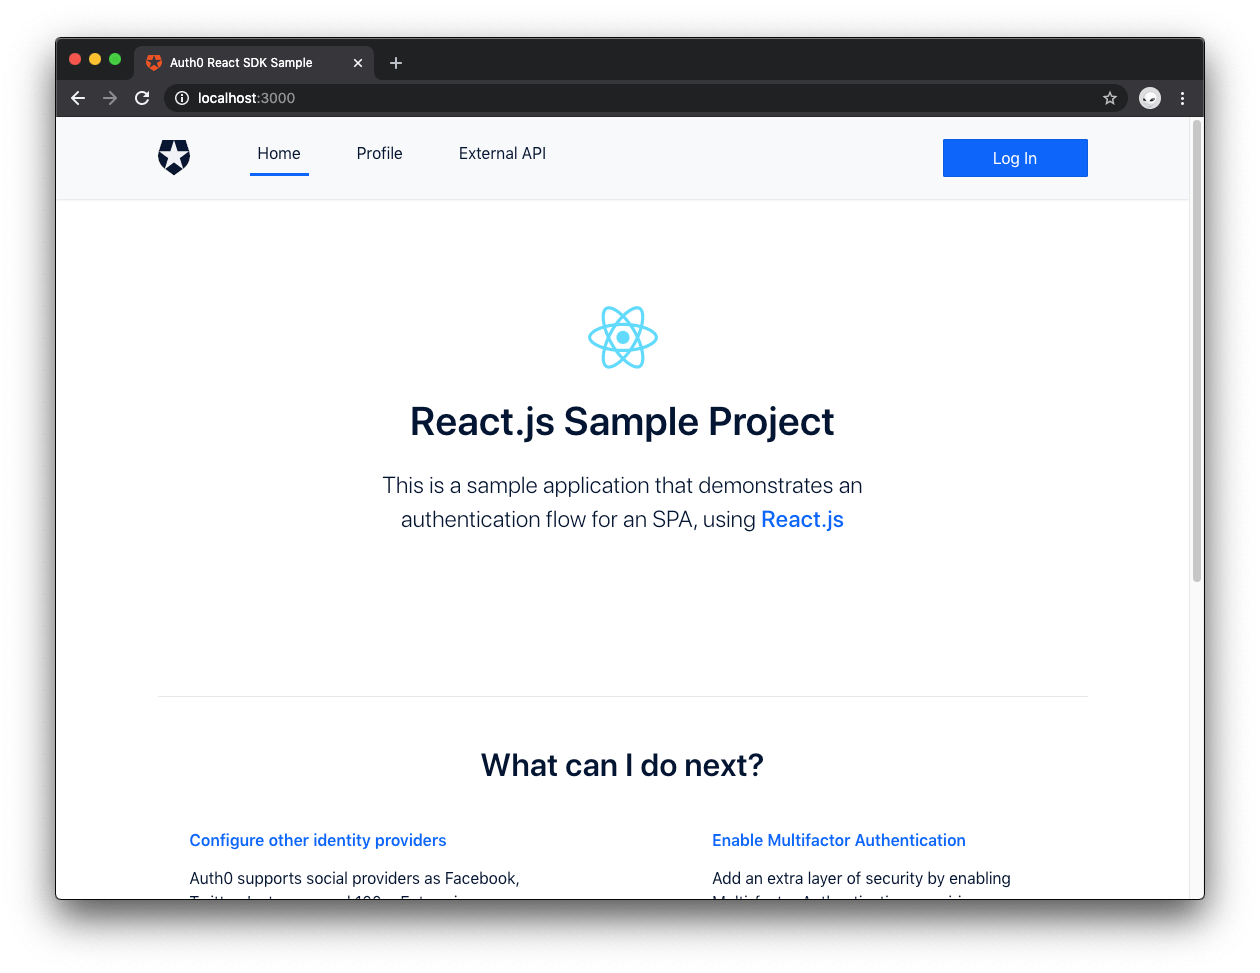
Open your browser and access [https://localhost:3000/](https://localhost:3000/). You should get the following page:
## What Are Auth0 Actions?
If you are new to this neck of the woods, this might be your first time hearing about Actions, don't worry; I got you covered, but if you are familiar with Actions, feel free to jump to the next section.
As mentioned, you will use Actions to add a custom claim to your users' ID tokens, and Actions are the new way to extend Auth0 functionalities. They are JavaScript functions running in a Node.js environment executed when specific events happen in some internal Auth0 flows.
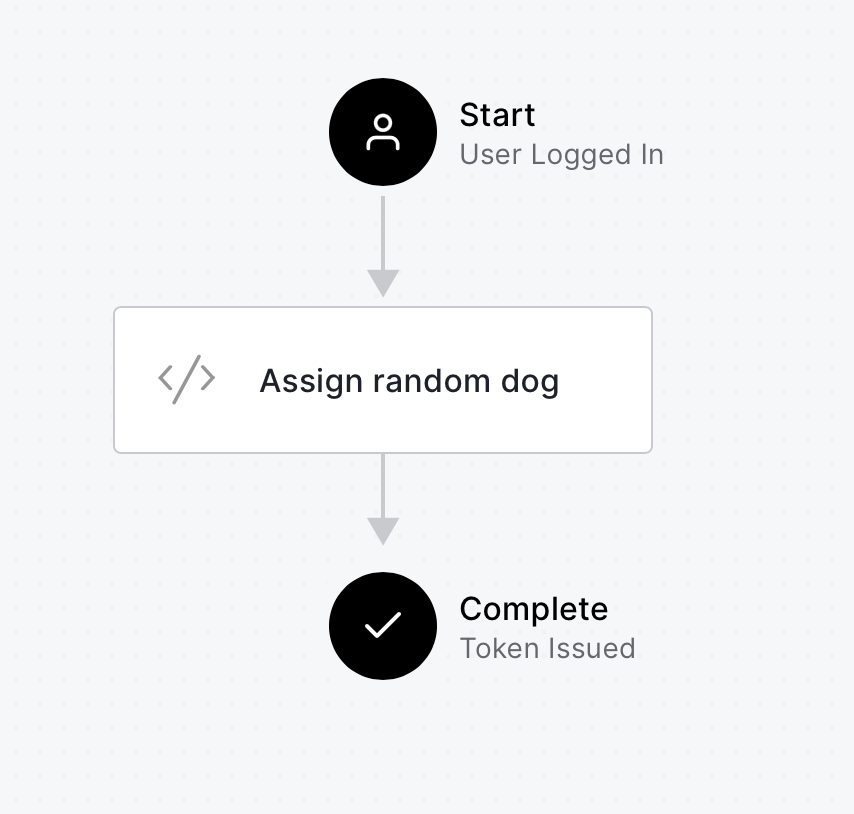
For example, Actions can be triggered when a user authenticates or changes their password. Today, you'll build an Action that will run after a user logs into your application, and as a result, the ID token will have a new custom claim. You can imagine this process as shown in the image below:
The Action code itself is implemented inside the Auth0 Dashboard, with an in-browser editor that allows you to write the code and use a prepared test environment to test your code. Also, you can deploy the code and use the versioning tool, but you will see more of that later.
> You can check out these blog posts for [a quick introduction to Auth0 Actions](https://auth0.com/blog/introducing-auth0-actions/) and how they [compare with the deprecated Rules and Hooks](https://auth0.com/blog/actions-now-generally-available/).
## Implementing The Assign Random Dog Action
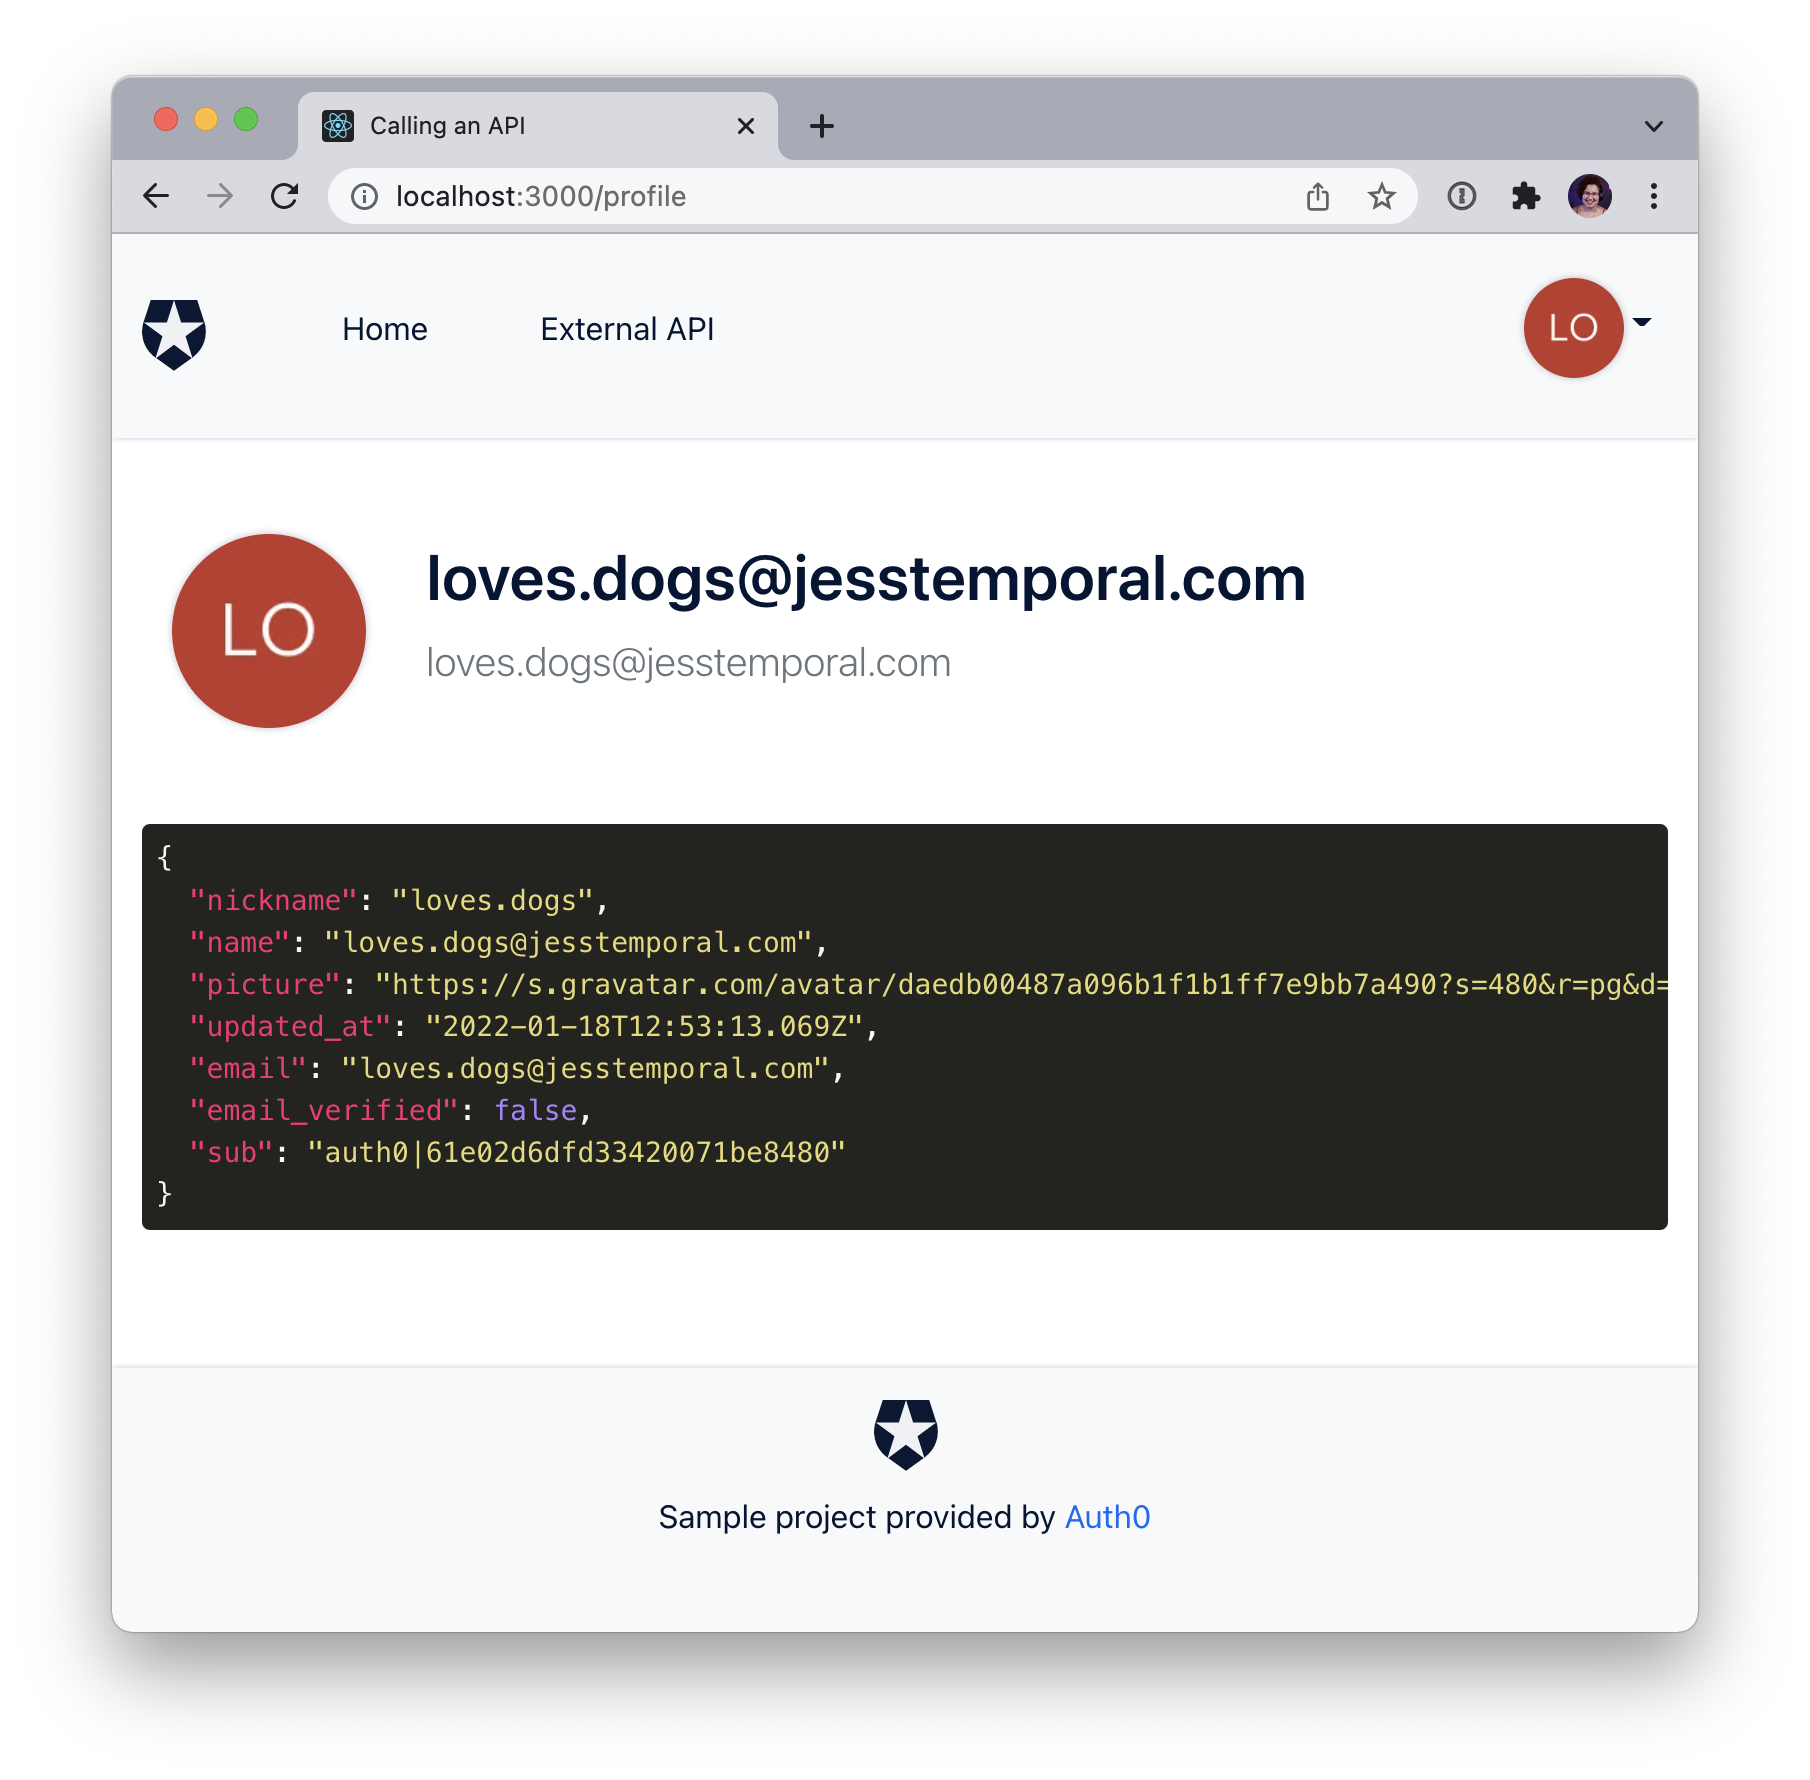
Having fun while learning new things makes everybody's life easier! For your custom claim, you will call an external API to grab a random dog picture to be displayed every time the user navigates to their user profile. Right now, your profile page looks like this:
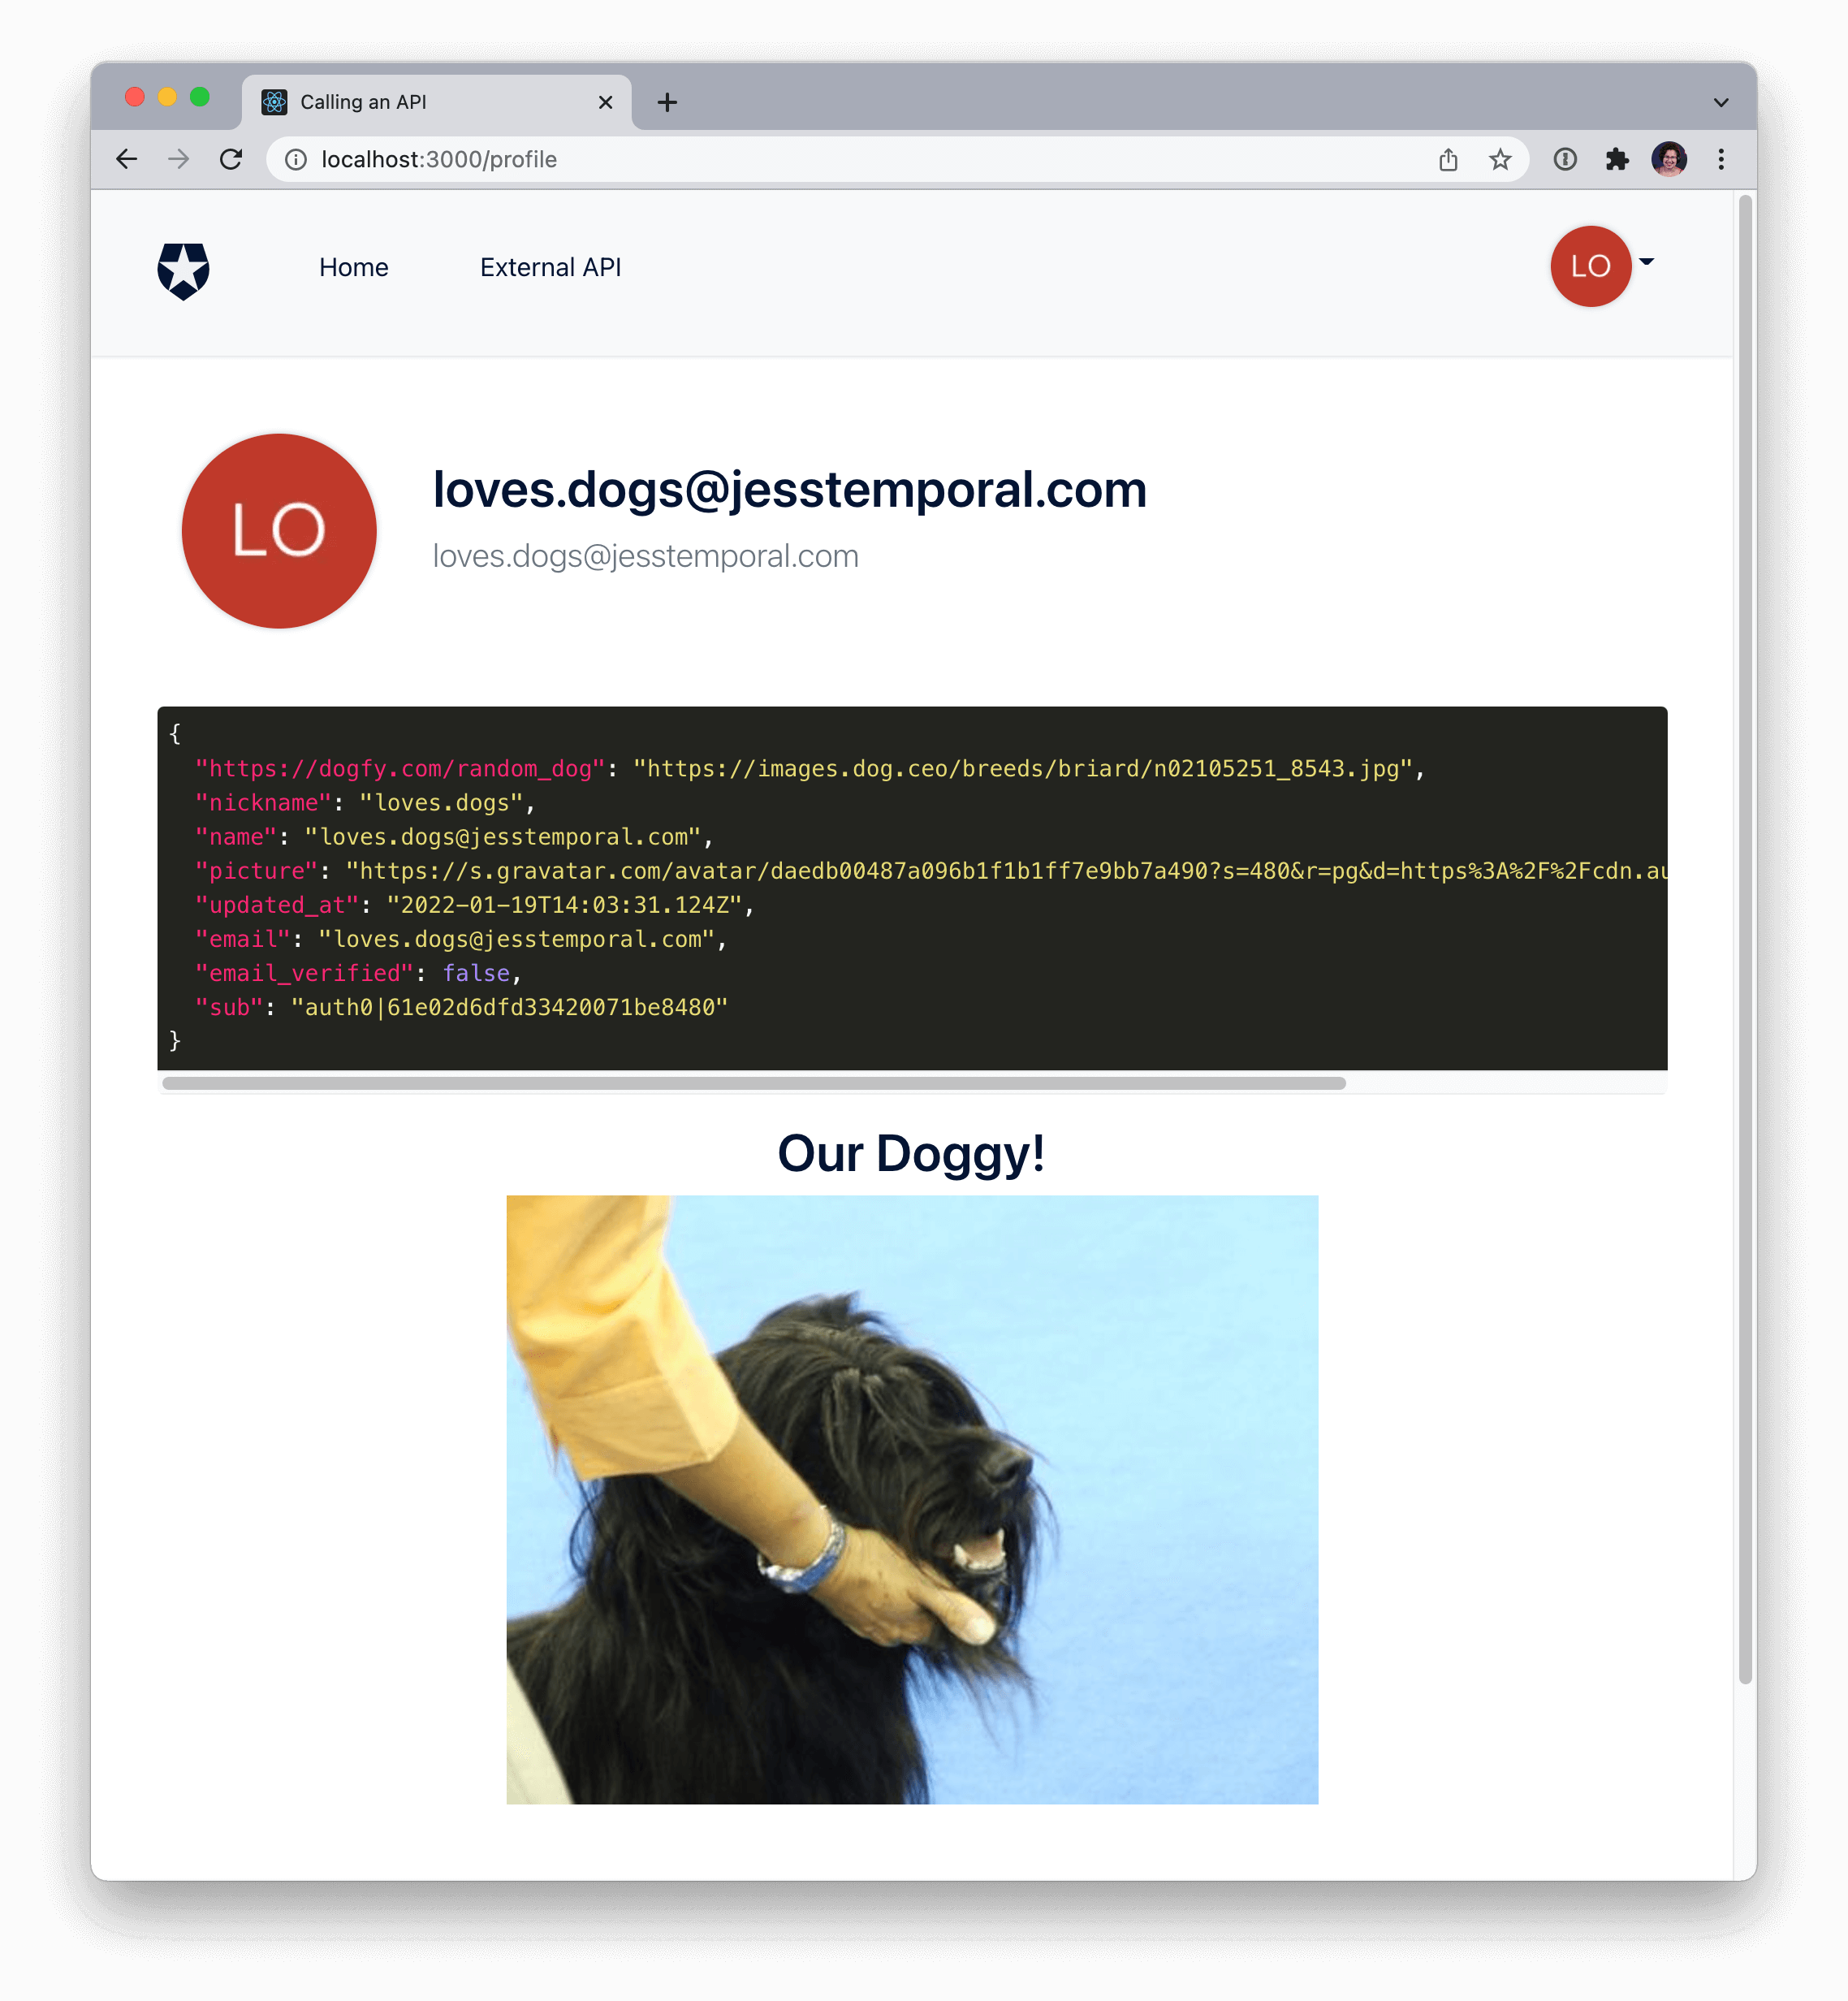
And you want to make it look like this:
The API you will use is the [Dog API](https://dog.ceo/dog-api), which claims to be _"the internet's biggest collection of open source dog pictures."_ This API has a "random" endpoint that gives back JSON containing the URL for a dog picture it chooses randomly from its database. That URL will be the value of your custom claim.
Let's go back to the [Auth0 Dashboard](https://manage.auth0.). Choose _Actions_ on the left-hand side menu, and you should see two options there:
1. **Flows:** the processes that can be extended with Actions. Each Flow is made up of one or more triggers and represents the logical pipeline through which information moves during a single point in the Auth0 journey, for example, the _Login_ Flow;
1. **Library:** contains all your Actions. They can be either ready-to-use [Actions built by third parties and published in the Auth0 Marketplace](https://marketplace.auth0.com/features/actions) or custom Actions, like the one we are building today.
So click on _Flows_ and choose the _Login_ flow. This will take you to the following page, where you can see your current login flow. There you will be able to edit the flow and add your custom action:
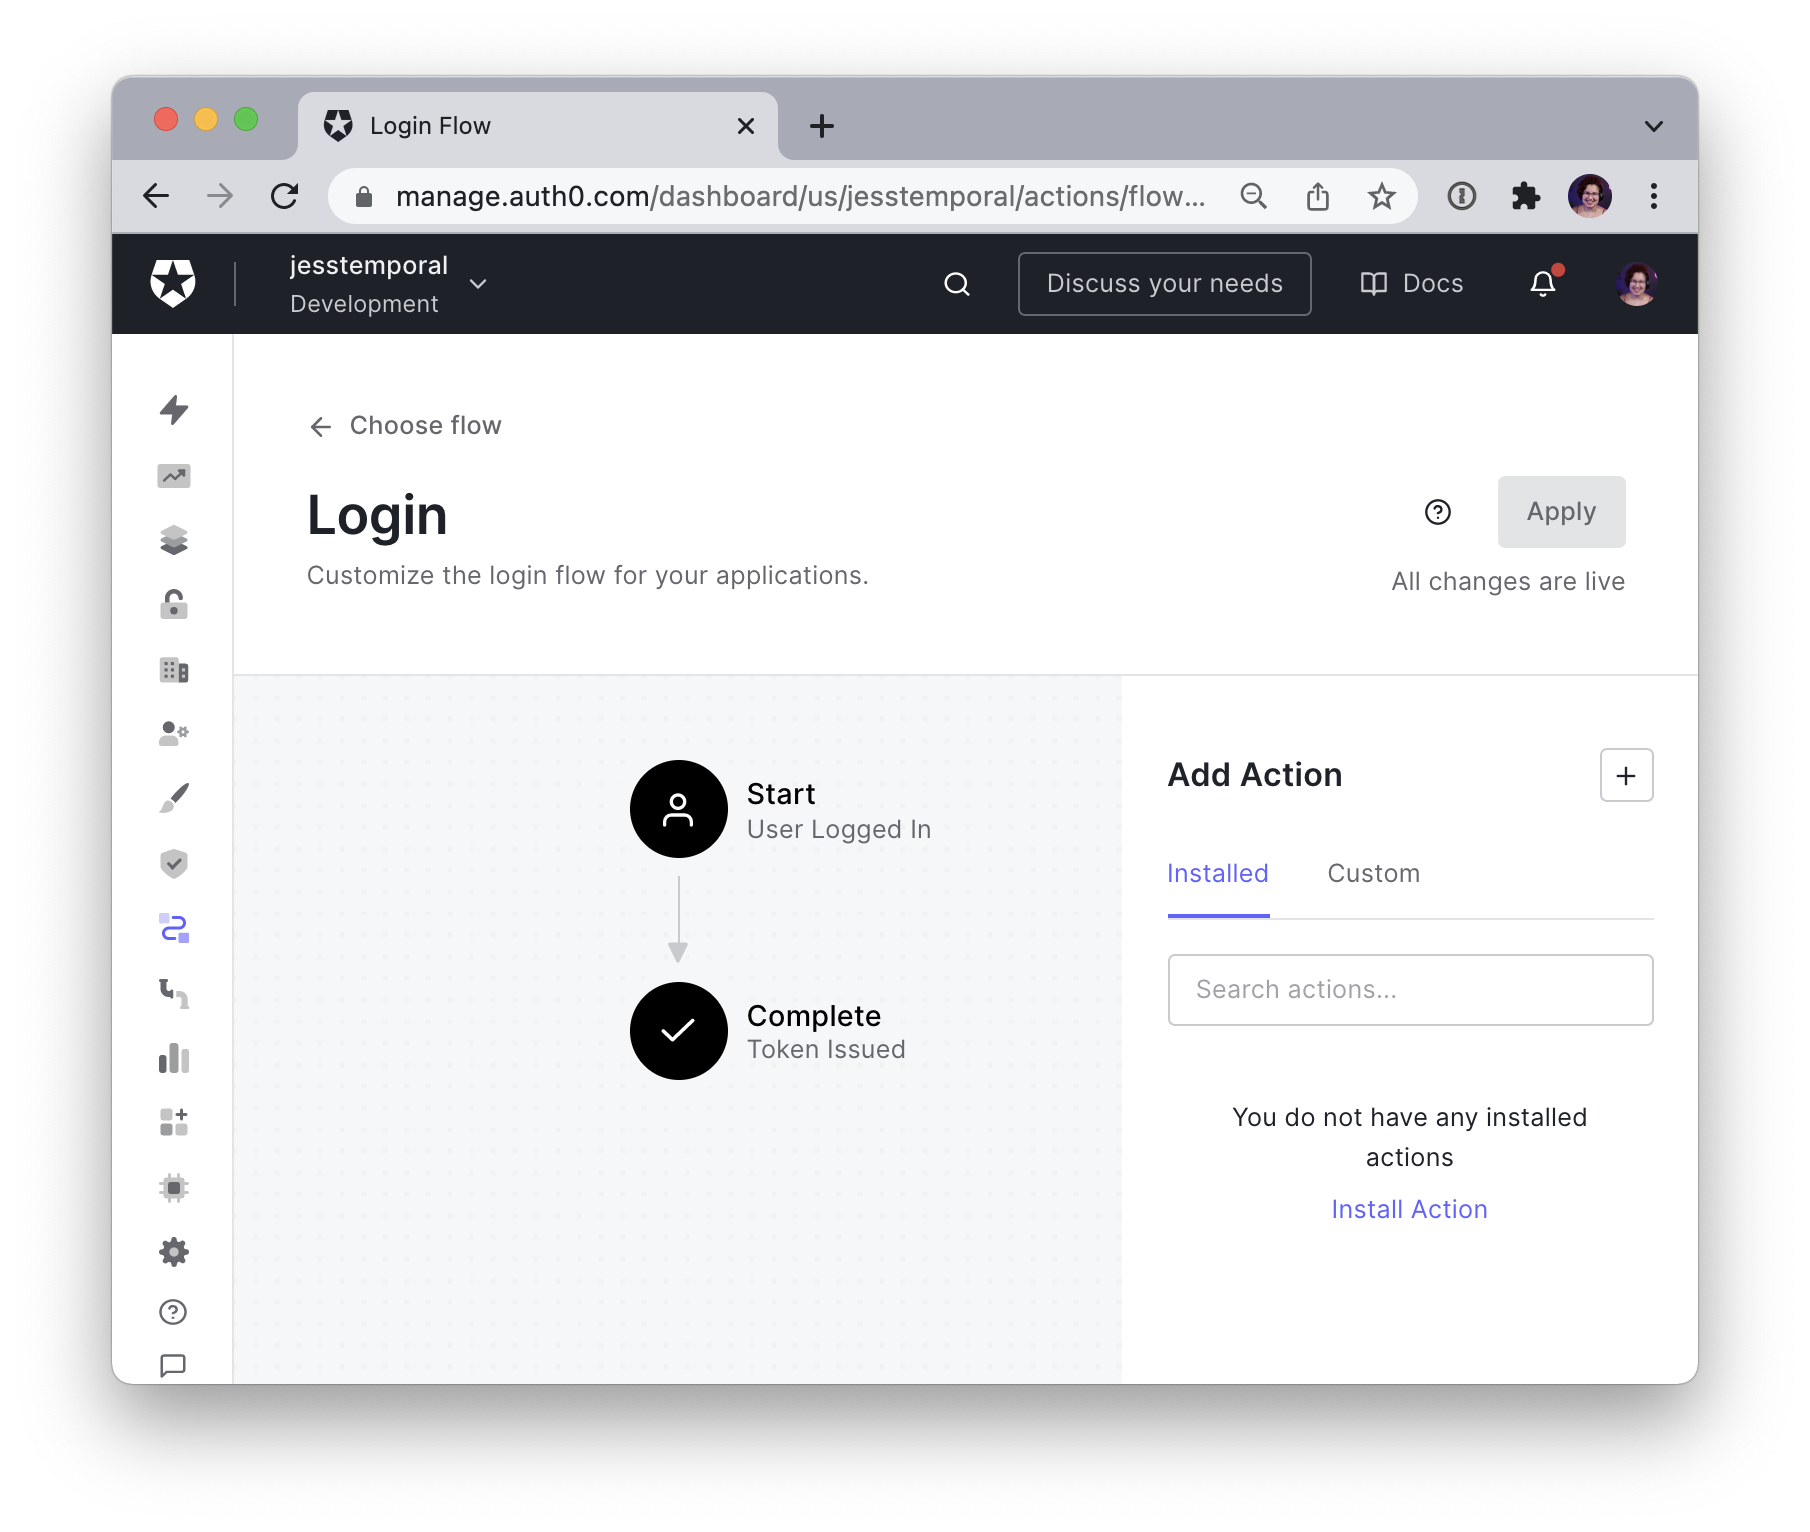
On the right-hand side, you'll see the list of your Actions. The ones that come from the marketplace and the custom ones you implement yourself.
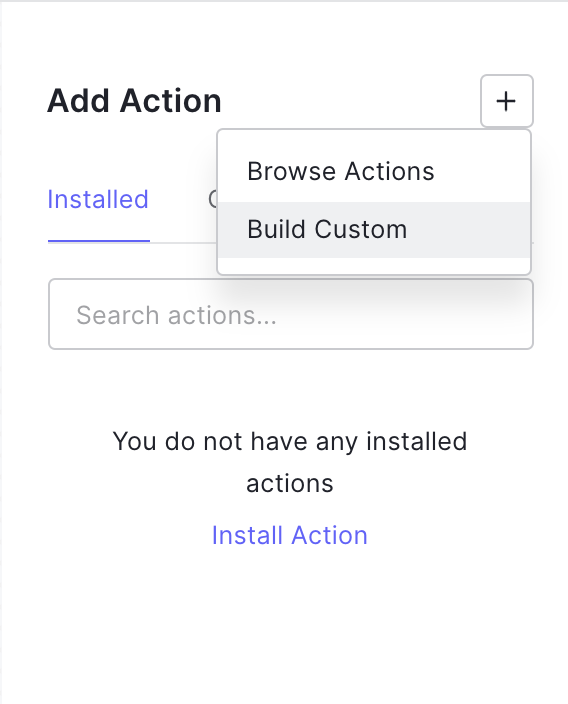
Click on the **+** sign button on the top right-hand corner, and you'll see a menu that will either take you to the marketplace if you select _Browse Actions_ or will allow you to create a new Action if you select _Build Custom_. The latter is the option you'll want. It will then display a _Create Action_ form. Now you can give your Action a name that represents what it does. For example, you could use _"Assign random dog"_ to the action you are creating:
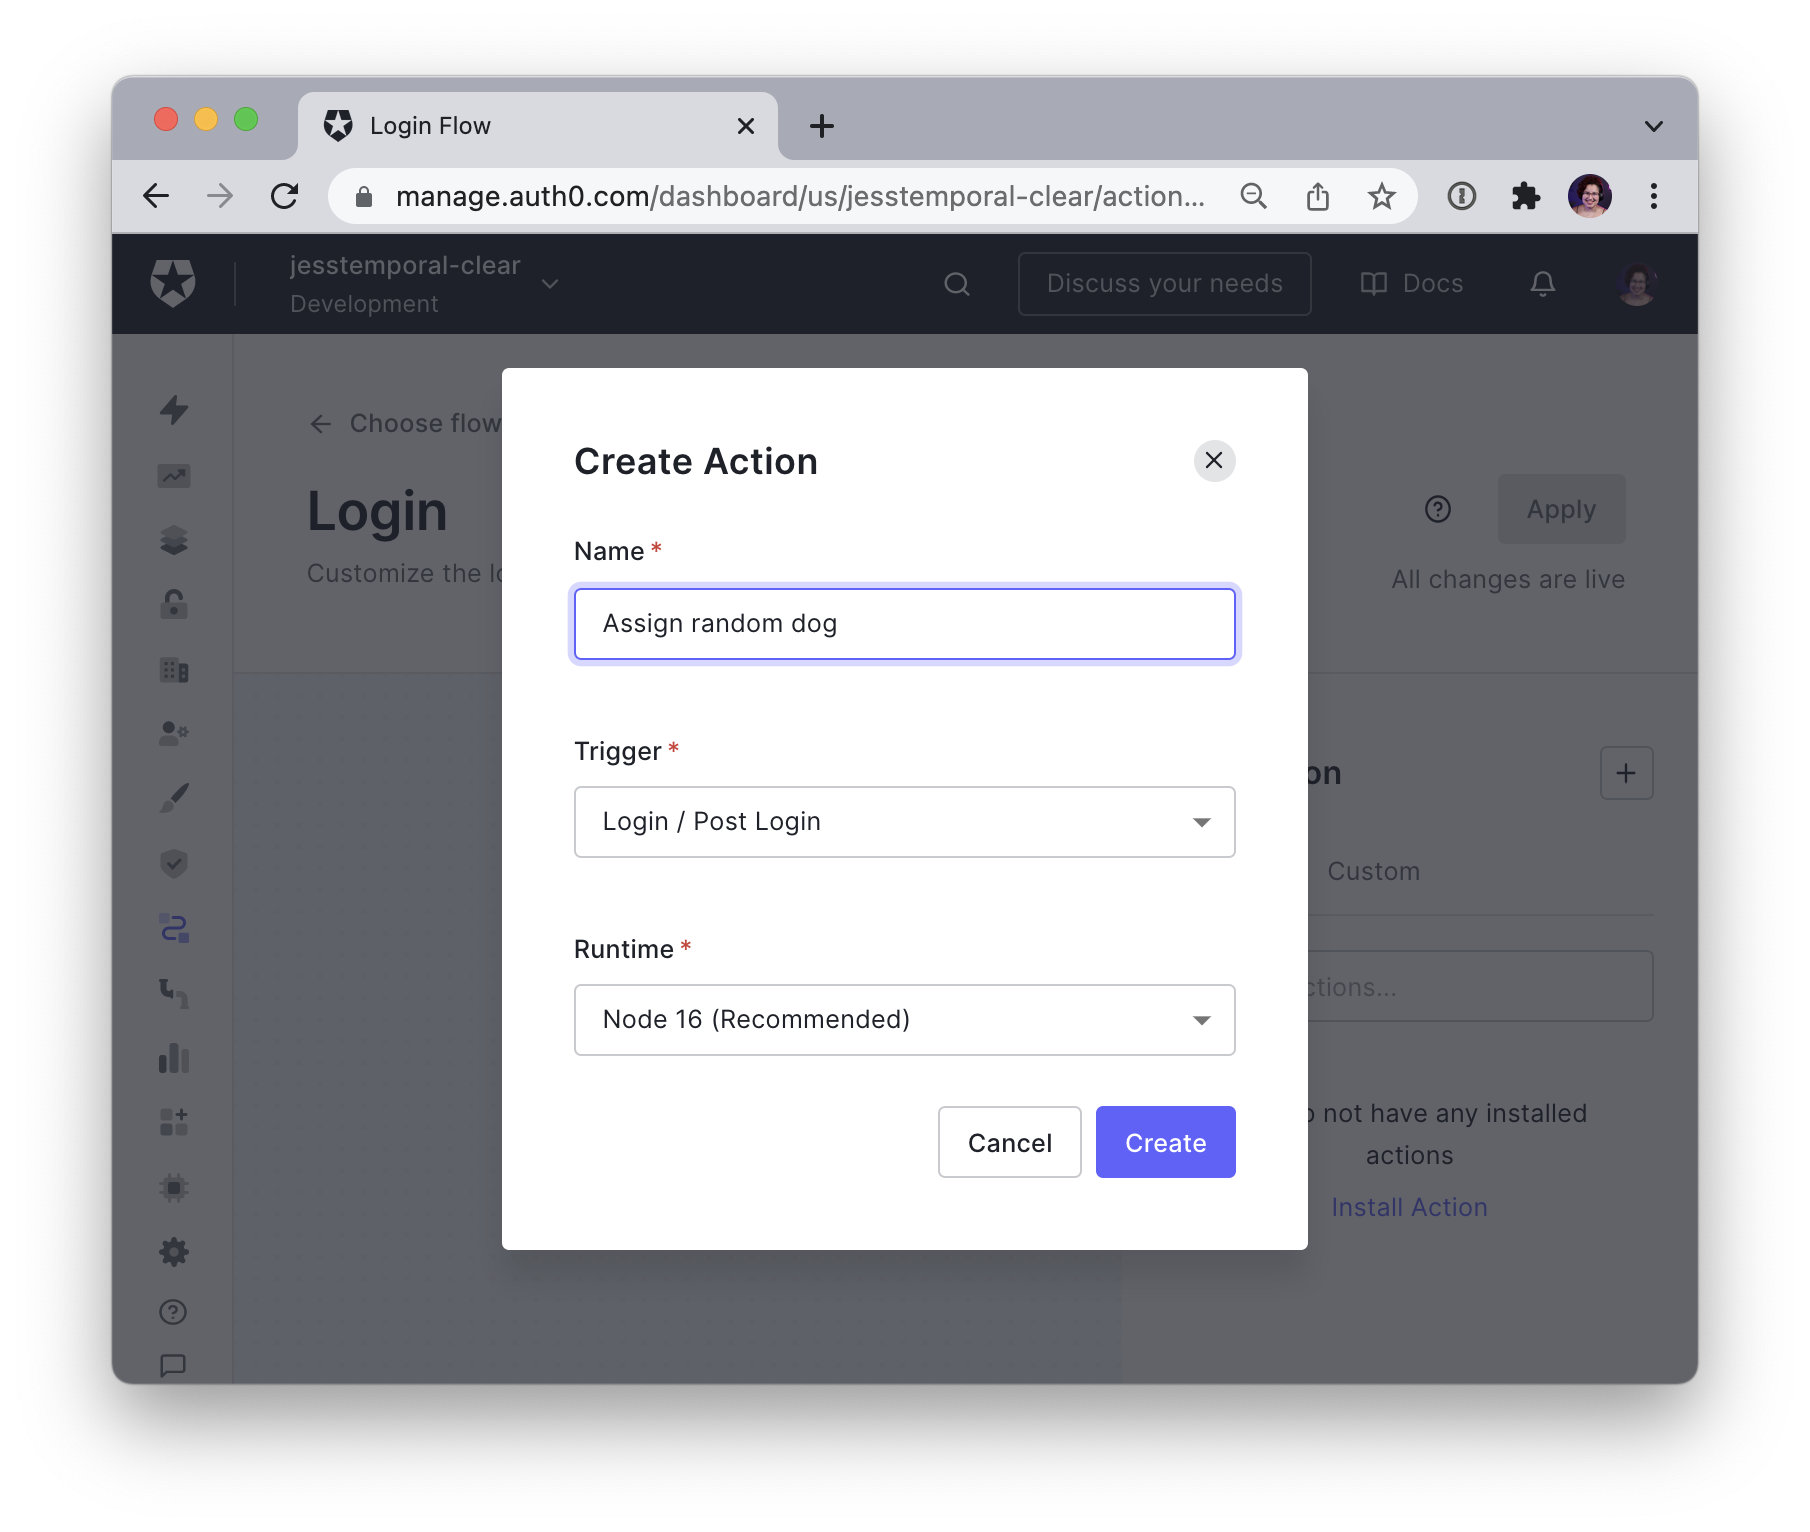
You can keep the default values for the other two fields. These fields define the flow where the action can work, in this case, the _Login Flow_, and which Node.js runtime will be used to run the Action. Click the _Create button_ in the form, this will create your Action, and you will see the in-browser editor.
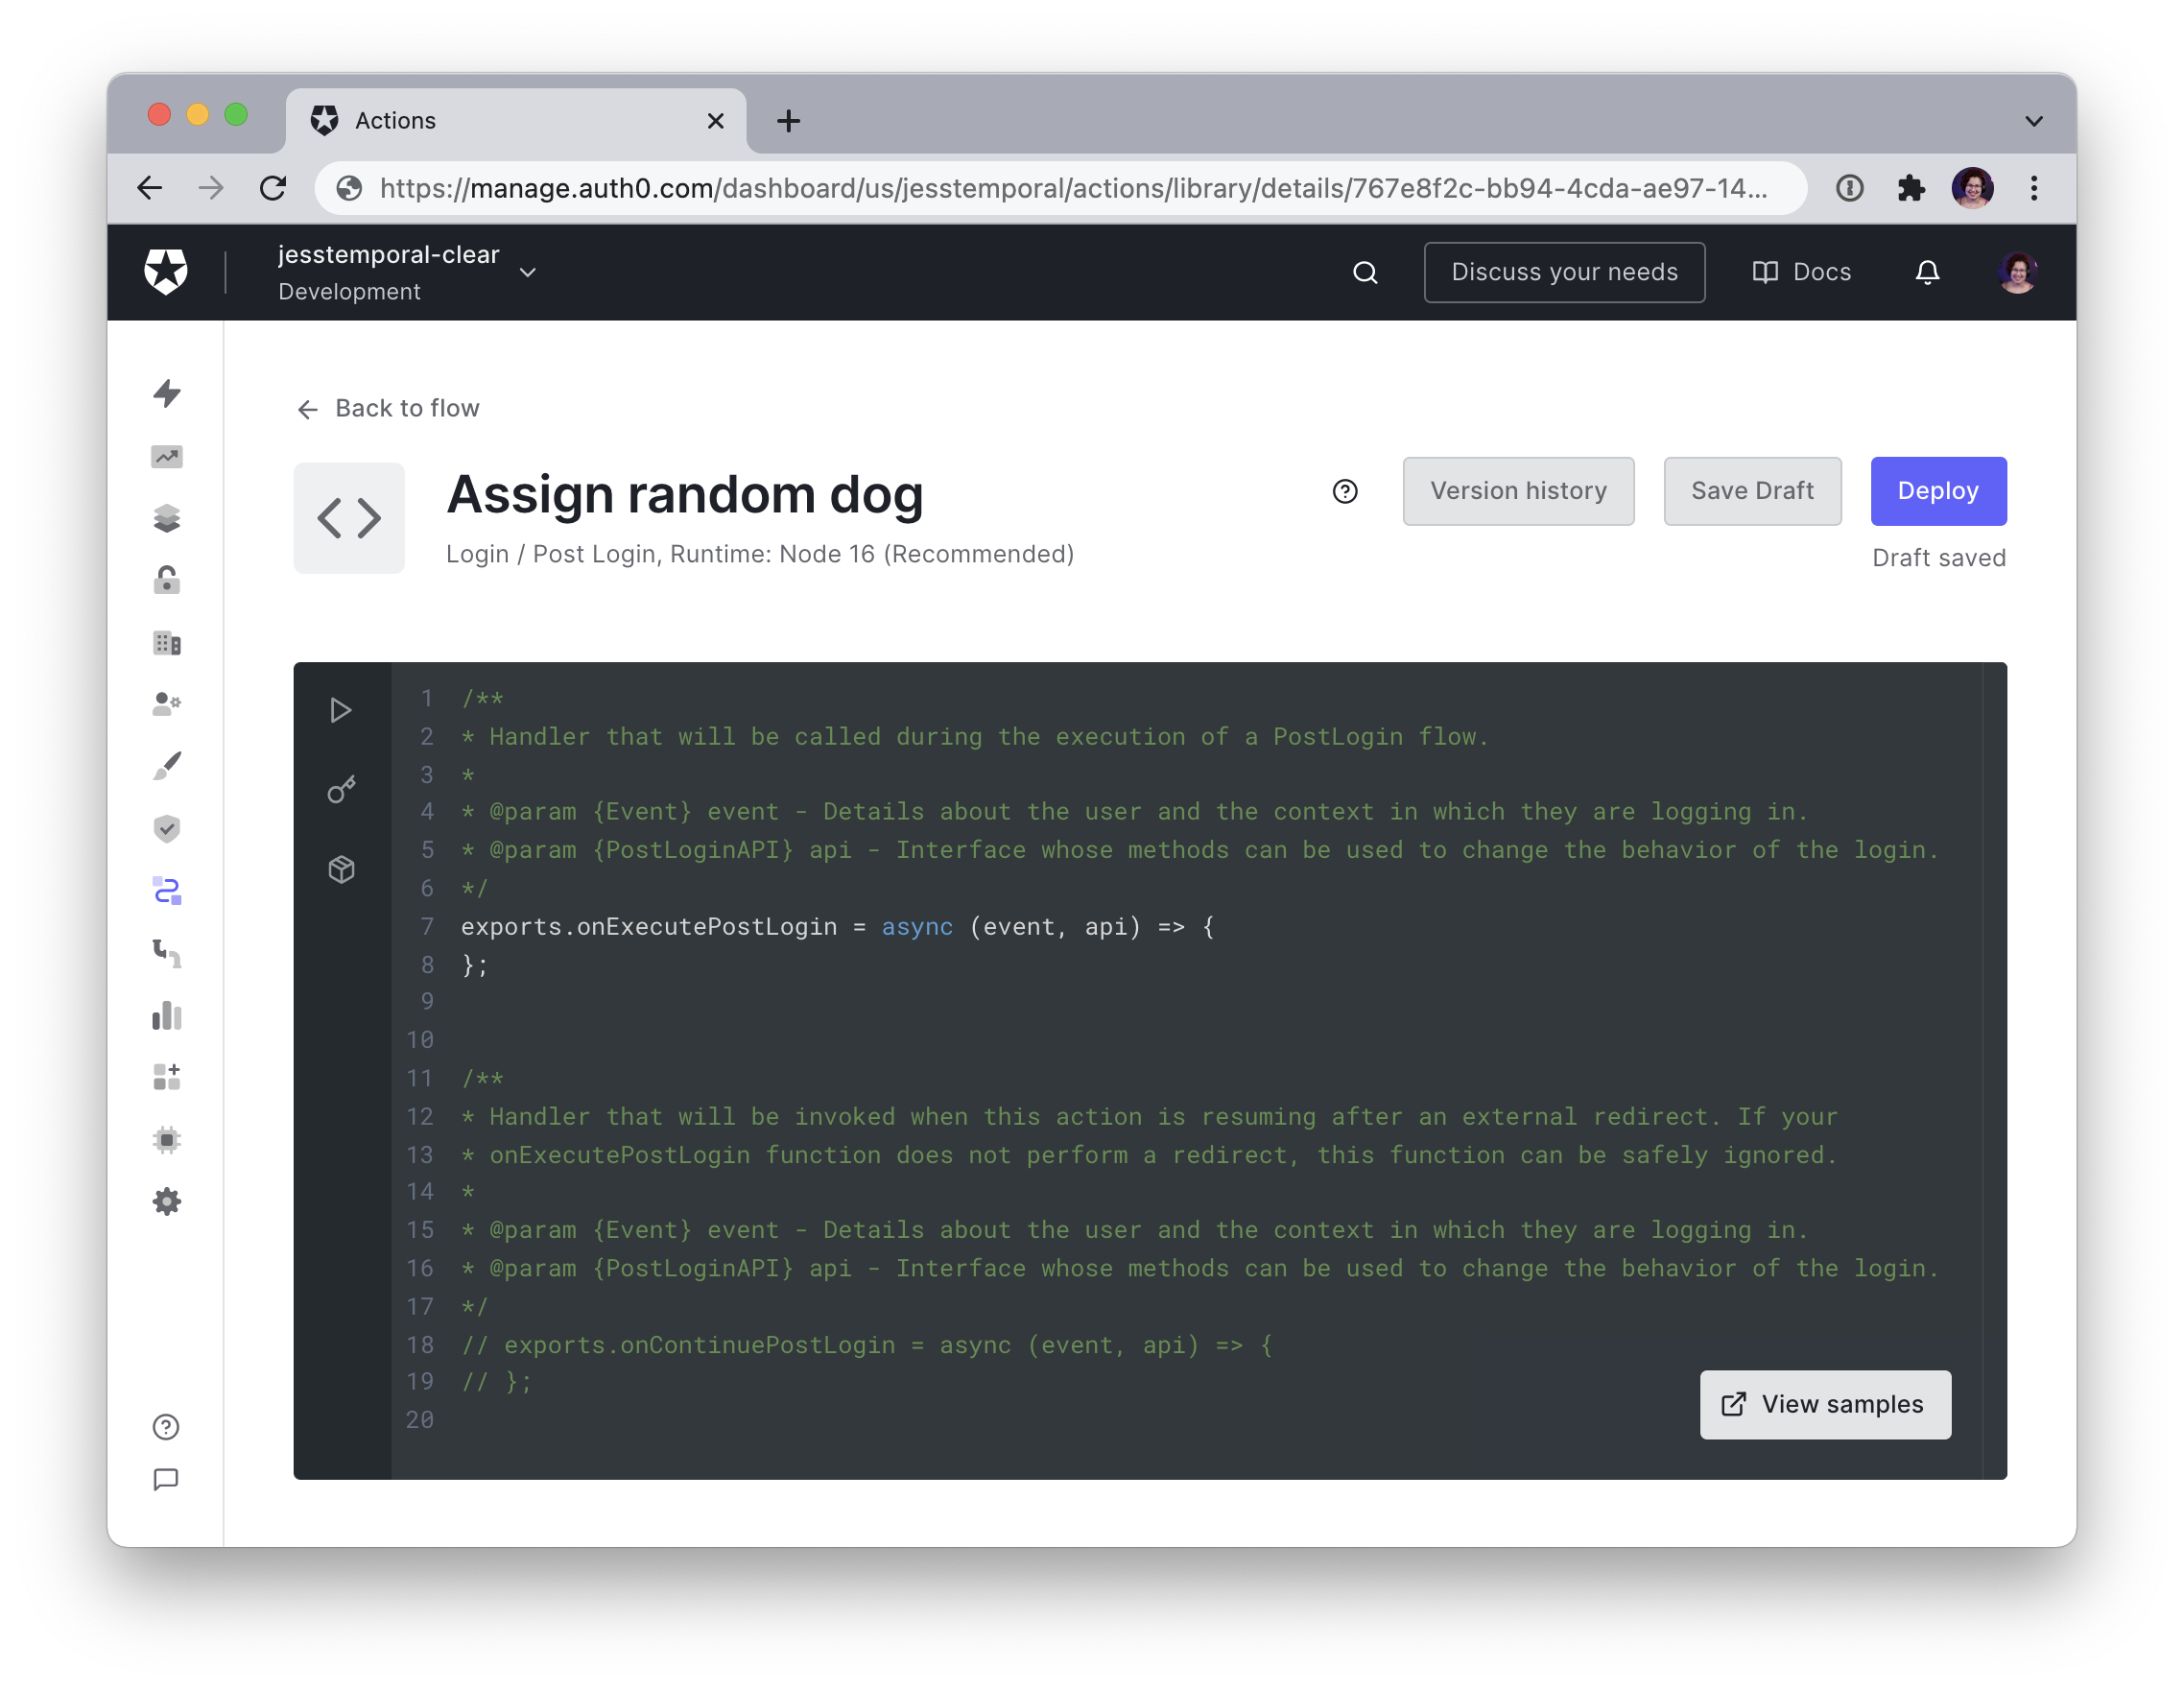
Take a closer look and see the editor already has some code and comments to help you write code for your Action. Let's take a moment to understand what it says.
First of all, since you are editing an Action that will run during login, it can be an event that occurs _post login_ or an event that happens after the user _resumes the login after an external redirect_. For this case, you need a _post-login_ event so you can focus on that part of the code copied below:
```javascript
/**
* Handler that will be called during the execution of a PostLogin flow.
*
* @param {Event} event - Details about the user and the context in which they are logging in.
* @param {PostLoginAPI} api - Interface whose methods can be used to change the behavior of the login.
*/
exports.onExecutePostLogin = async (event, api) => {
};
```
The function `onExecutePostLogin` receives the `event` and the `api` parameters.
The `event` object carries information about the login context, for example, which authorization was granted to the user while logging in. For more details on this, [refer to the post-login `event` object documentation](https://auth0.com/docs/customize/actions/triggers/post-login/event-object).
The `api` object, on the other hand, has methods for changing the behavior of the flow, like denying access to the app if you want more details on this object [refer to the post-login `api` object documentation](https://auth0.com/docs/customize/actions/triggers/post-login/api-object).
For the Action to work, you will also need to install `axios`, an NPM package that will make the request to the _Dog API_ `random` endpoint. A cool feature of Actions is that you can add almost any NPM package as long as it can be installed without relying on native add-ons. So let's do this first and then go back to the code.
Notice that there are three tabs on the left-hand side of the editor:
- The ▶️ icon: where you can run a test suite to see if your action is performing as expected;
- The 🔑 icon: where you can access the secret storage menu;
- The 📦 icon: where you can install NPM modules.
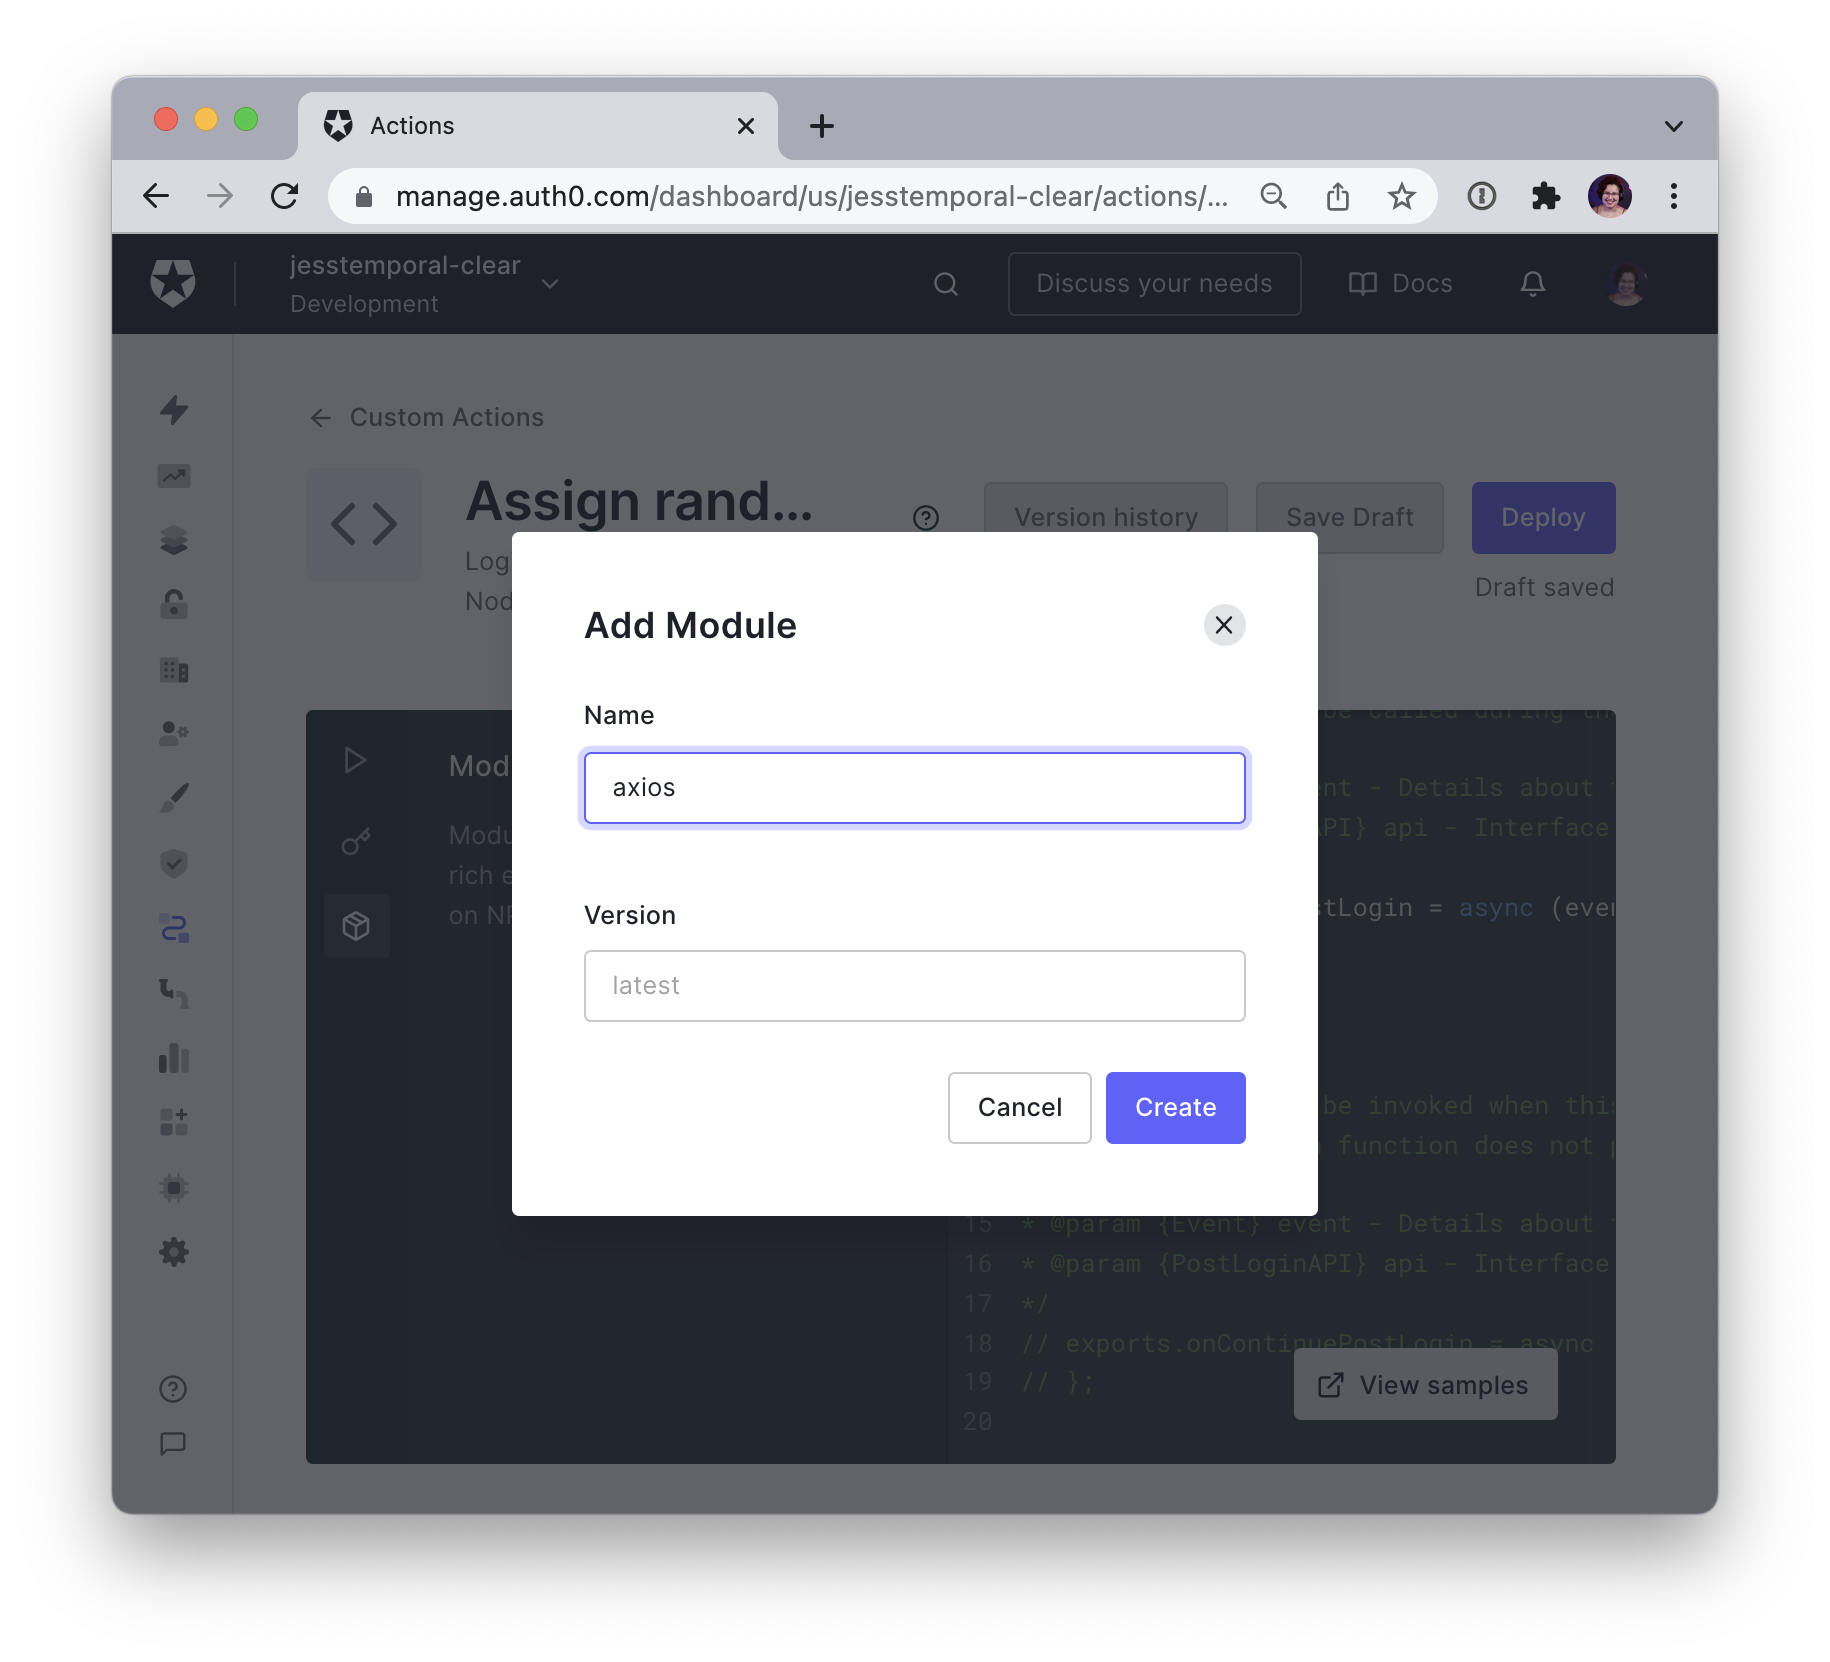
Since you need to install `axios` on the environment for your Action to work properly, click on the 📦 icon, and you'll see a sidebar inside the editor with the _Add Module_ button. Click the _Add Module_ button, and you'll see a form where you can put the name of the module you want to add, like this:
Now `axios` is available for you to use on your action. If you click the 📦 icon, the modules sidebar will be hidden, and you can go back to full editor space. Now substitute the code in the editor with the following code:
```javascript
exports.onExecutePostLogin = async (event, api) => {
const axios = require("axios");
const randomDog = await axios.get("https://dog.ceo/api/breeds/image/random");
if (event.authorization) {
api.idToken.setCustomClaim("https://dogfy.com/random_dog", randomDog.data.message);
}
};
```
Inside the function, the logic is as follows:
1. First, you import the `axios` package into the variable `axios` so you can use it;
1. Second, you make a `GET` request to the `random` endpoint of the Dog API and restore the resulting response in the `randomDog` variable;
1. Finally, if the event is an _authorization_ flow, you use the `api.idToken.setCustomClaim` to create your custom claim.
The third and last step uses the `setCustomClaim` method to create the custom claim and give it the value returned from the Dog API. There are two important things to notice here:
1. The first one is that your custom claim name should always try to avoid clashes with standard claims, one way to achieve this is by using the URI format to name that claim. For example, here, we used `"https://dogfy.com/" + "random_dog"` to set the name of your claim, and the URL doesn't even need to be a real-life URL. [You can read more about naming custom claims here](https://auth0.com/docs/secure/tokens/json-web-tokens/create-namespaced-custom-claims).
2. The second thing to notice is that to access the URL for the dog picture, you use `randomDog.data.message` because the JSON containing the URL is located inside `data` on the response structure.
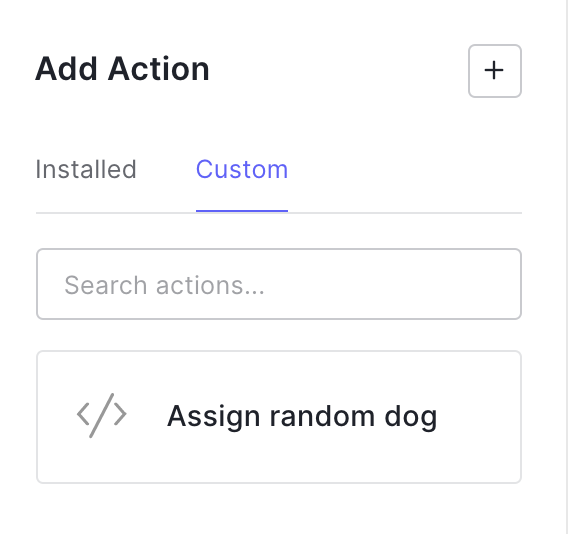
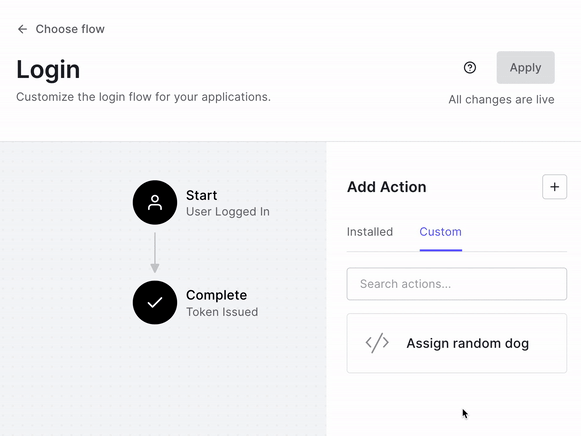
Now that you've got your code, you can go ahead and click the *Deploy* button on the top left corner, which will save the Action and make it available for use. After deploying your Action, you need to go back to the flow to add it. On the right-hand main menu, choose _Actions_, then _Flows_, and pick the _Login_ flow; now, if you look at your _Add action_ section, and if you click on the _Custom_ tab, you should see your Action in there:
With that said, it is time to drag your Action, drop it on the Flow, and don't forget to click _Apply_ to make your Action part of your _Login_ flow.
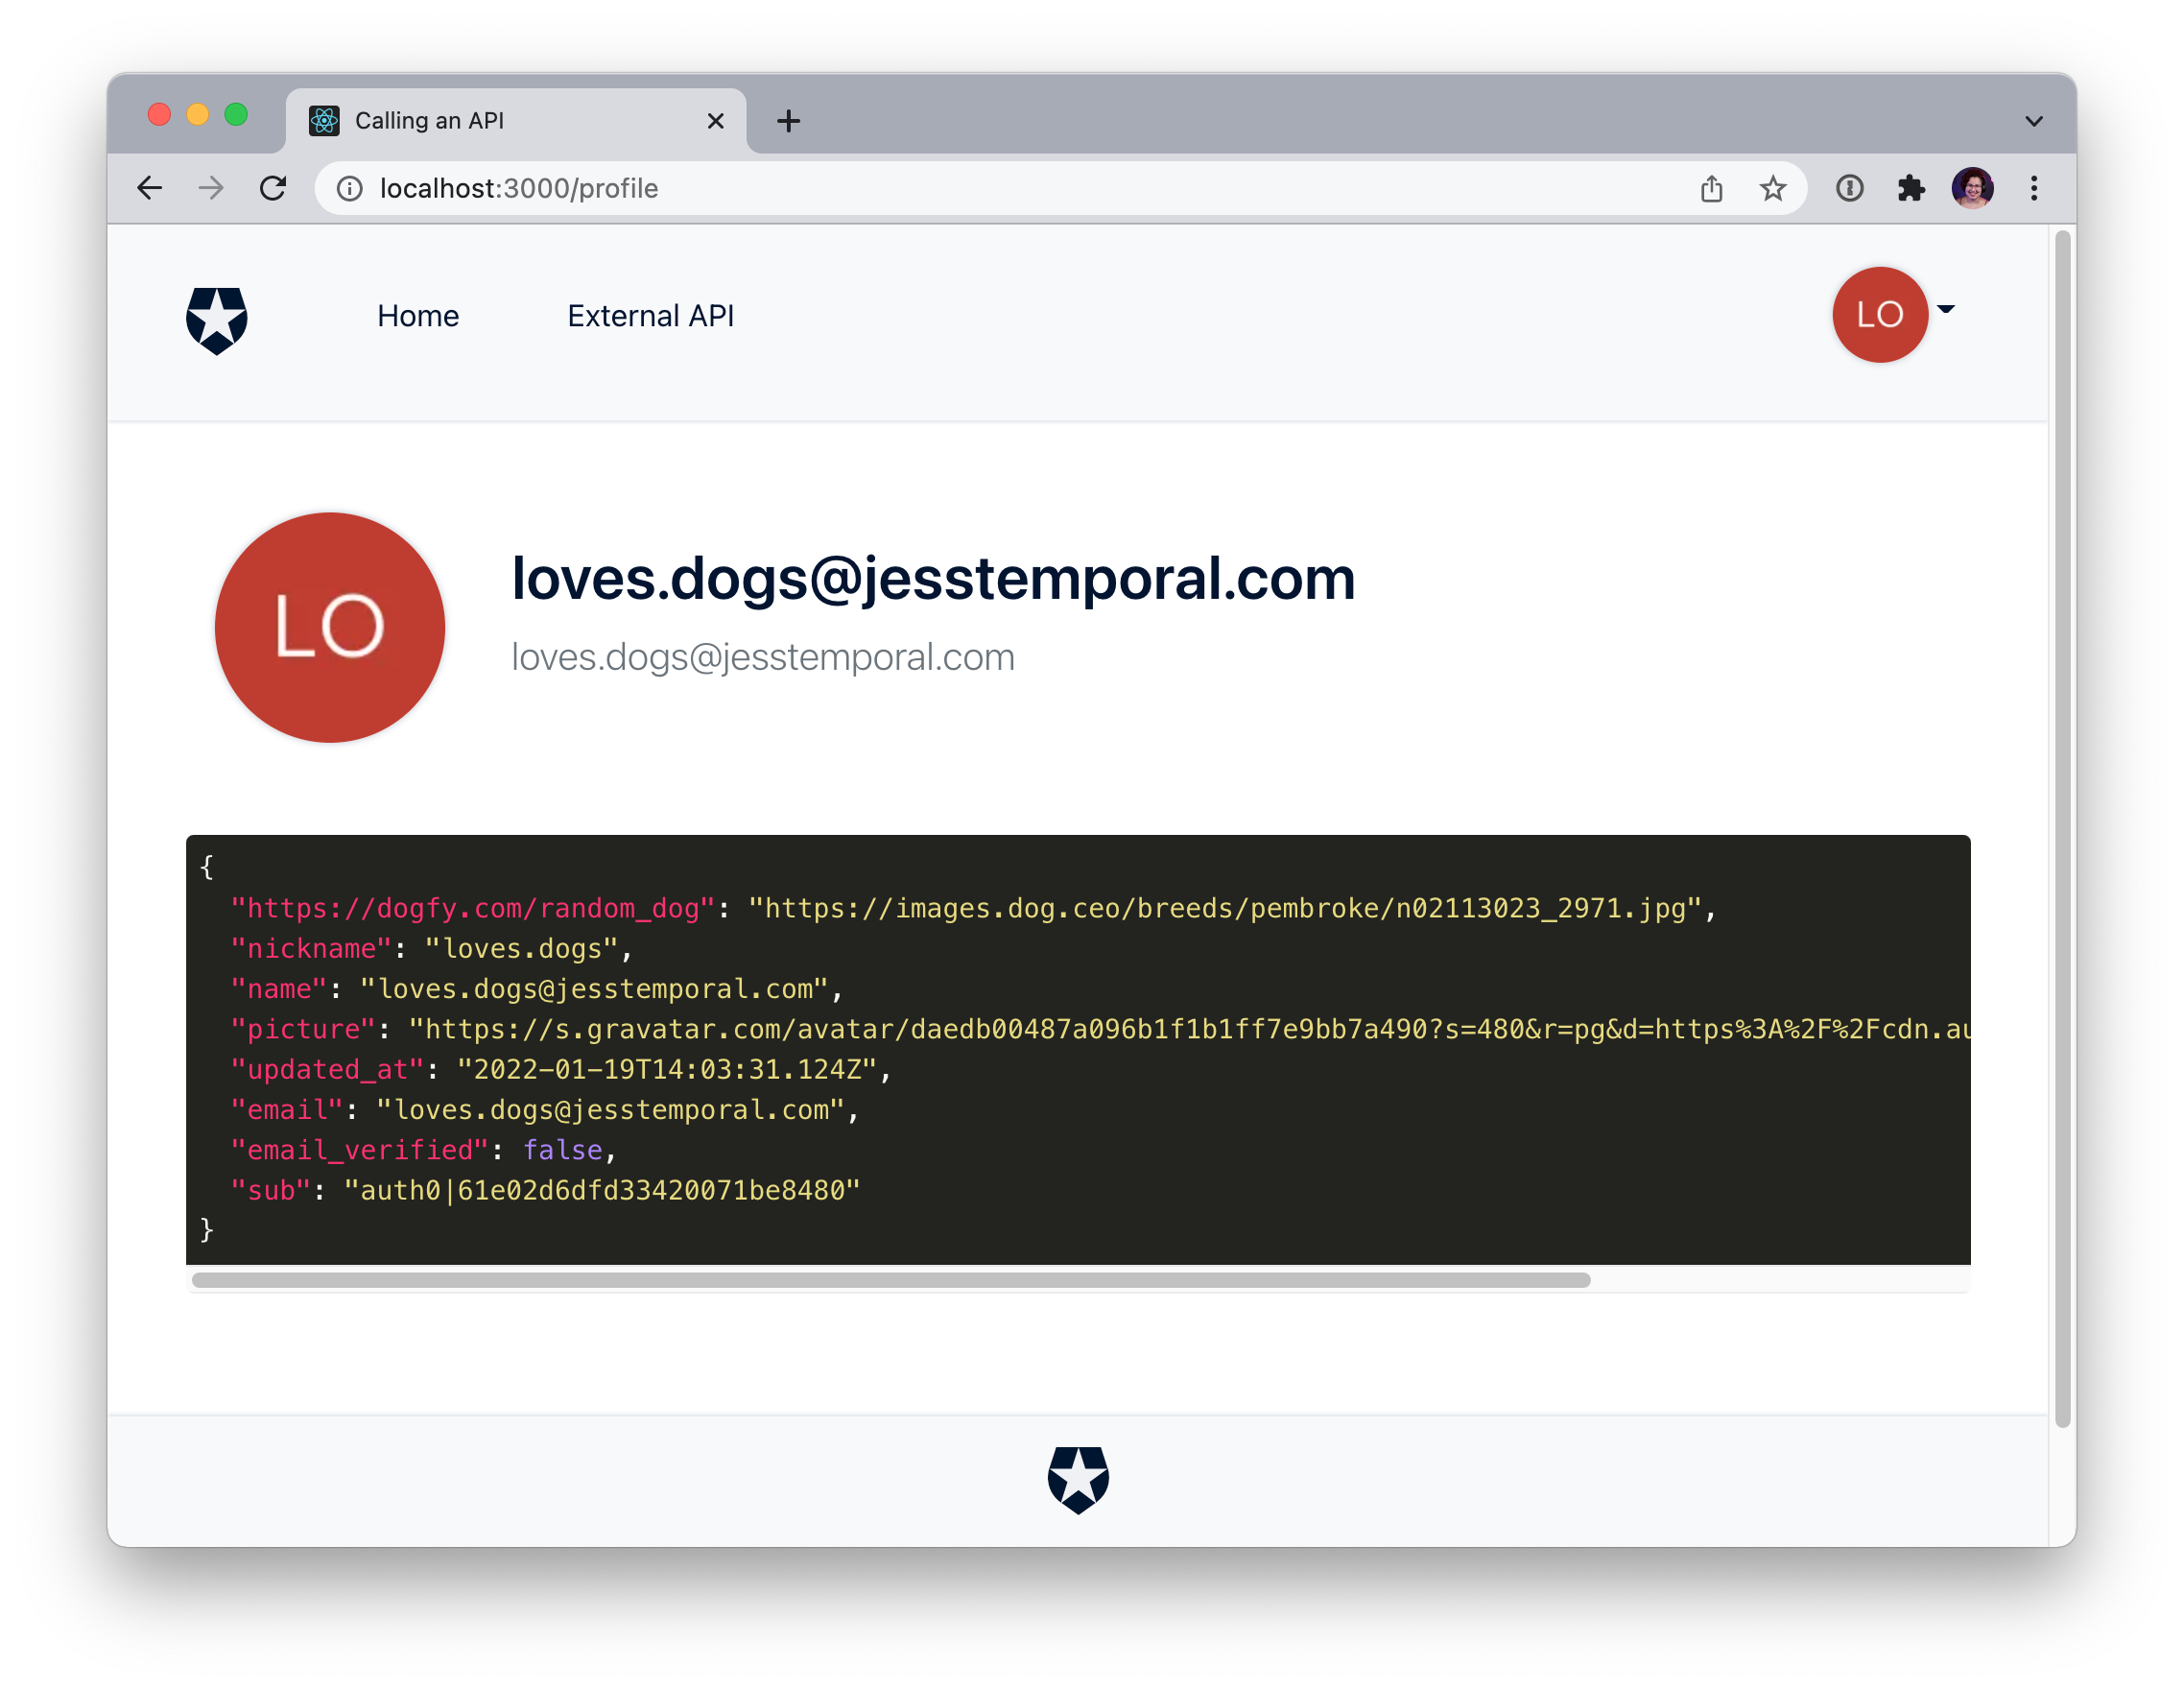
You can test to see if the change worked by logging out of your application then logging back in once more. You should see on the _Profile_ page that the ID token content was updated and the new custom claim is there:
## Updating Your Application to Use the Custom Claim
Now that we have the URL for the dog picture is time to update the profile page to display it. Let's see how to do that.
> Since the sample application is built with React, the steps described in this subsection are strictly related to this library. This step aims to update the profile page to display a cute dog picture, so feel free to adapt this step to your needs.
On the project source code, navigate to the file `Profile.js` inside `src/views` directory. Then add the code highlighted below:
```javascript
import React from "react";
import { Container, Row, Col } from "reactstrap";
import Highlight from "../components/Highlight";
import Loading from "../components/Loading";
import { useAuth0, withAuthenticationRequired } from "@auth0/auth0-react";
export const ProfileComponent = () => {
// ...existing code...
{JSON.stringify(user, null, 2)}
// 👇 new code
{user["https://dogfy.com/random_dog"] &&
Our Doggy!
}
// 👆 new code
);
};
// ...existing code...
```
This code will add a picture from the ID token to the profile page whenever there is a `"https://dogfy.com/random_dog"` claim. Your page should automatically reload itself and display the current dog picture:

With that done, your application is ready. 🎉 Congratulations!
You can check out [the complete code changes, access this link](https://github.com/auth0-blog/assign-random-dog/tree/profile-page-updated) or switch to the branch `profile-page-updated` on your sample app.
## Recap
You just implemented a brand new Action to be used during the Login flow 🎉. Let's recap what you've learned:
1. You set up a SPA using Auth0;
1. You learned what Actions are and how you can use them to expand Auth0's functionalities;
1. You implemented an Action that makes a call to an external API, and that creates a custom claim with data from the response;
1. Finally, you deployed that custom action and updated your app to use the custom claim.
Keep in mind that this was a colorful way to show how you can use Actions to make a call to an external resource and add a custom claim on the user's ID token. Now you can let your imagination fly and use the knowledge you acquired today to add useful information to your user's ID tokens.
Are you ready to add more custom claims to your user's ID tokens? Let me know in the comments 😉.