---
title: "Adding authentication to your React Flux app"
description: "ReactJS authentication gets easy if you understand just a few basic concepts. Because, let’s face it. React is the new cool kid on the block."
authors:
- name: "Martin Gontovnikas"
url: "https://auth0.com/blog/authors/martin-gontovnikas/"
date: "Apr 9, 2015"
category: "Developers,Tutorial,React"
tags: ["featured", "react", "flux", "login", "authentication", "authorization", "store", "action", "dispatcher"]
url: "https://auth0.com/blog/adding-authentication-to-your-react-flux-app/"
---
# Adding authentication to your React Flux app
---
**TL;DR**: You can check out a React Flux app with authentication implemented in [this Github repository](https://github.com/auth0/react-flux-jwt-authentication-sample)
---
Let’s face it. [React](https://facebook.github.io/react/) is the new cool kid on the block. Everybody is working on creating React components because it entails understanding just 2 basic concepts:
* A component is just a function
* Single-direction data flow
However, once you start creating a bigger app, you realize that just using React isn’t enough. So you start looking at [Flux](https://facebook.github.io/flux/), which is the architecture Facebook uses to create React apps.
As we learned in a previous blog post, learning how to conduct authentication in a Single Page App can get super complex. We had to learn about tokens, [JWTs](http://jwt.io/) and how to integrate them with SPAs. Learning how to do it with Flux is even harder! That’s why in this blogpost we’ll learn how to add authentication to a React Flux app.

## Before we start
We’ll be coding our React app using ES6 thanks to [Browserify](http://browserify.org/) and [Babelify](https://github.com/babel/babelify), and we’ll be using npm for build tools and installing dependencies. If you want to start a project with the same architecture, just clone [this seed project](https://github.com/auth0/react-browserify-spa-seed).
## Coding ReactJS Authentication!
### Login page
#### The Login component
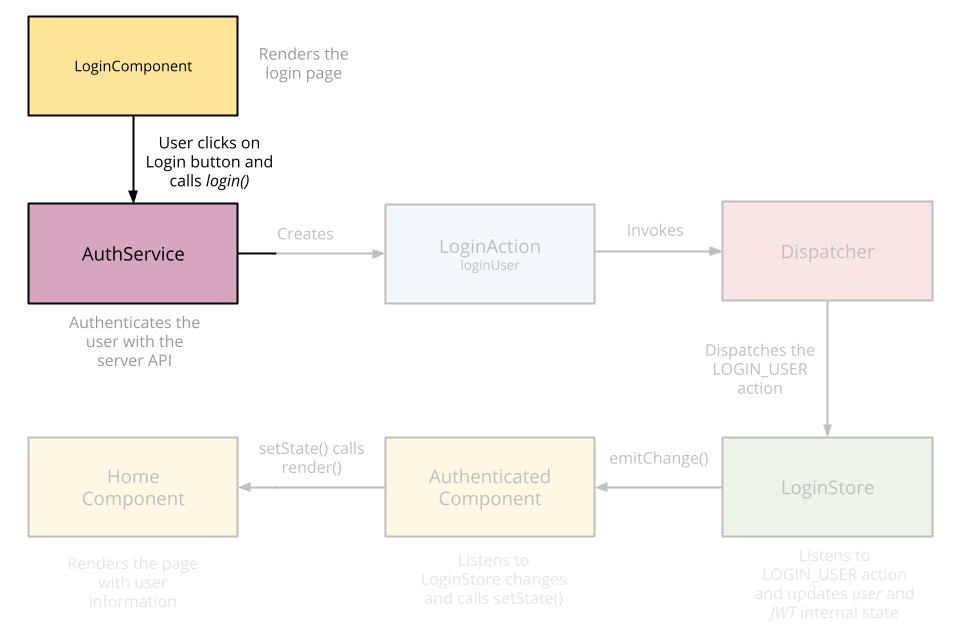
First, let’s create our `Login` component. Its main function is rendering an input for the username and password and calling the `AuthService` when the user clicks on the login button.
```jsx
// ... imports
export default class Login extends React.Component {
constructor() {
this.state = {
user: ‘’,
password: ‘’
};
}
// This will be called when the user clicks on the login button
login(e) {
e.preventDefault();
// Here, we call an external AuthService. We’ll create it in the next step
Auth.login(this.state.user, this.state.password)
.catch(function(err) {
console.log(“Error logging in”, err);
});
}
render() {
return (
);
}
}
// We’re using the mixin `LinkStateMixin` to have two-way databinding between our component and the HTML.
reactMixin(Login.prototype, React.addons.LinkedStateMixin);
```
#### The AuthService & the LoginAction

Our AuthService is in charge of calling our [login API](https://github.com/auth0/nodejs-jwt-authentication-sample/blob/master/user-routes.js#L37-L54). The server will validate the username and password and return a token [(JWT)](http://jwt.io/) back to our app. Once we get it, we’ll create a [LoginAction](https://facebook.github.io/flux/docs/todo-list.html#creating-semantic-actions) and send it to all the [Stores](https://facebook.github.io/flux/docs/todo-list.html#creating-stores) using the [Dispatcher](https://facebook.github.io/flux/docs/todo-list.html#creating-a-dispatcher) from Flux.
```jsx
// AuthService.js
// ... imports
class AuthService {
login(username, password) {
// We call the server to log the user in.
return when(request({
url: ‘http://localhost:3001/sessions/create',
method: ‘POST’,
crossOrigin: true,
type: ‘json’,
data: {
username, password
}
}))
.then(function(response) {
// We get a JWT back.
let jwt = response.id_token;
// We trigger the LoginAction with that JWT.
LoginActions.loginUser(jwt);
return true;
});
}
}
export default new AuthService()
```
```js
// LoginAction.js
// ... imports
export default {
loginUser: (jwt) => {
// Go to the Home page once the user is logged in
RouterContainer.get().transitionTo(‘/‘);
// We save the JWT in localStorage to keep the user authenticated. We’ll learn more about this later.
localStorage.setItem(‘jwt’, jwt);
// Send the action to all stores through the Dispatcher
AppDispatcher.dispatch({
actionType: LOGIN_USER,
jwt: jwt
});
}
}
```
You can take a look at the router configuration [on Github](https://github.com/auth0/react-flux-jwt-authentication-sample/blob/gh-pages/src/app.jsx#L11-L29), but it’s important to note that once the `LoginAction` is triggered, the user is successfully authenticated. Therefore, we need to redirect him or her from the Login page to the Home. That’s why we’re adding the URL transition in here.
#### The LoginStore
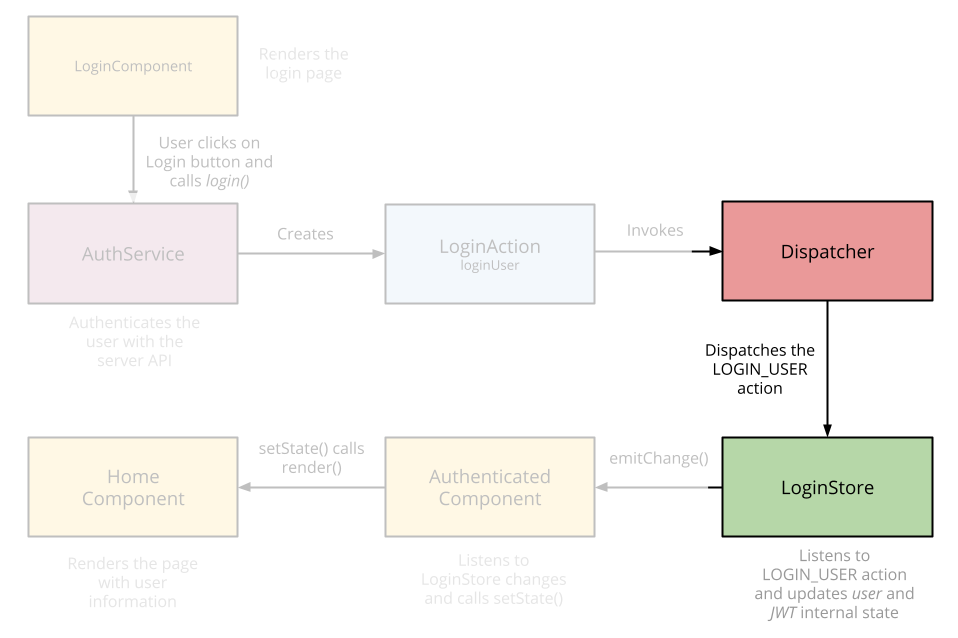
The LoginStore, like any other store, has 2 functions:
* It holds the data it gets from the actions. In our case, that data will be used by all components that need to display the user information.
* It inherits from `EventEmmiter`. It’ll emit a change event every time its data changes so that Components can be rendered again.
```jsx
// ... imports
class LoginStore extends BaseStore {
constructor() {
// First we register to the Dispatcher to listen for actions.
this.dispatchToken = AppDispatcher.register(this._registerToActions.bind(this));
this._user = null;
this._jwt = null;
}
_registerToActions(action) {
switch(action.actionType) {
case USER_LOGGED_IN:
// We get the JWT from the action and save it locally.
this._jwt = action.jwt;
// Then we decode it to get the user information.
this._user = jwt_decode(this._jwt);
// And we emit a change to all components that are listening.
// This method is implemented in the `BaseStore`.
this.emitChange();
break;
default:
break;
};
}
// Just getters for the properties it got from the action.
get user() {
return this._user;
}
get jwt() {
return this._jwt;
}
isLoggedIn() {
return !!this._user;
}
}
export default new LoginStore();
```
> You can take a look at the `BaseStore` [in Github](https://github.com/auth0/react-flux-jwt-authentication-sample/blob/gh-pages/src/stores/BaseStore.js). It includes some utility methods that all stores will have.
### Displaying the user information
#### Creating an Authenticated component
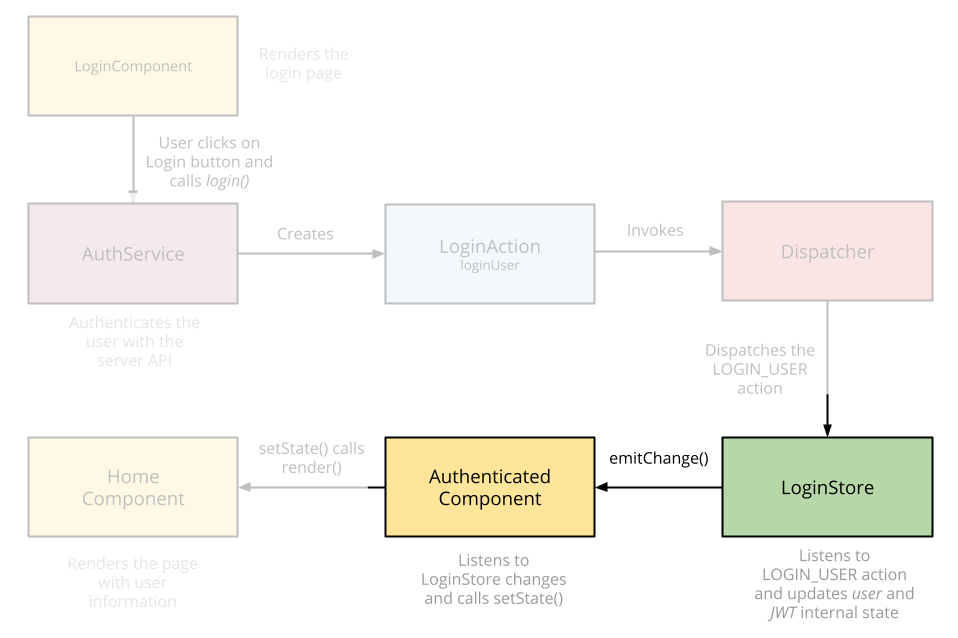
Now, we can start creating components that require authentication. For that, we’ll create a wrapper (or decorator) component called `AuthenticatedComponent`. It’ll make sure the user is authenticated before displaying its content. If the user isn’t authenticated, it’ll redirect him or her to the Login page. Otherwise, it’ll send the user information to the component it’s wrapping:
```jsx
// ... imports
export default (ComposedComponent) => {
return class AuthenticatedComponent extends React.Component {
static willTransitionTo(transition) {
// This method is called before transitioning to this component. If the user is not logged in, we’ll send him or her to the Login page.
if (!LoginStore.isLoggedIn()) {
transition.redirect(‘/login’);
}
}
constructor() {
this.state = this._getLoginState();
}
_getLoginState() {
return {
userLoggedIn: LoginStore.isLoggedIn(),
user: LoginStore.user,
jwt: LoginStore.jwt
};
}
// Here, we’re subscribing to changes in the LoginStore we created before. Remember that the LoginStore is an EventEmmiter.
componentDidMount() {
LoginStore.addChangeListener(this._onChange.bind(this));
}
// After any change, we update the component’s state so that it’s rendered again.
_onChange() {
this.setState(this._getLoginState());
}
componentWillUnmount() {
LoginStore.removeChangeListener(this._onChange.bind(this));
}
render() {
return (
);
}
}
};
```
An interesting pattern is used here.
First, take a look at what we’re exporting. We’re exporting a function that receives a Component as a parameter and then returns a new Component that wraps the one that was sent as an argument.
Next, take a look at the `render` method. There, we’re rendering the Component we received as a parameter. Besides the `props` it should receive, we’re also sending it all the user information so it can use those properties.
Now, let’s create the Home component which will be wrapped by the `AuthenticatedComponent` we’ve just created.
#### Home Page
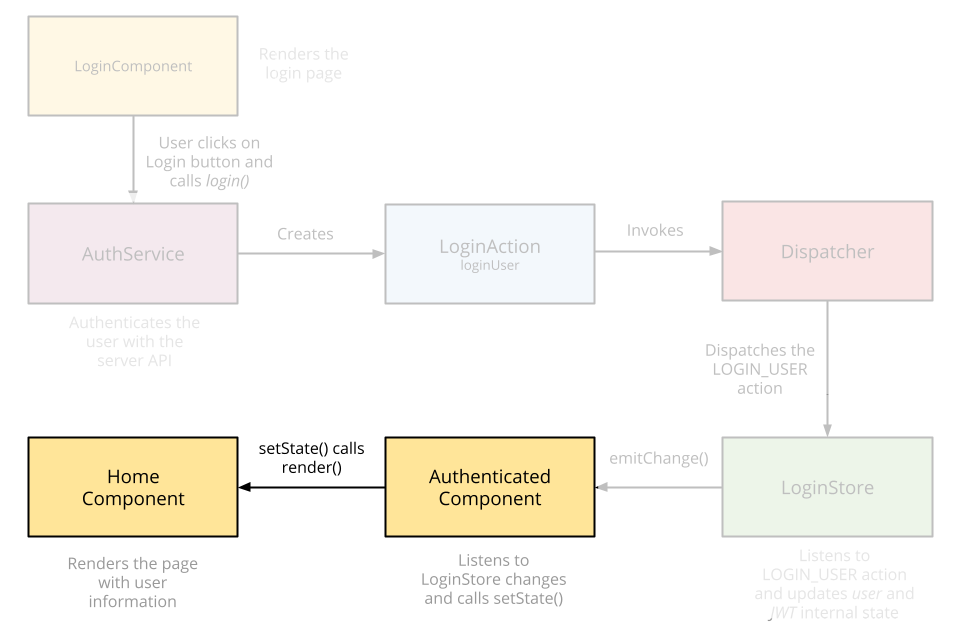
The `Home` will display user information. As it’s wrapped by the `AuthenticatedComponent`, we can be sure of 2 things:
* Once the `render` method is called on the `Home` component, we know the user is authenticated. Otherwise, the app would have redirected him to the `Login` page.
* We know we’ll have the user information under `props` because we’ve received them from the `AuthenticatedComponent`
```jsx
// ... imports
// We’re wrapping the home with the AuthenticatedComponent
export default AuthenticatedComponent(class Home extends React.Component {
render() {
// Here, we display the user information
return (Hello {this.props.user.username}
);
}
});
```
### Let’s call an API!
Now, you should be able to call an API. In order to call an API that requires authentication, you must send the JWT we received on Login in the `Authorization` header. Any `AuthenticatedComponent` has access to this JWT so you can do something as follows:
```jsx
// Home.jsx
// It must be on an AuthenticatedComponent
callApi() {
fetch(‘http://example.com/my-cool-url', {
method: ‘GET’,
headers: {
Authorization: ‘Bearer ‘ + this.props.jwt
}
}
```
### Keeping the user authenticated
Now that the user is authenticated, we want to keep him or her authenticated instead of showing the login page every time he refreshes the website.
Due to the fact we’re saving the JWT on `localStorage` after a successful authentication, we can manually trigger the `LoginAction` and everything will work. That’s the beauty of using Flux.
```js
// app.jsx ==> Bootstrap file
let jwt = localStorage.getItem(‘jwt’);
if (jwt) {
LoginActions.loginUser(jwt);
}
```
## Closing remarks
We’ve finished implementing the Login for a React Flux app. If you want to know how to implement a signup or if you want to see the full example at work, you can [grab the code from Github](https://github.com/auth0/react-flux-jwt-authentication-sample).
Happy Hacking! :).