---
title: "A Look at Android ML Kit - the Machine Learning SDK"
description: "Learn about the different APIs available in Google's ML Kit (mobile machine learning SDK). You will also learn how to create an application that uses one of its APIs."
authors:
  - name: "Joyce Echessa"
    url: "https://auth0.com/blog/authors/joyce-echessa/"
date: "Dec 21, 2021"
category: "AI"
tags: ["artificial-intelligence", "android", "ai", "mobile", "firebase", "google-io", "machine-learning", "java", "developers"]
url: "https://auth0.com/blog/a-look-at-android-ml-kit-the-machine-learning-sdk/"
---

# A Look at Android ML Kit - the Machine Learning SDK


*TL;DR: In today's fast-moving, information-rich world, it is becoming more necessary to build applications that are intelligent in the way they process the data they are fed. Artificial Intelligence is quickly becoming an essential tool in software development. In this article, we will look at the [ML Kit mobile SDK](https://developers.google.com/ml-kit/) that brings all the Google’s expertise on machine learning techniques to mobile developers in an easy-to-use package. We will look at the various APIs offered by the SDK, and then we will take one of the APIs on a test drive by creating an Android application that makes use of it. You can find the code for the application in [this GitHub repository](https://github.com/echessa/ImageLabelingDemo).*

<include src="TweetQuote" quoteText="Google I/O 2018 enabled @Android developers to take advantage of some cool #MachineLearning APIs. Learn what are the new APIs and create a simple app that recognizes objects on images."/>

## Introduction

In today's information-rich world, people have come to expect their technology to be smart. We are seeing the increased adoption of [Artificial Intelligence](https://en.wikipedia.org/wiki/Artificial_intelligence)(AI) in the development of intelligent software. AI is quickly becoming an essential tool in software development.

Luckily for developers, there are various services that make it easier and faster to add Artificial Intelligence to apps without needing much experience in the field. There has been a growing number of AI-related APIs in the market such as Amazon's [AWS Machine Learning APIs](https://aws.amazon.com/machine-learning/), [IBM Watson](https://www.ibm.com/watson/) and [Google Cloud AI](https://cloud.google.com/products/machine-learning/). In this article, we'll take a look at the [ML Kit mobile SDK](https://developers.google.com/ml-kit/) that was introduced at this year's Google IO.

ML Kit is a mobile SDK that enables you to add powerful machine learning features to a mobile application. It supports both Android and iOS and offers the same features for both platforms. The SDK is part of Firebase and bundles together various machine learning technologies from Google such as the [Cloud Vision API](https://cloud.google.com/vision/), [Android Neural Network API](https://developer.android.com/ndk/guides/neuralnetworks/) and [TensorFlow Lite](https://www.tensorflow.org/mobile/tflite/). This SDK comes with a set of ready-to-use APIs for common mobile use cases such as face detection, text recognition, barcode scanning, image labeling and landmark recognition. These are offered as either on-device or cloud APIs. On-device APIs have the advantage of being able to process data quickly, they are free to use and they don't require a network connection to work. The cloud-based APIs give a higher level of accuracy as they are able to leverage the power of Google Cloud Platform's machine learning technologies. All cloud-based APIs are premium services, with a free quota in place.

In this article, we'll briefly go over what each of the ML Kit APIs offers before taking a look at how to use one of the APIs in an Android application.

## Text Recognition with ML Kit SDK

With the [text recognition API](https://firebase.google.com/docs/ml-kit/recognize-text), your app can recognize text in any Latin-based language ([and more when using the Cloud-based API](https://cloud.google.com/vision/docs/languages)). This can have such use cases as automating data entry from physical records to digital format, providing better accessibility where apps can identify text in images and read it out to users, organize photos based on their text content, e.t.c.

Text recognition is available both as an on-device and cloud-based API. The on-device API provides real-time processing (ideal for a camera or video feed) while the cloud-based one provides higher accuracy text recognition and is able to identify a broader range of languages and special characters.

## Face Detection with ML Kit SDK

The [face detection API](https://firebase.google.com/docs/ml-kit/detect-faces) can detect human faces in visual media (digital images and video). Given an image, the API returns the position, size and orientation (the angle the face is oriented with respect to the camera) of any detected faces. For each detected face, you can also get landmark and classification information. Landmarks are points of interest within a face such as right eye, left eye, nose base, bottom mouth, e.t.c. Classification determines whether the face displays certain facial characteristics. ML Kit currently supports two classifications: eyes open and smiling. The API is available on-device.

<include src="TweetQuote" quoteText="@Android developers can now detect faces with ease using the new #MachineLearning SDK introduced by Google."/>

## Barcode Scanning with ML Kit SDK

With the [barcode scanning API](https://firebase.google.com/docs/ml-kit/read-barcodes), your app can read data encoded using most standard barcode formats. It is available on-device and supports the following barcode formats:

 - **1D barcodes**: EAN-13, EAN-8, UPC-A, UPC-E, Code-39, Code-93, Code-128, ITF, Codabar
 - **2D barcodes**: QR Code, Data Matrix, PDF-417, AZTEC
 
The Barcode Scanning API automatically parses structured data stored using one of the supported 2D formats. Supported information types include:

 - URLs
 - Contact information (VCARD, etc.)
 - Calendar events
 - Email addresses
 - Phone numbers
 - SMS message prompts
 - ISBNs
 - WiFi connection information
 - Geo-location (latitude and longitude)
 - AAMVA-standard driver information (license/ID)
 
## Image Labeling with ML Kit SDK

The [image labeling API](https://firebase.google.com/docs/ml-kit/label-images) can recognize entities in an image. When used, the API returns a list of recognized entities, each with a score indicating the confidence the ML model has in its relevance. The API can be used for such tasks as automatic metadata generation and content moderation.

Image labeling is available both as an on-device and cloud-based API. The device-based API supports 400+ labels that cover the most commonly found concepts in photos ([see examples](https://firebase.google.com/docs/ml-kit/label-images#example-on-device-labels)) while the cloud-based API supports 10,000+ labels ([see examples](https://firebase.google.com/docs/ml-kit/label-images#example-cloud-labels)).

## Landmark Recognition with ML Kit SDK

The [landmark recognition API](https://firebase.google.com/docs/ml-kit/recognize-landmarks) can recognize well-known landmarks in an image. When given an image, the API returns landmarks that were recognized, coordinates of the position of each landmark in the image and each landmark's geographic coordinates. The API can be used to generate metadata for images or to customize some features according to the content a user shares. Landmark recognition is only available as a cloud-based API.

## Using Custom Models with ML Kit SDK

If you are an experienced machine learning engineer and would prefer not to use the pre-built ML Kit models, you can use your own [custom TensorFlow Lite models](https://firebase.google.com/docs/ml-kit/use-custom-models) with ML Kit. The models can either be hosted on Firebase or they can be bundled with the app. Hosting the model on Firebase reduces your app's binary size while also ensuring that the app is always working with the most up-to-date version of the model. Storing the model locally on the device makes for faster processing. You can choose to support both on-device and cloud-hosted models in your app. By using both, you make the most recent version of the model available to your app while also ensuring that the app's ML features are always functional even if the Firebase-hosted model is unavailable (perhaps due to network issues).

## Upcoming APIs

When ML Kit was released, Google also announced its plans of releasing two more APIs in the near future. These are the **Smart Reply** and **Face Contour** APIs.

The Smart Reply API will allow you to support contextual messaging replies in your app. The API will provide suggested text snippets that fit the context of messages it is sent, similar to the suggested-response feature we see in the Android Messages app.

The Face Contour API will be an addition to the Face Detection API. It will provide a high-density face contour. This will enable you to perform much more precise operations on faces than you can with the Face Detection API. To see a preview of the API in use, you can take a look at [this YouTube video](https://youtu.be/Z-dqGRSsaBs?t=24m44s).

## Summary of On-Device and In-Cloud Features

![Google's mobile machine learning kit features](https://images.ctfassets.net/23aumh6u8s0i/7wLsClh95EGBAFffWqm6l8/09772c7090b65295bfcd2d15775796eb/ml-kit-features-per-type)

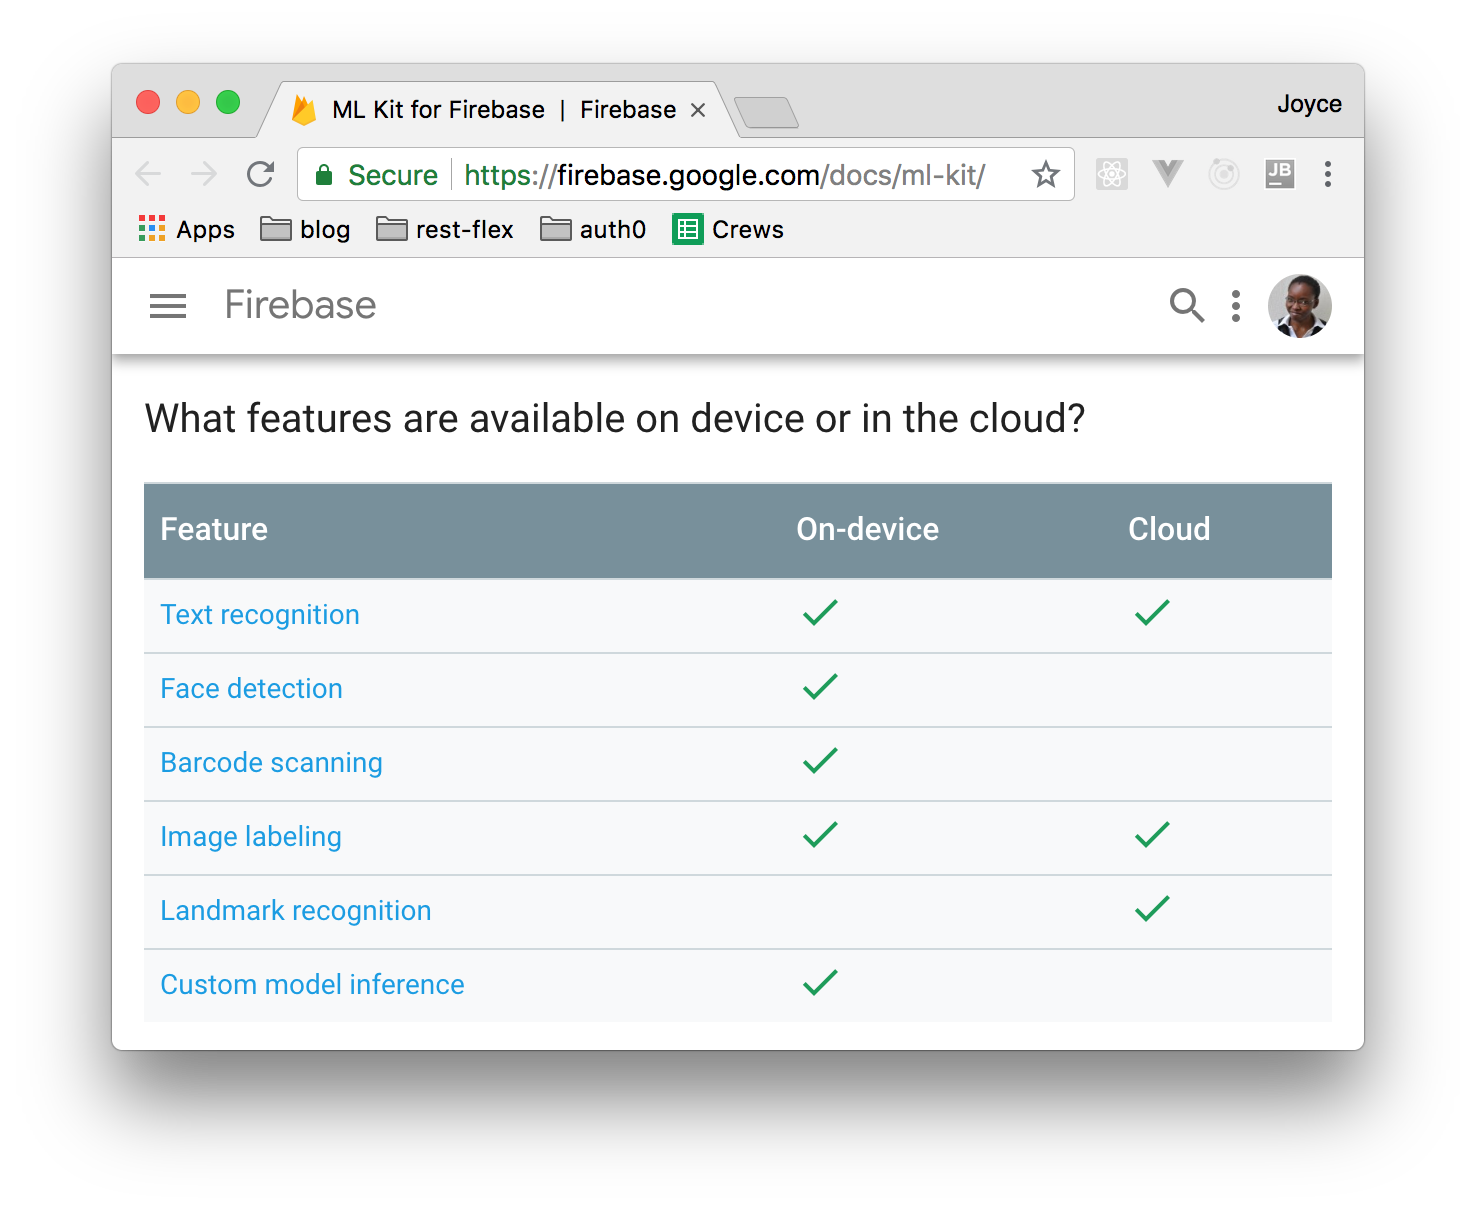
## Image Labeling in an Android App

To see one of the APIs in action, we will create an application that uses the Image Labeling API to identify the contents of an image. The APIs share some similarities when it comes to integration, so knowing how to use one can help you understand how to implement the others.

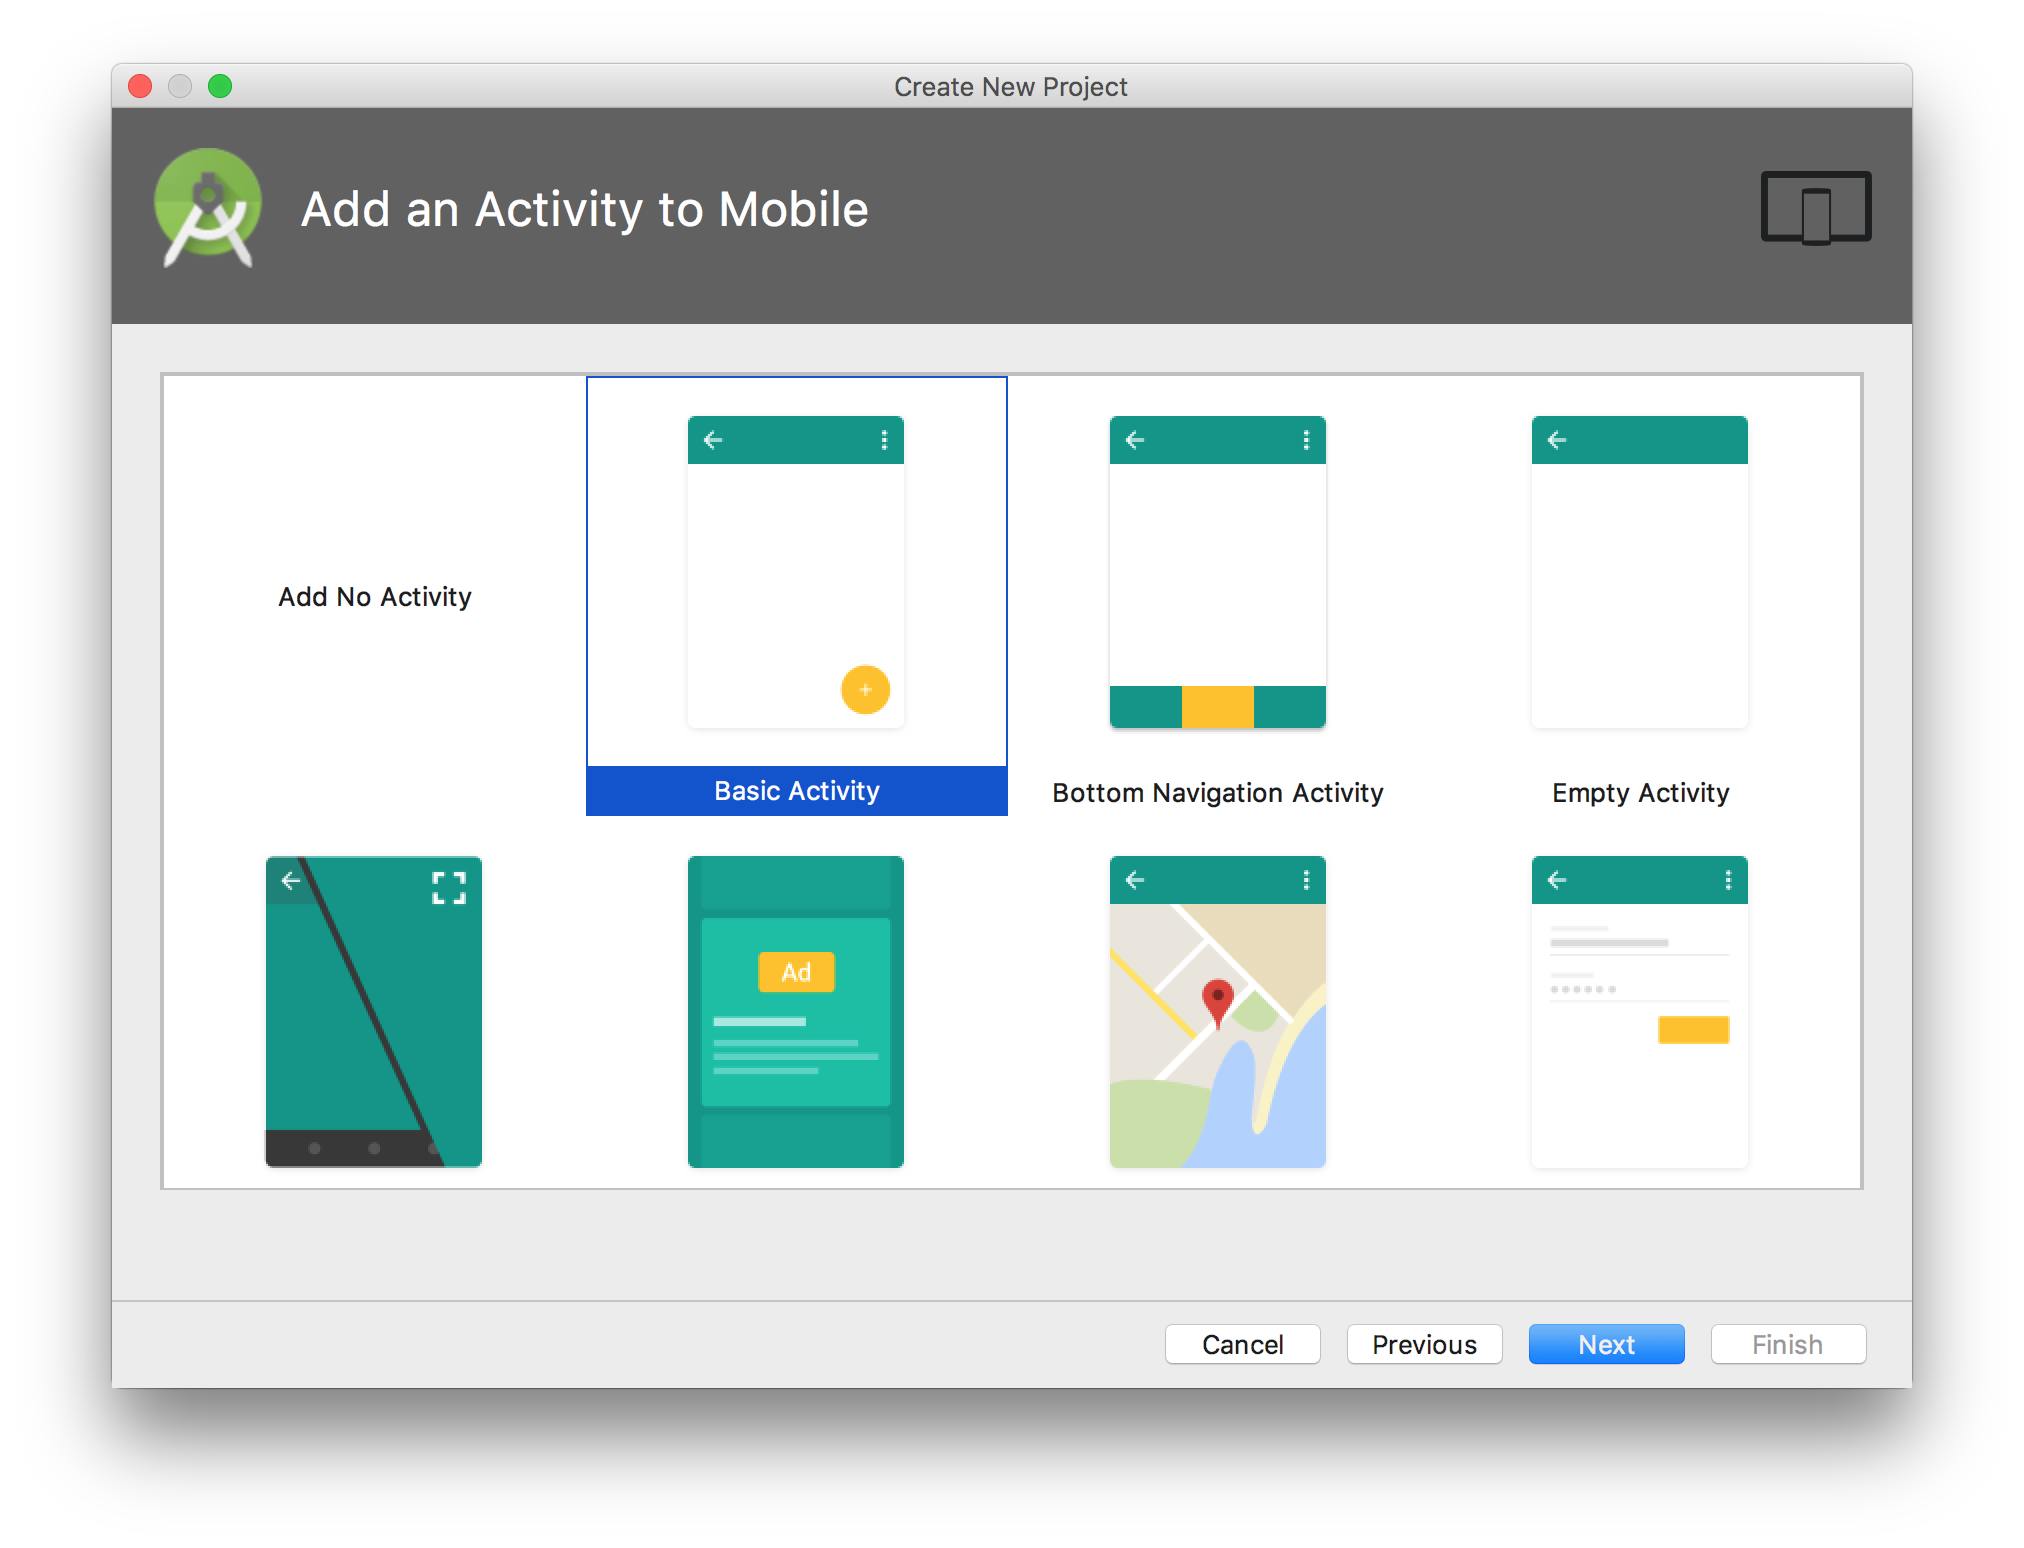
To get started, create a new project in Android Studio. Give your application a name; I named mine `ImageLabelingDemo`. Firebase features are only available on devices running API level 14 and above, so select 14 or higher for your app's minimum SDK. On the next window, select the `Basic Activity` template and on the last one, you can leave the default Activity name of `MainActivity`.

![Firebase Basic Activity Template](https://images.ctfassets.net/23aumh6u8s0i/6PsV6vxjnSk3yxawyOUmD1/34e9a878660a51e03ad63ff79bac19e6/choosing-basic-activity-to-new-android-project)

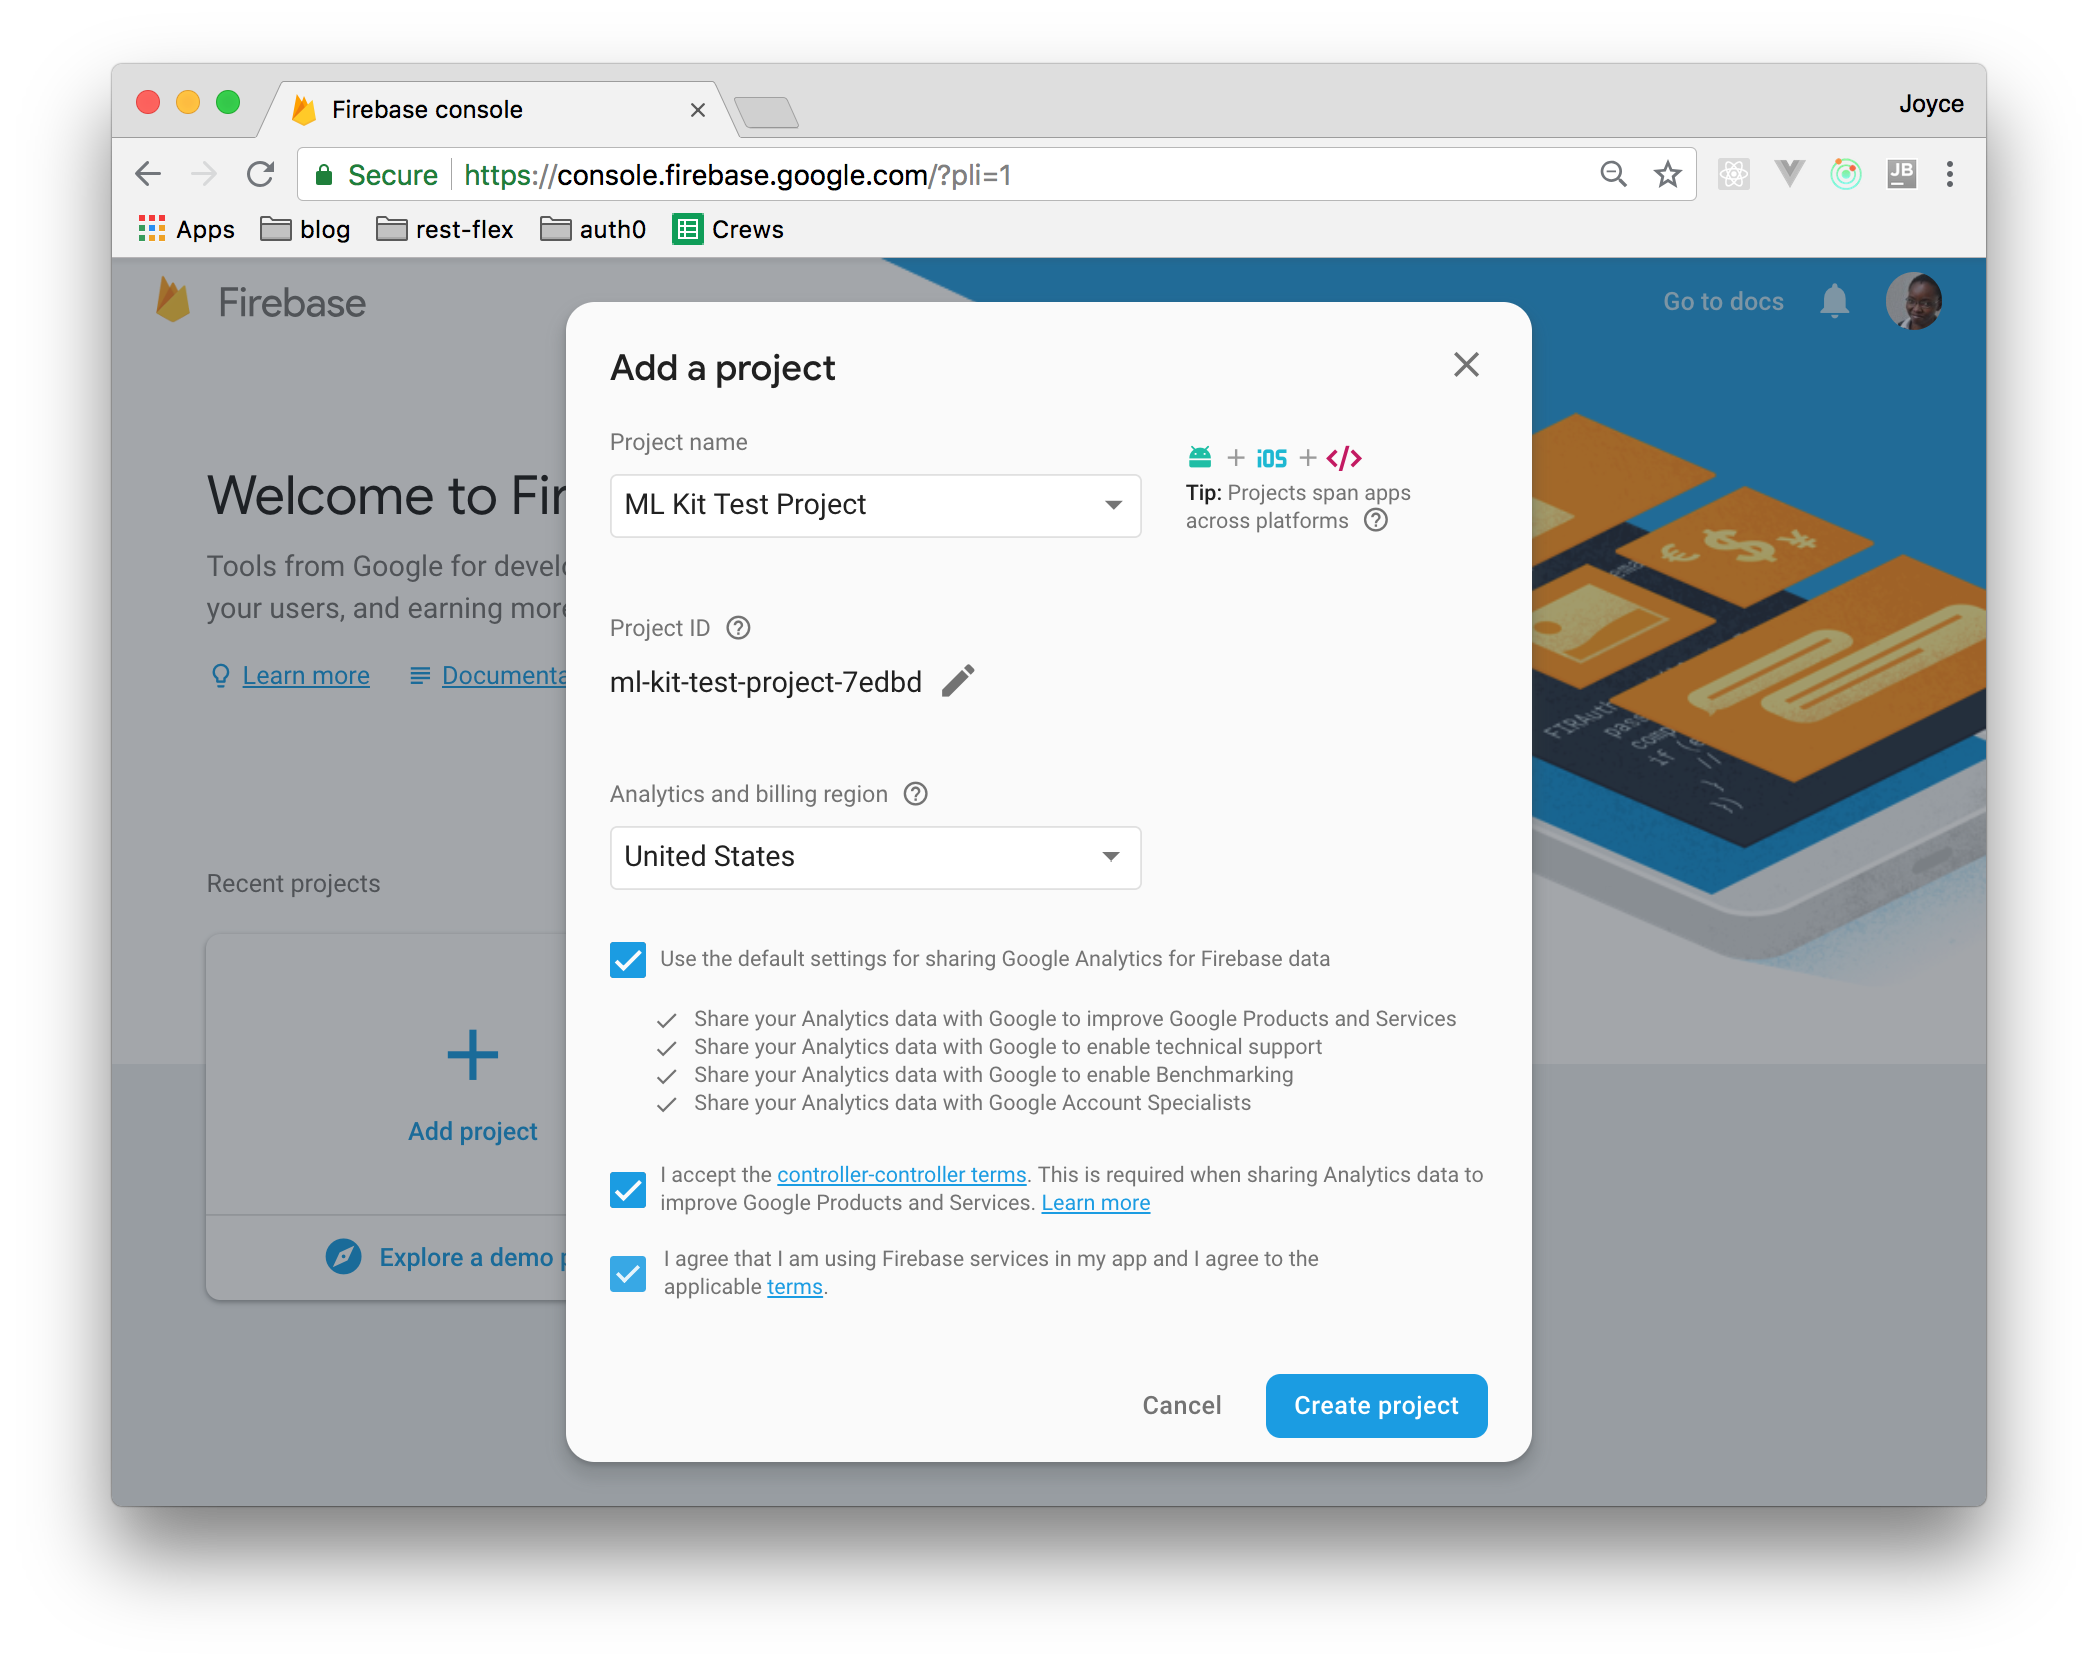
To add Firebase to your app, first, create a Firebase project in the [Firebase console](https://console.firebase.google.com).

![Create Firebase Project](https://images.ctfassets.net/23aumh6u8s0i/2wyYqZ2IqbIiJGtqIpNK6z/c30915ff2ac8b39bf395929c132a67c1/creating-a-firebase-project)

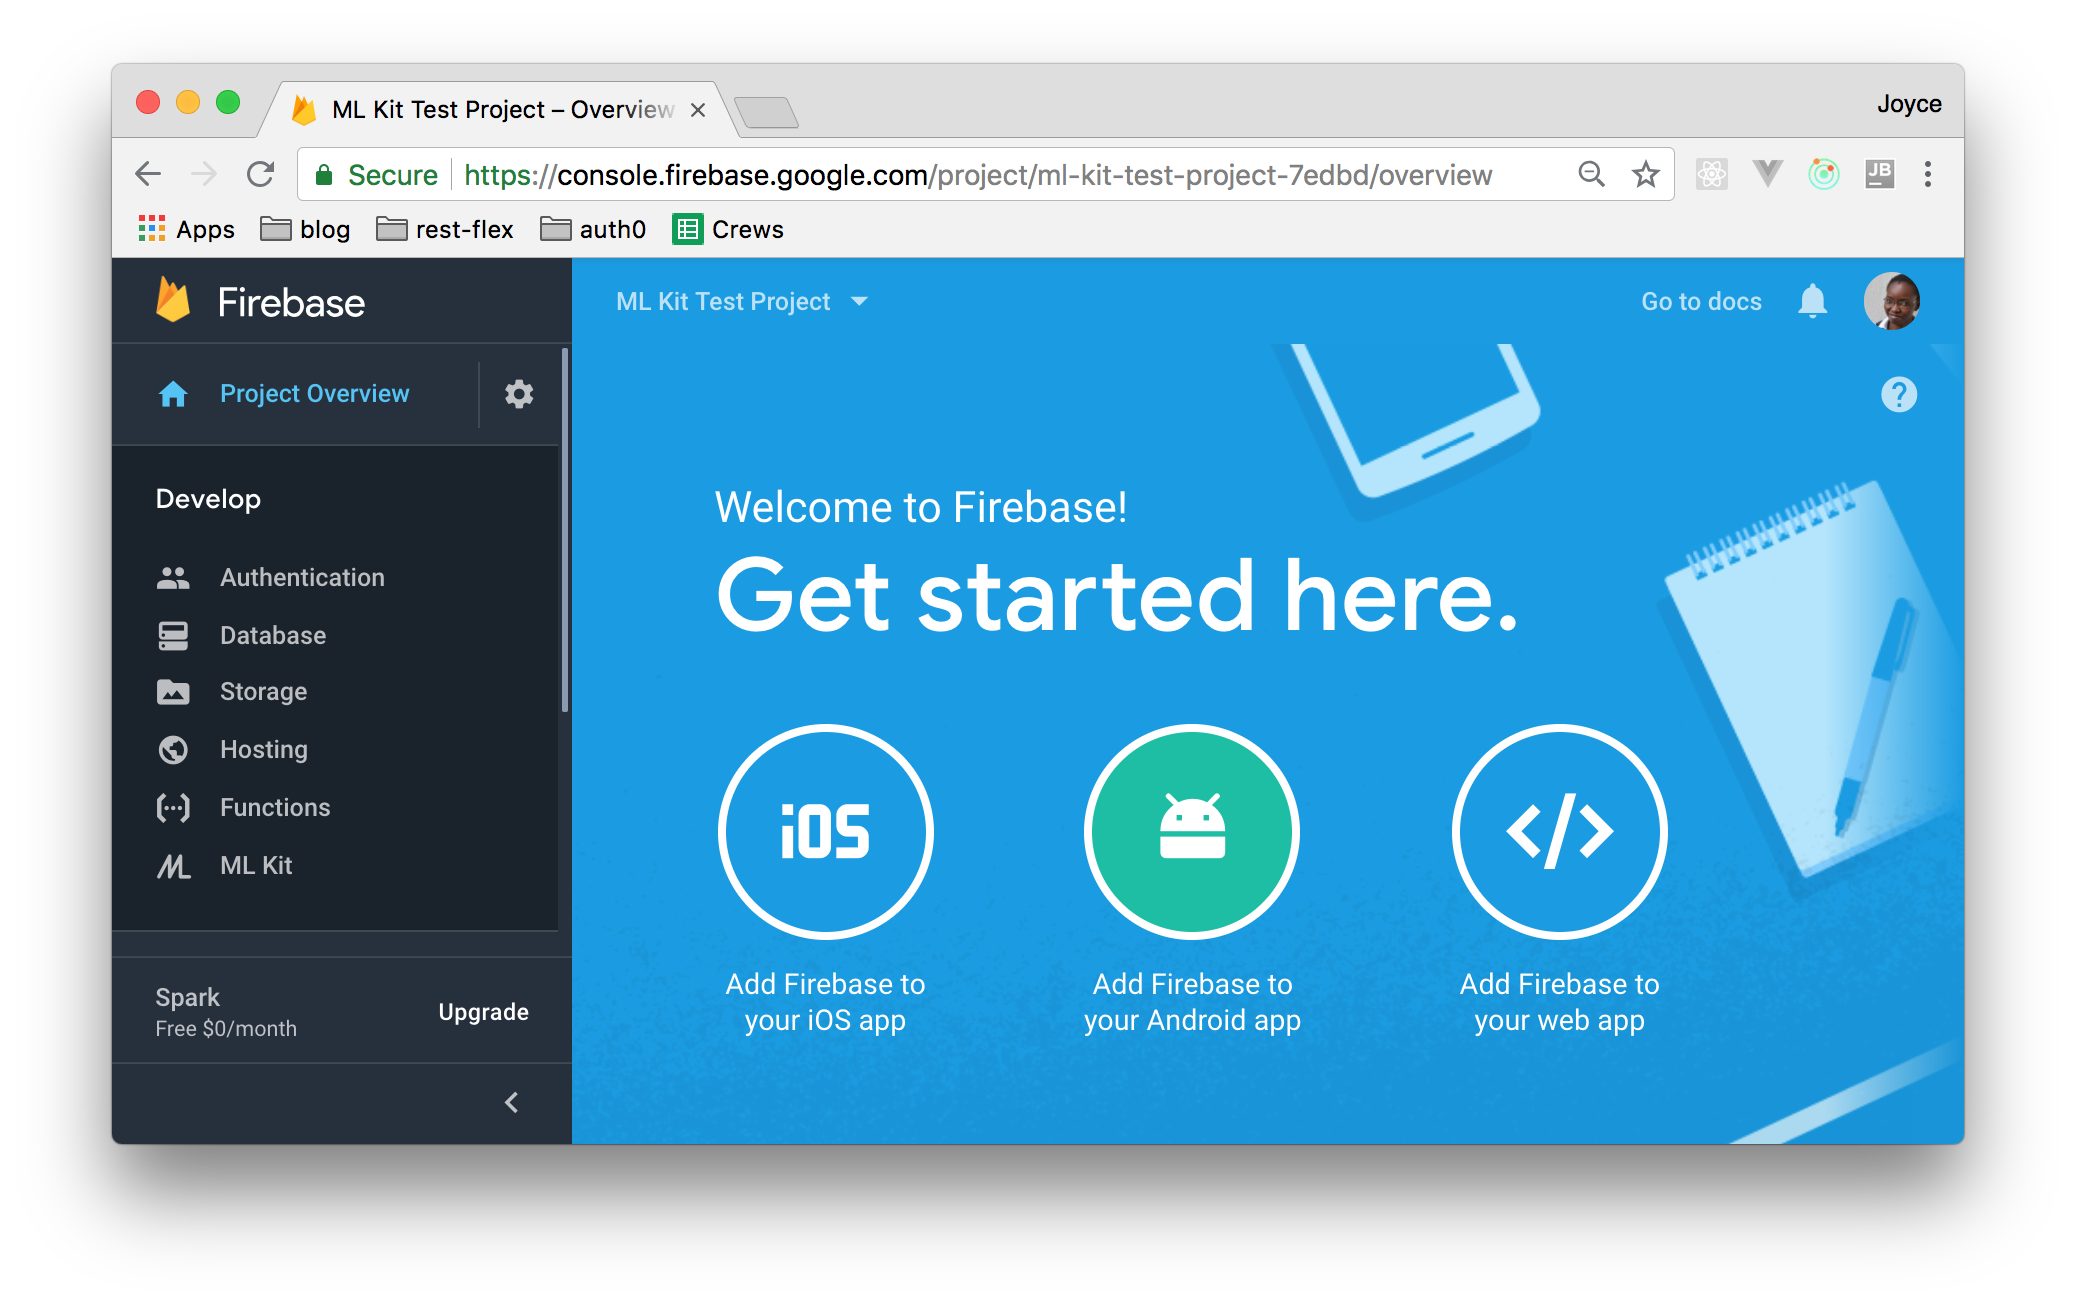
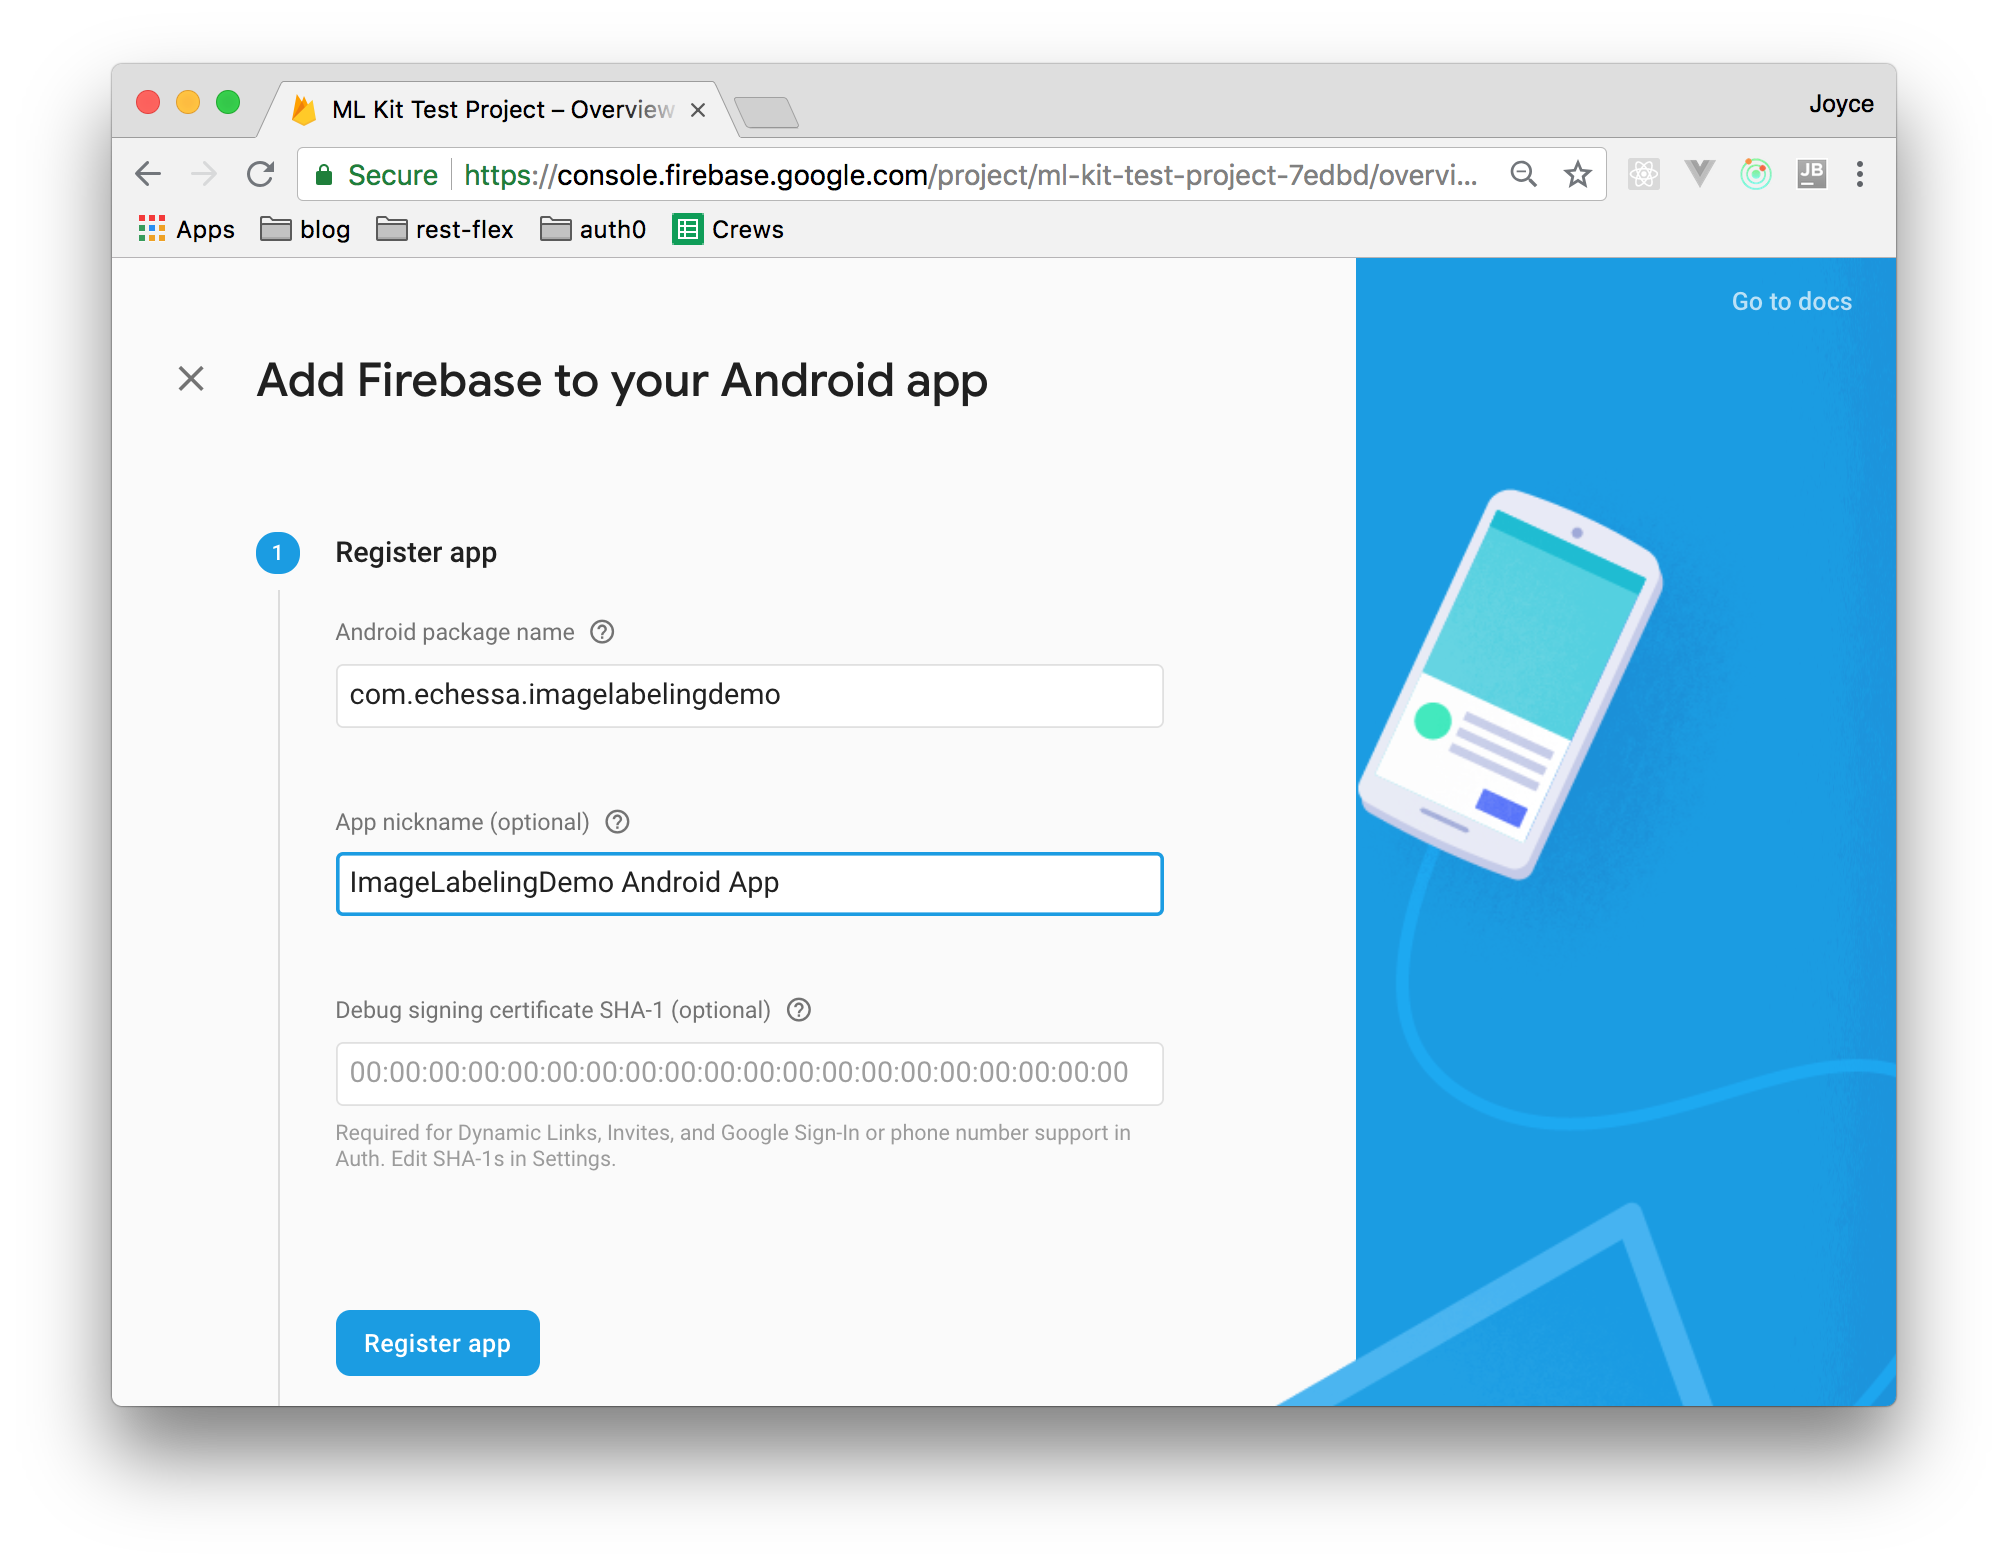
On the dashboard, select `Add Firebase to your Android app`.

![Add Firebase to your Android app](https://images.ctfassets.net/23aumh6u8s0i/6anXUvm4w5OLq3Z1svl5m0/30ad47c62cfed29711fe3f43cca22db5/add-firebase-to-android-app)

Fill out the provided form with your app's details. For this project, you only need to provide a package name (you can find this in your Android project's `AndroidManifest.xml` file). You can add an app nickname to easily identify the application on the Firebase console. This can come in handy if you are going to add several applications to the same project.

![Firebase app registration form](https://images.ctfassets.net/23aumh6u8s0i/50Jo4gqnnZ5S6MdsfaTHHd/1016fa32ac1aa2a700e1fc928d0c0405/add-firebase-to-android-app-step-2)

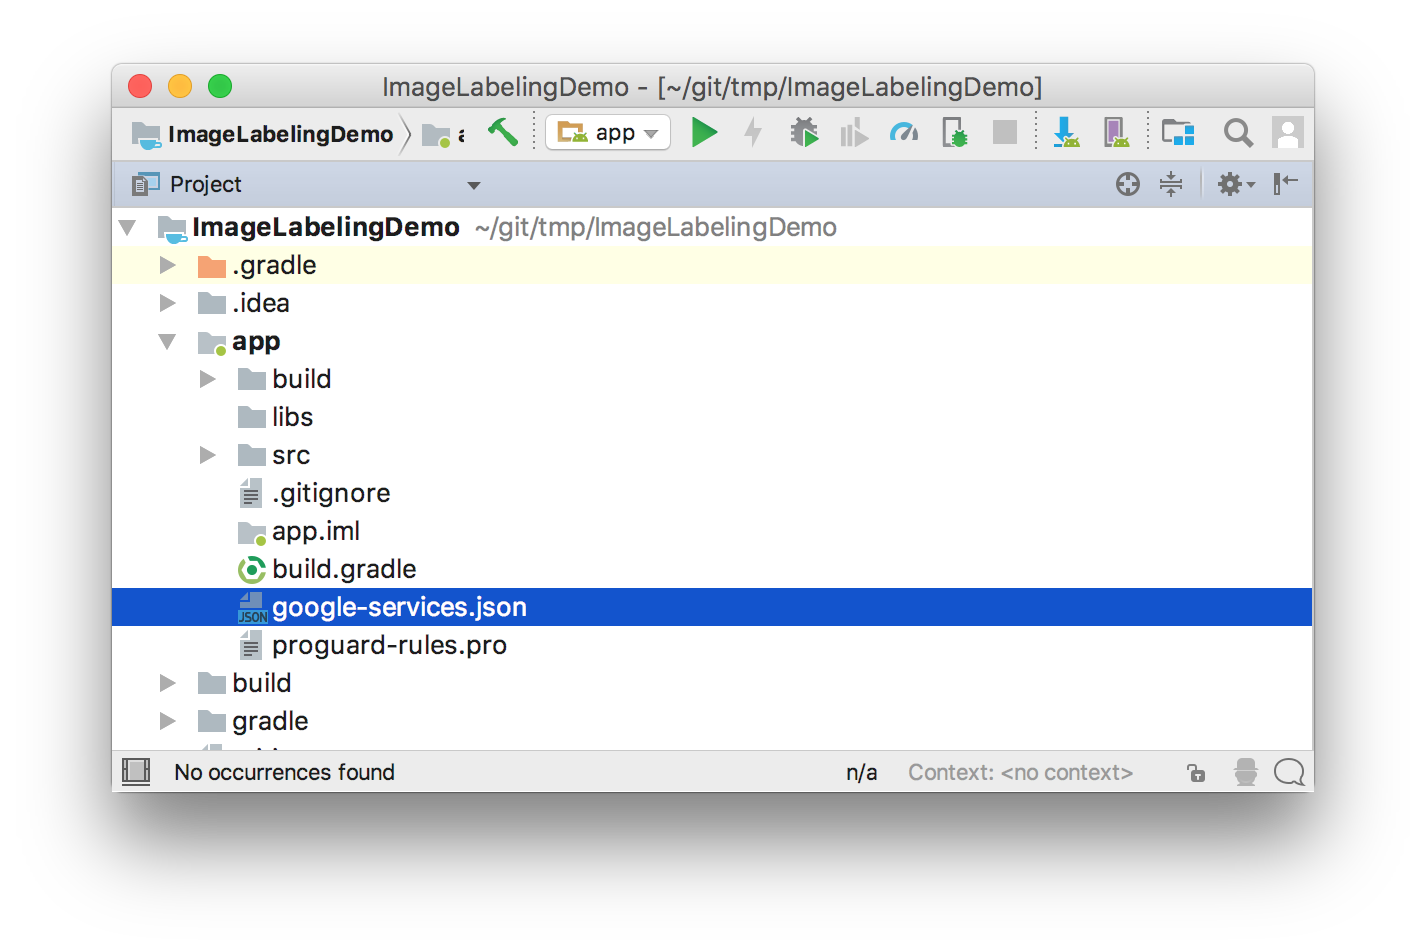
After the app has been registered, you will see a button you can use to download a config file named `google-services.json`. Download the file and move it into your Android app module root directory. This is where the file should be located if you use the Project view in Android Studio.

![Android Studio Project Directory](https://images.ctfassets.net/23aumh6u8s0i/ksMOPj16yHRJgsaTvPVyS/6ed1e61bfc14f60eba1a394febc474c0/add-google-services-json-file)

The Google services plugin for Gradle loads the `google-services.json` file that you added to your project. Modify your Project level `build.gradle` file to use the plugin by adding it to `dependencies`.

```
buildscript {
    // ... repositories ...
    dependencies {
        classpath 'com.android.tools.build:gradle:3.1.3'
        classpath 'com.google.gms:google-services:4.0.1'
    }
}

// ... allprojects, task clean ...
```

Next, add the following dependencies to the App-level `build.gradle` file (the one found in the `/app/build.gradle` directory).

```
// ... apply & android ...

dependencies {
    implementation 'com.google.firebase:firebase-core:16.0.1'
    implementation 'com.google.firebase:firebase-ml-vision:16.0.0'
    implementation 'com.google.firebase:firebase-ml-vision-image-label-model:15.0.0'
    // ... other dependencies ...
}
```

Then add the following to the bottom of the same file (right after dependencies) and press 'Sync now' in the bar that appears in the IDE.

```
apply plugin: 'com.google.gms.google-services'
```

Open up the `strings.xml` file and add the following string values that we'll use in the app.

```xml
<string name="action_process">Process</string>
<string name="storage_access_required">Storage access is required to enable selection of images</string>
<string name="ok">OK</string>
<string name="select_image">Select an image for processing</string>
```

In `menu_main.xml` add the following item to the menu. We'll see what this is for, later on.

```xml
<item
    android:id="@+id/action_process"
    android:title="@string/action_process"
    app:showAsAction="ifRoom" />
```

The app will allow the user to select an image on their phone and process it with the ML Kit library. To load images, it will require permission to read the phone's storage. Add the following permission to your `AndroidManifest.xml` file.

```xml
<uses-permission android:name="android.permission.READ_EXTERNAL_STORAGE"/>
```

Also, add the following to the manifest file inside `application`

```xml
<meta-data
    android:name="com.google.firebase.ml.vision.DEPENDENCIES"
    android:value="label" />
```

The above code is optional but recommended to add to your manifest file if your app will use any of the on-device APIs. With the above configuration, the app will automatically download the ML model(s) specified by `android:value` to the device soon after the app is installed from the Play Store. If you don't enable install-time model downloads, then the model that app needs will be downloaded the first time the app runs the detector for that particular model. Requests made before the download is complete won't produce any results. To use multiple models, include them in a comma-separated list, e.g. `android:value="ocr,face,barcode,label`.

Replace the content of `content_main.xml` with the following code.

```xml
<?xml version="1.0" encoding="utf-8"?>
<LinearLayout xmlns:android="http://schemas.android.com/apk/res/android"
    xmlns:app="http://schemas.android.com/apk/res-auto"
    xmlns:tools="http://schemas.android.com/tools"
    android:layout_width="match_parent"
    android:layout_height="match_parent"
    android:orientation="vertical"
    app:layout_behavior="@string/appbar_scrolling_view_behavior"
    tools:context=".MainActivity"
    tools:showIn="@layout/activity_main">

    <ImageView
        android:id="@+id/imageView"
        android:layout_width="match_parent"
        android:layout_height="0dp"
        android:layout_weight="1" />

    <TextView
        android:id="@+id/textView"
        android:layout_width="match_parent"
        android:layout_height="0dp"
        android:layout_margin="8dp"
        android:layout_weight="1"/>

</LinearLayout>
```

In `activity_main.xml`, give the root `android.support.design.widget.CoordinatorLayout` an `id`:

```xml
android:id="@+id/main_layout"
```

Then change the icon of the FloatingActionButton from `ic_dialog_email` to `ic_menu_gallery`.

```xml
app:srcCompat="@android:drawable/ic_menu_gallery"
```

Add the following variables to the `MainActivity` class.

```java
public class MainActivity extends AppCompatActivity {

    private static final int SELECT_PHOTO_REQUEST_CODE = 100;
    private static final int ASK_PERMISSION_REQUEST_CODE = 101;
    private static final String TAG = MainActivity.class.getName();

    private TextView mTextView;
    private ImageView mImageView;
    private View mLayout;

    private FirebaseVisionLabelDetector mDetector;
    
    // ... methods ...
}
```

If you haven't done so, I recommend enabling [Auto Import](https://stackoverflow.com/a/16616085/1380071) on Android Studio which will automatically import unambiguous libraries to the class as you add code that uses them. You can also [refer to this file](https://github.com/echessa/ImageLabelingDemo/blob/master/app/src/main/java/com/echessa/imagelabelingdemo/MainActivity.java) for a full list of libraries used in `MainActivity`.

Modify `onCreate()` as shown below.

```java
@Override
protected void onCreate(Bundle savedInstanceState) {
    super.onCreate(savedInstanceState);
    setContentView(R.layout.activity_main);
    Toolbar toolbar = (Toolbar) findViewById(R.id.toolbar);
    setSupportActionBar(toolbar);

    mTextView = findViewById(R.id.textView);
    mImageView = findViewById(R.id.imageView);
    mLayout = findViewById(R.id.main_layout);

    FloatingActionButton fab = findViewById(R.id.fab);
    fab.setOnClickListener(new View.OnClickListener() {
        @Override
        public void onClick(View view) {
            checkPermissions();
        }
    });
}
```

Here, we instantiate view objects in our layout and set a click listener on the FloatingActionButton. The user will use this button to select an image from their phone. The image will then be loaded onto the ImageView that we added to `content_main.xml`.

Add the following two functions to the class.

```java
public class MainActivity extends AppCompatActivity {
    // ... variables and methods ...
    
    private void checkPermissions() {
        if (ContextCompat.checkSelfPermission(MainActivity.this,
                Manifest.permission.READ_EXTERNAL_STORAGE) != PackageManager.PERMISSION_GRANTED) {
            // Permission not granted
            if (ActivityCompat.shouldShowRequestPermissionRationale(MainActivity.this,
                    Manifest.permission.READ_EXTERNAL_STORAGE)) {
                // Show an explanation to the user of why permission is needed
                Snackbar.make(mLayout, R.string.storage_access_required,
                        Snackbar.LENGTH_INDEFINITE).setAction(R.string.ok, new View.OnClickListener() {
                            @Override
                            public void onClick(View view) {
                            // Request the permission
                            ActivityCompat.requestPermissions(MainActivity.this,
                                    new String[]{Manifest.permission.READ_EXTERNAL_STORAGE},
                                    ASK_PERMISSION_REQUEST_CODE);
                            }
                        }).show();
            } else {
                // No explanation needed; request the permission
                ActivityCompat.requestPermissions(MainActivity.this,
                        new String[]{Manifest.permission.READ_EXTERNAL_STORAGE},
                        ASK_PERMISSION_REQUEST_CODE);
            }
        } else {
            // Permission has already been granted
            openGallery();
        }
    }

    private void openGallery() {
        Intent photoPickerIntent = new Intent(Intent.ACTION_PICK);
        photoPickerIntent.setType("image/*");
        startActivityForResult(photoPickerIntent, SELECT_PHOTO_REQUEST_CODE);
    }
}
```

In `checkPermissions()` we check if the user has granted the app permission to read from storage. If yes, we call `openGallery()` which opens up an Activity that the user can use to select a  photo. `shouldShowRequestPermissionRationale()` returns `true` if the user previously denied the permission request and returns `false` if they had denied the permission and checked the **Don't ask again** option in the request dialog. If they had previously denied permission but had not checked the **Don't ask again** option, then we show them a Snackbar with an explanation of why the app needs the permission. On clicking on OK on that Snackbar, the permission request dialog will be shown to the user.

If the user had denied the permission and chosen the **Don't ask again** option, the Android system respects their request and doesn't show them the permission dialog again for that specific permission. In our code, we check for this and call `requestPermissions()`. This method usually brings up the permission request dialog, but since the user requested not to be asked again for that permission, the system itself denies the permission without showing the dialog. The system calls `onRequestPermissionsResult()` callback method and passes `PERMISSION_DENIED`, the same way it would if the user had explicitly rejected the request.

Add the following methods to `MainActivity`.

```java
public class MainActivity extends AppCompatActivity {
    // ... variables and methods ...
    
    @Override
    protected void onActivityResult(int requestCode, int resultCode, Intent data) {
        super.onActivityResult(requestCode, resultCode, data);

        if (requestCode == SELECT_PHOTO_REQUEST_CODE && resultCode == RESULT_OK && data != null && data.getData() != null) {

            Uri uri = data.getData();

            try {
                Bitmap bitmap = MediaStore.Images.Media.getBitmap(getContentResolver(), uri);
                mImageView.setImageBitmap(bitmap);
                mTextView.setText("");
            } catch (IOException e) {
                e.printStackTrace();
            }
        }
    }

    @Override
    public void onRequestPermissionsResult(int requestCode, @NonNull String[] permissions, @NonNull int[] grantResults) {
        super.onRequestPermissionsResult(requestCode, permissions, grantResults);

        switch (requestCode) {
            case ASK_PERMISSION_REQUEST_CODE: {
                // If permission request is cancelled, grantResults array will be empty.
                if (grantResults.length > 0 && grantResults[0] == PackageManager.PERMISSION_GRANTED) {
                    // Permission was granted
                    openGallery();
                } else {
                    // Permission denied. Handle appropriately e.g. you can disable the
                    // functionality that depends on the permission.
                }
                return;
            }
        }
    }
}
```

In `openGallery()`, we called `startActivityForResult()` which starts an Activity that enables the user to select an image. When the user is done with that activity, the system calls `onActivityResult()`. Here, we grab the image that the user selected and set it onto the ImageView in our layout. We also set the value of the TextView to an empty string. Later on, we will display the result of ML Kit's image labeling on this TextView. So for each image selected, we clear the TextView in case it was displaying the results of a previous image.

`onRequestPermissionsResult()` is the callback that is invoked when permissions are requested. Here we check for the result of the permission that was requested with the code `ASK_PERMISSION_REQUEST_CODE` and then check if the permission was granted or not. If the permission was granted, then we call `openGallery()` which we have looked at previously. If the permission was denied, either by the user or by the system as a result of the user having previously chosen not to be asked again, it is recommended that you gracefully handle this in a way that will not cause the program to crash or to not work correctly. You can, for instance, disable the functionality that requires that permission and then let the user know why it is disabled. If the user requested to not be asked again for the permission, you can include in your message instructions for them on how to enable permission via Settings.

After the user selects an image, we want them to be able to process it with ML Kit. In `menu_main.xml` we had added a menu item to the layout. Add an `else if` clause to the `if` statement in the `onOptionsItemSelected()` method in `MainActivity` with the following code that calls `processImage()` when the user taps the menu item.

```java
if (id == R.id.action_settings) {
    return true;
} else if (id == R.id.action_process) {
    processImage();
    return true;
}
```

Next, add the following to the class.

```java
public class MainActivity extends AppCompatActivity {
    // ... variables and methods ...
    
    private void processImage() {
        if (mImageView.getDrawable() == null) {
            // ImageView has no image
            Snackbar.make(mLayout, R.string.select_image, Snackbar.LENGTH_SHORT).show();
        } else {
            // ImageView contains image
            Bitmap bitmap = ((BitmapDrawable) mImageView.getDrawable()).getBitmap();
            FirebaseVisionImage image = FirebaseVisionImage.fromBitmap(bitmap);
            mDetector = FirebaseVision.getInstance().getVisionLabelDetector();
            mDetector.detectInImage(image)
                    .addOnSuccessListener(
                            new OnSuccessListener<List<FirebaseVisionLabel>>() {
                                @Override
                                public void onSuccess(List<FirebaseVisionLabel> labels) {
                                    // Task completed successfully
                                    StringBuilder sb = new StringBuilder();
                                    for (FirebaseVisionLabel label : labels) {
                                        String text = label.getLabel();
                                        String entityId = label.getEntityId();
                                        float confidence = label.getConfidence();
                                        sb.append("Label: " + text + "; Confidence: " + confidence + "; Entity ID: " + entityId + "\n");
                                    }
                                    mTextView.setText(sb);
                                }
                            })
                    .addOnFailureListener(
                            new OnFailureListener() {
                                @Override
                                public void onFailure(@NonNull Exception e) {
                                    // Task failed with an exception
                                    Log.e(TAG, "Image labelling failed " + e);
                                }
                            });
        }
    }
}
```

When `processImage()` is called, we first check if the ImageView has an image. If it doesn't, we let the user know that an image is required, otherwise, we process the image with ML Kit.

Before we can label the image, we first create a `FirebaseVisionImage` object from the image. The object can be created from either a `Bitmap`, `media.Image`, `ByteBuffer`, byte array, or a file on the device.

We then instantiate the `FirebaseVisionLabelDetector` object that we had declared earlier. `FirebaseVisionLabelDetector` is a detector for finding `FirebaseVisionLabel`s in a supplied image.

Finally, we pass the image to the `detectInImage()` method and register listeners that will be called when the detection completes.

If the labeling succeeds, a list of `FirebaseVisionLabel` objects is passed to the success listener. Each `FirebaseVisionLabel` object represents a label for the image. For each label, you can get its text description, its [Knowledge Graph entity ID](https://developers.google.com/knowledge-graph/) (if available) and its confidence score. We get these, append them to a string and finally display the string in the TextView we added to the app.

When you are done with the detector or when it is clear that it will not be in use, you should close it to release the resources it is using. In our app, we can do this in `onPause()` which will close the detector when the activity goes to the background.

```java
public class MainActivity extends AppCompatActivity {
    // ... variables and methods ...
    
    @Override
    protected void onPause() {
        super.onPause();
        if (mDetector != null) {
            try {
                mDetector.close();
            } catch (IOException e) {
                Log.e(TAG, "Exception thrown while trying to close Image Labeling Detector: " + e);
            }
        }
    }
}
```

With that, you can now run the application.

On selecting an image and tapping on the **Process** button on the App Bar, you will be able to see the various labels and their corresponding confidence scores. If you are running the app on the emulator refer to [this guide to add an image to the app's gallery](https://stackoverflow.com/a/48669304/1232793).

![ML Kit Image Processing Results](https://images.ctfassets.net/23aumh6u8s0i/55lTopjpbZluPovpBPYxHH/40410c286863b0058bcc61f0bc1fdb02/android-app-processing-image-with-ml-kit)

By default, the on-device image labeler returns a maximum of 10 labels (returned labels can be less than 10). If you want to change this setting, you can set a confidence threshold on your detector. This is done with the `FirebaseVisionLabelDetectorOptions` object. As an example, you can specify that the detector only returns labels that are above a certain level. Below, we specify that the detector only returns labels with a confidence score of `0.8` and above.

```java
FirebaseVisionLabelDetectorOptions options =
        new FirebaseVisionLabelDetectorOptions.Builder()
                .setConfidenceThreshold(0.8f)
                .build();
```

The `FirebaseVisionLabelDetectorOptions` object can then be passed to the detector during instantiation.

```java
FirebaseVisionLabelDetector detector = FirebaseVision.getInstance()
        .getVisionLabelDetector(options);
```

<include src="TweetQuote" quoteText="I just built an @Android app that recognizes objects on images! #MachineLearning"/>

<include src="asides/Android" />

## Conclusion

In this article, we have looked at the Google ML Kit Mobile (the machine learning SDK) and all the features it offers. We've also looked at how to use one of its APIs in an Android application. To find out more about this SDK, you can watch this [video from Google IO](https://www.youtube.com/watch?v=Z-dqGRSsaBs) and you should also take a look at the [documentation](https://firebase.google.com/docs/ml-kit/) which covers all the APIs and shows their use on both Android and iOS. You can also take a look at the code in these apps, to see how the various APIs are implemented on [Android](https://github.com/firebase/quickstart-android/tree/master/mlkit) and on [iOS](https://github.com/firebase/quickstart-ios/tree/master/mlvision).
